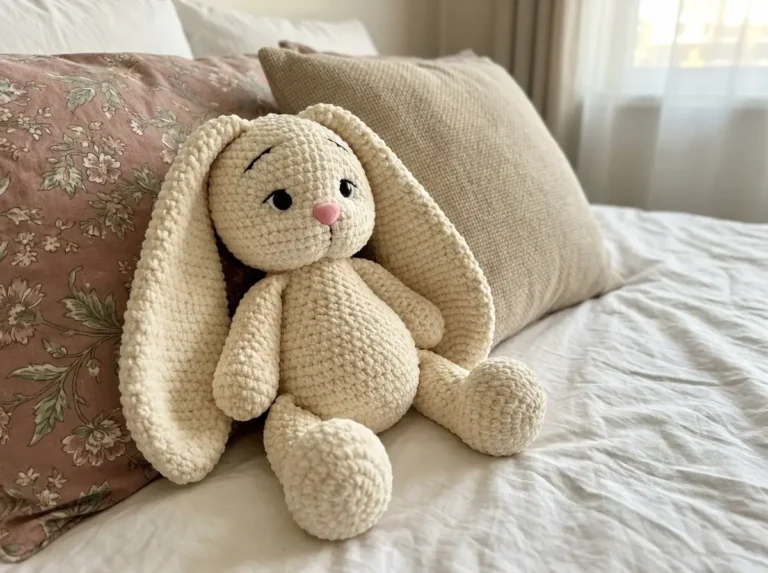
Meet This Sweet Little Amigurumi Bunny
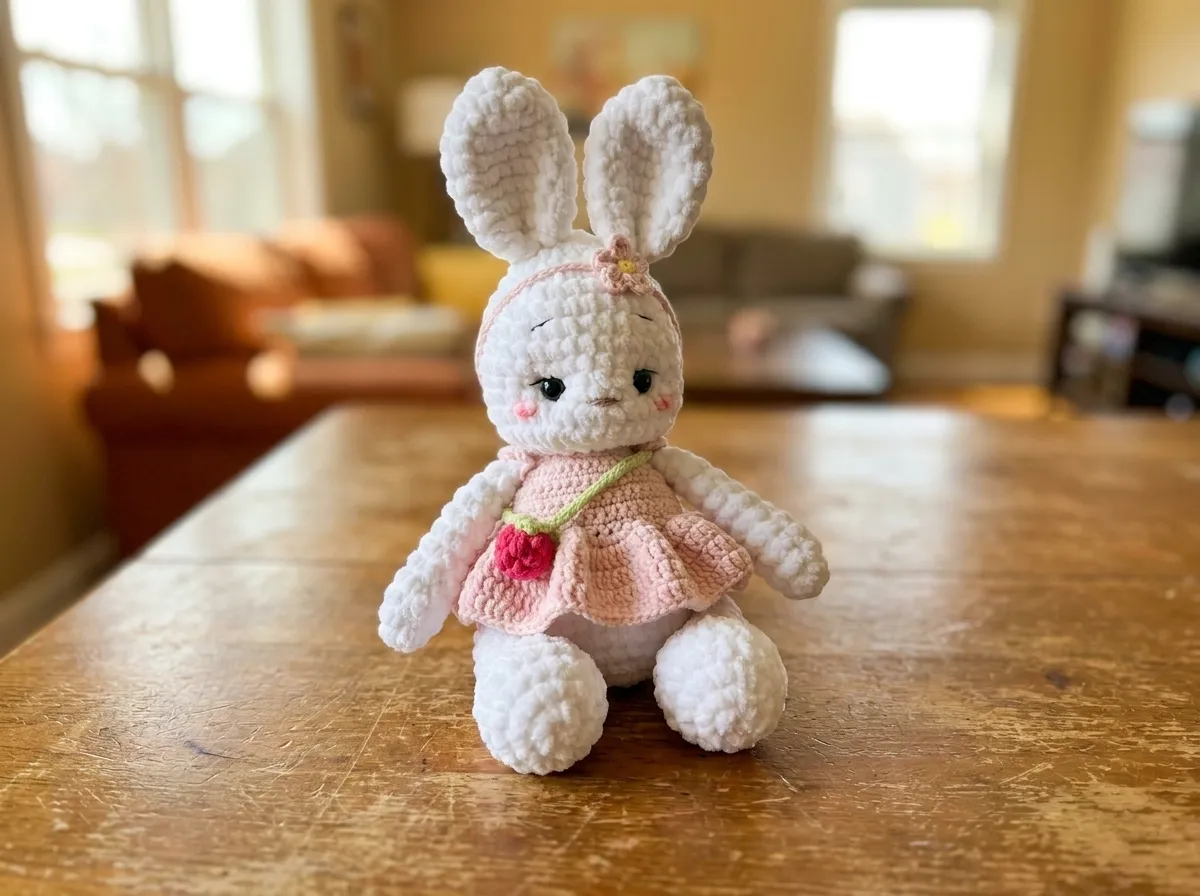
This free amigurumi bunny pattern creates the softest pastel sweetheart — about 11 inches of cream-white chenille, a dusty pink ruffled dress, and a tiny raspberry purse that’s almost too precious to exist. Every detail on this amigurumi bunny, from her glossy 12mm safety eyes to her embroidered rosy cheeks, was made to melt your heart. Let me show you how she comes together.
🩷 Pattern Highlights
- Cuteness Rating: 🩷🩷🩷🩷🩷
- Finished Size: 11–11.75 in (28–30 cm)
- Difficulty: Beginner-friendly
- Hook Sizes: 2.0mm and 3.5mm (approx. US E/4)
- Yarn Palette: soft cream-white chenille, dusty pink, bright raspberry pink, light green, light yellow, black, brown
- Key Detail: 12mm glossy safety eyes, embroidered rosy cheeks, tiny raspberry purse
- Estimated Time: 8–12 hours
What You’ll Need to Make Your Amigurumi Bunny
The color story for this amigurumi bunny is the whole point. A soft cream body in plush chenille, a dusty pink dress with a delicate ruffle, a pop of bright raspberry pink for her tiny purse, and the softest sprig of light green leaves. Pick your pastels carefully — the way these shades sit next to each other is what makes her look so dreamy.
Yarn — Body (cream-white chenille): Wolans Bunny Baby-01 in white. US alternatives: Premier Parfait or Bernat Baby Velvet. This is a Bulky (5) chenille — super soft, velvety, and the reason she feels so squishy when you hold her.
Yarn — Dress and Headband (dusty light pink): YarnArt Jeans, color 18. US alternatives: Drops Muskat or Paintbox Simply DK. This is a DK / Light Worsted (3) cotton-acrylic blend — smooth, defined stitches, and the perfect weight for that ruffle.
Yarn — Raspberry (bright pink): YarnArt Jeans, color 59. A punchy raspberry pink that pops beautifully against the cream body.
Yarn — Eyebrows and Lashes (black): YarnArt Jeans, color 53. Just a tiny bit for her delicate facial embroidery.
Yarn — Nose (brown): YarnArt Jeans, color 71. Warm brown for the sweetest little nose.
Yarn — Raspberry Strap and Leaves (light green): YarnArt Jeans, color 60. Soft mint-sage green that sets off the bright pink raspberry.
Yarn — Flower Center (light yellow): YarnArt Jeans, color 67. Just a whisper of buttery yellow at the center of her little flower.
Hooks: 2.0mm (for the chenille body parts) and 3.5mm (approx. US E/4) for the dress and accessories.
Other Tools: 12mm safety eyes (the perfect size for a piece this scale), tapestry needle, sharp scissors, one small button for the dress back, fiberfill stuffing, a lighter for sealing the safety eye backs, and a stitch marker or contrasting yarn scrap for tracking rounds.
Abbreviations Used in This Pattern
| Abbreviation | Meaning |
|---|---|
| ch | chain |
| mr | magic ring |
| sc | single crochet |
| dc | double crochet |
| tr | treble crochet |
| inc | increase (sc increase) |
| dec | decrease |
| sl st | slip stitch |
| dc-inc | double crochet increase |
| puff st | puff stitch |
| (…) × 6 | number of repeats |
| ( ) | total stitch count in round |
Before You Begin — Little Details That Make Her Extra Cute
The finishing on this piece is everything. She’s technically beginner-friendly, but the details are what take her from cute to irresistible. A few tips before you pick up your hook:
🩷 Chloe’s Eye Placement Tip: The pattern places the 12mm safety eyes between Rows 11 and 12, six stitches apart from the inner edge of one eye to the inner edge of the other. Before you snap those washers on, hold the head under a bright lamp and check from directly in front, then from above. Once the washers click, there’s no going back — so take an extra thirty seconds to make sure they’re perfectly level. It’s the difference between a sweet expression and a wobbly one.
If this is your first time working with 12mm safety eyes, our how to attach safety eyes tutorial walks you through positioning, sealing the backs with a lighter, and getting that perfectly symmetrical look every time.
The body is worked in soft chenille, which means stuffing is a little different — you want medium firmness in the head and body, firm at the bottom of the legs, and only a whisper of fluff in the upper legs and arms so they stay poseable. Our guide on how to stuff amigurumi has lovely tips for getting that smooth silhouette without any lumps showing through.
And if you’re brand new to the craft entirely, pop over to our complete beginner’s guide to amigurumi first — it’ll set you up with everything you need to know before starting your very own little bunny.
The Amigurumi Bunny Pattern
Work each part separately in continuous rounds (no joining between rounds) unless the pattern tells you otherwise. Use a stitch marker to track your round starts — with chenille especially, it’s easy to lose your place, and chenille forgives almost nothing.
Head (×1) — White
Using the white chenille and 2.0mm hook. Start with a magic ring.
Row 1: 6 sc in mr (6)
Row 2: 6 inc (12)
Row 3: (1 sc, inc) × 6 (18)
Row 4: (2 sc, inc) × 6 (24)
Row 5: (3 sc, inc) × 6 (30)
Row 6: (9 sc, inc) × 3 (33)
Row 7: (10 sc, inc) × 3 (36)
Rows 8–11: even, no changes (4 rows) (36)
Row 12: (5 sc, inc) × 6 (42)
Row 13: 1 row even, no changes (42)
Row 14: 1 sc, (2 sc, dec) × 10, 1 sc (32)
Row 15: (2 sc, dec) × 8 (24)
Row 16: (2 sc, dec) × 6 (18)
Eyes: Insert the 12mm safety eyes between Rows 11 and 12, 6 stitches apart from the inner edge of one eye to the inner edge of the other. Seal the backs with a lighter so they’re locked in forever.
Finishing: Stuff the head with fiberfill to a medium firmness — not too tightly. Distribute the stuffing evenly by prodding gently with your needle so it sits round and smooth.
Body (×1) — White
White chenille, 2.0mm hook. Start with a magic ring.
Row 1: 6 sc in mr (6)
Row 2: 6 inc (12)
Row 3: (1 sc, inc) × 6 (18)
Row 4: (2 sc, inc) × 6 (24)
Row 5: (3 sc, inc) × 6 (30)
Row 6: (4 sc, inc) × 6 (36)
Rows 7–11: 5 rows even, no changes (36)
Row 12: (4 sc, dec) × 6 (30)
Row 13: 1 row even, no changes (30)
Row 14: (3 sc, dec) × 6 (24)
Row 15: 1 row even, no changes (24)
Row 16: (2 sc, dec) × 6, sl st (18)
Finishing: Leave a long yarn tail for sewing the body to the head later. Stuff firmly with fiberfill so she stands up on her own.
Tail (×1) — White
A tiny cotton puff for her back. Chenille, 2.0mm hook, magic ring.
Row 1: 6 sc in mr (6)
Row 2: 6 inc (12)
Row 3: 6 dec (6)
Finishing: Do NOT stuff! The chenille itself is plush enough that the tiny tail stays perfectly round without any filling.
Arms (×2) — White
White chenille, 2.0mm hook, magic ring. Make two identical arms.
Row 1: 6 sc in mr (6)
Row 2: (1 sc, inc) × 3 (9)
Rows 3–5: 3 rows even, no changes (9)
Row 6: dec, 7 sc (8)
Rows 7–11: 5 rows even, no changes (8)
Finishing: Stuff only the bottom portion of the arm — the rounded hand part. Leave the top soft and empty so she can pose naturally against her body. Fold in half and sc through both layers for 4 sc to close.
Legs (×2) — White
White chenille, 2.0mm hook, magic ring. Make two.
Row 1: 6 sc in mr (6)
Row 2: 6 inc (12)
Row 3: (1 sc, inc) × 6 (18)
Row 4: (2 sc, inc) × 6 (24)
Rows 5–6: even, no changes (24)
Row 7: 6 sc, 6 dec, 6 sc (18)
Row 8: 6 sc, 3 dec, 6 sc (15)
Row 9: 5 sc, 3 dec, 4 sc (12)
Rows 10–13: 4 rows even, no changes (12)
Finishing: This is where the shape really forms — the little foot is so satisfying to see. Stuff the bottom of the leg (the foot) firmly, and only very lightly at the top. Fold in half and sc through both layers for 6 sc to close.
Ears (×2) — White
White chenille, 2.0mm hook, magic ring. Make two.
Row 1: 6 sc in mr (6)
Row 2: 6 inc (12)
Row 3: (1 sc, inc) × 6 (18)
Rows 4–10: 7 rows even, no changes (18)
Row 11: (1 sc, dec) × 6 (12)
Finishing: Do NOT stuff! Fold in half and sc through both layers for 6 sc. Fold in half once more and sc through both layers for 3 sc. This creates that soft, floppy bend at the base that makes her ears look so natural.
Dress (×1) — Light Pink
Switch to your 3.5mm (approx. US E/4) hook and the dusty light pink DK yarn. Start with a beginning chain.
Row 1: Ch 43 (43)
Row 2: 42 sc starting from 2nd ch from hook (42)
Row 3: (1 sc, inc) × 3, ch 6, skip 6 sts, (2 sc, inc) × 6, ch 6, skip 6 sts, (1 sc, inc) × 3 (54)
Row 4: (8 sc, inc) × 6 (60)
Rows 5–9: 5 rows even, no changes (total not stated)
After Row 9, finish the round and join the two front sections together so the dress can be worked in the round for the ruffle.
Row 10: inc in every st (120)
Row 11: (1 dc, dc-inc) × 60 (180)
Rows 12–15: 180 dc, 4 rows (180)
Finishing: Close with a sl st, cut yarn, and weave in the end. For each sleeve, attach yarn to the upper sleeve edge where the ch-6 armhole was and work 3 dc in each st × 6 for a ruffled sleeve (18). For the back button loop: attach yarn, ch 8, and sl st into the adjacent st. Sew the small button onto the opposite side of the back opening. So many layers of cuteness in this little dress.
Headband (×1) — Light Pink
Light pink DK, 3.5mm hook. Start with a beginning chain.
Row 1: Ch 77, sl st in every ch from the 2nd ch (77)
That’s it — a simple, delicate little band for her head.
Flower (×1) — Light Yellow + Light Pink
Start with the light yellow center, then switch to light pink for the petals.
Row 1: (Light yellow) 6 sc in mr, sl st (6)
Row 2: (Light pink) Ch 3, dc, ch 3, sl st. Repeat 5 times in each st. (total not stated)
Join the light pink yarn in Round 2 to work the petals. A tiny five-petal bloom — so dainty.
Raspberry (×1) — Bright Pink
The most satisfying little detail. Bright raspberry pink, 3.5mm hook, magic ring.
Row 1: 4 puff sts in mr (4)
Row 2: 4 puff st-inc (total not stated)
Row 3: (1 puff st, puff st-inc) × 4 (total not stated)
Rows 4–5: 2 rows sc (12)
Finishing: Sl st to close, stuff the berry with a tiny amount of fiberfill so it keeps its round, bubbly shape. Weave in the yarn end.
Raspberry Strap (×1) — Light Green
Light green DK, 3.5mm hook.
Row 1: Ch 65, sl st in every ch from the 2nd ch (65)
Finishing: Cut yarn and set aside to sew onto the raspberry.
Leaves (×3) — Light Green
Light green DK, 3.5mm hook. Make three identical leaves.
Row 1: Ch 4, tr in 2nd ch from hook, tr, ch 4, sl st (total not stated)
Repeat three times total to make three leaves. The tiniest, most delicate little things — they’ll sit at the top of the raspberry.
Assembling Your Amigurumi Bunny
This is the part where she really becomes herself. Take your time — the positioning of every little piece matters. If you’ve never sewn amigurumi parts before, our sewing amigurumi parts guide shows you the invisible stitch technique that makes everything look professional.
- Sew the tail onto the body at Rows 6, 7, and 8. Center it on the back.
- Sew the arms to the body between Rows 15 and 16. They should sit high and shoulder-like.
- Sew the legs to the body between Rows 7 and 8. Make sure they’re symmetrical — sit her up and check she doesn’t lean before securing.
- Sew the ears to the head between Rows 4 and 5. Angle them slightly outward for that sweet, alert look.
- Sew the flower onto the headband, then sew the headband onto the bunny’s head at a slight angle — it’s cuter off-center.
- Sew the 3 leaves onto the top of the raspberry, clustered together like a little leafy cap.
- Sew the green strap onto the raspberry so she can carry it like a tiny shoulder purse.
Making It Extra Cute — The Finishing Details
Okay, this is my favorite part of any project and the section where this amigurumi bunny really comes to life. The face-shaping and embroidery are what take her from cute plushie to the kind of bunny you cannot stop staring at.
🩷 Chloe’s Detail Tip: Do the face shaping before you sew the head to the body. It’s so much easier to access the inside of the head when it’s still a separate piece, and you can really get your needle to pull the cinch tight without fighting the body.
Face shaping (cinching): Using a long length of white chenille (or switch to YarnArt Jeans white for more control), you’re going to pull the face inward at 8 specific points to create that soft sculpted look around the eyes. The original pattern provides a numbered diagram showing points 1–8 around the eye area. Insert your needle at point 1, come out at point 2, then 3, and so on through all 8 points, pulling gently as you go. When you reach the end, tie off securely and hide the yarn tail inside the head.
Nose: Embroider the nose with brown yarn between Rows 12 and 13, catching 3 stitches across. Work a few stitches on top of each other to build up a little rounded nose shape — you want it to have some dimension, not look flat.
Eyebrows: Embroider delicate eyebrows with black yarn at Row 8, positioned directly above each eye. Keep them short and soft — just little curves, nothing dramatic. This is what gives her that sweet, slightly surprised expression.
Lashes: Embroider lashes with black yarn — 2 sc-width strokes extending outward from the outer corner of each eye. These are tiny but they make such a difference. Little flicks of black that catch the light next to the glossy safety eyes.
Rosy cheeks (my addition): The pattern doesn’t include them, but you know I can’t leave a bunny without her blush. Take a little bit of dusty pink embroidery floss or a soft pink pastel powder, and add the faintest circle of color on each cheek, just below and slightly outward of the safety eyes. If you’re using yarn, make small satin stitches in a tight circle. If you’re using pastel, dab it on with a cotton swab — light layers, you can always add more.
🩷 Chloe’s Color Variation Ideas: She’s stunning in dusty pink, but try her in lavender with a mint green flower headband and a tiny blueberry purse instead. Or baby yellow dress with a cream flower and a strawberry. The silhouette is so sweet that any soft pastel palette you pick will look dreamy.
Chloe’s Final Look
I keep picking her up just to look at her. That cream chenille softness, the ruffled sleeves of her dusty pink dress, the little raspberry purse hanging at her side — she’s everything. The way her ears flop just slightly forward and her embroidered lashes catch the light is almost too much. Try making a whole set in different pastel dresses — one in pink, one in lavender, one in butter yellow — and line them up on a shelf together. I’m warning you now: you won’t be able to stop smiling. 🩷