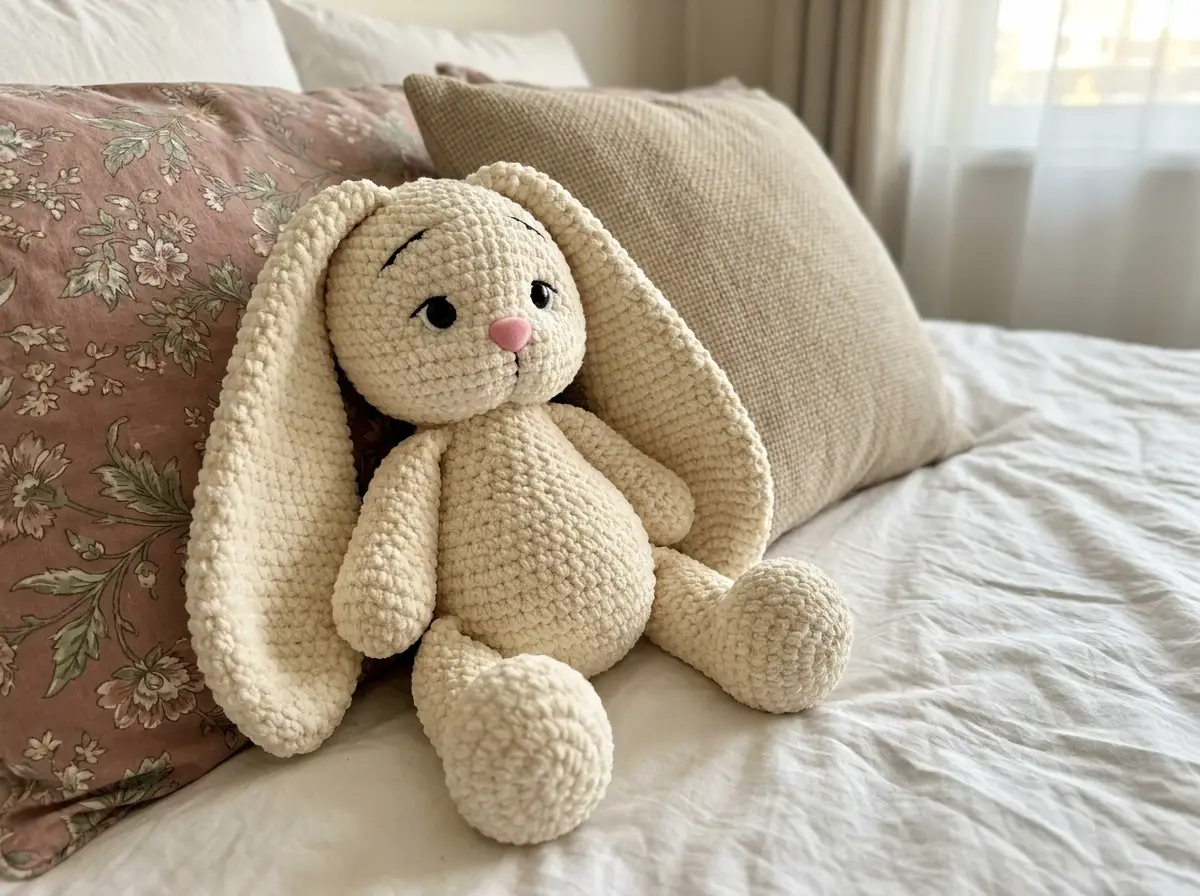
Bunny Amigurumi — Free Crochet Bunny Pattern
📋 Pattern Quick Stats
- Difficulty: Intermediate
- Finished Size: 11.8 in (30 cm)
- Main Hook: 3.5mm (approx. US E/4)
- Ear Hook: 6.0mm (US J/10)
- Yarn Weight: DK / Light Worsted (CYCA 3)
- Techniques: magic ring, chain start, invisible decrease, hdc, joining limbs while crocheting, continuous rounds
- Estimated Time: 8–12 hours
Materials for This Bunny Amigurumi
- Main yarn: DK / Light Worsted weight (CYCA 3), approx. 300–350 yds — any smooth, non-fuzzy yarn works well here. US alternatives I reach for: Lion Brand 24/7 Cotton (DK), Paintbox Simply DK, or Cascade 220 Superwash Sport. Avoid chenille or velvet for a pattern with this much shaping — you need stitch definition to count cleanly.
- Secondary yarn: Sport or DK weight cotton-blend in white, approx. 20 yds — for eye tacking and embroidered whites. Lion Brand 24/7 Cotton and Paintbox Simply DK both work here.
- Black thread or embroidery floss: for lashes and eyebrows
- Main hook: 3.5mm (approx. US E/4)
- Ear hook: 6.0mm (US J/10) — used only for the ears to create that intentionally looser, floppy texture
- Safety eyes: 12mm black, 1 pair
- Nose: pink oval velvet nose piece, approx. 17mm × 12mm — available on Amazon or Etsy; alternatively, embroider with pink floss
- Stuffing: Polyester fiberfill — Poly-Fil (available at Joann, Michaels, or Hobby Lobby) is my standard
- Tapestry needle — for sewing parts and weaving in ends
- Sewing needle and thread — matching your yarn color, for attaching the head and ears securely
- Stitch marker
- Scissors
- Craft glue (optional): E6000 or Aleene’s Tacky Glue — for securing the nose if your velvet nose doesn’t have a post
This yarn falls under the DK / Light Worsted (CYCA 3) category on the Craft Yarn Council yarn weight system, which is a useful reference when substituting yarn brands.
Abbreviations Used in This Bunny Amigurumi Pattern
| Abbreviation | Meaning |
|---|---|
| MR | magic ring |
| ch | chain |
| sc | single crochet |
| hdc | half double crochet |
| inc | increase — 2 sc worked into the same stitch |
| dec | invisible decrease — insert hook through front loops only of next 2 stitches simultaneously, yarn over, pull through, yarn over, pull through 2 loops |
| hdc-inc | 2 hdc worked into the same stitch |
| hdc-dec | invisible decrease in hdc — insert hook through front loops only of next 2 stitches, yarn over, pull through, yarn over, pull through all 3 loops |
| sl st | slip stitch |
| rep | repeat |
| BLO | back loop only |
Special Techniques — Read Before You Start
This bunny amigurumi uses a few techniques that are worth reviewing before you pick up your hook.
The magic ring is the starting point for the arms, tail, body, head, and ears — everything except the legs. If you haven’t worked one before, or if yours tends to leave a small hole in the center, our step-by-step magic ring tutorial walks through the method I use. A tight center is especially important on the head, which is the most visible piece.
The invisible decrease is the only decrease method used in this pattern — both for the sc sections and adapted for the hdc ear sections. This is non-negotiable for me. The standard sc2tog leaves a visible gap that I simply can’t accept in a finished piece. If you’re not confident with it yet, spend five minutes with our complete invisible decrease tutorial before starting — it will save you from frogging later.
The chain start for the legs creates an oval base rather than a circular one, which gives this pattern those characteristic wide, flat-bottomed feet. Row 1 is worked around both sides of a foundation chain — go slowly, count carefully, and you’ll get it on the first try.
Joining limbs while crocheting the body (Rows 9–10 for legs, Row 21 for arms) is one of those moments that feels tricky the first time and obvious the second. The key is positioning your legs exactly as the notes describe — inner side facing the body — before you start working those rows.
Safety eyes: At 12mm, these are larger eyes intended for a substantial toy. For any toy made for a child under 3 years old, please review toy safety standards at the U.S. Consumer Product Safety Commission (CPSC) — or embroider the eyes instead. Always attach safety eyes before stuffing and closing the head.
Bunny Amigurumi Pattern
This pattern is worked in continuous rounds unless otherwise noted. Place a stitch marker at the beginning of each round and move it up as you go. I always run my marker along the back seam of the body — it makes assembly much easier later.
Legs (make 2)
Starting method: Ch 8
Row 1: 1 inc in 2nd ch from hook, 5 sc, 3 sc in last ch, 4 sc, 1 inc along back side (16)
Row 2: (1 inc, 1 sc) ×3, 1 sc, (1 inc, 1 sc) ×3, 3 sc (22)
Row 3: (1 sc, 1 inc) ×4, 3 sc, (1 sc, 1 inc) ×4, 3 sc (30)
Rows 4–5: 30 sc (2 rows) (30)
Row 6: 1 sc, 5 dec, 3 sc, 1 dec, 10 sc, 1 dec, 2 sc (23)
Row 7: 1 sc, 3 dec, 16 sc (20)
Row 8: 1 sc, 2 dec, 15 sc (18)
Rows 9–15: 18 sc (7 rows) (18)
💡 Emma’s Tip: Stuff the legs gradually as you work — add a small amount of fiberfill every few rows. The foot section (Rows 1–5) needs more stuffing; the leg tube can be lightly filled. After Row 15: work 4 sc, then fold the leg piece in half so the sides meet. Working through both layers, work 1 dec, 5 sc, 1 dec (7 stitches total — the decreases catch the side edges on each end). Fasten off, cut yarn, and tuck the tail inside the leg.
Arms (make 2)
Starting method: MR
Row 1: 6 sc in MR (6)
Row 2: 6 inc (12)
Row 3: (1 sc, 1 inc) ×6 (18)
Row 4: 18 sc (18)
Row 5: 2 sc, 3 dec, 10 sc (15)
Row 6: 3 sc, 1 dec, 10 sc (14)
Rows 7–12: 14 sc (6 rows) (14)
💡 Emma’s Tip: Stuff the hand section (Rows 1–5) firmly, then leave the arm tube lightly filled or unfilled — this lets this bunny’s arms hang naturally. After Row 12: work 5 sc, fold in half, and work 1 dec, 3 sc, 1 dec through both layers (5 stitches total). Fasten off, cut yarn, tuck tail inside.
Tail (make 1)
Starting method: MR
Row 1: 6 sc in MR (6)
Row 2: 6 inc (12)
Row 3: 6 dec (6)
Sl st to close. Cut yarn. No stuffing needed — the shape holds on its own.
Body (make 1)
Starting method: MR
Row 1: 6 sc in MR (6)
Row 2: 6 inc (12)
Row 3: (1 sc, 1 inc) ×6 (18)
Row 4: (2 sc, 1 inc) ×6 (24)
Row 5: (3 sc, 1 inc) ×6 (30)
Row 6: (4 sc, 1 inc) ×6 (36)
Row 7: (5 sc, 1 inc) ×6 (42)
Row 8: 42 sc (42)
Row 9: 3 sc, 7 sc joining first leg (along inner side of last leg row), 14 sc, 7 sc joining second leg (along inner side of last leg row), 11 sc (42)
Row 10: 3 sc, 7 sc joining first leg (folded row), 14 sc, 7 sc joining second leg (folded row), 11 sc (42)
Rows 11–13: 42 sc (3 rows) (42)
Row 14: 3 sc, 7 sc (above leg), 1 sc, (1 dec, 1 sc) ×4, 1 sc, 7 sc (above leg), 11 sc (38)
Row 15: 6 sc, 1 dec, 14 sc, 1 dec, 14 sc (36)
Row 16: (4 sc, 1 dec) ×6 (30)
Row 17: (3 sc, 1 dec) ×6 (24)
Rows 18–20: 24 sc (3 rows) (24)
Row 21: 3 sc, 5 sc joining first arm, 7 sc, 5 sc joining second arm, 4 sc (24)
💡 Emma’s Tip: Keep your stitch marker running along the back throughout the body — it’s your reference point for arm and leg placement. The decreases in Row 14 shape the tummy inward slightly, which gives this crochet pattern a more organic silhouette. Stuff the body firmly and evenly as you go; waiting until the end makes it much harder to get even distribution. Sl st to close after Row 21, fasten off, cut yarn.
Ears (make 2)
Starting method: MR — worked entirely in hdc, using 6.0mm (US J/10) hook
Row 1: 6 hdc in MR (6)
Row 2: 6 hdc-inc (12)
Row 3: (1 hdc, 1 hdc-inc) ×6 (18)
Row 4: (2 hdc, 1 hdc-inc) ×6 (24)
Row 5: (3 hdc, 1 hdc-inc) ×6 (30)
Row 6: 6 hdc, 1 hdc-dec, 13 hdc, 1 hdc-dec, 7 hdc (28)
Row 7: 6 hdc, 1 hdc-dec, 12 hdc, 1 hdc-dec, 6 hdc (26)
Row 8: 5 hdc, 1 hdc-dec, 11 hdc, 1 hdc-dec, 6 hdc (24)
Row 9: 5 hdc, 1 hdc-dec, 10 hdc, 1 hdc-dec, 5 hdc (22)
Row 10: (3 hdc, 1 hdc-dec) ×4, 2 hdc (18)
Row 11: 1 hdc-dec, 16 hdc (17)
Row 12: 8 hdc, 1 hdc-dec, 7 hdc (16)
Row 13: 1 hdc-dec, 14 hdc (15)
Row 14: 7 hdc, 1 hdc-dec, 6 hdc (14)
Row 15: 3 hdc, 1 hdc-dec, 5 hdc, 1 hdc-dec, 2 hdc (12)
Row 16: 12 hdc (12)
Row 17: 1 hdc, 1 hdc-dec, 4 hdc, 1 hdc-dec, 1 hdc (10)
💡 Emma’s Tip: The larger hook is intentional — it creates a softer, naturally floppy ear texture that you simply can’t get with the main hook. Do not stuff the ears. After Rows 10 and 13, work 2 extra hdc so the stitch marker sits at the center of one side of the ear. After Row 17: fold the ear in half so the edges align. Switch back to your 3.5mm (approx. US E/4) hook and work 5 hdc through both layers to close the bottom edge cleanly.
Head (make 1)
Starting method: MR
Row 1: 6 sc in MR (6)
Row 2: 6 inc (12)
Row 3: (1 sc, 1 inc) ×6 (18)
Row 4: (2 sc, 1 inc) ×6 (24)
Row 5: (3 sc, 1 inc) ×6 (30)
Row 6: (4 sc, 1 inc) ×6 (36)
Row 7: (5 sc, 1 inc) ×6 (42)
Rows 8–10: 42 sc (3 rows) (42)
Row 11: 10 sc, 1 dec, 2 sc, 1 dec, 2 sc, 1 dec, 22 sc (39)
Row 12: 9 sc, 1 dec, 2 sc, 1 dec, 2 sc, 1 dec, 20 sc (36)
Row 13: 36 sc (36)
Row 14: (4 sc, 1 dec) ×6 (30)
Row 15: (3 sc, 1 dec) ×6 (24)
Row 16: (2 sc, 1 dec) ×6 (18)
Row 17: (1 sc, 1 dec) ×6 (12)
Row 18: 6 dec (6)
💡 Emma’s Tip: Rows 11 and 12 shape the muzzle area — the “2 sc” segments must sit directly above the “2 sc” from the previous row each time. This is the detail that makes the face look intentional rather than accidental. Insert your 12mm safety eyes between Rows 11 and 12, positioned above the first and last decreases of those rows with approximately 6 sc between them. Attach safety eyes before stuffing. Stuff the head fully and firmly before closing. Cut yarn, fasten off, and use your tapestry needle to close the remaining 6-stitch opening cleanly.
Assembly
- Head to body: Sew the head to the body using sewing thread — go around the join twice and stitch through multiple times. this bunny’s ears are heavy; a single pass will not hold. Take your time here and test the stability before moving on.
- Tail: Sew the tail to the center back of the body. I like to position it about 2–3 rows above the base.
- Ears: Sew to the top of the head with sewing thread, approximately 4–5 rows above where the eyebrow embroidery will sit. Pin them in place first and check the symmetry from the front before you sew — once those ears are on, adjusting them is unpleasant.
💡 Emma’s Tip: For any piece where the head needs to support heavy ears, I always do a double pass around the neck seam with sewing thread and then go back through several times with the tapestry needle and yarn. Checking our guide on sewing amigurumi parts together is worth it if this kind of structural sewing is new to you — the method makes a real difference in durability.
Face Decoration
This is the part that takes patience — and it’s absolutely worth it. Bunny’s face is what makes her her.
- Eye tacking and whites: Thread your tapestry needle with white sport-weight cotton. Insert the needle at Point 1 (base of head, near Row 1 area) and use it as your anchor throughout. Make four passes in sequence, pulling firmly and knotting after each:
- 1 → 2 → 3 → 1
- 1 → 4 → 5 → 1
- 1 → 6 → 7 → 1
- 1 → 8 → 9 → 1
- Lashes and eyebrows: Embroider with black thread using straight strokes. Add a single side lash if you like — I think it adds a lot of personality without much effort.
- Nose: If your velvet nose has a screw post, snap it off cleanly. Apply a small amount of E6000 or Aleene’s Tacky Glue to the back of the nose piece and press it firmly into position between the muzzle decreases from Rows 11–12. Hold for 30 seconds and allow to cure fully before moving the head.
- Optional finishing: A very small drop of craft glue on the eye whites and lash embroidery will keep them from snagging or shifting over time. Use sparingly — less is more.
Emma’s Note
I’ve made several versions of bunny now, and every time I get to those ears I pause and appreciate what a difference the hook swap makes — that simple change from 3.5mm to 6.0mm is the whole personality of this bunny. If your tension is anything like mine, the body will feel wonderfully solid and the shaping on the muzzle will come out crisp. Don’t rush the face decoration; the eye tacking in particular is fiddly but it’s what gives bunny that soft, almost dreamy expression. Happy hooking. 🧶
What yarn is best for this bunny amigurumi?
Any smooth DK or Light Worsted (CYCA 3) yarn works well — Lion Brand 24/7 Cotton, Paintbox Simply DK, and Cascade 220 Superwash Sport are all reliable choices. Avoid chenille or velvet, as clean stitch definition is essential for accurate shaping
How long does it take to crochet this bunny amigurumi?
Most intermediate makers finish this bunny in 8–12 hours. The ears and face decoration are the most time-intensive sections, so plan for two or three focused sessions rather than trying to complete it in one sitting.
Can beginners make this bunny amigurumi?
This pattern is rated intermediate, mainly because of the chain-start for the legs, the technique of joining limbs while crocheting the body, and the face embroidery. Beginners who are solid on the magic ring and invisible decrease can attempt it — just take extra care with the leg and arm joining rows.