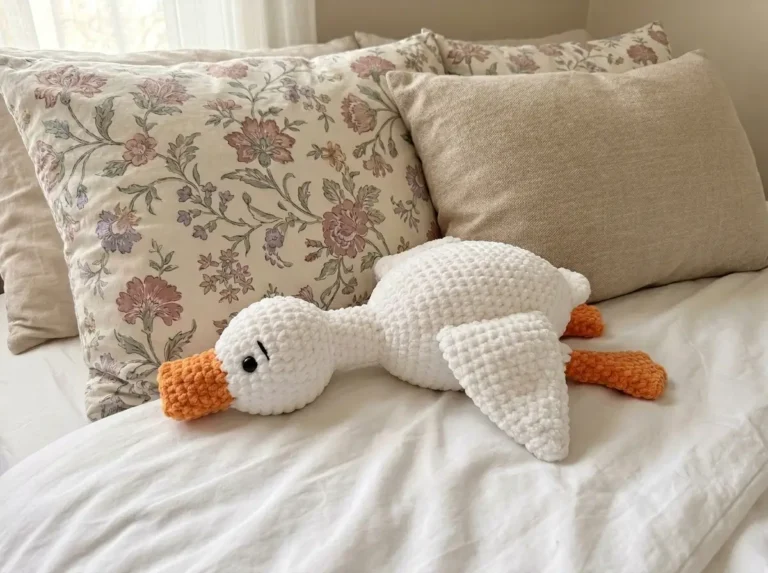
Free Goose Amigurumi Pattern — Scrap-Friendly Couple Set
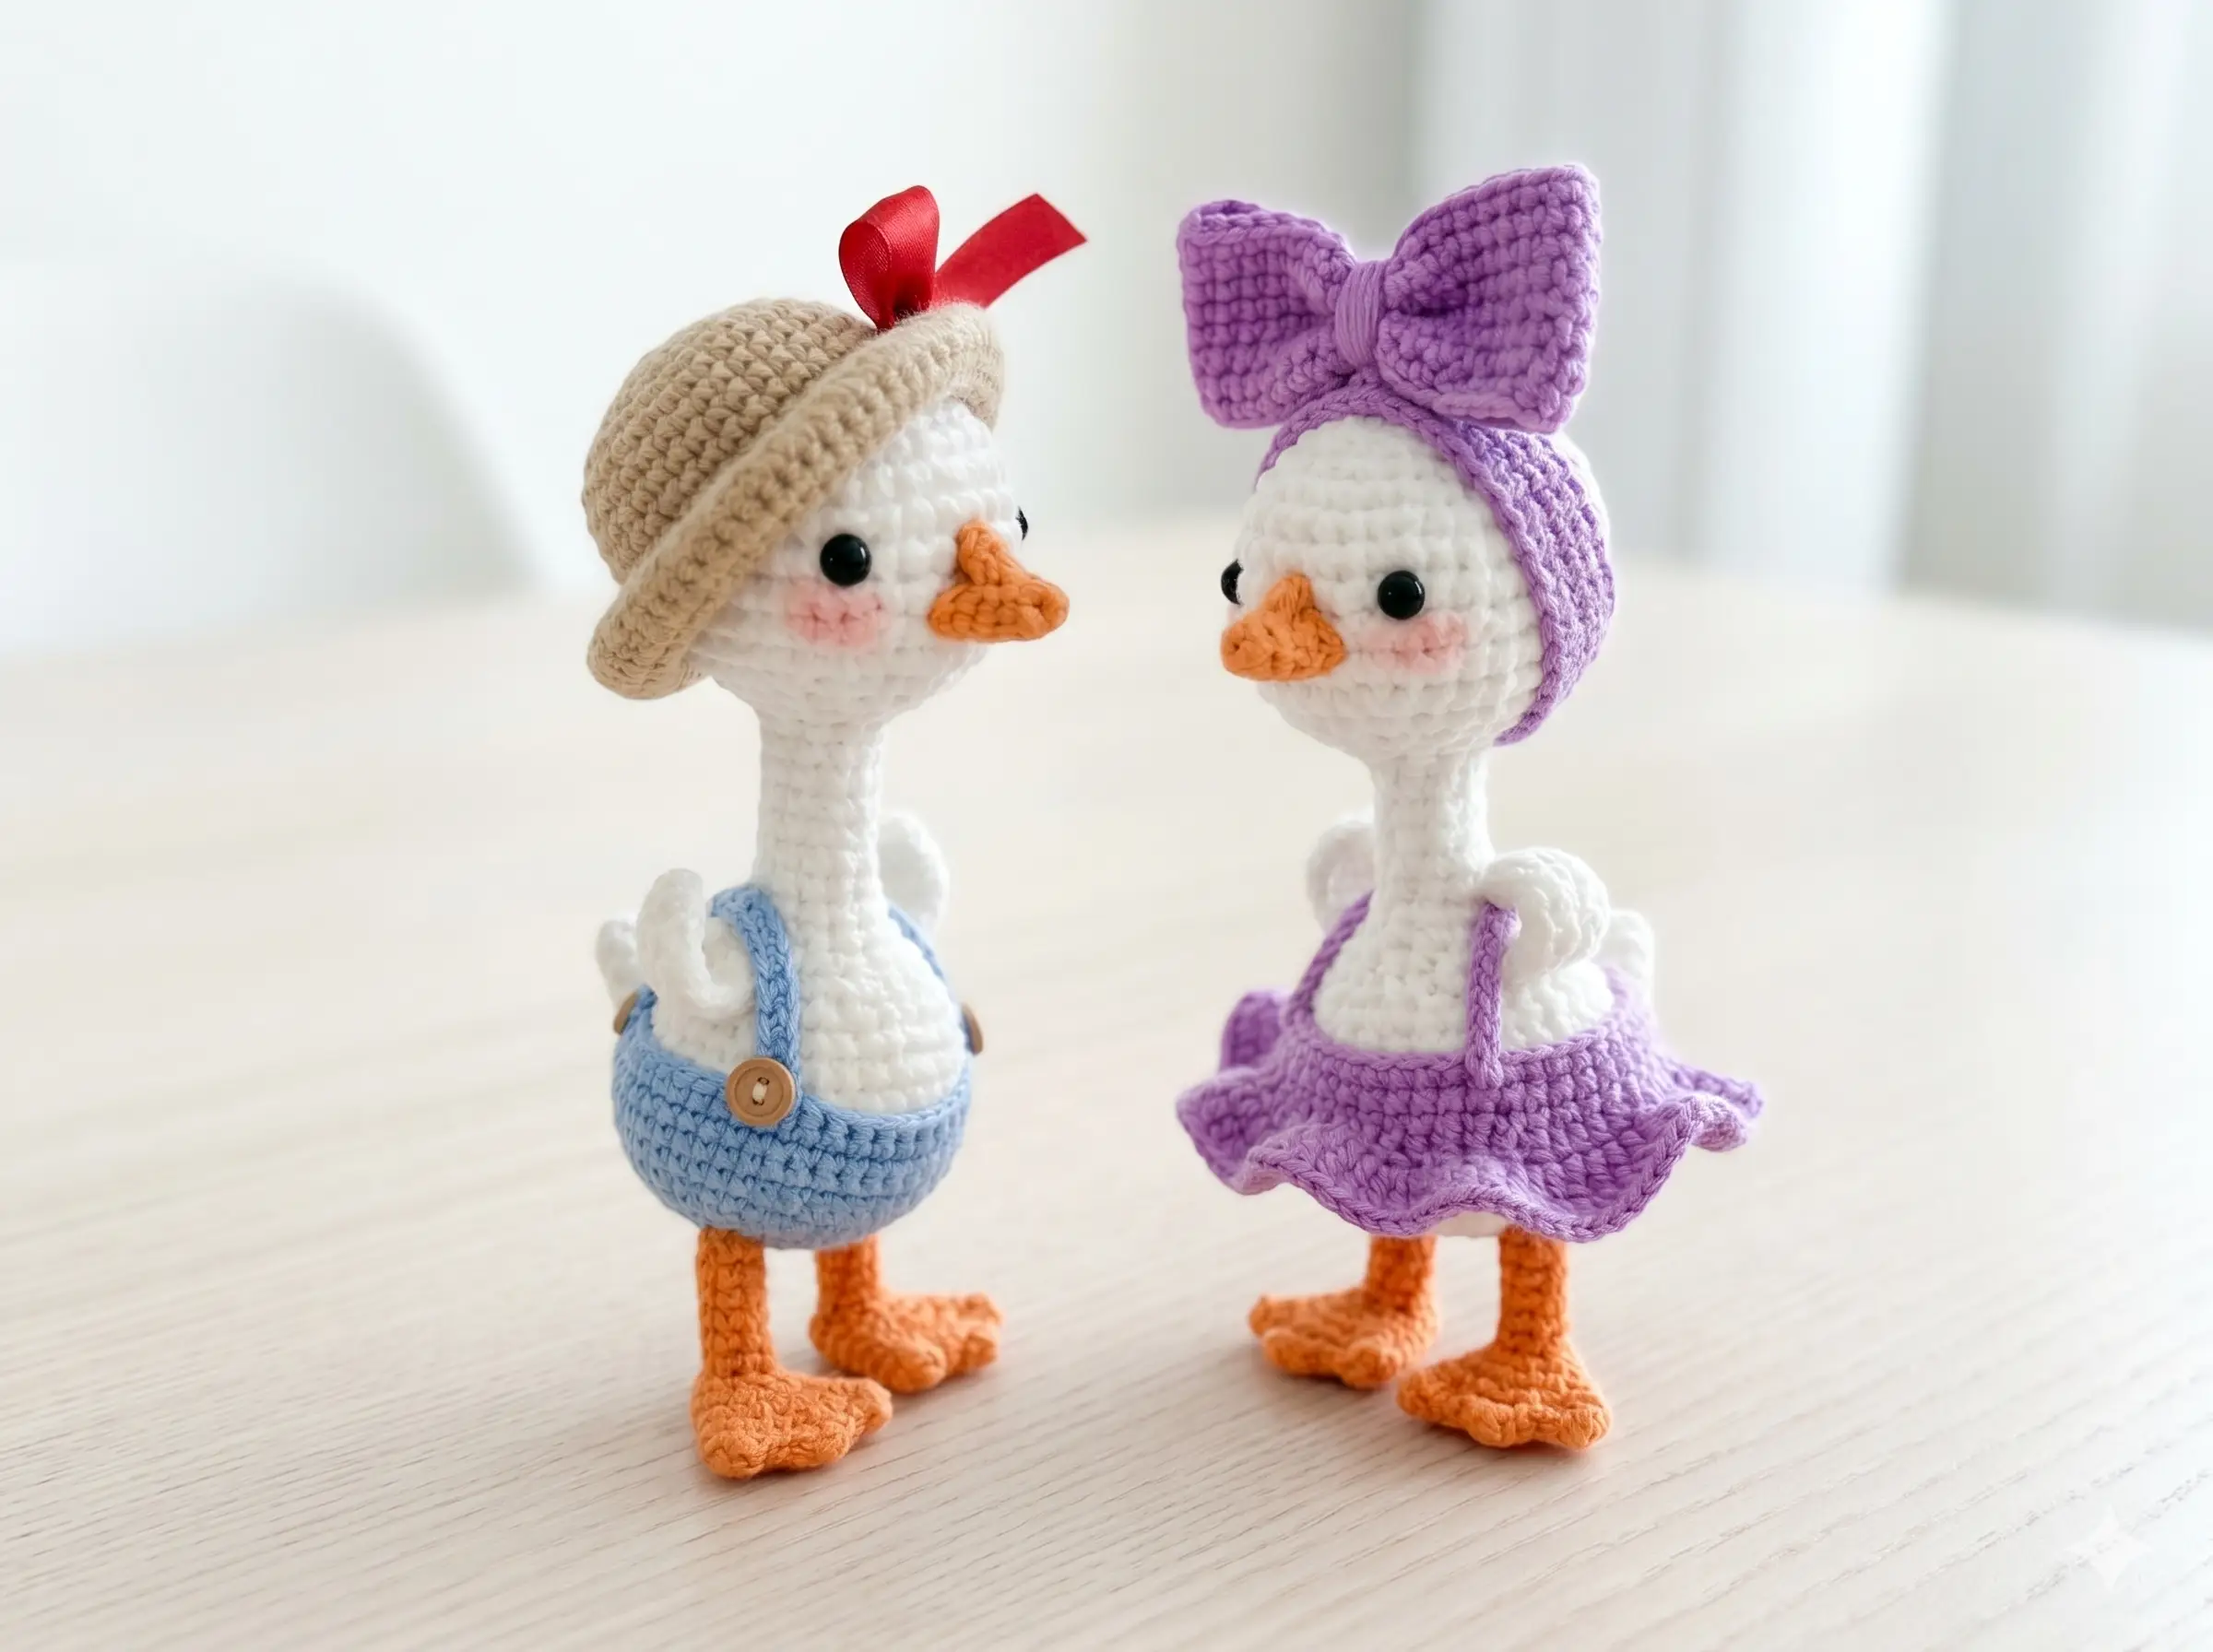
This free goose amigurumi pattern makes a complete matched couple — two dressed-up geese built almost entirely from yarn you already own. The goose amigurumi bodies take a solid white skein; the hats, overalls, dress, and headband are pure scrap territory. About 250 yards total across two finished characters. A white skein plus whatever colors are sitting in your basket — that’s the whole supply list.
What You’ll Need to Crochet This Goose Amigurumi Couple
🧶 What You’ll Need From Your Stash
- 💰 Yarn Needed: ~250 yds total — approx. 130 yds white (bodies), 45 yds orange or yellow (beaks + feet ×2), 45 yds outfit color A (overalls + hat), 35 yds outfit color B (dress + headband + bow)
- 🎨 Colors: white (main), orange or yellow (beak/feet), two contrast colors for outfits — use whatever scraps you have
- 🪝 Hook: 2.5mm (approx. US C/2) for fingering cotton; 3.5mm (approx. US E/4) for DK weight
- ⏱️ Time: 8–10 hours for the complete couple
- 📏 Finished Size: approx. 4 in (10 cm) without accessories; 5–5.5 in (12–14 cm) with hat
- 💡 Difficulty: Intermediate — the bodies are straightforward; the overalls and dress have a few tricky construction rows
- 🎁 Great For: wedding gifts, couple gifts, shelf display, market sets, keepsake pairs
Materials for Your Goose Amigurumi
Yarn:
- White yarn — approximately 130 yards total for both goose bodies, tails, and wings. Any fingering or DK weight white acrylic or cotton you have on hand works well. This is the only color where you’ll need a real skein; everything else comes from scraps.
- Orange or yellow yarn — approximately 45 yards total for the beaks and feet of both geese. A small leftover ball is more than enough.
- Outfit color A (your choice) — approximately 45 yards for the overalls and flat hat. Any medium contrast color works — denim blue, forest green, dusty mustard.
- Outfit color B (your choice) — approximately 35 yards for the dress, headband, and bow. A soft pink, lavender, or coral reads beautifully, but this is your call.
- White yarn (secondary, small amount) — for the toe detail on the feet. A few yards is all you need.
Tools and notions:
- Crochet hook: 2.5mm (approx. US C/2) recommended for fingering weight; adjust to your yarn
- 4 safety eyes, 6mm (2 per goose) — install before stuffing
- Polyester fiberfill — enough to firmly stuff both bodies and the tail pieces
- Tapestry needle for sewing and weaving in ends
- Stitch markers — you’ll use these constantly
- Optional: small decorative buttons for the overalls; a length of red ribbon (approx. 12 in) to thread through the hat brim; blush powder for the cheeks
A note on yarn weight: No specific yarn is listed in the original pattern. For the tightest, cleanest stitch definition on small amigurumi, fingering weight (CYCA 1) on a 2.5mm hook is ideal. If you prefer a faster, slightly larger result, DK weight on a 3.5mm hook works just as well — your finished geese will come out slightly bigger, which actually makes the clothing construction easier.
Abbreviations
| Abbreviation | Meaning |
|---|---|
| mr | magic ring |
| ch | chain |
| sc | single crochet |
| hdc | half double crochet |
| dc | double crochet |
| sl st | slip stitch |
| inc | increase — 2 sc worked into the same stitch |
| dec | decrease (invisible decrease preferred — see tips below) |
| FLO | front loop only |
| BLO | back loop only |
| FO | fasten off |
| st(s) | stitch(es) |
Smart Crafter Tips for This Goose Amigurumi
Use the invisible decrease throughout the body closure. The standard decrease leaves a visible gap — for clean, tight closures on your goose head and body, the invisible decrease is the only method worth using here. If you haven’t tried it yet, our invisible decrease tutorial makes it click in about five minutes. It will change every closure you ever make.
The neck section is your yarn-saving win. Rows 17–22 on the head-body are worked over just 10 stitches — that’s the thin goose neck. This section uses almost no yarn and goes fast. Don’t rush through it; keeping your tension even here is what gives the finished goose its distinctive silhouette.
Make both geese in parallel, not sequentially. Work Row 1 through Row 38 on the first head-body, then repeat for the second before moving on to accessories. This keeps your tension consistent across both pieces and means you won’t accidentally use up your white yarn on one oversized goose and underfill the second. Same logic applies to the feet and beaks — make all four feet in one session.
The overalls are the trickiest part — read them through first. Rows 6–10 use chain leg holes, turning rows, and BLO/FLO switching. This isn’t complicated, but it moves differently from standard amigurumi rounds. Reading through the full overalls section before picking up your hook will save you from frogging. If you’ve never worked from a flat panel or used BLO rows, our beginner’s guide to amigurumi covers the foundational skills that apply here.
The tail gets lightly stuffed before closing. Don’t skip this step — a flat unstuffed tail looks unfinished. A tiny pinch of polyfill is all it takes. Not sure how much stuffing is too much? Our guide to stuffing amigurumi covers exactly how to control the shape without lumps.
How to Crochet Your Goose Amigurumi — Complete Pattern
This pattern makes two geese. Make every body part twice (Head-Body, Tail, Wings, Beak, Feet/Legs) — once for each goose. Then make one set of clothing for each: Overalls + Hat for Goose A, and Dress + Headband + Bow for Goose B.
Head-Body (Make 2 — one per goose)
Yarn color: white | Starting method: magic ring
🧶 Scrap Check: Each head-body uses approximately 60–65 yards of white yarn. This is the largest single piece in the pattern — it’s where the bulk of your white skein goes.
Row 1: 6 sc in mr (6)
Row 2: 6 inc (12)
Row 3: (sc, inc)*6 (18)
Row 4: (2 sc, inc)*6 (24)
Row 5: 24 sc (24)
Row 6: (9 sc, 3 inc)*2 (30)
Row 7: 30 sc (30)
Row 8: (sc, inc)*3, 9 sc, (sc, inc)*3, 9 sc (36)
Rows 9–11: 36 sc (36)
Note: After Row 8, insert safety eyes. Position them on either side of the head in the wider section, approximately 6–8 stitches apart. Install the locking washers firmly before continuing.
Row 12: (4 sc, dec)*6 (30)
Row 13: (3 sc, dec)*6 (24)
Row 14: (2 sc, dec)*6 (18)
Row 15: (sc, dec)*6 (12)
Row 16: (4 sc, dec)*2 (10)
Note: Rows 17–22 form the neck — a narrow tube of 10 stitches. Keep your tension firm and even.
Rows 17–22: 10 sc (10)
Row 23: (4 sc, inc)*2 (12)
Row 24: 12 sc (12)
Row 25: (sc, inc)*6 (18)
Row 26: (2 sc, inc)*6 (24)
Row 27: 24 sc (24)
Row 28: (3 sc, inc)*6 (30)
Row 29: (4 sc, inc)*6 (36)
Rows 30–33: 36 sc (36)
Note: Begin stuffing the head firmly before continuing. The neck is narrow and it gets harder to stuff cleanly after more rows close in.
Row 34: (4 sc, dec)*6 (30)
Row 35: (3 sc, dec)*6 (24)
Row 36: (2 sc, dec)*6 (18)
Row 37: (sc, dec)*6 (12)
Row 38: 6 dec (6)
FO. Add remaining stuffing to firm up the body before closing. Weave in ends.
New to the magic ring? Our magic ring tutorial covers the setup in detail — it takes about two minutes to get right and you’ll use it for almost every part of this pattern.
Beak (Make 2 — one per goose)
Yarn color: orange or yellow | Starting method: magic ring
🧶 Scrap Check: Each beak uses approximately 7–8 yards. A small leftover ball makes both beaks easily.
Row 1: 6 sc in mr (6)
Row 2: (sc, inc)*3 (9)
Row 3: sc, 2 inc, sc, inc, sc, 2 inc, sc (14)
Row 4: 3 sc, 2 inc, 2 sc, inc, 2 sc, 2 inc, 2 sc (19)
Row 5: 5 sc, 2 inc, 3 sc, inc, 3 sc, 2 inc, 3 sc (24)
Row 6: 7 sc, 2 inc, 4 sc, inc, 4 sc, 2 inc, 4 sc (29)
Row 7: 29 sc (29)
FO, leaving a long tail for sewing. Sew the beak onto Row 9 of the head, centered below the safety eyes.
Wings (Make 4 total — 2 per goose)
Yarn color: white | Starting method: chain
🧶 Scrap Check: Each wing uses approximately 4–5 yards. Four wings total = roughly 18–20 yards of white.
Row 1: 10 ch, starting from 2nd ch from hook: 9 sc, ch, continue along the other side of the chain (9)
Row 2: 6 hdc, 3 sc, 9 sl st (total varies)
Row 3: 9 sl st, 2 hdc (total varies)
FO, leaving a long tail for sewing. The slip stitches in Rows 2–3 create a natural curve that gives the wing its shape — don’t pull them too tight.
Tail (Make 2 — one per goose)
Yarn color: white | Starting method: magic ring
🧶 Scrap Check: Each tail uses approximately 10–12 yards. If you have a small white remnant, this is the place to use it.
Row 1: 6 sc in mr (6)
Row 2: 6 inc (12)
Row 3: 12 sc (12)
Row 4: (sc, inc)*6 (18)
Row 5: 18 sc (18)
Row 6: (2 sc, inc)*6 (24)
FO, leaving a long tail for sewing. Before attaching, lightly stuff the tail — just a small pinch of polyfill. A completely flat tail looks deflated; a lightly stuffed one holds its shape and sits nicely at the back of the body.
Feet/Legs (Make 4 total — 2 per goose)
Yarn color: orange or yellow (main), white (toe detail) | Starting method: magic ring
🧶 Scrap Check: Each foot uses approximately 10–12 yards of orange/yellow plus a few yards of white for the toe. Four feet total.
Row 1: 6 sc in mr (6)
Row 2: (sc, inc)*3 (9)
Row 3: 9 sc (9)
Row 4: 4 ch, skip 2 sts, sc, inc, sc, 2 inc, sc, inc (15)
Row 5: 15 sc (15)
Row 6: (4 sc, inc)*3 (18)
Row 7: (2 sc, inc)*6 (24)
Rows 8–9: 24 sc (24)
Row 10: FLO: (3 dc, sl st)*3 (webbed toe detail)
Note: After completing the main foot piece, attach yarn at Row 4 and mark 7 stitches. Work Rows 1–9 over those 7 stitches (7 sc per row) in orange/yellow, then switch to white yarn and work Rows 10–11 (7 sc each). This builds out the leg section above the foot. Leave a tail for sewing.
FO and weave in ends on the foot piece. Leave a long sewing tail on the leg section.
Overalls/Pants (Make 1 — for Goose A)
Yarn color: your chosen outfit color A | Starting method: magic ring
🧶 Scrap Check: The overalls use approximately 20–22 yards. A medium leftover ball is plenty.
Note: Rows 1–6 are worked in rounds. Rows 7–10 introduce turning rows and BLO/FLO working. Read through before you begin — this section moves like a flat panel, not a standard amigurumi round.
Row 1: 6 sc in mr (6)
Row 2: 6 inc (12)
Row 3: (sc, inc)*6 (18)
Row 4: (2 sc, inc)*6 (24)
Row 5: (3 sc, inc)*6 (30)
Row 6: 4 sc, inc, 6 ch, skip 5 sts, (4 sc, inc)*2, 6 ch, skip 5 sts, 4 sc, inc (36)
Note: The two 6-ch gaps in Row 6 create the leg openings. You will work the pant legs into these openings later.
Row 7: 5 sc, inc, 6 sc, inc, 10 sc, inc, 6 sc, inc, sc, skip 4 sts, ch, turn (36)
Row 8: FLO: 32 sc, ch, turn, skip 4 sts, turn (32)
Row 9: BLO: 32 sc, ch, turn (32)
Row 10: BLO: 32 sc, ch, turn (32)
Suspenders: Chain 16. Starting from 5th ch from hook: work 12 sc. (12 stitches total.) This makes one suspender strap. Make 2.
Pant legs: Work into the 6-ch gaps from Row 6. For each leg: Rows 1–2: 13 sc each round. (13)
Optionally sew small buttons onto the front of the overalls bib as decoration.
Hat (Make 1 — for Goose A)
Yarn color: your chosen outfit color A | Starting method: magic ring
🧶 Scrap Check: The hat uses approximately 22–25 yards. If you’re making the overalls and hat in the same color, one medium remnant ball handles both pieces.
Row 1: 6 sc in mr (6)
Row 2: 6 inc (12)
Row 3: (sc, inc)*6 (18)
Row 4: (2 sc, inc)*6 (24)
Row 5: (3 sc, inc)*6 (30)
Row 6: (4 sc, inc)*6 (36)
Row 7: (5 sc, inc)*6 (42)
Row 8: BLO: 42 sc (42)
Row 9: 42 sc (42)
Row 10: (2 sc, 2 ch, skip 2 sts)*10, 2 sc (42)
Rows 11–12: 42 sc (42)
Row 13: (sc, inc)*21 (63)
Rows 14–15: 63 sc (63)
FO and weave in ends.
Note: Thread a length of red ribbon (approximately 12 in) through the chain-space eyelets on Row 10 to decorate the hat brim. Tie it into a bow at the front.
Dress (Make 1 — for Goose B)
Yarn color: your chosen outfit color B | Starting method: chain
🧶 Scrap Check: The dress uses approximately 18–20 yards. This is where a soft, pretty scrap color really shines — the dc rows have good drape and look intentional even in an irregular leftover colorway.
Row 1: 40 ch, sl st to join in the round (40)
Row 2: 40 sc (40)
Row 3: (4 dc, inc)*8 (48)
Row 4: 48 dc (48)
Row 5: (48 dc, 3 sc in corner st) to end of row (total varies — this row creates the decorative hem edge)
Strap: Chain 16. Starting from 5th ch from hook: work 12 sc. (12 stitches total.) Make 2 straps and attach to the back and front of the dress at the top edge.
FO and weave in ends. Slip the dress over Goose B’s body before assembly.
Headband (Make 1 — for Goose B)
Yarn color: your chosen outfit color B | Starting method: chain
🧶 Scrap Check: The headband uses approximately 12–14 yards. A true scrap piece — a few yards of any coordinating color is enough.
Setup: 50 ch, sl st to join in the round (50)
Rows 1–5: 2 ch, 50 dc, sl st (50)
FO and weave in ends. Sew the bow onto the headband after completing the bow piece.
Bow (Make 1 — for Goose B)
Yarn color: your chosen outfit color B (or a contrast color) | Starting method: flat panel
🧶 Scrap Check: The bow uses approximately 4–5 yards. The definition of a scrap piece — the tail end of almost any skein works here.
Work a small flat rectangular panel to your desired bow size. Sew the short ends together to form a loop. Wrap a separate length of yarn tightly around the center to cinch the bow shape. Fasten securely. Sew the finished bow onto the front of the headband.
FO and weave in ends.
Assembling Your Goose Amigurumi Couple
For tips on getting clean, invisible joins between sewn parts, our guide to sewing amigurumi parts together is worth a quick read before you begin — the positioning tips alone will save you from re-sewing.
- Beak: Sew each beak onto Row 9 of the corresponding head, centered below the safety eyes. The flat, wider edge of the beak should sit flush against the head surface.
- Tail: Lightly stuff each tail before sewing closed, then attach at the back of the body, angled slightly upward. Position it at approximately Rows 33–35 of the body.
- Feet/Legs: Attach the feet to the base of each body using the sewing tail left on the leg section. Position them at the front-lower edge of the body so the goose sits upright.
- Wings: Pin the wings on each side of the body before sewing — try different angles to find what looks most natural. Attach at approximately Row 27–29 of the body, angled slightly downward.
- Clothing: Dress each goose before the final wing attachment if the clothing style requires it. Slip the dress over Goose B’s body. For Goose A, wrap the overalls around the lower body and secure the suspender straps at the back.
- Hat: Place the hat on Goose A’s head and tack it in place with 2–3 invisible stitches so it doesn’t slide.
- Headband + Bow: Fit the headband over Goose B’s head and position the bow at the front center. Tack lightly if needed.
- Finishing touches: Apply a small amount of blush powder to both cheeks (a cotton swab works well for controlled application). Thread the red ribbon through the hat eyelets if you haven’t already.
💡 Stretch It Further: These two geese don’t have to be a couple. Make three bodies and give them three different outfits — overalls, dress, and a plain undressed goose with a tiny scarf made from a 4-inch strip of any leftover yarn. Bundle all three in a kraft box with tissue paper and you’ve got a handmade gift set that costs under $6 in materials. The same pattern works in gray yarn for a completely different look — same construction, totally different bird. And if you love the shape of the goose body, our free penguin pattern uses a very similar structure — once you’ve made these two, that one will go fast.
Mia’s Take
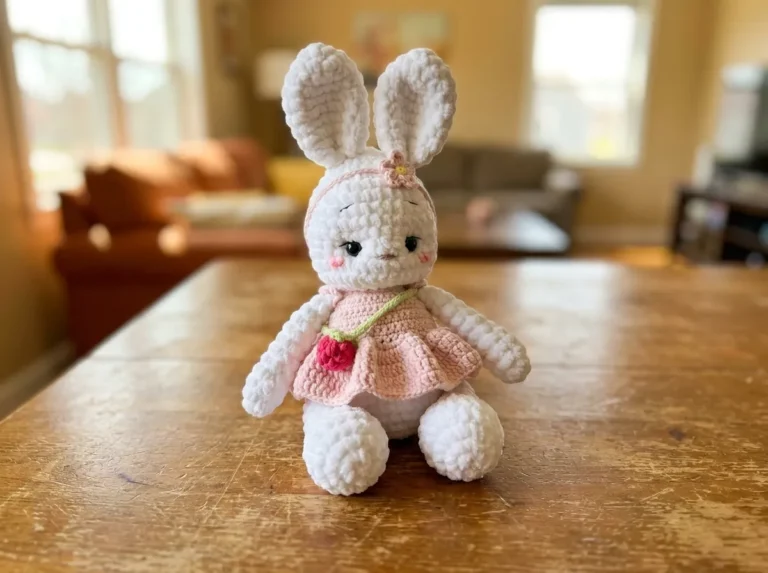
White yarn for the bodies, four small scraps for the outfits, and one afternoon of patient assembly — that’s a complete pair of finished characters you can hold in both hands. The overalls construction has a learning curve on the first read-through, but once you’re in it, the logic clicks. Make both geese in parallel so your white yarn goes further and your tension stays consistent. If you’ve already got our bunny amigurumi in your queue, these geese make a perfect companion project — same skill level, different enough to stay interesting. Two is always better than one. 🧶
What yarn is best for this goose amigurumi?
Fingering weight cotton (CYCA 1) is ideal for tight, clean stitch definition, but DK weight also works well and results in slightly larger geese.
How long does it take to crochet this goose couple?
It takes approximately 8 to 10 hours to complete the entire set, including both geese bodies and all their clothing accessories.
Can beginners make this goose amigurumi pattern?
This pattern is recommended for intermediate crocheters. While the bodies are straightforward, the overalls and dress feature some tricky construction rows.