Free Crochet Kitten Pattern — Black Cat Amigurumi with Overalls
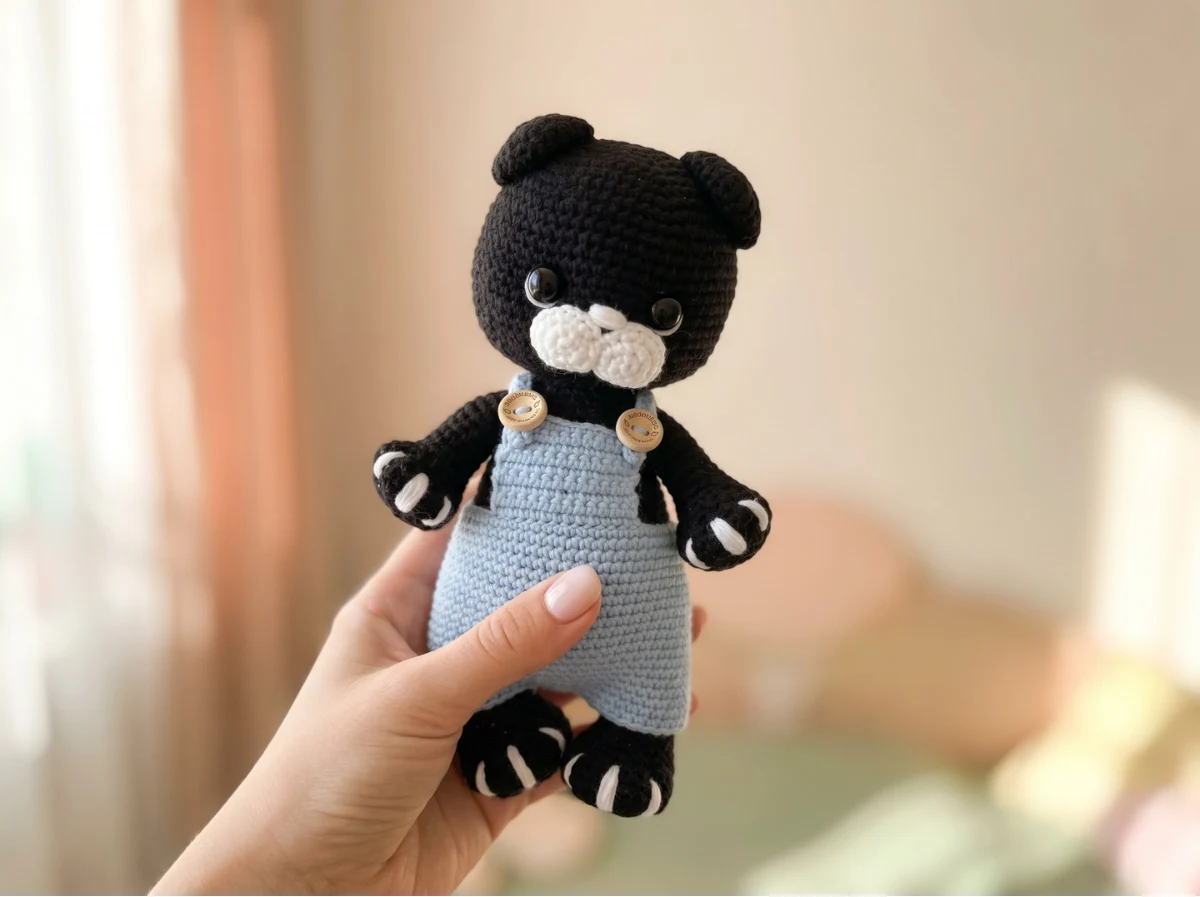
This free crochet kitten pattern delivers an 8-inch dressed black cat — full overalls included — from three colors of DK yarn you probably already own. The black is the real investment here; the light blue and white both come from scraps. If you’ve got a partial skein of any baby blue or leftover white sitting in your basket, the overalls and all the embroidered details are already paid for. Small hook, tight stitches, big payoff. Let’s get into it.
🧶 What You’ll Need From Your Stash
- 💰 Yarn Needed: ~450 yards total (black ~300 yds, light blue ~120 yds, white ~30 yds)
- 🎨 Colors: black (body), light blue (overalls), white (muzzle + embroidery) — or similar from your stash
- 🪝 Hook: 1.75mm (no standard US letter equivalent — sits below a US B/1)
- ⏱️ Time: 6–10 hours
- 📏 Finished Size: 8–9 in (20–23 cm)
- 💡 Difficulty: Intermediate
- 🎁 Great For: gifts, kids’ room decor, handmade market items, character display
Materials for This Free Crochet Kitten Pattern
Everything in this pattern uses DK / Light Worsted weight (CYCA 3) — a great middle-ground weight that gives you defined stitches without being as slow to work as worsted. All three colors use the same weight, so if you’re pulling from your stash, you can mix brands freely as long as the weight matches.
- Black yarn — approximately 300 yards. Your main color: head, body, both arms, both legs, both ears, and the tail. This is the one color you’ll want a full skein for. Suggested US alternatives if you’re buying: Paintbox Simply DK, Lion Brand Heartland DK, or any similar DK-weight acrylic in black.
- Light blue yarn — approximately 120 yards. Used for the complete overalls set: pants, bib, and both straps. A partial skein from a baby project or a spring make is more than enough. Any light blue DK works.
- White yarn — approximately 30 yards. For the two muzzle pieces plus all embroidered details: eye whites, nose, and claws on all four paws. A small leftover ball covers everything — this is exactly what that 50-yard white scrap in your drawer was made for.
- Hook: 1.75mm. There is no standard US letter for this size — it falls between a US B/1 (2.25mm) and nothing. Most specialty amigurumi hook sets include it. If you only have a 2.0mm, work at tighter tension and check your fabric for gaps.
- 12mm safety eyes — 1 pair. For a finished piece this size, 12mm sits just right.
- Polyfill stuffing — polyester fiberfill, standard. Poly-Fil by Fairfield is widely available at Joann, Michaels, and Hobby Lobby.
- Tapestry needles: one long needle for tightening the muzzle area, one short blunt-tip for sewing all pieces together.
- 2 small buttons — to fasten the overall straps at the back.
- Scissors
🧶 Scrap Check: The white in this pattern is minimal — about 30 yards covers both muzzle pieces and every embroidered detail on the whole cat. That’s the amount that’s usually left on a nearly-finished spool. Check before buying.
Abbreviations for This Crochet Kitten Pattern
| Abbreviation | Meaning |
|---|---|
| mr | magic ring — adjustable loop start that closes completely to eliminate the center hole |
| sc | single crochet |
| inc | increase — 2 sc worked into the same stitch |
| dec | invisible decrease — insert hook through front loops only of next 2 stitches simultaneously, yarn over, pull through, yarn over, pull through 2 loops. This is the only decrease method used in this pattern. |
| ch | chain |
| sl st | slip stitch — used to join the muzzle pieces and for round joins only |
| (…) × n | repeat what is in brackets the indicated number of times |
A note on dec: every decrease in this pattern is an invisible decrease (worked through front loops only). On black yarn especially, gaps show — the invisible method keeps your surface clean and tight. Need a walkthrough? Our invisible decrease tutorial breaks it down stitch by stitch.
Smart Crafter Tips for This Free Crochet Kitten Pattern
Stitch markers are non-negotiable on black yarn. Black hides your stitches completely, and losing count on a 60-stitch round costs you real time. Place a marker at the first stitch of every round and move it up as you go. It takes two seconds and saves the frustration of discovering you’re three rows off when you’re halfway through the head.
The 1.75mm hook is doing real work here. That tiny hook with DK yarn creates the tight, dense fabric that gives amigurumi its shape and stops stuffing from showing through. It’s a standard choice in this size range — but if you’re new to this hook size, your tension might feel stiff at first. That’s correct. Not sure how hook size affects your finished piece? Our hook size guide for amigurumi covers exactly this, including what happens when you size up or down.
The muzzle joint is the technical centerpiece of the face. You’re making two identical white circles, placing them face-to-face, and joining them with 3 slip stitches — this creates the raised, three-dimensional muzzle shape that makes a cat look like a cat. Take your time on those three joining stitches. After the muzzle is sewn to the face, a long tapestry needle and yarn are used to indent and tighten the eye area around the safety eyes — this is what gives the face its expression. Don’t skip that step.
First time making a magic ring? Nearly every piece in this pattern starts with one. Our magic ring tutorial covers the whole technique in a few minutes — it looks complicated and isn’t.
If you enjoy making cats, our free gray cat amigurumi pattern uses a similar body structure and makes a great companion piece — same techniques, totally different character.
Free Crochet Kitten Pattern — Full Instructions
Head (×1) — Black
Starting method: magic ring
Row 1: 6 sc in mr (6)
Row 2: 6 inc (12)
Row 3: (1 sc, inc) × 6 (18)
Row 4: (2 sc, inc) × 6 (24)
Row 5: (3 sc, inc) × 6 (30)
Row 6: (4 sc, inc) × 6 (36)
Row 7: (5 sc, inc) × 6 (42)
Row 8: (6 sc, inc) × 6 (48)
Row 9: (7 sc, inc) × 6 (54)
Row 10: (8 sc, inc) × 6 (60)
Rows 11–24: 60 sc (14 rows) (60)
Row 25: (8 sc, dec) × 6 (54)
Row 26: (7 sc, dec) × 6 (48)
Row 27: (6 sc, dec) × 6 (42)
Row 28: (5 sc, dec) × 6 (36)
Row 29: (4 sc, dec) × 6 (30)
Row 30: (3 sc, dec) × 6 (24)
Insert 12mm safety eyes between rows 18 and 19, spaced 8–9 stitches apart. Eyes must go in before you stuff and close — once the head is sealed, there’s no going back. Our safety eye guide covers placement and the locking washer method. If this cat is a gift for a child under 3, embroider the eyes instead — the U.S. Consumer Product Safety Commission recommends avoiding removable parts on toys for young children.
Fasten off and weave in end. Stuff head firmly.
Muzzle (×2) — White
Starting method: magic ring
Make two identical pieces.
Row 1: 6 sc in mr (6)
Row 2: 6 inc (12)
Row 3: (1 sc, inc) × 6 (18)
Place the two pieces face to face and work 3 sl st through both pieces to join them.
Work 1 sl st on the first piece. Fasten off and weave in end on the first piece. Leave a long tail on the second piece for sewing the joined muzzle to the head.
🧶 Scrap Check: Both muzzle pieces together use roughly 12 yards of white. If you have any white scraps at all, you’re covered — no new yarn needed.
Ears (×2) — Black
Starting method: magic ring
Make two identical pieces.
Row 1: 6 sc in mr (6)
Row 2: 6 inc (12)
Row 3: 12 sc (12)
Row 4: (1 sc, inc) × 6 (18)
Row 5: 18 sc (18)
Row 6: (2 sc, inc) × 6 (24)
Row 7: 24 sc (24)
Fold ear in half. Work 3 sc, then 3 dec, then 3 sc across the folded edge to close and shape the base. Fasten off and leave a tail for sewing.
Body (×1) — Black
Starting method: magic ring
Row 1: 6 sc in mr (6)
Row 2: 6 inc (12)
Row 3: (1 sc, inc) × 6 (18)
Row 4: (2 sc, inc) × 6 (24)
Row 5: (3 sc, inc) × 6 (30)
Row 6: (4 sc, inc) × 6 (36)
Row 7: (5 sc, inc) × 6 (42)
Row 8: (6 sc, inc) × 6 (48)
Row 9: (7 sc, inc) × 6 (54)
Row 10: (8 sc, inc) × 6 (60)
Rows 11–15: 60 sc (5 rows) (60)
Row 16: (8 sc, dec) × 6 (54)
Rows 17–18: 54 sc (2 rows) (54)
Row 19: (7 sc, dec) × 6 (48)
Rows 20–21: 48 sc (2 rows) (48)
Row 22: (6 sc, dec) × 6 (42)
Rows 23–24: 42 sc (2 rows) (42)
Row 25: (5 sc, dec) × 6 (36)
Rows 26–27: 36 sc (2 rows) (36)
Row 28: (4 sc, dec) × 6 (30)
Rows 29–30: 30 sc (2 rows) (30)
Row 31: (3 sc, dec) × 6 (24)
Rows 32–33: 24 sc (2 rows) (24)
Stuff body firmly. Fasten off and leave a tail for sewing the head.
Arms (×2) — Black
Starting method: magic ring
Make two identical pieces.
Row 1: 6 sc in mr (6)
Row 2: 6 inc (12)
Row 3: (1 sc, inc) × 6 (18)
Row 4: (2 sc, inc) × 6 (24)
Rows 5–7: 24 sc (3 rows) (24)
Row 8: 6 sc, 6 dec, 6 sc (18)
Row 9: 4 sc, 5 dec, 4 sc (13)
Rows 10–20: 13 sc (11 rows) (13)
Stuff the arm only up to row 14. Leave the upper portion unstuffed — this keeps the arm flexible and flat enough to sew neatly. Work 2 sc offset to reposition the yarn end before closing.
Fold in half and work 6 sc across the folded edge. Fasten off and leave a tail for sewing.
Tail (×1) — Black
Starting method: magic ring
Row 1: 6 sc in mr (6)
Rows 2–13: 6 sc (12 rows) (6)
Do not stuff the tail. Fasten off and leave a tail for sewing.
🧶 Scrap Check: The tail is 13 rows of 6 sc — it uses less than 8 yards of black total. Smallest piece in the whole pattern. Good place to use up the very end of a skein.
Legs (×2) — Black
Starting method: magic ring
Make two identical pieces.
Row 1: 6 sc in mr (6)
Row 2: 6 inc (12)
Row 3: (1 sc, inc) × 6 (18)
Row 4: (2 sc, inc) × 6 (24)
Row 5: (3 sc, inc) × 6 (30)
Rows 6–9: 30 sc (4 rows) (30)
Row 10: 7 sc, 8 dec, 7 sc (22)
Row 11: 5 sc, 6 dec, 5 sc (16)
Rows 12–26: 16 sc (15 rows) (16)
Stuff the leg up to row 16. Leave the rest unstuffed for clean sewing. Work 3 sc offset to reposition the yarn end before closing.
Fold, then work 8 sc across the folded edge. Fasten off and leave a tail for sewing.
Overalls — Pants (×1) — Light Blue
Starting method: starting chain
Row 1: Ch 60, join into a round (60)
Rows 2–7: 60 sc (6 rows) (60)
Row 8: Form tail hole — ch 5, skip 5 sc, insert hook into the 6th stitch and work 55 sc to end of row (60)
Rows 9–21: 60 sc (13 rows) (60)
To form the leg openings: work 4 sc, then turn the piece inside out and work 4 sl st catching the opposite wall. Each leg opening should measure 26 sc.
Fasten off and weave in end.
Overalls — Top Bib (×1) — Light Blue
Starting method: attach yarn to the pants
Mark the center at the top edge of the pants. Attach yarn at that point and work flat, back-and-forth rows. Begin each row with ch 1.
Rows 1–9: 13 sc per row, worked back and forth (13)
Fasten off and weave in end.
Overalls — Straps (×2) — Light Blue
Starting method: starting chain
Make two identical pieces.
Row 1: Ch 33 (33)
Row 2: Starting from 2nd ch from hook, work 32 sc (32)
Fasten off and leave a tail for sewing.
🧶 Scrap Check: The full overalls set — pants, bib, and both straps — uses about 120 yards of light blue total. A partial skein from a baby blanket, a dishcloth, or any spring project is almost certainly enough. This is a genuinely good place to use up a color that’s been sitting around.
Assembling Your Free Crochet Kitten Pattern
Ten pieces, all coming together in one go. Work symmetrically and pin or hold pieces in place before you commit a single sewing stitch — getting the ears level and the arms at the same height takes an extra two minutes of checking but saves a lot of picking out. Our guide on sewing amigurumi parts has practical tips for keeping everything even on a piece this size.
- Head to body: Sew the head to the open top of the body, stuffing the neck area as you go. The neck needs to be firm — the head shouldn’t wobble or tip once attached. Work slowly around the full perimeter.
- Muzzle: Position the joined muzzle just below the safety eyes, centered evenly. Sew it flat against the face. Then use your long tapestry needle and a length of yarn to tighten and indent the eye area — pull the needle from one eye position to the other through the head to create that characteristic cat-eyed depth. This step transforms the face.
- Ears: Sew both ears symmetrically to the top of the head. Check that they’re even before fastening off.
- Arms: Attach both arms symmetrically to the upper sides of the body.
- Legs: Attach both legs symmetrically to the lower sides of the body.
- Tail: Sew the tail at the back of the body, positioned between rows 12 and 13.
- Overalls: Slide the pants onto the body. Attach both straps to the front of the bib, cross them at the back, and secure each end with a button.
Embroidery and Decoration Details
- Eye indenting: After the muzzle is in place, use a long tapestry needle threaded with black yarn to tighten and draw the eyes slightly inward. This is the step that adds expression — don’t skip it.
- Eye whites: Embroider small white arcs at the inner corners or edges of the eyes using white yarn.
- Nose: Embroider a small rounded triangle in white at the top center of the muzzle.
- Arm claws: Use white yarn to work several short stitches at the tip of each arm, fanning out slightly to form claw lines.
- Leg claws: Repeat the same short-stitch claw embroidery on both leg tips.
💡 Stretch It Further: The overalls are the variable — swap the light blue for dusty rose, sage green, rust orange, or lavender and you’ve got a completely different cat without touching a single body row. Same pattern, four color combos, instant gift set. Three cats in different overall shades, bundled in a kraft box with tissue paper, costs under $15 in yarn total if you’re buying new — and considerably less if you’re working from stash. That’s a handmade market item. A birthday gift. A set of three for a kid’s room. The black body is the constant; the overalls are where you play.
Mia’s Take
Three colors, about 450 yards total, one very small hook, and a little patience at the assembly stage — that’s the whole cost of this cat. The black is the real investment; everything else can come from scraps. Once you’ve made it once, you know the structure well enough to knock out a second one in a different overall color faster than the first. Make two or three in a row and you’ve got a set that actually looks intentional. That’s the kind of project I keep in rotation. 🧶
What yarn is best for this kitten amigurumi?
DK or Light Worsted weight yarn (CYCA 3) is ideal for this pattern. Acrylic yarns like Paintbox Simply DK work perfectly for achieving tight stitches.
How long does it take to crochet this black cat?
This pattern takes approximately 6 to 10 hours to complete, depending on your crochet speed and experience with amigurumi assembly.
What size hook do I need for this pattern?
A 1.75mm crochet hook is recommended to create a tight, dense fabric that prevents the polyfill stuffing from showing through.