Free Crochet Hen Pattern — Tiny Amigurumi with Red Comb
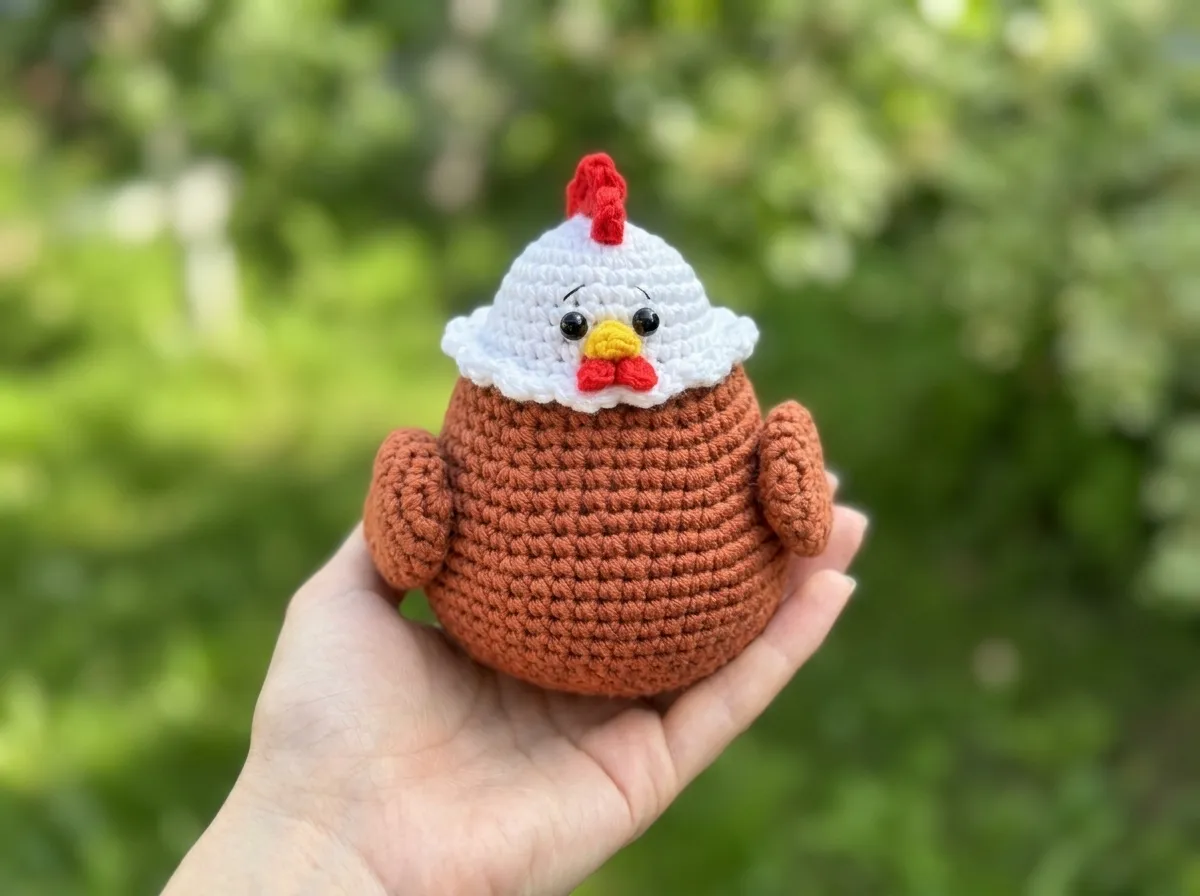
Free crochet hen pattern — the roundest, squishiest little bird you’ll ever hold in your palm. She has a fluffy white head, a feathery ruff at her neck, a proud little red comb, and the tiniest 5mm glossy safety eyes that give her the most irresistible, slightly baffled expression. Pick any color for her body and she becomes completely yours. Let me show you how she comes together.
🩷 Pattern Highlights
- Cuteness Rating: 🩷🩷🩷🩷🩷
- Finished Size: 3.9 in (10 cm)
- Difficulty: Beginner–Intermediate
- Hook Size: 2.0mm (steel 4)
- Yarn Palette: soft white, body color of your choice (blush pink, pale lavender, and warm terracotta are all wonderful), sunshine yellow, cherry red
- Key Detail: feathery white neck ruff worked into BLO front loops + 5mm glossy safety eyes + embroidered brows
- Estimated Time: 4–6 hours
Materials for This Crochet Hen Pattern Free
- Yarn: YarnArt Jeans (US alternatives: Drops Muskat or Paintbox Simply Cotton DK) — DK / Light Worsted weight (3) — in the following colors:
- White — for the head and the feathery neck ruff
- Body color of your choice — your main accent color (I am completely in love with her in blush pink, but soft lavender or warm terracotta give her such different personalities — all equally charming)
- Sunshine yellow — for the beak
- Cherry red — for the comb and wattles
- Hook: 2.0mm (steel 4) — this is intentionally much smaller than the yarn label suggests. Working DK weight cotton with a 2.0mm hook creates that tight, smooth amigurumi fabric that keeps stuffing invisible and every stitch crisp and defined
- Safety eyes: 5mm × 2 — tiny and perfectly proportioned for her 3.9 in frame, giving her that wide, earnest expression
- Fiberfill stuffing — polyester fiberfill, Poly-Fil works beautifully and is easy to find at Joann or Michaels
- Stitch marker
- Tapestry needle — for sewing parts together and weaving in ends
- Scissors
🩷 Chloe’s Yarn Note: Because this pattern uses a 2.0mm steel hook with DK weight cotton, the fabric will feel noticeably stiffer than usual — that is completely intentional and it’s what gives her that satisfying density and smooth surface finish. Your tension might feel a little different at first. Just breathe and keep your stitches even. She is worth the extra focus.
Abbreviations Used in This Pattern
| Abbreviation | Meaning |
|---|---|
| mr | magic ring |
| ch | chain |
| sc | single crochet |
| inc | increase — 2 sc worked into the same stitch |
| dec | invisible decrease — insert hook through front loops only of next 2 stitches simultaneously, yarn over, pull through, yarn over, pull through 2 loops |
| sl st | slip stitch |
| dc | double crochet |
| tr | treble crochet |
| BLO | back loop only |
| FO | fasten off |
Before You Begin — The Details That Make Her Special
There are a few things about this particular pattern that are worth knowing before you cast on, because they are what make this little hen so distinctly her.
The feathery neck ruff is the magic moment. This pattern uses BLO (back loop only) stitches starting at Row 12 of the head-body. That means the front loops at Row 12 are left free — and at the very end, you rejoin white yarn there and work a row of shell-stitch clusters into those loops to create a fluffy, feathered collar between her head and body. It is a tiny technique choice with an enormous visual payoff. Don’t rush it. Each little cluster should puff outward like a real feather. If you’d like a refresher on what BLO means and how it creates structural details, our right side vs wrong side tutorial explains the loop mechanics clearly.
The 5mm safety eyes are very small and leave very little room for error. Install them between Rows 8 and 9 with exactly 3 sc between them before continuing past Row 12 — once the body begins to form, the head rounds in and positioning becomes much harder. If this is your first time working with safety eyes, our safety eyes tutorial walks you through exactly how to place and lock them so they sit perfectly symmetrical.
The tail is three separate pieces joined into one. Two shorter pieces and one slightly longer piece are each worked individually, then joined together with a row of sc before being sewn onto the body. Leave long yarn tails after fastening off each piece — it makes joining much easier when they’re still trailing.
The comb and wattles are worked directly in red yarn and are deceptively simple. The comb is attached straight onto the top of the head using a short sequence of dc and tr stitches that create that classic uneven comb silhouette. The wattles are literally two stitches each. Tiny details — massive personality impact.
Free Crochet Hen Pattern — Part by Part
Head-Body (×1)
Yarn: white for Rows 1–11, switch to body color at Row 12
Starting method: magic ring
Note: Starting from Row 12, all stitches are worked in BLO (back loop only).
Row 1: 6 sc in mr (6)
Row 2: 6 inc (12)
Row 3: (1 sc, inc) × 6 (18)
Row 4: (2 sc, inc) × 6 (24)
Row 5: (3 sc, inc) × 6 (30)
Rows 6–11: 30 sc (30)
🩷 Safety Eyes: Before working Row 12, install your 5mm safety eyes between Rows 8 and 9, with exactly 3 sc between them. Check the placement from directly in front of the face before pressing the washers home. Once they click in, there’s no going back — so take an extra thirty seconds and make sure those little eyes are perfectly level with each other.
🩷 Color Switch: Before beginning Row 12, switch to your body color yarn. From Row 12 onward, work all stitches in BLO (back loop only). The front loops you leave behind at Row 12 will become the feathery neck ruff at the very end — they are important, so don’t accidentally pick them up.
Row 12: (4 sc, inc) × 6 — worked in BLO (36)
Row 13: 36 sc (36)
Row 14: (5 sc, inc) × 6 (42)
Row 15: 42 sc (42)
Row 16: (6 sc, inc) × 6 (48)
Row 17: 48 sc (48)
Row 18: (7 sc, inc) × 6 (54)
Row 19: (8 sc, inc) × 6 (60)
Rows 20–24: 60 sc (60)
She should look almost perfectly round at this point — a plump, satisfying little sphere. This is her widest moment and it is so good.
Row 25: (8 sc, dec) × 6 (54)
Row 26: (7 sc, dec) × 6 (48)
Row 27: (6 sc, dec) × 6 (42)
Row 28: (5 sc, dec) × 6 (36)
🩷 Stuffing Time: After completing Row 29, stuff the body firmly before the opening gets too small to work comfortably. Use small amounts of fiberfill at a time and press it in gently so it fills the rounded shape evenly without creating lumps. Our guide to stuffing amigurumi properly has all the tips you need for getting that perfect, smooth shape.
Row 29: (4 sc, dec) × 6 (30)
Row 30: (3 sc, dec) × 6 (24)
Row 31: (2 sc, dec) × 6 (18)
Row 32: (1 sc, dec) × 6 (12)
Finishing: Close the opening, fasten off, and weave in ends.
Now for the moment she becomes a hen. Join white yarn to Row 12 at the free front loops you left behind. Work the feathery neck ruff: sl st in the first stitch, 3 dc in the next stitch, sl st in the next stitch — repeat this sequence all the way around to the end of the round. The clusters of three dc stitches will puff outward like tiny feathers all the way around her neck. Fasten off and weave in ends. The transformation is immediate and completely delightful.
Tail (×1 — worked in three separate pieces)
Yarn: body color
Starting method: magic ring
Do not stuff any of the tail pieces.
The tail is made in three individual pieces — two shorter and one slightly longer — then joined together with a row of sc before being sewn onto the body. Keep the yarn tails long after fastening off each piece; they make the joining step much easier.
Short pieces — make 2:
Row 1: 6 sc in mr (6)
Row 2: (1 sc, inc) × 3 (9)
Rows 3–4: 9 sc (9)
Fasten off, leaving a long tail.
Third piece — make 1 (slightly longer):
Row 1: 6 sc in mr (6)
Row 2: (1 sc, inc) × 3 (9)
Rows 3–5: 9 sc (9)
Fasten off, leaving a long tail.
Joining: Hold all three pieces together — longer piece in the center, shorter pieces on either side — and join them by working a single row of sc across all three. This creates a little fan of tail feathers that fans outward beautifully when sewn onto the body. Do not stuff.
Wings (×2)
Yarn: body color
Starting method: magic ring
Make 2 identical pieces.
Row 1: 6 sc in mr (6)
Row 2: 6 inc (12)
Row 3: (1 sc, inc) × 6 (18)
Rows 4–6: 18 sc (18)
Row 7: (7 sc, dec) × 2 (16)
Row 8: (6 sc, dec) × 2 (14)
Row 9: (5 sc, dec) × 2 (12)
Row 10: (4 sc, dec) × 2 (10)
Row 11: (3 sc, dec) × 2 (8)
Row 12: (2 sc, dec) × 2 (6)
Finishing: Close the opening, fasten off, and cut yarn. The wings taper down to a sweet little rounded point. Before setting them aside, hold both wings next to each other to make sure they look equal — a small difference in tension can sneak in between pieces. They should be mirror images of each other.
Beak (×1)
Yarn: sunshine yellow
Starting method: magic ring
Row 1: 6 sc in mr (6)
Row 2: (sc, inc) × 3 (9)
Finishing: Fasten off, leaving a long tail for sewing. That tiny sunshine-yellow triangle is going to anchor her whole expression. Small as it is, the position of the beak on her face changes everything — a little higher gives her a surprised look, a little lower feels more content. Try it in a few spots before committing.
Comb (×1)
Yarn: cherry red
Starting method: Attached directly to the top of the head
Row 1: sl st in the first stitch, 3 dc in the next stitch, sl st in the next stitch, 3 tr in the next stitch, sl st in the next stitch, 3 dc in the next stitch, sl st in the next stitch
The alternating heights of the dc and tr stitches create that classic uneven comb profile — shorter at the sides, taller in the center — that makes her immediately, unmistakably a hen. Fasten off and weave in ends carefully so the red doesn’t pull through to the wrong side of the head.
Wattles (×2)
Yarn: cherry red
Starting method: ch 3
Row 1: sc in the 2nd ch from hook, sl st in the next ch
Finishing: Fasten off, leaving a tail for sewing. Two stitches. That’s all a wattle is, and somehow it is the most adorable two-stitch piece you will ever make. The little red teardrop shape is impossibly small and completely perfect. Make both before you sit down to assemble — they’re so quick you’ll want to have them ready to go.
Putting Her Together
Lay all your finished pieces out on a flat surface and look at them for a moment before you start sewing. The plump round body. The little tapered wings. The three-piece tail. The sunshine-yellow beak. The two tiny red teardrops. That feathery white ruff already framing her face. She’s almost there. For a complete walkthrough on getting clean, secure sewn joints between amigurumi parts, our guide to sewing amigurumi parts together covers everything from threading your tapestry needle to finishing the knot invisibly.
- Attach the wings. One on each side of the body, positioned roughly at the midpoint vertically. They should rest flat against the body with the tapered end pointing slightly downward and backward. Pin or hold each wing in place and check the symmetry from the front before you sew.
- Attach the tail. Centered at the back of the body, angled slightly upward. The longer center piece should be the most prominent point — it gives her silhouette that classic hen shape from the side.
- Attach the beak. Centered on the face, just below the safety eyes. A flat attachment — rather than letting it stick out — keeps her looking clean and kawaii. Try a few positions before sewing; even 1–2 stitches of difference makes a real change in her expression.
- Attach the wattles. One on each side just below the beak, like two small red teardrops framing her chin. They should hang down softly.
- Work the comb. Attach your cherry red yarn to the top center of the head and work the comb sequence (see the Comb section above). Make sure it sits perfectly centered from front to back. Fasten off and weave in the ends on the inside.
- Embroider the eyebrows. Using a small length of dark yarn (dark brown or charcoal works beautifully) and your tapestry needle, embroider two tiny arched lines directly above the safety eyes. Three to four stitches per brow is plenty. This is the detail that gives her a whole personality — curious, alert, slightly indignant. Everything a hen should be.
Making It Extra Cute — The Details That Go From Sweet to Irresistible
The little hen is already precious when she’s assembled. But this is the part I look forward to most — the finishing details that make you hold her up to the light and go oh.
Getting those 5mm eyes perfectly level. Because the head is on the smaller side and the eyes are so tiny, even a half-stitch of asymmetry reads clearly on her finished face. Before you installed the washers (during the pattern), I hope you spent a good thirty seconds holding her at arm’s length and checking from directly in front. If you haven’t done it yet: do it now. Look at her under a lamp. Look at her from slightly above. The two eyes should feel like two little moons sitting at the exact same height, equally spaced from the center of the face. When they are right, you will feel it — and when they aren’t, you will also feel it. Take your time. That click of a correctly placed safety eye washer is one of the most satisfying sounds in all of amigurumi.
🩷 Chloe’s Detail Tip: Before pressing the washers in permanently, I always use a tiny piece of removable tape to mark each eye position while I’m still deciding. It lets me adjust and compare freely without committing to anything. Once I’m happy with the placement from every angle, then I press in the washers. The extra step takes maybe one minute and saves so much heartache.
The embroidered eyebrows are non-negotiable. Two tiny upward-curved arches just above the eyes — worked in dark brown, charcoal, or even a deep shade of your body color. They don’t need to be elaborate. Even three or four carefully placed stitches per brow will give her that bright, alert expression that makes her feel alive rather than just round. I like mine slightly angled inward so she looks perpetually curious. Try a few variations with a single strand held loosely in place before you commit to sewing.
Blush cheeks for maximum softness. Using a cotton swab and a tiny amount of pink craft chalk or pressed eyeshadow, dab two soft circles onto her cheeks, just below and to the outside of the safety eyes. The tight sc fabric holds the chalk beautifully. It’s optional — but it takes her from charming to unbearably sweet. I haven’t made a single piece without cheeks since I discovered this.
Color variations — because she looks wonderful in almost everything. The “body color” in this pattern is entirely yours to interpret. Some combinations I love:
- Blush pink — soft and dreamy, she looks like a hen from a pastel picture book
- Pale lavender — unexpected and lovely, the cherry red comb really pops against it
- Warm terracotta — earthy and classic, immediately reads as a real farmyard hen
- Mint green — maximum contrast, maximum kawaii, absolute chaos in the best way
- Cream / off-white — all-white with the red comb detail, pure and simple and still completely adorable
If you love small, round, bird-shaped amigurumi with glossy safety eyes and a personality all their own, our tiny button penguin pattern was made for you — he has that same satisfying roundness and those same big earnest eyes. And for another little winged creature with delicate details, our tiny butterfly amigurumi is exactly the kind of small, detailed make that pairs beautifully with the hen on a shelf or gift tag.
Chloe’s Final Look
I have been holding this little hen for longer than I would like to admit and I am not even slightly sorry about it. The feathery white ruff catches the light so beautifully, the cherry red comb sits perfectly upright, and those 5mm eyes are giving the most earnest, slightly bewildered expression I have ever seen on a crocheted bird. She is entirely too much personality for something that fits in your palm.
Make her in blush pink and set her next to a tiny crocheted egg. Make her in terracotta and put her on a little wooden shelf. Make three in different body colors and line them up from smallest to largest. You absolutely cannot make just one. 🩷
What yarn is best for this crochet hen pattern free guide?
YarnArt Jeans (DK / Light Worsted weight cotton blend) is highly recommended. You can also use excellent alternatives like Drops Muskat or Paintbox Simply Cotton DK.
What size hook should I use for this amigurumi hen?
A 2.0mm (steel 4) hook is ideal. Using a hook smaller than recommended on the yarn label ensures a tight, crisp fabric that hides the stuffing completely.
Is this crochet hen pattern suitable for beginners?
Yes, it is beginner-friendly to intermediate. The stitches are foundational, and special steps like working in the back loops (BLO) for the neck ruff are fully detailed.