Poseable Skeleton Doll Crochet Pattern: Step-by-Step Guide
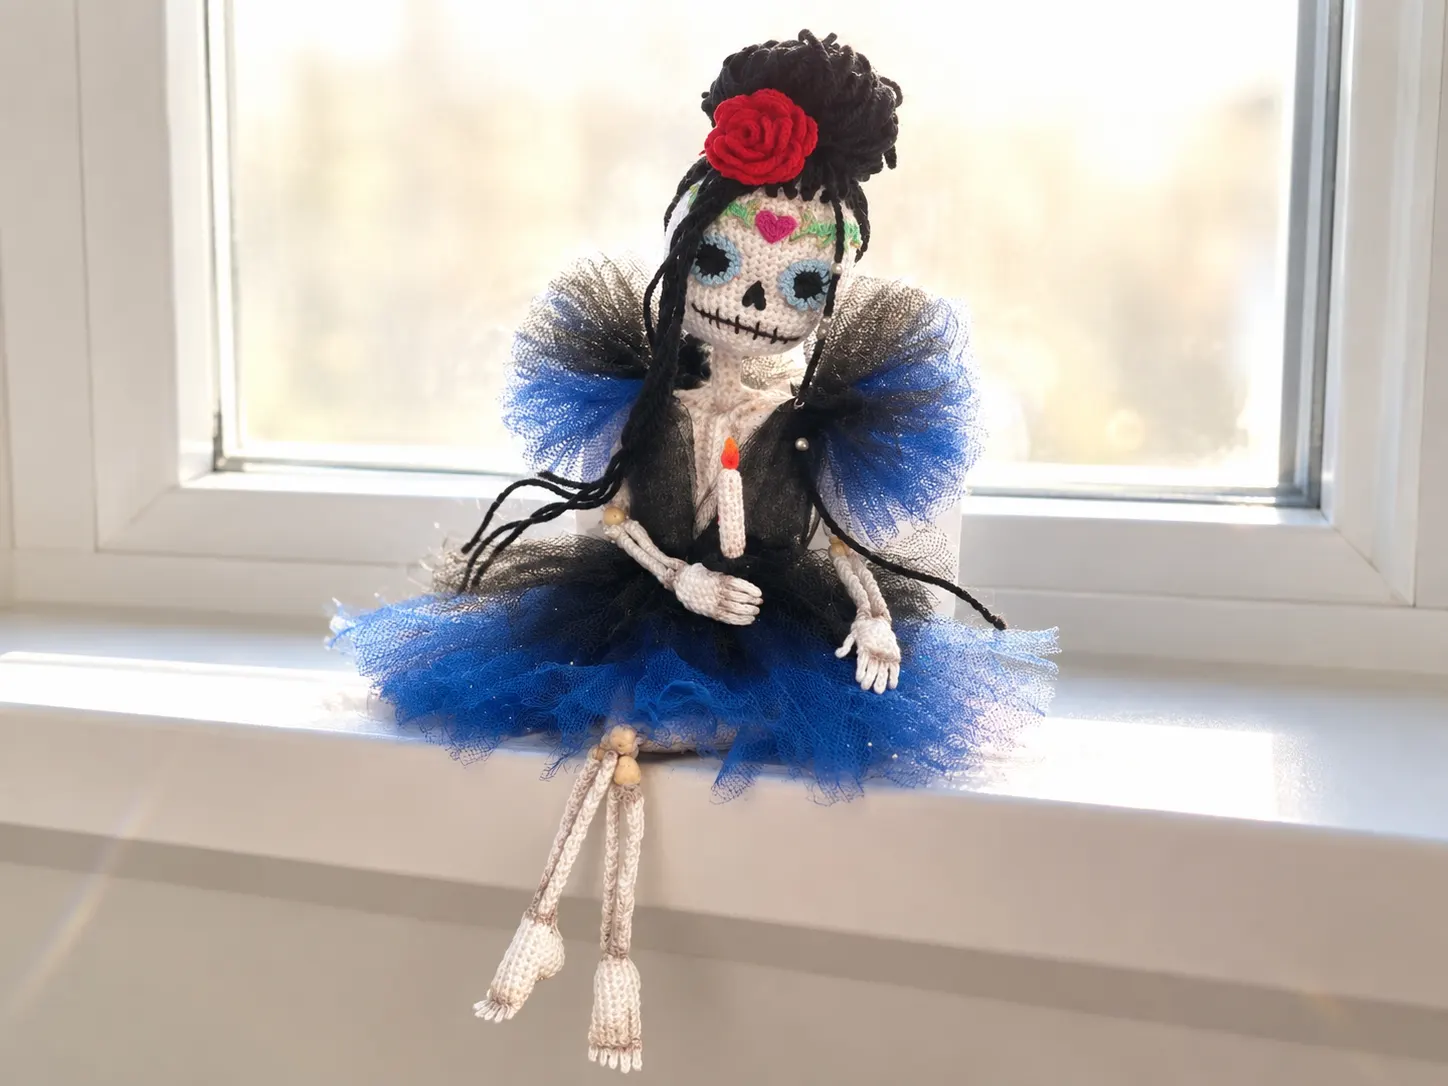
Some projects are built stitch by stitch; this one is built bone by bone. The crochet skeleton doll pattern below works at a miniature scale in fine cotton thread, shaping individual fingers, separate toes, a curved set of ribs, and a pelvic basin that all mount onto a wire framework running up the center of the body. Because nearly every element is structural rather than decorative, the order in which you make things matters as much as the stitch counts do. Read the whole plan once before you cast on, and keep your materials grouped by body section.
The surface texture comes from working the waistcoat stitch wrong side out, which packs the stitches into a dense, slightly ridged fabric that reads convincingly as bone once it is shaded. That density is also what lets such small pieces hold their shape around wire and beads instead of collapsing in the hand. The rest of the build divides neatly into dozens of tiny chained extremities, two separate torso halves, a jointed limb system, and a wardrobe that involves no crochet at all.
About This Skeleton Doll Crochet Pattern
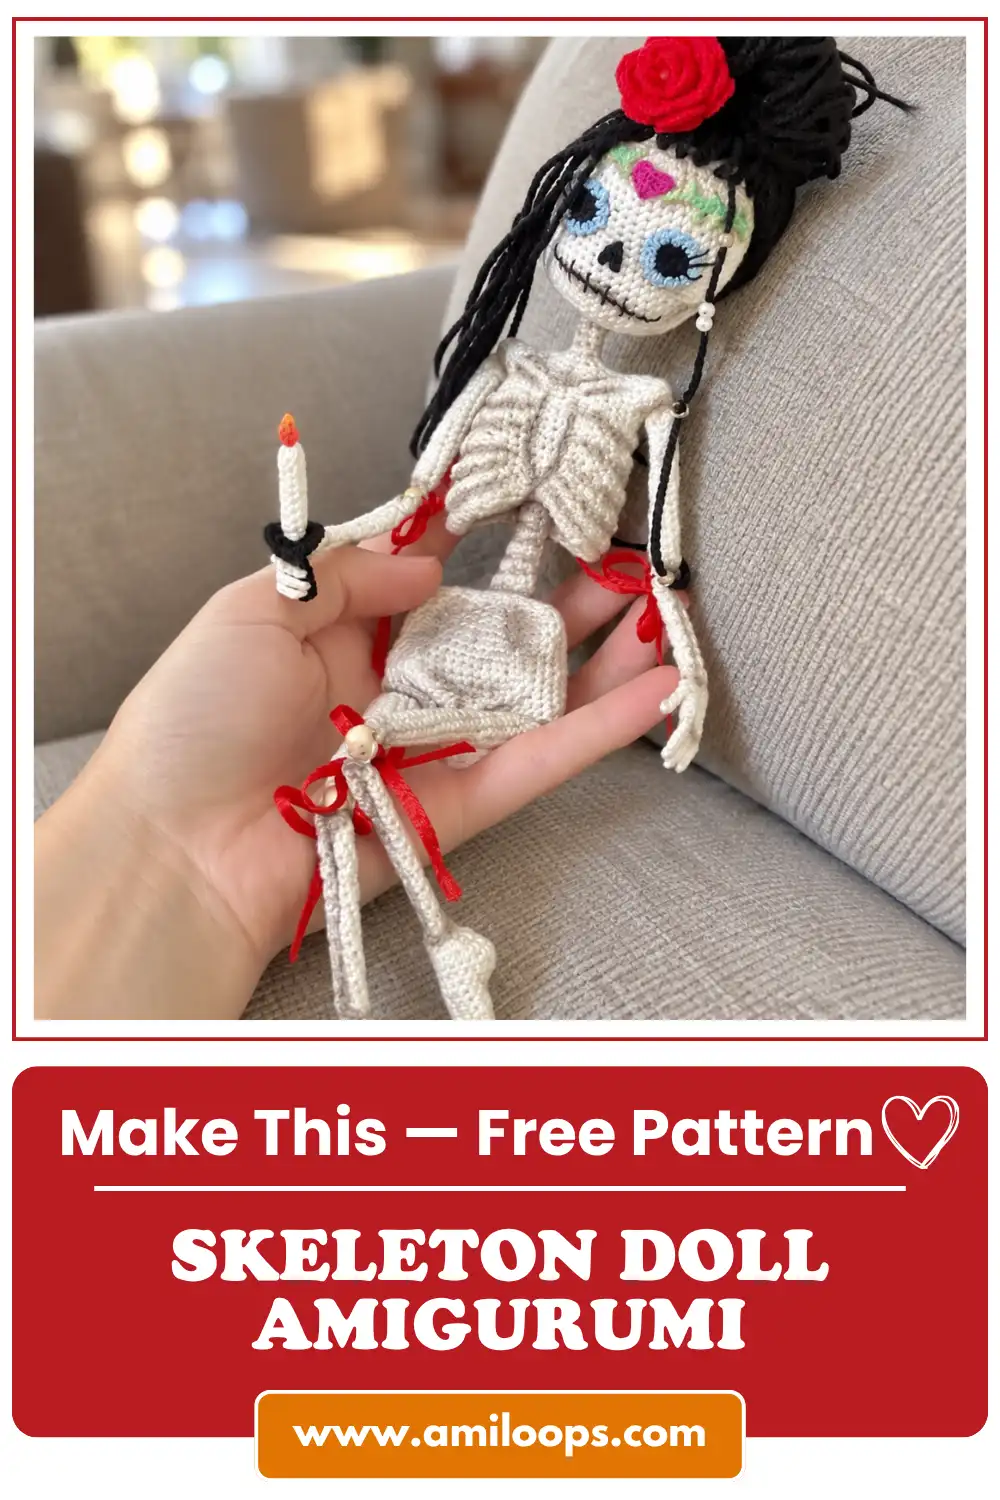
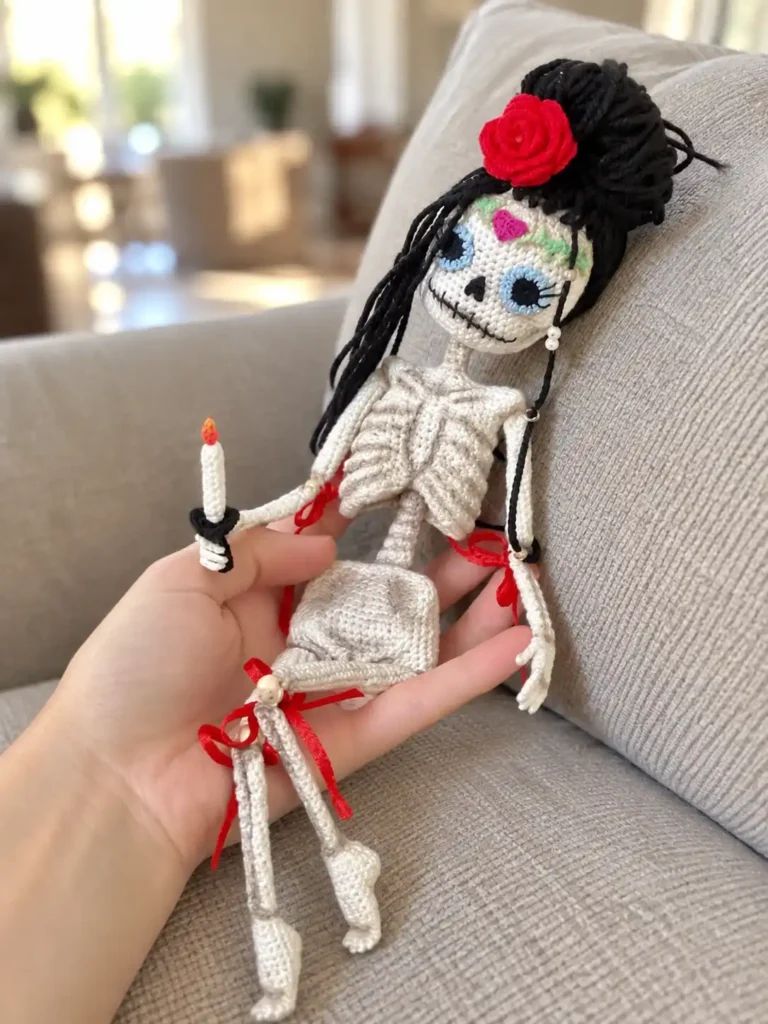
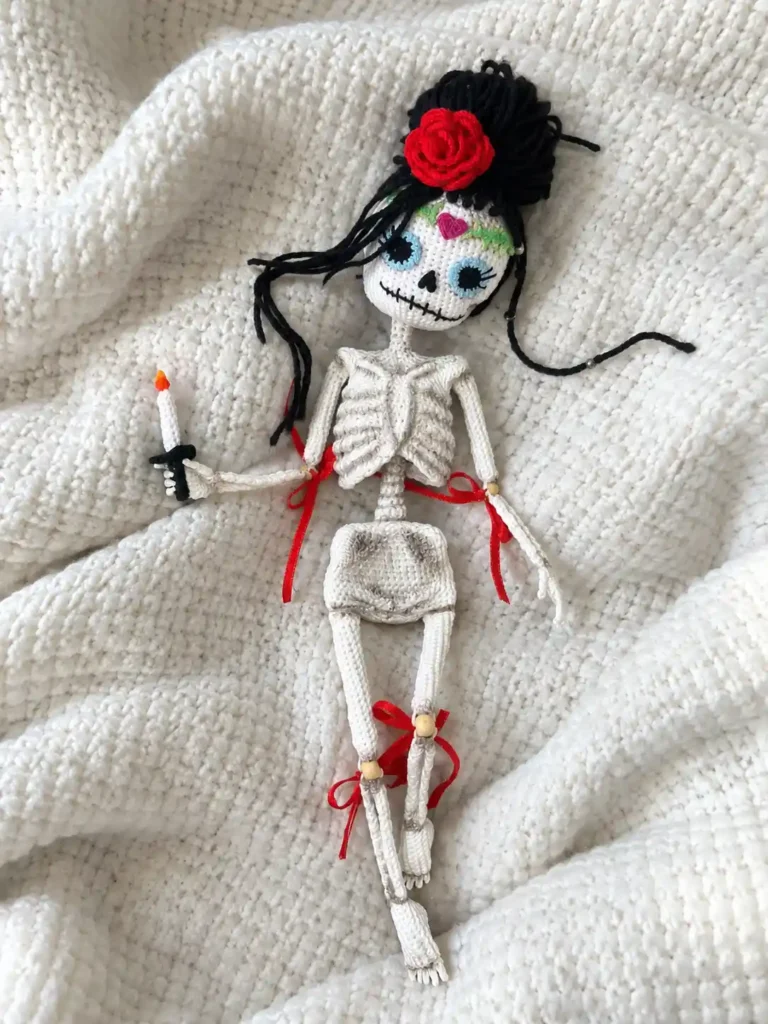
Every limb on this doll is segmented the way a real one is. The arms break down into a hand, a forearm bone, and a separate shoulder bone; the legs break down into a foot, a lower bone, an upper bone, and a thigh casing. Those segments are linked with small wooden beads that act as functional joints, so the finished figure can be posed rather than locked into one rigid stance. Plan for that from the first round, because a bone tube worked loosely will swallow its bead and lose the articulation entirely.
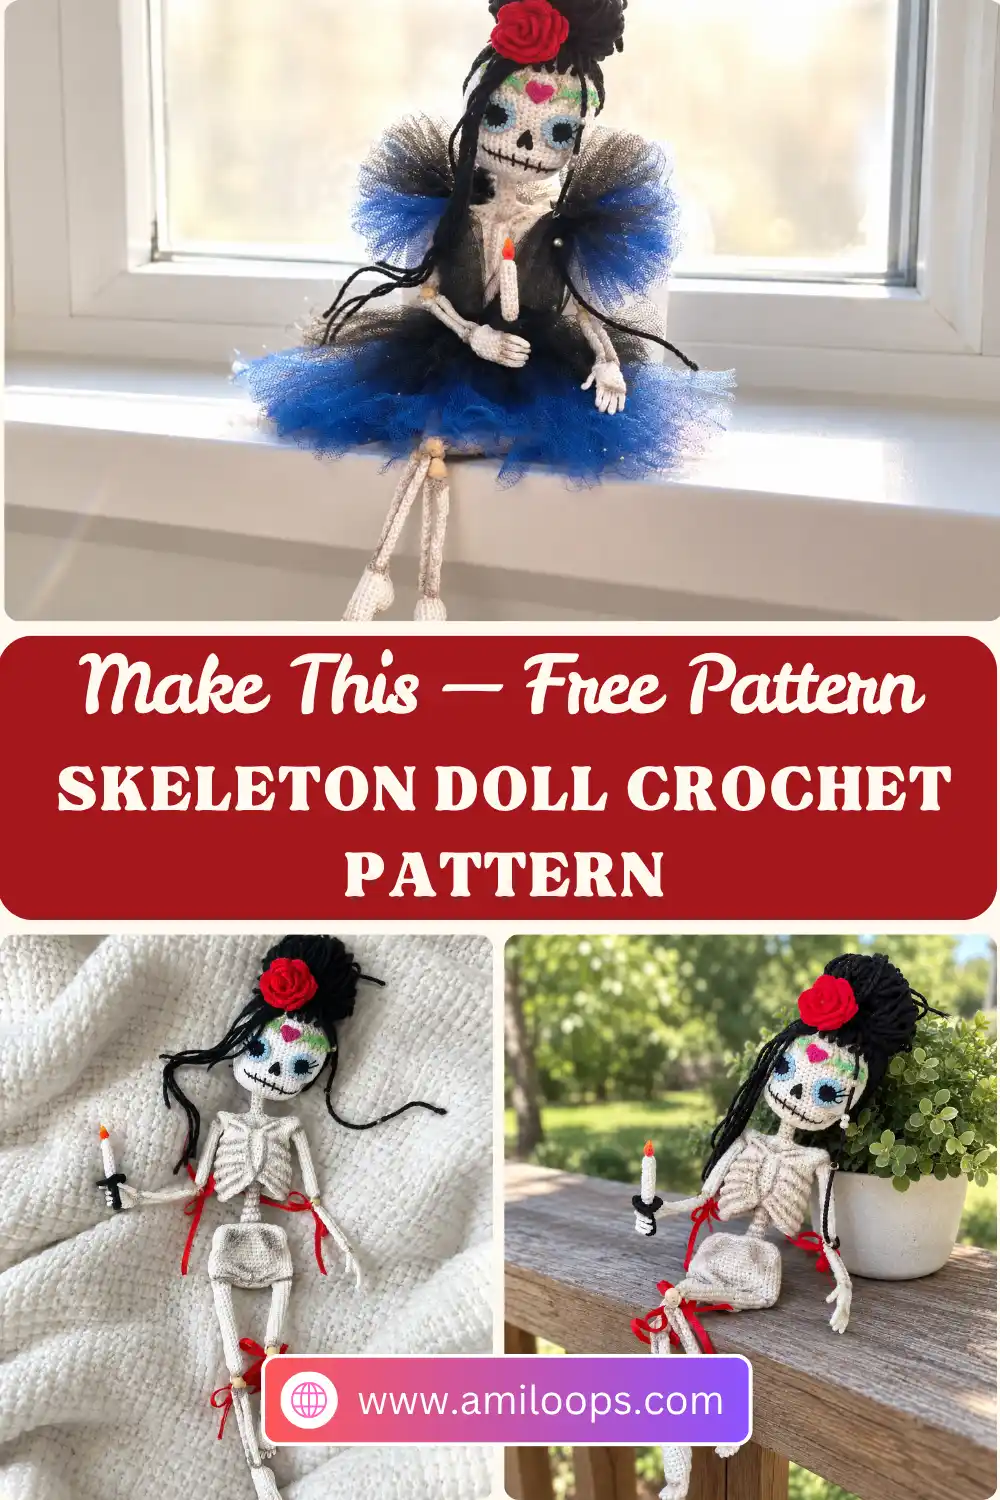
The chest is the centerpiece of the whole build. Instead of a smooth tube, the ribcage is shaped in three dimensions using integrated chains and half double crochets that rise and fall across each round, producing ribs you can see and feel. The clothing takes the opposite approach. The dress avoids crochet entirely and relies on gathered, layered black and blue tulle that is assembled directly onto the finished body, which means you can adjust its volume by eye rather than by stitch count.
Materials and Tools
Sort your supplies into three groups before you start: thread, structure, and finish. The structural group deserves the closest attention. Braided electrical wire or copper wire at 1.5 mm is required rather than optional, because the central spine casing is sized to that diameter and will not sit straight around anything thinner. The joints need small wooden beads in both 5 mm and 6 mm sizes, and the holes must be wide enough to pass a threaded needle, so check the drilling on a mixed bag before you commit to it.
The finishing group is just as specific. PVA glue and flat-nosed tweezers are both called for to shape and stiffen the spindly fingers, which cannot hold a pose on thread alone. A dedicated flat brush and dry brown pastel dust do the shading that makes the recessed bones read from across a room. For thread, set aside one skein of Pechorka Ajurnaya color #01 (50g/280m) for the main body, and keep the lace colors grouped separately for the smaller accessories and trim.
- Pechorka Ajurnaya (100% mercerized cotton, 50g/280m), color #01 (White) — 1 skein
- Pechorka Colored Lace (50g/475m), colors #02, #09, #05, #49, #01, #06
- Pechorka Children’s Novelty (50g/200m), Black
- 1.5 mm thick braided electrical wire or copper wire — 17 cm long
- Wooden beads: 6 mm (2 pieces), 5 mm (2 pieces)
- 0.6 mm crochet hook
- Fabric sticking plaster or tape (for wire ends)
- Pliers
- Polyester fiberfill or hollowfiber stuffing
- Stuffing tools/skewers (toothpicks or matches can be used)
- Brown dry pastel
- Disappearing fabric marker
- Black and blue tulle fabric (15 cm wide)
- Scissors and needle
Crochet Abbreviations Used Here
This project leans on a wider stitch vocabulary than most amigurumi, so scan the list below before you begin. Alongside the familiar single crochet and increase, you will meet three-, four-, and five-stitch decreases that collapse several stitches at once, plus front loop only rounds that create the hinge lines at the jaw. If any of that is unfamiliar, a short refresher on reading amigurumi pattern abbreviations helps, and the standard US crochet abbreviations list is worth keeping open beside you at the table.
- MR — magic ring
- ch — chain
- sc — single crochet
- hdc — half double crochet
- inc — increase (2 sc in one stitch)
- dec — decrease (single crochet 2 together)
- sc3tog — single crochet 3 together
- sc4tog — single crochet 4 together
- sc5tog — single crochet 5 together
- hdc2tog — half double crochet 2 together
- sl st — slip stitch
- FLO — front loop only
- BLO — back loop only
- st/sts — stitch/stitches
Construction Overview
Work outward from the hardest pieces first. The build opens with the extremities, the hands and feet, because they set the scale for everything that follows and because they are the parts most likely to need a second attempt. Each hand begins as four separately chained fingers that are joined together in a single round, with the thumb added afterward as its own small chained loop. The feet follow the same logic with five graduated toes. Once those are behind you, the long bone tubes feel almost restful by comparison.
The torso arrives as two major pieces rather than one: a pelvic basin worked from a foundation chain, and a ribcage worked the same way but with a far denser stitch sequence. The ribcage does not stop at the shoulders. It narrows and then continues upward into a thirty-round tubular casing that houses the wire spine, which is why its closing rounds look deceptively plain on paper. Several smaller components, including the shoulder bones and the candle, begin instead by working a magic ring.
Before You Start
Prepare the wire before anything else. Both ends need a generous wrap of fabric sticking plaster or tape, because an untaped cut end works its way through the tight cotton fabric during handling and leaves a visible puncture in the finished piece. Cut the 17 cm length with pliers, tape it thoroughly, and set it somewhere it cannot roll off the table. Doing this at the start means the spine is ready the moment the ribcage casing comes off the hook.
Then commit to a firm hand throughout. Everything here depends on dense, gap-free fabric: the bones have to stay stiff, the joints have to grip their beads, and the shading has to sit on a smooth surface instead of sinking into open holes. Work a few practice rounds with the 0.6 mm hook and your cotton thread until your grip settles into something repeatable. The finished figure stands approximately 28 cm tall when using specified materials.
Tension check: Check your tension against the first bone tube you finish. If the fabric shows daylight between the stitches, move to a firmer hold and rework it, because a stiff, gap-free skeleton depends on that density. Every piece that follows is built to the same firmness.
Skeleton Doll Crochet Pattern
Work the parts in the order given and keep finished pieces separated by body section as you go. Several rounds behave unusually on purpose. Head Round 14 combines front-loop increases and decreases to build the jaw and lands on 56 stitches, Pelvis Round 1 opens out to 52 stitches by working around both sides of the foundation chain, Ribcage Round 4 uses seven consecutive slip stitches to pull the sternum inward, and the chain-10 segments in Ribcage Round 16 float free to form the armhole sockets.
Right Arm
- Pinky Finger: ch 6, 5 sl st along the back of the chain.
- Ring Finger: ch 7, 6 sl st along the back of the chain.
- Middle Finger: ch 7, 6 sl st along the back of the chain.
- Index Finger: ch 7, 6 sl st along the back of the chain.
- Round 1: along one side of the fingers: sc, 2 inc, sc, along the other side of the fingers: 4 sc. (10 sts)
- Round 2: 10 sc. (10 sts)
- Round 3: sc, (ch 6, 5 sl st down chain) [this creates the thumb], 9 sc. (10 sts)
- Round 4: sc, 2 sc into the thumb, 9 sc. (12 sts)
- Round 5: 6 sc, dec, 4 sc. (11 sts)
- Round 6: sc4tog, sc, sc3tog, 3 sc. (6 sts)
- Bone 1 Rounds 1-14: 3 sc. – Cut thread. (3 sts)
- Shoulder (Bone 2) Round 1: 7 sc in MR. (7 sts)
- Shoulder Rounds 2-17: 7 sc. – Cut thread. (7 sts)
Left Arm
- Index Finger: ch 7, 6 sl st along the back of the chain.
- Middle Finger: ch 7, 6 sl st along the back of the chain.
- Ring Finger: ch 7, 6 sl st along the back of the chain.
- Pinky Finger: ch 6, 5 sl st along the back of the chain.
- Round 1: along one side of the fingers: sc, 2 inc, sc, along the other side: 4 sc. (10 sts)
- Round 2: 10 sc. (10 sts)
- Round 3: 5 sc, (ch 6, 5 sl st down chain) [thumb], 5 sc. (10 sts)
- Round 4: 5 sc, 2 sc into the thumb, 5 sc. (12 sts)
- Round 5: dec, 9 sc. (11 sts)
- Round 6: sc3tog, sc, sc4tog, 3 sc. (6 sts)
- Bones and Shoulder: Crochet exactly the same as the Right Arm.
Head
- Start: Chain 9. Join into a ring with a sl st.
- Rounds 1-3: 9 sc. (9 sts)
- Round 4: working in FLO for the entire round: 4 inc, 3 sc in next st, 4 inc. (19 sts)
- Round 5: (4 sc, 3 sc in next st) * 3, 4 sc. (25 sts)
- Round 6: 5 sc, 3 sc in next st, (6 sc, 3 sc in next st) * 2, 5 sc. (31 sts)
- Round 7: 6 sc, 3 sc in next st, (8 sc, 3 sc in next st) * 2, 6 sc. (37 sts)
- Round 8: inc, sc, inc, 32 sc, inc, sc. (40 sts)
- Round 9: sc, inc, 2 sc, inc, 32 sc, inc, 2 sc. (43 sts)
- Round 10: 43 sc. (43 sts)
- Round 11: sc, inc, 4 sc, inc, 32 sc, inc, 3 sc. (46 sts)
- Round 12: 2 sc, inc, 4 sc, inc, 35 sc, inc, 2 sc. (49 sts)
- Round 13: 49 sc. (49 sts)
- Round 14: 2 sc, inc, 5 sc, inc, 5 sc, dec, 4 inc, dec, 10 sc, dec, 4 inc, dec, 5 sc, inc, 3 sc. (56 sts)
- Round 15: 56 sc. (56 sts)
- Round 16: 21 sc, dec, 16 sc, dec, 15 sc. (54 sts)
- Rounds 17-19: 54 sc. (54 sts)
- Round 20: 30 sc, inc, 23 sc. (55 sts)
- Rounds 21-24: 55 sc. (55 sts)
- Round 25: (dec, 9 sc) * 5. (50 sts)
- Round 26: 50 sc. (50 sts)
- Round 27: (dec, 8 sc) * 5. (45 sts)
- Round 28: (dec, 7 sc) * 5. (40 sts)
- Round 29: (dec, 6 sc) * 5. (35 sts)
- Round 30: (dec, 5 sc) * 5. (30 sts)
- Round 31: (dec, 4 sc) * 5. (25 sts)
- Round 32: (dec, 3 sc) * 5. (20 sts)
- Round 33: (dec, 2 sc) * 5. (15 sts)
- Round 34: (dec, sc) * 5. (10 sts)
- Round 35: 5 dec. – Cut thread. (5 sts)
Eyes
- Round 1: 6 sc in MR, sl st, ch 1. (6 sts)
- Round 2: 6 inc, sl st, ch 1. (12 sts)
- Round 3: (sc, inc) * 6, sl st. (18 sts)
- Round 4: (ch 3, sl st in next st) * 18. – Cut thread. (18 sts)
Nose
- Instruction: (ch 3, 2 sl st along chain), (ch 3, 2 sl st along chain), dec into the base stitches.
Decor Part 1
- Instruction: (ch 3, sc, hdc along chain), (ch 3, sc, hdc along chain), 1 sc in the base, crochet around the entire piece with slip stitches.
Decor Part 2
- Instruction: (ch 6, 2 sl st along chain), (ch 5, 2 sl st along chain) * 2, (ch 6, 3 sl st along chain). Then continue along the second side: (ch 3, 2 sl st along chain), 4 sl st along the base, (ch 3, 2 sl st along chain), 3 sl st along the base, (ch 3, 2 sl st along chain), 2 sl st along the base.
Left Leg
- Toe 1: ch 5, 4 sc along chain.
- Toe 2: ch 5, 4 sl st along chain.
- Toe 3: ch 4, 3 sl st along chain.
- Toe 4: ch 4, 3 sl st along chain.
- Toe 5: ch 3, 2 sl st along chain.
- Round 1: 5 sc along one side of the toes, along the other side: (sc, inc) * 2, sc. (12 sts)
- Rounds 2-4: 12 sc. (12 sts)
- Round 5: 2 sc, dec, 8 sc. (11 sts)
- Round 6: 2 sc, 4 sc in next st, 8 sc. (14 sts)
- Round 7: 3 sc, 2 inc, 9 sc. (16 sts)
- Rounds 8-9: 16 sc. (16 sts)
- Round 10: 3 sc, 2 dec, 9 sc. (14 sts)
- Round 11: 2 sc, 2 dec, 8 sc. (12 sts)
- Round 12: 3 dec, 6 sc. (9 sts)
- Round 13: sc, dec, 6 sc. (8 sts)
- Bone 1 Rounds 1-21: 3 sc. – Cut thread. (3 sts)
- Bone 2 Rounds 1-4: 5 sc. (5 sts)
- Bone 2 Round 5: dec, 3 sc. (4 sts)
- Bone 2 Rounds 6-15: 4 sc. (4 sts)
- Bone 2 Round 16: inc, 3 sc. (5 sts)
- Bone 2 Rounds 17-21: 5 sc. – Cut thread. (5 sts)
- Thigh Start: Chain 9, join into a ring with a sl st. Continue crocheting in the round, wrong-side out.
- Thigh Rounds 1-9: 9 sc, sl st, ch 1. (9 sts)
- Thigh Round 10: dec, 7 sc, sl st, ch 1. (8 sts)
- Thigh Rounds 11-24: 8 sc, sl st, ch 1. – Cut thread. (8 sts)
Right Leg
- Toe 1: ch 3, 2 sc along chain.
- Toe 2: ch 4, 3 sl st along chain.
- Toe 3: ch 4, 3 sl st along chain.
- Toe 4: ch 5, 4 sl st along chain.
- Toe 5: ch 5, 4 sc along chain.
- Round 1: 5 sc along one side of the toes, along the other side: (sc, inc) * 2, sc. (12 sts)
- Rounds 2-4: 12 sc. (12 sts)
- Round 5: 2 sc, dec, 8 sc. (11 sts)
- Round 6: 2 sc, 4 sc in next st, 8 sc. (14 sts)
- Round 7: 3 sc, 2 inc, 9 sc. (16 sts)
- Rounds 8-9: 16 sc. (16 sts)
- Round 10: 3 sc, 2 dec, 9 sc. (14 sts)
- Round 11: 2 sc, 2 dec, 8 sc. (12 sts)
- Round 12: 3 dec, 6 sc. (9 sts)
- Round 13: dec, 7 sc. (8 sts)
- Bones and Thigh: Crochet exactly the same as the Left Leg.
Torso: Pelvis
- Start: Chain 22. Start in the 2nd ch from the hook.
- Round 1: 21 sc along one side of the chain, then along the second side of the chain: 3 sc, 5 inc, 5 sc, 5 inc, 3 sc. (52 sts)
- Round 2: 25 sc, (inc, 2 sc) * 3, sc5tog, (2 sc, inc) * 3, 4 sc. (54 sts)
- Round 3: 26 sc, (inc, 3 sc) * 2, inc, sc5tog, inc, (3 sc, inc) * 2, 5 sc. (56 sts)
- Round 4: 37 sc, sc3tog, 16 sc. (54 sts)
- Round 5: 31 sc, inc, 4 sc, sc3tog, 4 sc, inc, 10 sc. (54 sts)
- Round 6: 36 sc, sc3tog, 15 sc. (52 sts)
- Round 7: 35 sc, sc3tog, 14 sc. (50 sts)
- Round 8: 34 sc, sc3tog, 13 sc. (48 sts)
- Round 9: 33 sc, sc3tog, 12 sc. (46 sts)
- Round 10: 32 sc, sc3tog, 11 sc. (44 sts)
- Round 11: 31 sc, sc3tog, 10 sc. (42 sts)
- Rounds 12-13: 42 sc. (42 sts)
- Round 14: 40 sc, dec. (41 sts)
- Round 15: 4 dec, 7 sc, 5 dec, 12 sc, 2 dec. (30 sts)
- Round 16: 3 dec, 3 sc, 5 dec, 5 sc, 3 dec. (19 sts)
- Round 17: 2 dec, 2 sc, 5 dec, 3 sc. (12 sts)
- Round 18: working in BLO: 12 sc. (12 sts)
- Round 19: 12 sc. (12 sts)
- Round 20: working in FLO: (2 sc, dec, 8 sc). (11 sts)
- Round 21: 11 sc. (11 sts)
- Round 22: working in FLO: (sc, dec, 8 sc). (10 sts)
- Round 23: 10 sc. (10 sts)
- Round 24: working in FLO: (sc, dec, 7 sc). (9 sts)
- Round 25: 9 sc. (9 sts)
- Round 26: working in FLO: 9 sc. (9 sts)
- Round 27: 9 sc. – Cut thread. (9 sts)
Torso: Ribcage
- Start: Chain 34. Start in the 2nd ch from the hook.
- Round 1: along one side of the chain: 2 sl st, 3 sc, 4 hdc, 3 sc, 9 sl st, 3 sc, 4 hdc, 3 sc, 2 sl st, then along the second side of the chain: 2 sl st, 3 sc, 4 hdc, 3 sc, 9 sl st, 3 sc, 4 hdc, 3 sc, 2 sl st. (66 sts)
- Round 2: 2 sl st, 3 sc, 4 hdc, 3 sc, 9 sl st, 3 sc, 4 hdc, 3 sc, sl st, inc, 2 sl st, 3 sc, 4 hdc, 3 sc, 9 sl st, 3 sc, 4 hdc, 3 sc, sl st, inc. (68 sts)
- Round 3: 5 sc, hdc, 2 hdc in one st, 2 hdc, 4 sc, 7 sl st, 4 sc, 2 hdc, 2 hdc in one st, hdc, 11 sc, hdc, hdc2tog, hdc, 4 sc, 7 sl st, 4 sc, hdc, hdc2tog, hdc, 6 sc. (68 sts)
- Round 4: 5 sc, 5 hdc, 4 sc, 7 sl st, 4 sc, 5 hdc, 5 sc, inc, 5 sc, hdc2tog, hdc, sc, dec, sc, 7 sl st, sc, dec, sc, hdc, hdc2tog, 5 sc, inc. (66 sts)
- Round 5: 15 sc, 5 sl st, 20 sc, (dec, 2 sc) * 2, 5 sl st, (2 sc, dec) * 2, 5 sc. (62 sts)
- Round 6: 7 sc, inc, 7 sc, 5 sl st, (7 sc, inc) * 2, 3 sc, (dec, sc) * 3, skip 1 st, (sc, dec) * 3, 3 sc, inc. (59 sts)
- Round 7: 17 sc, 3 sl st, 18 sc, inc, 2 sc, (dec, sc) * 4, dec, 2 sc, inc, sc. (56 sts)
- Round 8: 38 sc, inc, 2 sc, (dec, sc) * 3, dec, 2 sc, inc, sc. (54 sts)
- Round 9: 45 sc. [Note: this is a partial round to shift the starting marker]. (45 sts)
- Round 10: sc, dec, 32 sc, dec, 8 sc. (43 sts)
- Rounds 11-12: 43 sc. (43 sts)
- Round 13: sc, dec, 30 sc, dec, 8 sc. (41 sts)
- Round 14: 41 sc. (41 sts)
- Round 15: sc, dec, 28 sc, dec, 8 sc. (39 sts)
- Round 16: 8 sc, ch 10, 16 sc, ch 10, 15 sc. (39 sts in the base, plus two 10-ch armhole loops)
- Round 17: sc, dec, 5 sc, 10 sc along the first chain, 16 sc, 10 sc along the second chain, 5 sc, dec, 8 sc. (57 sts)
- Round 18: sc, dec, 44 sc, dec, 8 sc. (55 sts)
- Round 19: 5 sc, 5 dec, 18 sc, 5 dec, 12 sc. (45 sts)
- Round 20: 3 sc, 5 dec, 12 sc, 5 dec, 10 sc. (35 sts)
- Round 21: 5 dec, 8 sc, 5 dec, 5 sc, dec. (24 sts)
- Round 22: 4 dec, 3 sc, 5 dec, sc, dec. (14 sts)
- Round 23: 2 dec, 3 sc, 3 dec, sc. (9 sts)
- Rounds 24-28: working in FLO: 9 sc. (9 sts)
- Round 29: (dec, sc) * 3. (6 sts)
- Rounds 30-59: 6 sc. (6 sts)
Candle: White Base
- Round 1: 6 sc in MR, sl st, ch 1. (6 sts)
- Round 2: working in FLO: 6 sc, sl st, ch 1. (6 sts)
- Rounds 3-11: 6 sc, sl st, ch 1. (6 sts)
Candle: Flame
- Round 1: 6 sc in MR, sl st, ch 1. (6 sts)
- Round 2: 6 sc, sl st, ch 1. (6 sts)
- Round 3: 3 dec, sl st. (3 sts)
Candleholder
- Round 1: 6 sc in MR, sl st, ch 1. (6 sts)
- Round 2: working in FLO: 6 sc, sl st, ch 1. (6 sts)
- Rounds 3-8: 6 sc, sl st, ch 1. (6 sts)
- Round 9: working in BLO: 6 inc. (12 sts)
- Round 10: (inc, sc) * 6. (18 sts)
- Round 11: (inc, 2 sc) * 6. – Cut thread. (24 sts)
Flower (Rose)
- Instruction: Chain 40. Starting in the 2nd chain from the hook, crochet according to the provided stitch chart motif, repeating the combination to the end of the chain.
Dress: Sleeves
- Instruction: Cut strips of black and blue tulle measuring 60 x 7.5 cm. Fold them in half lengthwise and gather them like an accordion (ruffle).
Dress: Bodice Squares
- Instruction: Cut 4 squares of black tulle measuring 15 x 15 cm. Fold them in pairs and cinch/tie them with thread in the middle to form the top panels.
Dress: Skirt Belts
- Instruction: Cut two belts measuring 15 x 4 cm.
Dress: Tutu Skirts
- Instruction: Cut tulle strips 170 cm long and 15 cm wide into smaller pieces measuring 3-4 cm wide. Gather these to assemble the tutu skirts. Trim the black skirt to a length of 5.5 cm and the blue skirt to 7.5 cm.
Assembly and Finishing
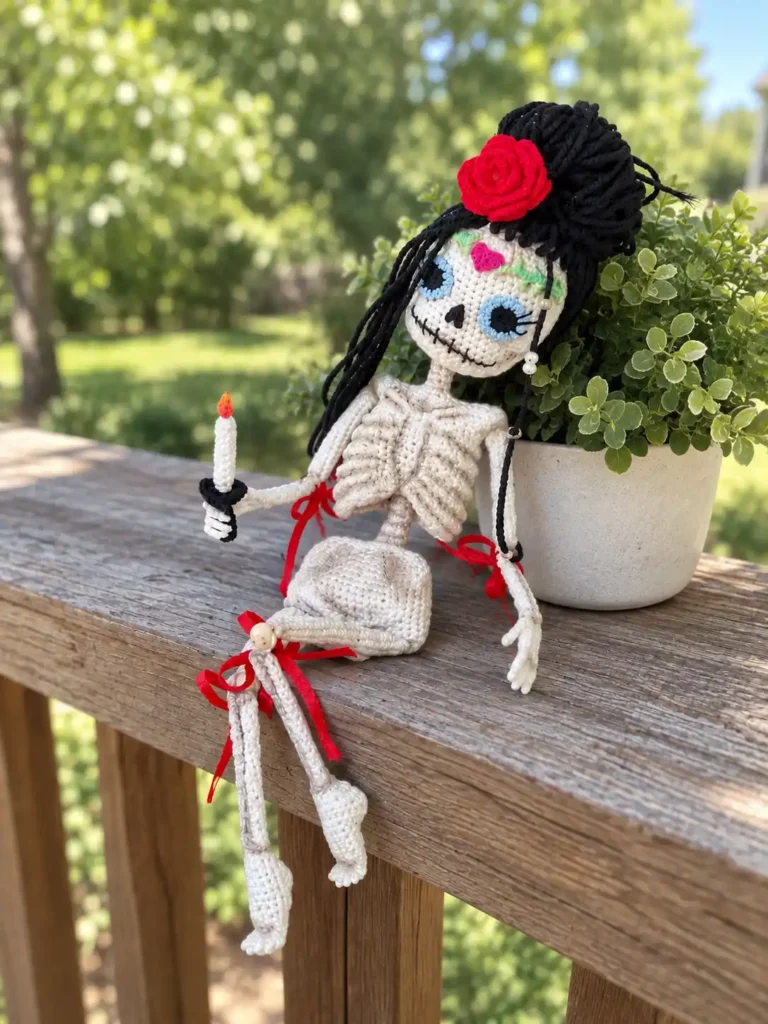
Begin the assembly at the core rather than the edges. The pelvic bowl is stitched securely to the lower rim of the ribcage first, and only after that seam is solid does the taped wire travel up through the center of both pieces, so the spine settles into a channel that is already aligned. Fitting the wire before the two halves are joined tends to leave the torso leaning to one side. Work the bead joints next, and use a skewer when stuffing small amigurumi parts so the narrow bone passages fill evenly.
The head is finished last because it carries the most detail. A disappearing marker is used to draw a grid across the scalp, and 30 cm strands are rooted firmly along those lines so the forehead stays deliberately exposed rather than covered over. Facial features, the embroidered mouth, and the eyelashes all go on before the hair blocks your access to the crown. Take your time sewing amigurumi parts together at this stage, since a shoulder set a few millimeters off will tilt the whole figure once the dress is on.
- Stuff the main body parts using fiberfill or hollowfiber, using skewers or toothpicks to push stuffing into narrow passages.
- Join the arms/forearms and legs/thighs at the joints using the wooden beads.
- Insert the taped 17 cm wire framework up the center spine tubing of the skeleton.
- Sew the pelvic piece to the base of the ribcage with the spine wire passing through the center.
- Attach the limbs securely to the main body trunk.
- Use white thread to sculpt and tighten the rib cage gaps, collarbones, and pelvic hollows.
- Apply brown dry pastel with a flat brush to shade the recessed bones.
- Shape the fingers and toes using PVA glue and tweezers until dry.
- Sew facial features, embroider mouth and eyelashes, and draw a hairline with a fabric marker.
- Root 30 cm strands of black yarn hair firmly along the drawn grid lines.
- Assemble and attach the candle components, tinting the flame tip with yellow pastel.
- Attach the rolled crochet rose securely to the doll’s head.
- Construct the tulle dress directly on the doll using gathered black and blue tulle pieces.
Pattern Notes and Troubleshooting
When the Jaw Looks Lopsided
An uneven jawline usually originates well before the round where it becomes visible. Go back to Head Rounds 4 through 6 and check the front loop only increases one at a time. Working into the wrong loop even once shifts the entire lower face to one side, and the error compounds across every round that follows. Ripping back those six short rounds is more reliable than trying to correct the shape later with sculpting stitches.
Why Ribcage Round 9 Is Shorter Than the Rest
Ribcage Round 9 stops at 45 stitches, and that is intentional rather than a typographical slip. Its only job is to move the starting marker to a new position before the decrease sequence begins, so the shaping lands where the shoulders need it. If you add the missing stitches to complete a full round, every decrease afterward falls in the wrong place and the chest ends up rotated. Work exactly the stated number, move your marker, and carry on.
Keeping the Armhole Chains Intact
Habit will tell you to skip the base stitches sitting underneath the two chain-10 segments in Ribcage Round 16, because that is what most patterns ask for when creating an opening. Resist it here. Those base stitches are meant to remain unworked and unskipped so they project outward and form the shoulder structure. If you skip them, the armholes close up too tightly and the arms end up mounted flush against the chest instead of standing proud of it.
Closing the Pelvis Without Puckering
Pelvis Round 17 finishes with exactly 3 single crochets, and that tail end exists to consume the remaining base stitches cleanly. Losing count here leaves the closure a stitch or two short and pulls it into a pucker that blocking will not flatten. Count the round twice before you move on to the back loop only round that follows, since the narrow tube above it depends on a flat, evenly distributed foundation.
Finishing Checklist
Run through this list before the dress goes on, because several items become difficult to correct once tulle is gathered around the body. The wire ends come first for a reason: tape that has slipped during handling is easy to re-wrap now and nearly impossible to reach later. Check the fingers for stiffness, confirm that every bead joint still turns freely, and hold the figure at arm’s length to judge whether the pastel shading actually reads as depth rather than a smudge.
- Verify the wire ends are taped before final closure.
- Ensure the fingers are stiffened with PVA glue.
- Confirm the limb joints articulate smoothly around the wooden beads.
- Check that brown pastel shading highlights the recessed gaps in the ribs and pelvis.
- Verify the candle flame is correctly tinted with yellow pastel.
- Ensure tulle skirts are trimmed exactly to 5.5 cm (black) and 7.5 cm (blue).