Meet the Sweetest Curly Little Lamb
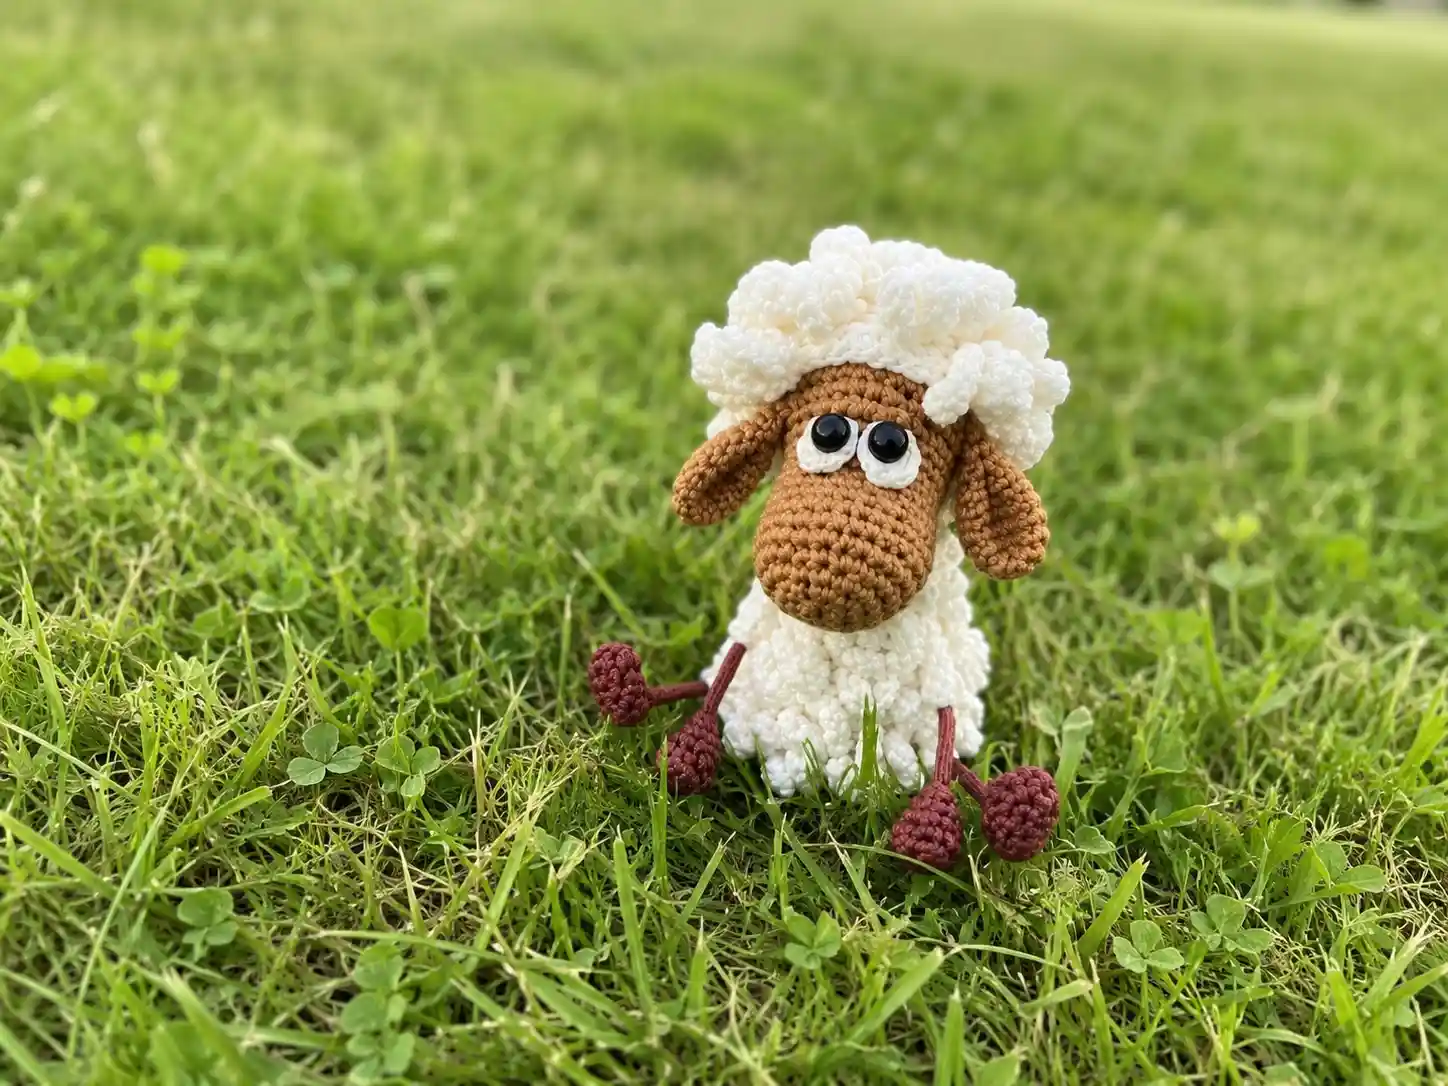
This sheep amigurumi free pattern makes the fluffiest little lamb you’ve ever seen — a soft white curly coat, a warm light brown face, and legs bendy enough to pose in any tiny scene you dream up. Every curl is worked one loop at a time, so the texture alone makes this one worth the extra love. Let me show you how it all comes together.
🩷 Pattern Highlights
- Cuteness Rating: 🩷🩷🩷🩷🩷
- Finished Size: 3.9 in (10 cm)
- Difficulty: Intermediate (this one takes a little extra love — lots of tiny curls!)
- Hook Size: 1.25mm
- Yarn Palette: soft cream white, warm light brown, deep dark brown, plus a touch of thin white cotton for the eyes
- Key Detail: hundreds of tiny hand-looped curls covering the wig and body, plus bendable wire arms and legs for posing
- Estimated Time: 5-7 hours
What You’ll Need for This Sheep Amigurumi Free Pattern
Okay, let’s talk yarn, because the color story on this little lamb is what makes it. You’ll want a soft cream white for the wig, sleeves, shins, and body — think the color of whipped frosting, not stark white. Then a warm light brown for the face and ears, like the inside of a caramel candy. And a deep dark brown for the arms and legs, grounding the whole palette.
- Main Color — Soft Cream White: acrylic yarn, 450m/100g. This falls into the Fingering / Sock (1) weight category, so look for a US fingering-weight acrylic or cotton-acrylic blend as your closest match.
- Light Brown: same Fingering / Sock (1) weight, for the face and ears.
- Dark Brown: same Fingering / Sock (1) weight, for the arms and legs.
- A small amount of thin white cotton yarn — just for the little crocheted eye discs.
- Hook: 1.25mm (no direct US letter equivalent — this is a very fine hook, well below the standard US B/1 size, so a specialty fine-gauge or lace hook is your best bet).
- Sewing needle and fiberfill stuffing.
- Eyes: two 6mm half-beads (glass or plastic) for gluing into the eye discs, or one pair of ready-made safety eyes as a swap.
- Embroidery floss in black or brown, for the nose.
- Universal transparent glue.
- Wire: four pieces, 1mm diameter, each 3.9 in (10 cm) long — this is what gives the arms and legs their poseable magic.
- Adhesive cloth tape or medical plaster, for securing the wire ends inside the body.
The eye size really does matter here — 6mm is small and sweet on a piece this size, keeping the whole face soft and gentle rather than wide-eyed and startled.
Abbreviations Used in This Pattern
| Abbreviation | Meaning |
|---|---|
| ch | chain |
| mr | magic ring |
| sl st | slip stitch |
| sc | single crochet |
| inc | increase (2 sc in 1 stitch) |
| inv dec | invisible decrease |
| hdc | half double crochet |
| dc | double crochet |
| BLO | back loop only |
Before You Begin — Making This Sheep Amigurumi Extra Cute
This pattern has a lot of moving pieces (literally — there’s wire in here!), so a few little notes before you dive in.
🩷 Chloe’s Detail Tip: If you’re newer to the magic ring, this pattern is a great one to practice on — nearly every small piece starts here, and a snug closed center keeps those tiny limbs looking clean.
You’ll also be working a lot of invisible decreases throughout the body and head shaping. Since so much of this piece is covered in curls anyway, keeping your decreases neat underneath really pays off — it’s what keeps the silhouette smooth once the wig goes on.
🩷 Chloe’s Detail Tip: Before gluing the half-bead eyes into the crocheted eye discs, hold both pieces up to the head under a bright lamp and check the spacing from directly in front. This piece uses a two-layer eye (a soft crocheted disc plus a glossy half-bead center), so it’s extra worth double-checking symmetry before the glue sets — there’s no adjusting after.
And since so many parts here get sewn together — arms, legs, shins, the wig, the ears — I always sew with the pieces held exactly where I want them to end up, checking from a few angles before I commit to the final stitches.
The Sheep Amigurumi Pattern
The Arms (Make 2)
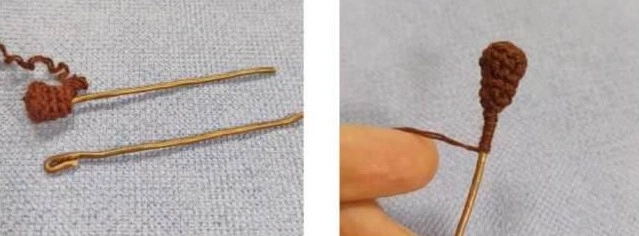
Dark brown, starting in a magic ring — these little arms are worked snug and small before the wire goes in to give them their pose.
Row 1: 6 sc in mr (6)
Row 2: 6 inc (12)
Row 3: BLO: (2 sc, 1 inv dec) × 3 times (9)
Row 4: 7 sc, 1 inv dec (8)
Row 5: 8 sc (8)
Row 6: (skip 1 stitch, 1 sc) × 4 times (4)
🩷 Chloe’s Detail Tip: After Row 2, work a shift stitch and move your marker so your rounds stay aligned. After Row 5, cut two pieces of wire, each 3.9 in (10 cm) long, and make a small loop at the end of each — that loop is what keeps the wire from poking through later.
Slide the looped wire into each arm. Cut the yarn, leaving a long tail of about 11.8 in (30 cm). Dab a little transparent glue onto half of the wire and wrap it carefully in yarn — wrapping it a few times adds thickness and gives the wire a soft, finished feel instead of a bare metal one. Seal the yarn end with a touch more glue.
The Sleeves (Make 2)
Soft cream white, magic ring start — these slide up over the arms once everything’s assembled.
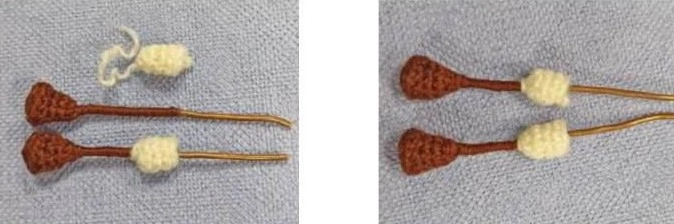
Row 1: 5 sc in mr, do not pull too tight (5)
Row 2: 1 inc, 4 sc (6)
Row 3: (2 sc, 1 inc) × 2 times (8)
Row 4: 7 sc, 1 sl st (8)
Cut the yarn, leaving a tail for sewing.
The Legs (Make 2)
Dark brown, this time starting from a chain rather than a ring — these are the little hooves that carry our lamb’s whole poseable frame.
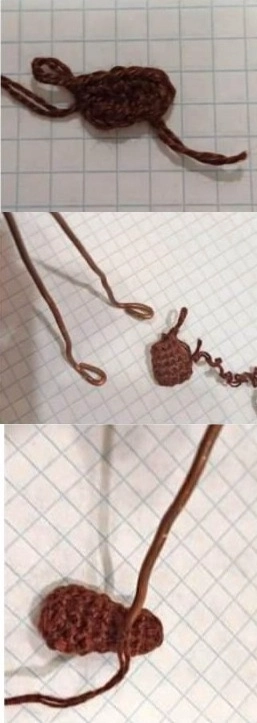
Row 1: ch 5, starting from the 2nd chain from hook: 3 sc, 3 sc in the last chain, on the opposite side: 2 sc, 1 inc (10)
Rows 2-3: 10 sc (2 rows) (10)
Row 4: 9 sc, leave the last stitch unworked (10)
Row 5: (1 inv dec, 3 sc) × 2 times (8)
Row 6: 2 sc, insert wire into the leg, ch 1, skip 1 stitch, 5 sc (7 + 1 ch)
Row 7: 2 sc, 1 sc in ch, 5 sc (8)
🩷 Chloe’s Detail Tip: At the end of Row 4, move your marker — that’s where your next round begins. After Row 5, cut two pieces of wire, each 3.9 in (10 cm) long, and loop the ends so the loop length matches the length of the little foot. After Row 6, add just a light bit of stuffing before continuing on.
Cut the yarn, leaving a long tail of about 35.4 in (90 cm) — you’ll need that length later for securing and sewing. Secure the wire loops in place. Just like with the arms, dab transparent glue onto half of the wire and wrap it in yarn a few times for thickness, then seal the end with glue.
The Shins (Make 2)
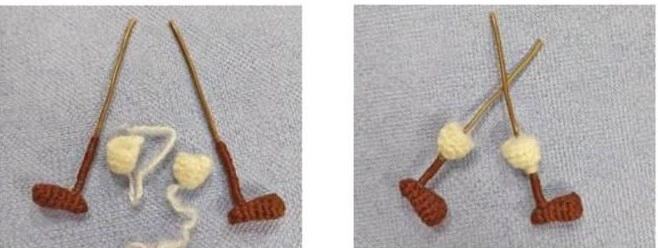
Soft cream white, magic ring — these sit right above the legs for that soft white-over-dark-brown color contrast.
Row 1: 6 sc in mr, do not pull too tight (6)
Row 2: (1 sc, 1 inc) × 3 times (9)
Row 3: (2 sc, 1 inc) × 3 times (12)
Row 4: 11 sc, 1 sl st (12)
Cut the yarn, leaving a tail for sewing.
The Body
This is the big one — soft cream white, started from a chain, and where all those signature curls really start to happen. Go slow through this section; it’s the heart of the whole piece.
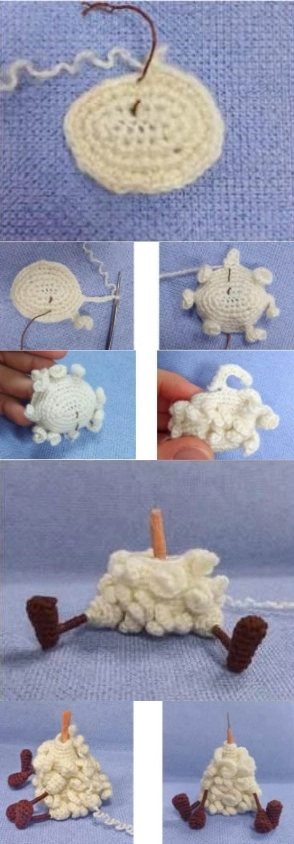
Row 1: ch 6, starting from the 2nd chain from hook: 1 inc, 3 sc, 3 sc in the last chain, on the opposite side: 4 sc (12)
Row 2: 3 sc in one stitch, (1 sc, 1 inc) × 2 times, 1 sc, 3 sc in one stitch, 1 sc, 1 inc, 1 sc (19)
Row 3: (1 inc, 2 sc) × 2 times, (1 inc, 1 sc) × 3 times, (1 sc, 1 inc) × 3 times, 1 sc (27)
Row 4: (1 sc, 1 inc) × 4 times, 2 sc, 1 inc, 3 sc, 1 inc, 2 sc, 1 inc, 9 sc (34)
Row 5: 13 sc, 1 inc, (3 sc, 1 inc) × 2 times, 8 sc, (1 inc, 1 sc) × 2 times (39)
🩷 Chloe’s Detail Tip: This is where the shape really starts to round out — so satisfying to watch it become a little body. At the end of Row 2, leave the last 2 stitches unworked and move your marker. That marker line runs straight down the back of the body, so use a shift stitch as needed to keep it perfectly aligned — a crooked marker line shows once the curls go on.
Row 6: (1 sc, 1 inc) × 2 times, loop stitch, along the body 4 sc; loop stitch, along the body 7 sc; loop stitch, along the body 3 sc, 1 inc, 3 sc; loop stitch, along the body 7 sc; loop stitch, along the body 5 sc; loop stitch, along the body 5 sc (42)
🩷 Chloe’s Detail Tip — the Loop Stitch: This is the special little element that gives our lamb its curly coat: ch 9, then starting from the 2nd chain from hook, work 1 sl st, 6 inc, 1 sc. Want bigger, fluffier curls? Just size up — try ch 12, then from the 2nd chain from hook: 1 sl st, 9 inc, 1 sc. Keep every loop stitch tucked on the right side of your work as you go, starting from Row 8 — that’s what keeps the curls facing outward and looking soft rather than tangled underneath.
Row 7: 5 sc, skip the lower loop stitch, 4 sc, skip the lower loop stitch, 7 sc, skip the lower loop stitch, 8 sc, skip the lower loop stitch, 7 sc, skip the lower loop stitch, 5 sc, skip the lower loop stitch, 5 sc. Now we crochet the tail: ch 4, from the 3rd chain from hook: 2 hdc (42)
Row 8: 4 sc, loop stitch, 10 sc, place an additional marker for the leg, 7 sc, loop stitch, 7 sc, place an additional marker for the leg, 7 sc, loop stitch, 7 sc (42)
Row 9: Pull out the tail, 9 sc, loop stitch, 15 sc, loop stitch, 18 sc (42)
Row 10: 12 sc, loop stitch, 3 sc, loop stitch, 12 sc, loop stitch, 4 sc, loop stitch, 3 sc, 1 inv dec, 1 sc, 1 inv dec, loop stitch, 1 sc, 1 inv dec (39)
Row 11: (1 sc, 1 inv dec) × 3 times, 8 sc, loop stitch, 22 sc (36)
Row 12: 3 sc, loop stitch, 33 sc (36)
Row 13: 13 sc, 1 inv dec, 2 sc, loop stitch, 4 sc, 1 inv dec, 6 sc, 1 inv dec, 5 sc (33)
Row 14: 5 sc, 1 inv dec, 13 sc, loop stitch, 7 sc, loop stitch, 1 inv dec, 1 sc, 1 inv dec, loop stitch, 1 sc (30)
Row 15: (1 inv dec, 1 sc) × 2 times, loop stitch, 4 sc, loop stitch, 2 sc, (1 inv dec, 1 sc) × 3 times, 9 sc (25)
Row 16: 25 sc (25)
Row 17: 2 sc, 1 inv dec, 2 sc, place an additional marker for the arm, 3 sc, 1 inv dec, 2 sc, loop stitch, 1 sc, 1 inv dec, 3 sc, place an additional marker for the arm, 2 sc, 1 inv dec (21)
Row 18: 2 sc, loop stitch, 13 sc, loop stitch, 6 sc (21)
Row 19: 5 sc, loop stitch, (1 inv dec, 5 sc) × 2 times, loop stitch, 1 inv dec (18)
Row 20: 7 sc, loop stitch, 11 sc (18)
Row 21: 10 sc, loop stitch, 8 sc (18)
Row 22: (1 inv dec, 4 sc) × 2 times, 1 inv dec, 3 sc, loop stitch, 1 sc (15)
Row 23: (3 sc, 1 inv dec) × 2 times, 2 sc, 1 inv dec, 1 sc (12)
Row 24: 12 sc (12)
Row 25: 2 sc, loop stitch, 1 inv dec, 2 sc, 1 inv dec, 1 sc, loop stitch, 1 sc, 1 inv dec (9)
Rows 26-27: 9 sc (2 rows) (9)
🩷 Chloe’s Detail Tip: Stuff as you go through this whole section — it’s much easier than trying to pack it all in at the end. At the end of Rows 6, 11, and 19, work a shift stitch and move your marker to keep everything lined up. Save the final wire assembly (arms, legs, and shaping the frame) for the Assembly section below.
Cut the yarn, leaving a tail for sewing.
The Head
Light brown, magic ring start — this is where that sweet little sheep face comes to life.
Row 1: 6 sc in mr (6)
Row 2: 6 inc (12)
Row 3: (1 sc, 1 inc) × 6 times (18)
Row 4: (1 sc, 1 inc, 1 sc) × 6 times (24)
Row 5: (3 sc, 1 inc) × 6 times (30)
Rows 6-9: 30 sc (4 rows) (30)
Row 10: (1 inv dec, 8 sc) × 3 times (27)
Rows 11-12: 27 sc (2 rows) (27)
Row 13: 12 sc, ch 3, skip 3 stitches, 12 sc (27)
Row 14: 12 sc, 3 sc along the ch space, 12 sc (27)
Row 15: (8 sc, 1 inc) × 3 times (30)
Row 16: (2 sc, 1 inc, 2 sc) × 6 times (36)
Rows 17-22: 36 sc (6 rows) (36)
Row 23: (2 sc, 1 inv dec, 2 sc) × 6 times (30)
Row 24: (1 inv dec, 3 sc) × 6 times (24)
Row 25: (1 inv dec, 2 sc) × 6 times (18)
Row 26: (1 inv dec, 1 sc) × 6 times (12)
Row 27: 6 inv dec (6)
🩷 Chloe’s Detail Tip: Row 13’s little skipped-stitch gap is what forms the neck opening — don’t panic when you see the hole, it’s exactly right. Add your fiberfill after Row 25, packing it in gently so the face stays round and full without looking stiff.
Fasten off and pull the opening closed. Weave in the tail. Sew the head to the body.
The Curly Wig (for the Head)
Soft cream white, magic ring — this is the piece that turns a plain head into an unmistakably curly little lamb.
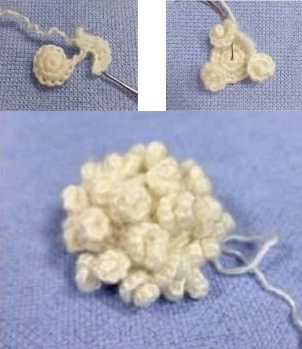
Row 1: 6 sc in mr (6)
Row 2: 6 inc (12)
Row 3: loop stitch, (1 sc, 1 inc) × 2 times, loop stitch, (1 sc, 1 inc) × 2 times, loop stitch, (1 sc, 1 inc) × 2 times (18)
Row 4: (2 sc, 1 inc) × 6 times (work loop stitches and skips symmetrically without altering the base stitch count) (24)
Row 5: (3 sc, 1 inc) × 6 times (work skips and stitches carefully over the base layer) (30)
Row 6: 4 sc, 1 inc, 3 sc, loop stitch, 1 sc, 1 inc, 2 sc, loop stitch, 2 sc, 1 inc, 4 sc, 1 inc, 2 sc, loop stitch, 2 sc, 1 inc, 3 sc, loop stitch, 1 sc, 1 inc (36)
Row 7: 1 sc, loop stitch, 20 sc, loop stitch, 15 sc (36)
Row 8: 4 sc, loop stitch, 7 sc, loop stitch, 6 sc, loop stitch, 11 sc, loop stitch, 8 sc (36)
Row 9: 7 sc, loop stitch, 12 sc, loop stitch, 5 sc, loop stitch, 7 sc, loop stitch, 4 sc, loop stitch, 1 sc (36)
Row 10: 14 sc, loop stitch, 12 sc, loop stitch, 10 sc (36)
Row 11: 2 sc, loop stitch, 7 sc, loop stitch, 7 sc, loop stitch, 6 sc, loop stitch, 7 sc, loop stitch, 7 sc (36)
🩷 Chloe’s Detail Tip: The curls here are placed asymmetrically on purpose — that’s what makes the wig look like a natural, tumbled little fleece instead of a stiff wig shape. In Row 3, you’ll work exactly 3 curls. This is the same loop stitch from the body section, so you’ve already got the motion down.
Weave in the yarn ends. Glue or sew the curly wig onto the head.
The Eyes (Make 2)
A small amount of thin white cotton yarn, chain start — these little discs are what your glossy half-bead eyes will sit inside.
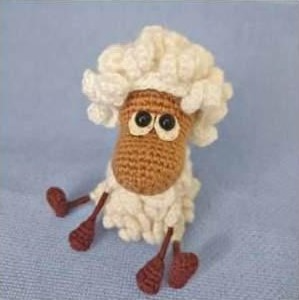
Row 1: ch 3, from the 3rd chain from hook: 7 hdc, join with a sl st to form a ring (7)
Cut and weave in the yarn ends.
The Ears (Make 2)
Light brown, chain start — soft little ears in that same warm caramel shade as the face.
Row 1: ch 8, starting from the 2nd chain from hook: 1 sc, 2 hdc, 1 dc, 1 hdc, 1 sc, in the last chain: 1 sl st, 1 sc, 1 sl st; on the opposite side: 1 sc, 1 hdc, 1 dc, 2 hdc, 1 sc (15)
Cut the yarn, leaving a tail for sewing.
Assembly
Here’s where our little lamb finally comes together into one poseable, huggable whole.
- Arms & Shoulders: Insert the wired arms into the arm marker positions on the body (around Row 17). Twist the internal wire ends together securely inside the body’s core and wrap the twisted join with adhesive cloth tape or medical plaster. Slide the sleeves up over the arms to meet the body. Close any small gaps at the shoulders using the leftover white yarn tail from the sleeves, then fasten off and hide the tails inside. If needed, tuck a little extra fiberfill into the upper arm area to keep things smooth.
- Legs & Shins: Feed the wire loop from each foot up through the shin and into the leg marker position on the body (around Row 8). Twist the inner wire ends together tightly and wrap fully with adhesive cloth tape to keep the posture stable. Pin the shins against the lower edge of the body opening, then sew them cleanly in place using the white yarn tails. Pack the shins and lower body firmly with fiberfill before you close everything up.
- Head & Wig: Sew or glue the finished curly wig symmetrically over the crown of the light brown head.
- Ears: Position and sew both ears onto the lower left and right edges of the wig line, right where the curls meet the face.
Making It Extra Cute — Finishing Details
This is where it goes from “nice little sheep” to “I can’t put this down.”
Start with the eyes: glue each 6mm half-bead right into the center of its crocheted white eye disc, then attach the finished two-layer eye pieces onto the face. Take your time here — a half-bead sitting even slightly off-center inside its disc will read as lopsided once it’s glued to the head, so check it under good light before it’s permanent.
Next, embroider a small, clean nose in dark brown or black embroidery floss right in the center of the muzzle. Keep the stitches tidy and close together — a soft, compact little nose suits this face far better than a big bold one.
And don’t skip a slow once-over of every curl before you call this one finished. Because the loop stitches were worked asymmetrically on purpose, a few gentle tugs and fluffs here and there help the coat settle into that natural, tumbled look rather than sitting flat.
For color variations, this pattern is lovely worked in a pale gray body with a black face for a “black sheep” version, or in a soft blush pink wig for something even sweeter.
Chloe’s Final Look
I have been turning this little lamb over in my hands for way too long, and I regret absolutely nothing. The curls catch the light differently from every angle, the eyes have that perfect glossy shine, and those poseable wire legs mean it can actually stand on a shelf looking pleased with itself. Try a little herd of these in cream, gray, and blush — trust me, you will not stop rearranging them. 🩷
FAQ
What yarn weight is best for this sheep amigurumi free pattern?
This pattern works best with Fingering or Sock weight (Category 1) acrylic or cotton-blend yarn (approximately 450m/100g) to maintain the fine, detailed scale of the 3.9-inch lamb.
How do you make the curly texture for the sheep’s fleece?
The curly coat is created using a specific loop stitch variant: chaining 9, then working 1 slip stitch, 6 increases, and 1 single crochet back down the chain to form a natural, springy curl.
Is this sheep pattern suitable for beginners?
This pattern is rated as Intermediate. While the stitches themselves are foundational, working with a 1.25mm fine hook, managing wire armatures, and crocheting dozens of individual loop stitches require extra patience.