This Free Sheriff Woody Amigurumi Pattern Is the Sweetest Little Cowboy You’ll Ever Make
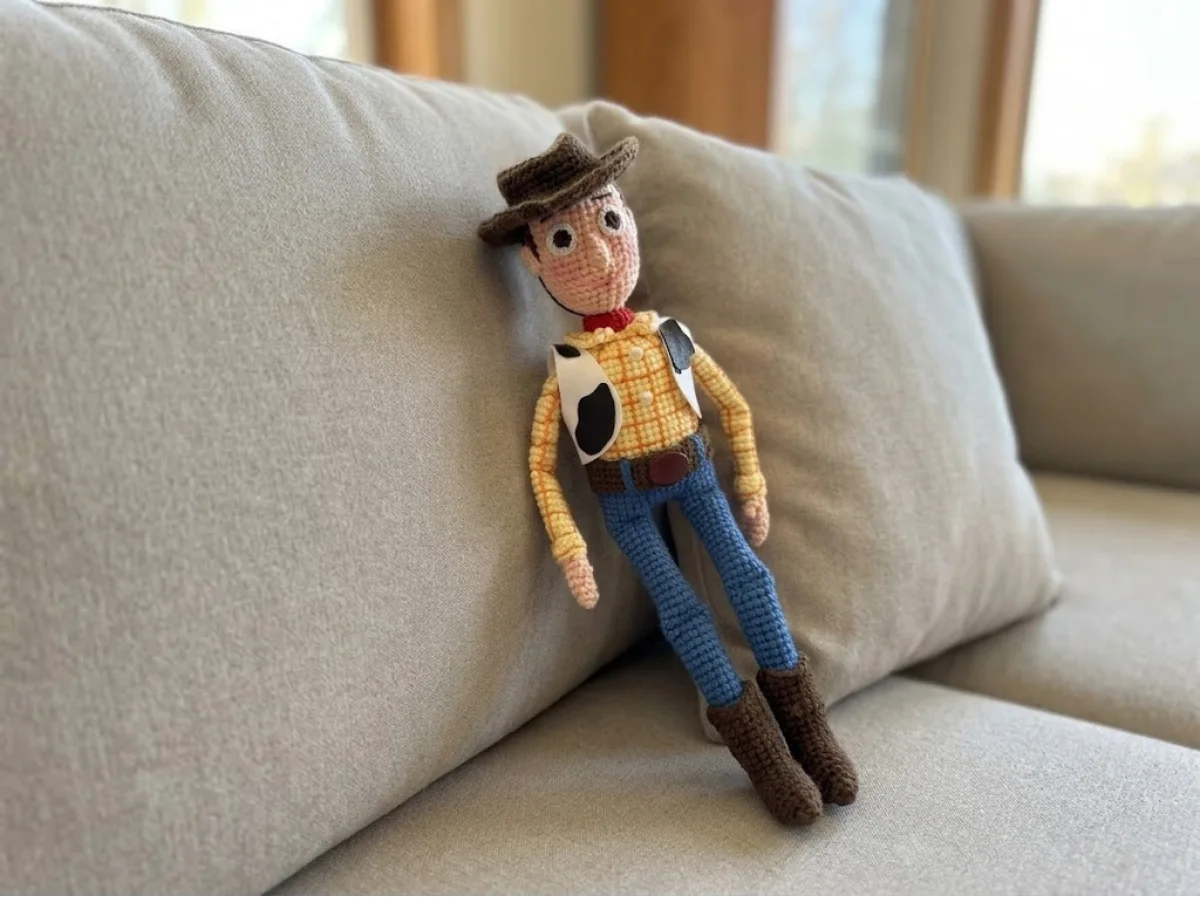
This free Sheriff Woody amigurumi pattern comes together in the softest little palette — dusty blue jeans, a sunshine-yellow shirt, a warm brown hat and boots, and the tiniest red kerchief tied at his neck. He’s got round, friendly white eyes, a peachy little face, and that classic cowboy silhouette shrunk down into something you just want to scoop up and squeeze. Grab your hook — this one has a lot of tiny, precious details waiting for you.
🩷 Pattern Highlights
- Cuteness Rating: 🩷🩷🩷🩷🩷
- Finished Size: approx. 11 in (28 cm) standing (estimated from pattern row count — not stated in source, please verify)
- Difficulty: Advanced (estimated — not stated in source)
- Hook Size: 1.6mm (no clean US letter equivalent for this fine a hook)
- Yarn Palette: dusty blue, sunshine yellow, warm brown, soft light peach, a touch of red, and a whisper of white
- Key Detail: the folded, hand-shaped limbs and that sweet round hat with the folded brim
- Estimated Time: 6-9 hours
What You’ll Need for Your Sheriff Woody Amigurumi Free Pattern
This little cowboy uses three different yarns working together, which is part of what makes him so fun to make — every piece gets its own personality.
- Dusty blue & sunshine yellow (Worsted 4): Alize Cotton Gold Hobby in the original pattern — a lovely US swap is Lion Brand 24/7 Cotton. Blue for the jeans, yellow for the shirt.
- Soft light peach (DK / Light Worsted 3): GAZZAL Baby Cotton in the original — try Drops Safran or Paintbox Cotton DK. This is your skin tone for the head and hands.
- Warm brown (DK / Light Worsted 3): YarnArt Baby in the original — any similar DK-weight brown works beautifully for the hat, boots, and hair.
- A touch of red: for the little neckerchief peeking out at his collar. (Not listed in the original materials — please confirm weight before publishing.)
- A whisper of white (fine/fingering weight, like Iris thread): for those sweet round eyes.
- Hook: 1.6mm
- Stuffing: polyester fiberfill, added gradually so nothing looks lumpy
- Two small white buttons or half-beads (optional, for the eyes)
- One oval brown or black button, about 10mm x 15mm, for the belt buckle
- Tapestry needle, stitch marker, and small scissors
This yarn falls into the DK / Light Worsted (3) and Worsted (4) weight categories — the combination gives him that soft, slightly textured look where the shirt and jeans feel just a touch chunkier than his sweet peachy face.
Abbreviations Used in This Sheriff Woody Amigurumi Pattern
| Abbreviation | Meaning |
|---|---|
| mr | magic ring |
| sc | single crochet |
| sl st | slip stitch |
| inc | increase |
| dec | invisible decrease |
| ch | chain |
| hdc | half double crochet |
| dc | double crochet |
| tr | treble crochet |
| BLO | back loop only |
| FLO | front loop only |
| FO | fasten off |
Before You Begin — Little Details That Make This One Special
🩷 Chloe’s Detail Tip: This pattern uses the invisible decrease throughout, which is exactly what keeps his little face, hands, and boots looking smooth with no gaps. If you haven’t tried it yet, our invisible decrease tutorial walks through it step by step — it makes such a difference on a face this small.
Woody starts from several separate magic rings — arms, legs, head, hat, and eyes all begin this way. If magic rings still feel a little fiddly, our magic ring tutorial is a sweet refresher before you dive in.
This pattern changes yarn color a lot — jeans to shirt, shirt to collar, collar to kerchief. Our guide to changing colors seamlessly will help every transition look clean and intentional instead of choppy.
Sheriff Woody Amigurumi Pattern — Arms (make 2)
Worked in light peach for the hand, switching to yellow for the sleeve. This little sleeve cuff is one of my favorite tiny details — it’s what makes the arm actually read as “wearing a shirt” instead of just being one solid tube.
Yarn: light peach, changing to yellow after Row 8
Start: mr
Row 1: 6 sc in mr (6)
Row 2: (sc, inc) x3 (9)
Rows 3-5: 9 sc, worked 3 rows (9)
Row 6: ch 4, from the second ch from hook work 3 sl st along the chain, sl st into the last stitch of Row 5 (the base of the chain), then continue around the main piece with 9 sc (total not stated in source)
Row 7: 9 sc (9)
Row 8: (sc, dec) x3 (6)
Change to yellow here — this is where the sleeve begins.
Row 9: (sc, inc) x3 (9)
Row 10: BLO, 9 sc (9)
Rows 11-18: 9 sc, worked 8 rows (9)
Row 19: Fold flat (pay attention to thumb placement — shift a stitch or two if needed), then work 4 sc through both layers together (4)
Row 20: ch, then work in the round through one loop only: 4 sc through the closest loop on the wrong side of the previous row, then 5 sc through the remaining loops on the right side of the arm (total not stated in source)
Rows 21-32: 9 sc, worked 12 rows (9)
Row 33: Fold flat, then work 4 sc through both layers together (4)
FO, leaving no need for a long tail here — the arm joins directly into the body during the Body section, so keep this handy.
🩷 Chloe’s Detail Tip: Row 6’s little folded chain-and-slip-stitch bit forms the thumb. It looks fiddly on paper, but once you see it curling away from the hand, it clicks — just take it slow and don’t rush the slip stitches.
Sheriff Woody Amigurumi Pattern — Legs (make 2)
Yarn: light peach for the foot, changing to blue after Row 15 (interpreted from source note — see editorial flag above)
Start: mr
Row 1: 6 sc in mr (6)
Row 2: 6 sc (6)
Row 3: (sc, inc) x3 (9)
Row 4: (2 sc, inc) x3 (12)
Rows 5-8: 12 sc, worked 4 rows (12)
Rows 9-10: Turned rows — 6 sc, ch, turn, then 6 sc back the other direction, ch, turn (6)
Row 11: 3 dec (3)
Row 12: 3 sc together (1)
Row 13: 3 sc along one side of the little toe shape, 6 sc across the toe, 3 sc along the other side (12)
Rows 14-15: 12 sc (12)
Change to blue here — jeans begin.
Row 16: BLO, 12 sc (12)
Rows 17-31: 12 sc, worked 15 rows (12)
Row 32: Fold flat, work 6 sc through both layers together (6)
Row 33: Work in the round through one loop only: 6 sc through the closest loop on the wrong side, 6 sc through the remaining loops on the right side (12)
Rows 34-47: 12 sc, worked 14 rows (12)
Row 48: Fold flat, work 6 sc through both layers together (6)
FO and cut yarn on the first leg. On the second leg, do not cut — you’ll continue straight into the Body from here.
Sheriff Woody Amigurumi Pattern — Boots (make 2)
Little brown boots joined right onto the loops left behind from the legs — such a satisfying piece to finish.
Yarn: brown
Start: join brown yarn to the front loops left from Leg Row 16
Row 1: 12 sc (12)
Row 2: (3 sc, inc) x3 (15)
Row 3: 15 sc (15)
Rows 4-7: 15 sc (15)
Row 8: (sc, hdc, dc, tr, dc, hdc, sc) x2, sl st (15 per source — flagged above, math totals 14 sts plus the joining slip stitch)
FO, cut yarn.
🩷 Chloe’s Detail Tip: That Row 8 combination of stitch heights (sc up through tr and back down) is what gives the boot its curved, pointed toe shape. Go slowly through the taller stitches — it’s a small row but it does a lot of shaping work.
Sheriff Woody Amigurumi Pattern — Body
This is where your two legs become one little standing cowboy — always such a fun moment.
Yarn: blue, changing to yellow after Row 56, changing to red after Row 74
Start: continuing directly from the leg where yarn was left
Row 49: Take the leg with the working yarn attached. Ch 5, then along the other leg work through the closest loops 6 sc, 6 sc along the other side through the remaining loops, 5 sc along the chain, 6 sc through the closest loops of the first leg, 6 sc through the remaining loops on the other side, 5 sc along the chain (34)
Row 50: 12 sc, inc, 3 sc, inc, 17 sc (36)
Row 51: (5 sc, inc) x6 (42)
Rows 52-56: 42 sc, worked 5 rows (42)
Change to yellow here — the shirt begins.
Row 57: BLO, 42 sc (42)
Rows 58-69: 42 sc, worked 12 rows (42)
Row 70: Place a stitch marker before this row to help keep track. 8 sc, 4 sc together with the arm, 17 sc, 4 sc together with the arm, 9 sc (42)
Row 71: (5 sc, dec) x6 (36)
Row 72: (2 sc, dec, 2 sc) x6 (30)
Row 73: (3 sc, dec) x6 (24)
Row 74: (sc, dec, sc) x6 (18)
Change to red here — this small section becomes the peek of neckerchief at his collar.
Row 75: BLO, 18 sc (18)
Rows 76-77: 18 sc (18)
FO, cut yarn.
🩷 Chloe’s Detail Tip: Also place a stitch marker in the exact center of the back of Row 51 before you keep going — it keeps everything symmetrical when you’re attaching the arms at Row 70, and trust me, a lopsided cowboy is much harder to fix after stuffing.
Sheriff Woody Amigurumi Pattern — Collar
A tiny yellow flip of collar right at the front loops of the neck opening — this is the detail that really sells the “shirt” of it all.
Yarn: yellow
Start: join to the front loops of Body Row 75, beginning at the center front loop, working top-down
Row 1: (2 sc, inc) x5, 2 sc, ch, turn (22)
Row 2: 22 sc, ch, turn (22)
Row 3: (3 sc, inc) x5, 2 sc (27)
FO, cut yarn.
Sheriff Woody Amigurumi Pattern — Belt
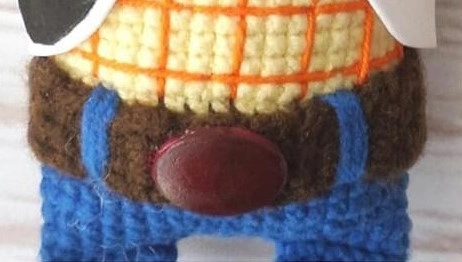
Yarn: brown
Start: chain foundation
Row 1: Ch 5, starting from the second chain from hook work 4 sc along the chain, ch, turn, 4 sc, ch, turn — repeat to reach the desired length around the waist (total not stated in source)
Sew into a circle to fit around the waist, then sew onto the body along Row 51’s color-change line. This is where your oval button buckle gets sewn or glued to the center front.
Sheriff Woody Amigurumi Pattern — Head
This is genuinely my favorite piece of the whole pattern — this is where his sweet, friendly little face starts to take shape.
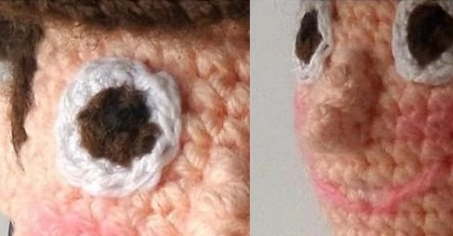
Yarn: light peach
Start: mr
Row 1: 6 sc in mr (6)
Row 2: 6 inc (12)
Row 3: (sc, inc) x6 (18)
Row 4: sc, inc, (2 sc, inc) x5, sc (24)
Row 5: (3 sc, inc) x6 (30)
Row 6: 2 sc, inc, (4 sc, inc) x5, 2 sc (36)
Rows 7-18: 36 sc, worked 12 rows (36)
Row 19: (2 sc, dec, 2 sc) x6 (30)
Row 20: 13 sc, 4 hdc, 13 sc (30)
Row 21: (2 sc, dec) x3, sc, 4 hdc, sc, (2 sc, dec) x3 (24)
Row 22: (sc, dec) x3, sc, 2 dec, sc, (sc, dec) x3 (16)
Row 23: 6 sc, 2 dec, 6 sc (14)
Rows 24-25: 14 sc (14)
FO, cut yarn, leaving a long tail for sewing. This is your moment to sculpt the face — take your time here before adding eyes.
🩷 Chloe’s Detail Tip: The 4 hdc worked into Rows 20-21 create a slightly raised little jaw shape — don’t skip it or flatten it out. It’s subtle, but it’s exactly what gives Woody his gentle, rounded chin instead of a flat oval face.
Sheriff Woody Amigurumi Pattern — Nose
Yarn: light peach
Start: chain foundation
Row 1: Ch 5, from the second chain from hook work 4 sc, turn, 3 sc, turn, 2 sc, turn, sc (total not stated in source)
Fold in half and sew closed with a needle, then sew onto the head — right in the center, just below the eye line looks best.
Sheriff Woody Amigurumi Pattern — Ears (make 2)
Yarn: light peach
Start: mr
Row 1: 5 sc in mr (5)
Pull the ring tight and do not join in a round — leave it open. FO, cut yarn, leaving a long tail for sewing.
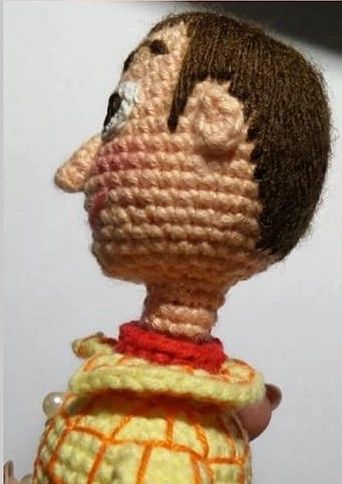
Sheriff Woody Amigurumi Pattern — Eyes (make 2)
Round, glossy, and so full of expression — these little eyes are worked separately in a fine white thread and embroidered with a pupil after.
Yarn: white, fine/fingering weight (like Iris-weight thread)
Start: mr
Row 1: 6 sc in mr (6)
Row 2: 6 inc (12)
FO, cut yarn.
Sheriff Woody Amigurumi Pattern — Hat
The finishing crown of the whole look. That folded brim is what makes this instantly read as “cowboy hat” rather than just a little brown dome.
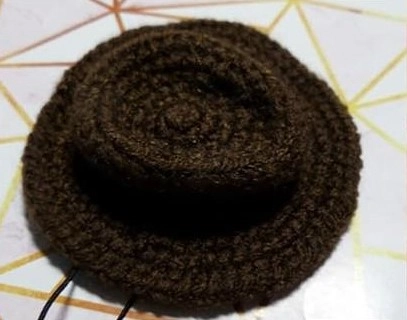
Yarn: brown
Start: mr
Row 1: 6 sc in mr (6)
Row 2: 6 inc (12)
Row 3: (sc, inc) x6 (18)
Row 4: sc, inc, (2 sc, inc) x5, sc (24)
Row 5: (3 sc, inc) x6 (30)
Row 6: 2 sc, inc, (4 sc, inc) x5, 2 sc (36)
Row 7: BLO, 36 sc (36)
Rows 8-11: 36 sc, worked 4 rows (36)
Row 12: FLO, (2 sc, inc) x12 (48)
Row 13: (7 sc, inc) x6 (54)
Row 14: (8 sc, inc) x6 (60)
Row 15: (9 sc, inc) x6 (66)
FO, cut yarn.
Assembling Your Sheriff Woody Amigurumi
- Stuff the body, legs, and head firmly but gently, adding fiberfill a little at a time so the shape stays smooth rather than lumpy.
- Insert the neck opening of the head into the top of the body — this actually helps the little red kerchief section sit with more volume around the neck. Sew the head into place with red yarn to keep the color transition invisible.
- Fold the nose piece in half, sew closed, and stitch it onto the center of the face just below the eye line.
- Sew the ears on gently near the top sides of the head, checking from the front that they sit level with each other.
- Position the two white eyes side by side and check them from directly in front, under good light, before committing to placement — symmetry here is everything.
- Sew or glue the little brown buckle button to the center front of the belt, then sew the belt around the waist along the jeans-to-shirt color line.
- Set the hat gently on the head — you can tack it in place with a few small stitches if you’d like it secure, or leave it removable.
Making It Extra Cute — Finishing Details
This is the part where a nice little cowboy shape turns into an actual, unmistakable Sheriff Woody, and it’s honestly my favorite section of any pattern.
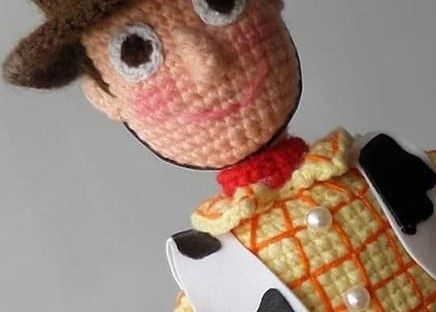
The plaid shirt: Using a thin orange strand, embroider a simple plaid grid pattern across the yellow shirt and collar — a few straight vertical and horizontal lines is all it takes. Don’t overthink the spacing; a slightly imperfect little plaid actually looks more charming and handmade.
The belt loops: With a thin blue strand, add a few small straight stitches along the top edge of the belt to suggest belt loops. Tiny, but it’s exactly the kind of detail that makes people look twice.
The eyes: Embroider the pupils onto the white eye circles using black and brown thread, ideally in the same weight as the rest of the toy. I like to embroider the pupil slightly toward the inner corner of the eye rather than dead center — it gives him a warmer, more attentive expression.
🩷 Chloe’s Detail Tip: Before you sew the eyes down for good, hold the head up under a bright lamp and look at it straight on. This is the moment where a slightly-off eye placement becomes obvious — and the moment where thirty extra seconds saves you from unpicking stitches later.
The smile: Don’t skip it — embroider a soft little smile beneath the nose. It’s such a small stitch, but it’s the one thing that turns this from “a doll” into “a friend.”
Chloe’s Final Look
I am so in love with how this little cowboy turned out — that soft peach face, the plaid shirt with its tiny hand-stitched lines, and the hat sitting just slightly tilted make him feel so full of personality. The folded boots and the little belt buckle are the kind of details that make people ask “wait, you made that?” Try him in a slightly softer, more pastel blue for the jeans if you want your own gentler version — he’s just as sweet either way. 🩷
FAQ
What yarn is best for this Sheriff Woody amigurumi free pattern?
A combination of Worsted weight cotton for the jeans and shirt, and DK weight cotton for the skin and hat provides the perfect textured contrast.
How long does it take to crochet this amigurumi?
This is an advanced pattern with many small, intricate details, so it typically takes between 6 to 9 hours to complete.
What size hook do I need for this pattern?
The pattern calls for a very fine 1.6mm crochet hook to ensure the stitches are tight and the small details, like the fingers and collar, hold their shape.