Free Crochet Bear Amigurumi Pattern — Pastel Dress Bear
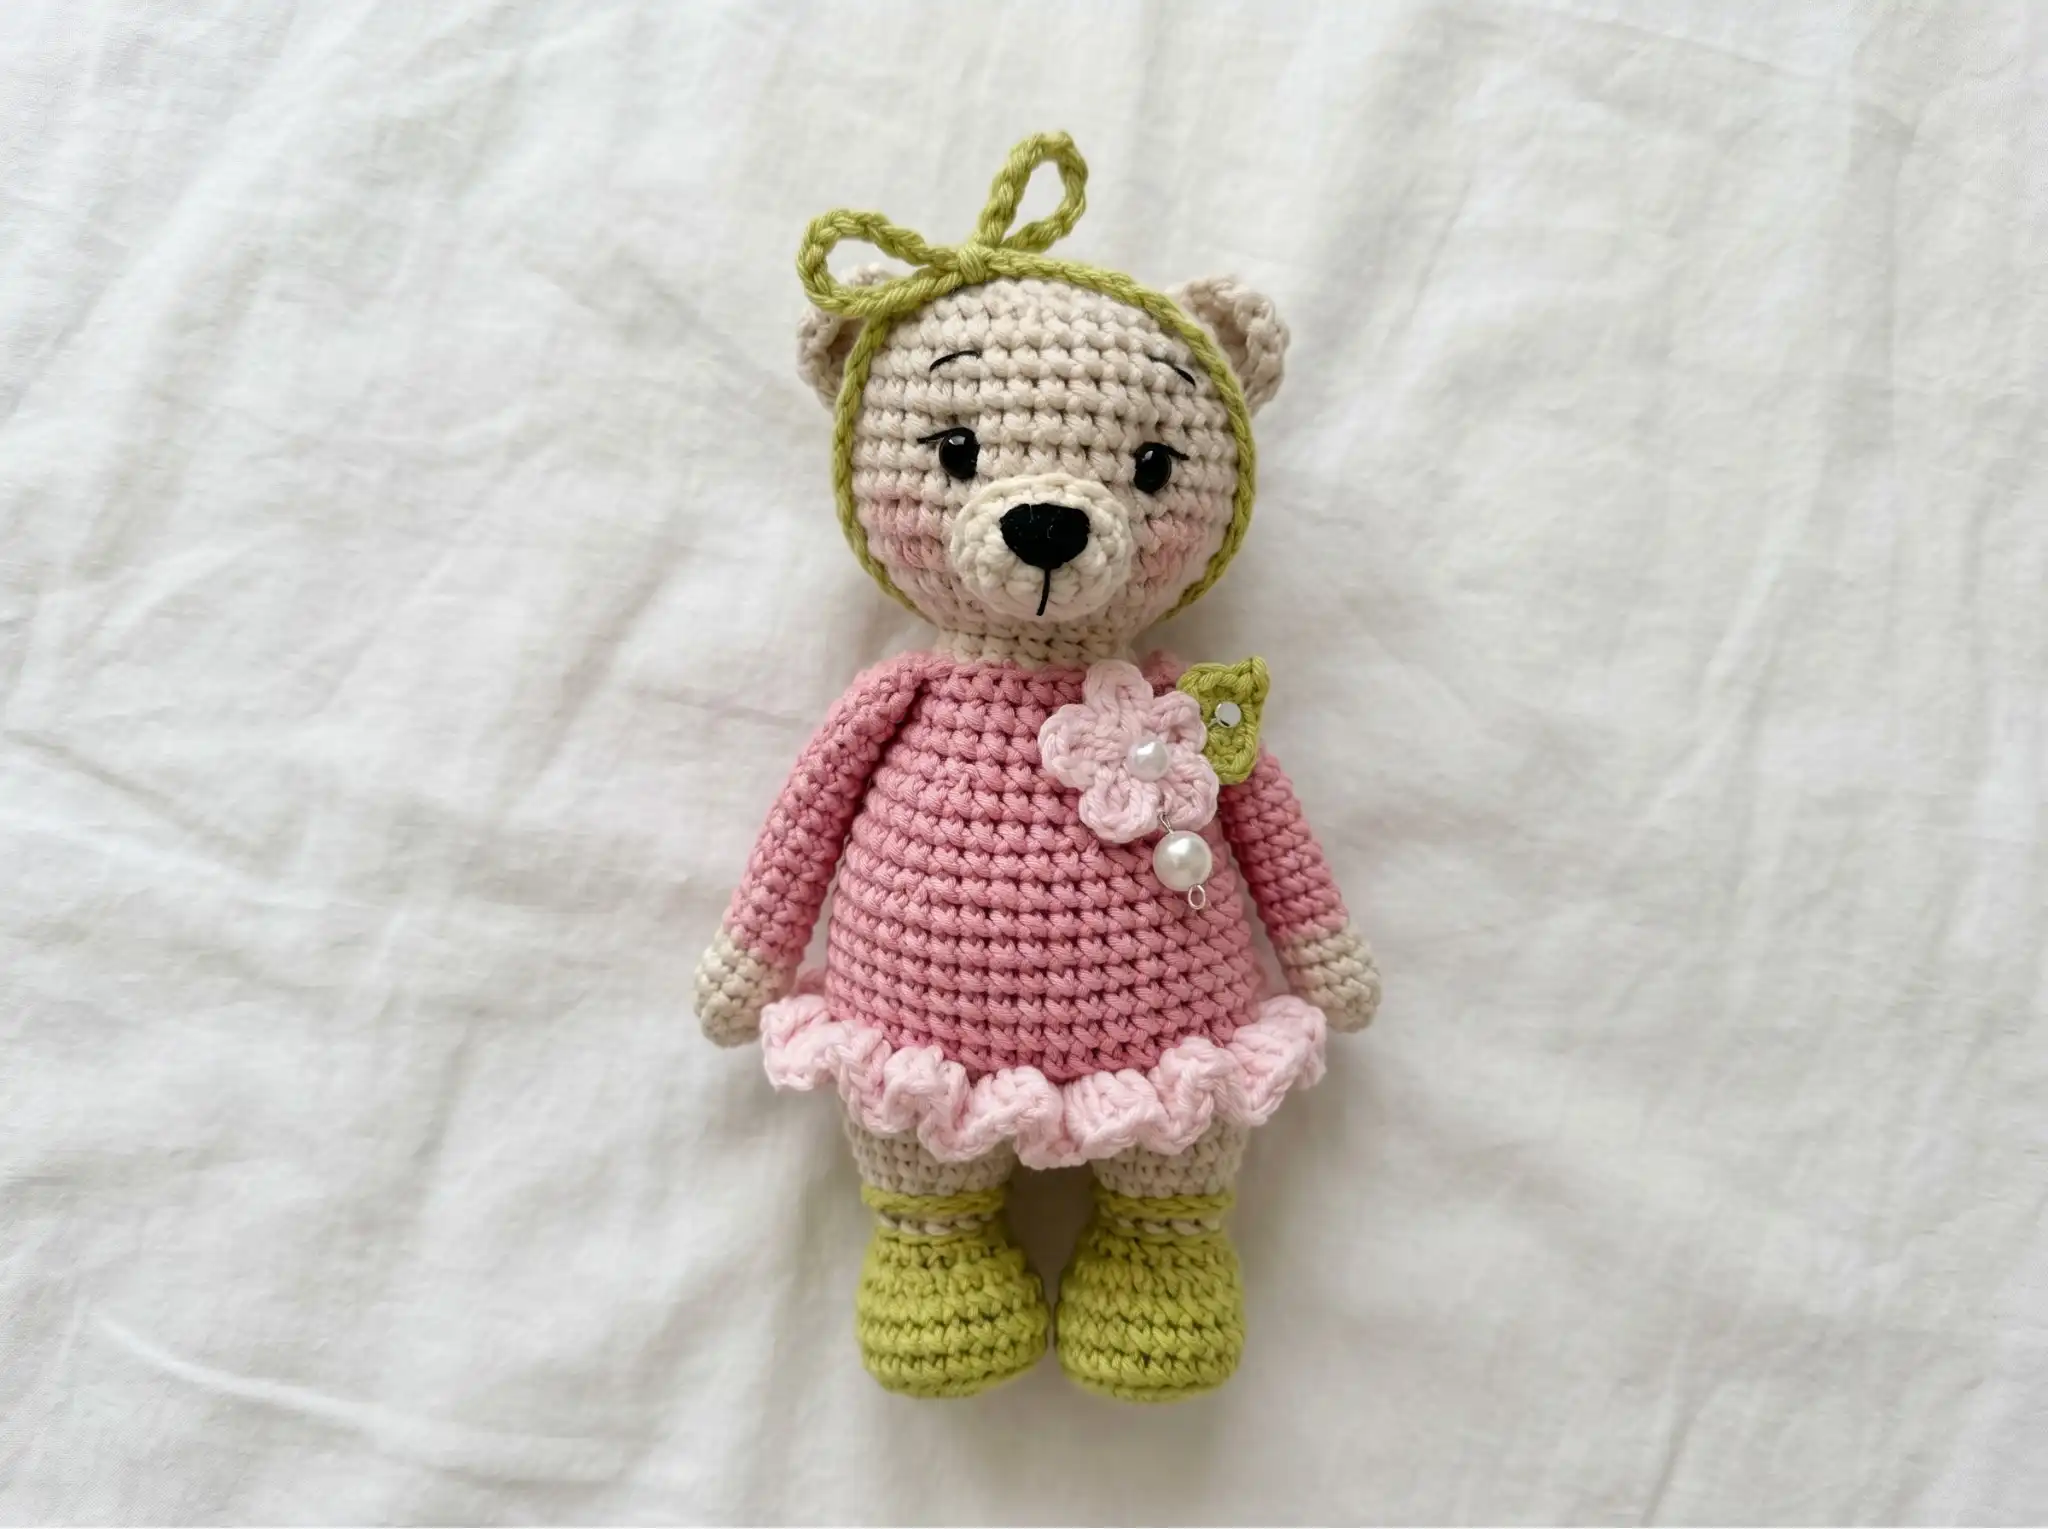
This free crochet amigurumi bear pattern creates the sweetest 5.9 in dressed-up bear — soft beige body, a blush ruffle skirt, sage green Mary Jane shoes with tiny straps, and a matching bow headband perched right on top. The cream muzzle, embroidered brows, and shiny half-bead eyes give her so much personality. Every detail on this one adds up to something really precious. She fits right in your palm and she’s honestly impossible not to love. Ready to make her?
🩷 Pattern Highlights
- Cuteness Rating: 🩷🩷🩷🩷🩷
- Finished Size: 5.9 in
- Difficulty: Intermediate
- Hook Size: 2.5mm (no standard US equivalent — between US B/1 and C/2)
- Yarn Palette: warm beige, sage green, dusty rose, warm cream, blush light pink
- Key Detail: Sculpted eye indentations, embroidered brows and nose, ruffled dress hem fanning out from the body, tiny shoe straps
- Estimated Time: 8–12 hours
Materials for This Amigurumi Bear Pattern
Part of what makes this little bear so dreamy is her color palette — warm, soft, and just the right amount of pastel contrast. Here’s everything you’ll need before you cast on.
Yarn
This pattern uses DK / Light Worsted weight (CYCA #3) yarn in five colors. The original pattern uses YarnArt Jeans, a smooth cotton-acrylic blend that gives beautifully defined stitches at this small gauge. Great US alternatives include Drops Muskat, Paintbox Simply DK, or any smooth DK-weight cotton or cotton-acrylic blend.
- Warm beige — main color for the body, head, arms, and ears
- Sage green — for the shoes, leg upper, and headband
- Dusty rose pink — for the bodice section of the body
- Warm cream — for the muzzle
- Blush light pink — for the ruffle dress hem and the flower decoration
Tools and Notions
- 2.5mm crochet hook (no standard US letter equivalent — falls between US B/1 and C/2)
- Polyester fiberfill / polyfill stuffing
- 2 × 6mm black half-bead eyes
- Super glue (for securing the half-bead eyes)
- Black embroidery thread (for lash lines, eyebrows, and nose)
- Tapestry needle (for sewing parts and weaving in ends)
- Stitch markers (at least 2)
- Pins (for assembly positioning)
- Scissors
- Small piece of stiff cardboard or thin plastic sheet (for sole inserts — optional but recommended for stability)
- Small pearl or decorative beads for the dress (optional — shown in reference photos)
🩷 Chloe’s Detail Tip: The 6mm half-bead eyes used here are a little different from standard safety eyes — they’re flat-backed domed beads, glued in place rather than snapped through the fabric with a locking washer. They give the face a really polished, glossy look. Because they’re secured with glue rather than mechanically locked, this finished bear is best as a display piece or a gift for older children and adults. For guidance on toy safety for crochet pieces, the U.S. Consumer Product Safety Commission (CPSC) has useful resources. If you’re making her for a young child, embroider the eyes with black satin stitch instead — it’s just as sweet.
Abbreviations
| Abbreviation | Meaning |
|---|---|
| mr | magic ring |
| sc | single crochet |
| hdc | half double crochet |
| dc | double crochet |
| tr | treble crochet |
| ch | chain |
| sl st | slip stitch — used to join only |
| inc | increase — 2 sc worked into the same stitch |
| 3sc-inc | triple increase — 3 sc worked into the same stitch |
| inv dec | invisible decrease — insert hook through front loops only of next 2 stitches simultaneously, yarn over, pull through, yarn over, pull through 2 loops |
| BLO | back loop only |
| FLO | front loop only |
| (…)×n | repeat the instructions inside the brackets n times |
Before You Begin — A Few Detail Notes
This amigurumi bear is worked in several separate pieces that come together in a really satisfying way. A few things to keep in mind before you pick up your hook.
Work in continuous rounds. Use a stitch marker to track the beginning of each round and move it up as you go. Don’t join rounds unless the pattern specifically says to.
The magic ring: The muzzle, arms, and legs all start with a magic ring. If this technique is still new to you, our magic ring tutorial walks you through it step by step — it’s the key to a clean, hole-free center on every piece.
The invisible decrease: This pattern uses the invisible decrease (inv dec) throughout to shape the body, head, and legs cleanly. If you want a refresher before you start, our invisible decrease tutorial shows you exactly how it’s done — it eliminates the gap that a standard decrease leaves behind, which matters so much at this small scale.
The color changes: This bear has five yarn colors across nine pieces. The most important color transitions are in the body (beige → dusty rose → beige) and in the legs (sage green → warm beige). For the legs specifically, do not cut the green yarn when you change to beige at Row 9 — you’ll bring it back for the shoe strap later.
The dress hem: The blush ruffle is worked into the front loops of Row 17 of the body after the body is finished. Keep those Row 17 front loops accessible and don’t weave in any ends there.
If you’re new to sewing amigurumi parts together, our guide to sewing amigurumi parts is worth a read before assembly. A well-centered muzzle and symmetrical ears make all the difference on a face this expressive.
Amigurumi Bear Pattern — Full Instructions
Work in continuous rounds throughout unless otherwise indicated. Stitch counts at the end of each row are shown in bold in parentheses.
Muzzle (×1)
Color: warm cream
Starting method: magic ring
Row 1: 7 sc in mr (7)
Row 2: inc in each st (14)
Row 3: work row even (14)
Fasten off, leaving a long tail for sewing. Do not stuff yet — you’ll add a tiny pinch of polyfill when you sew it onto the head during assembly.
🩷 Chloe’s Detail Tip: The muzzle is only 14 stitches around, but it carries so much of this bear’s expression. Before you sew it down, take a moment to hold it against the face and try it in a few positions. Just a millimeter or two makes the difference between curious and soft and sweet.
Ears (×2)
Color: warm beige
Starting method: slip knot loop
Row 1: Into the slip knot loop, work: sc, hdc, dc, tr, dc, hdc, sc (7)
Row 2: ch 1 to turn, turn piece and work a row of sc in BLO (7)
Pull the slip knot loop closed. Fasten off, leaving a long tail for sewing. Make the second ear the same way.
Arms (×2)
Color: warm beige, changing to dusty rose pink after Row 5
Starting method: magic ring
Row 1: 5 sc in mr (5)
Row 2: inc in each st (10)
Rows 3–5: work 3 rows even (10)
Change to dusty rose pink. Lightly stuff the beige palm section with a small amount of polyfill.
Rows 6–18: work 13 rows even (10)
Fasten off and cut yarn. Make the second arm the same way.
🩷 Chloe’s Detail Tip: You can thread a length of wire through the arm before closing to make it poseable — so sweet for display poses! If you prefer no wire, stuff the arm loosely about halfway up, then fold it flat at the open end and close it with 5 sc worked through both layers at once before fastening off.
Legs (×2)
Color: sage green (changing to warm beige at Row 9)
Starting method: magic ring
Row 1: 6 sc in mr (6)
Row 2: inc in each st (12)
Row 3: (3sc-inc)×2, 3 sc, (3sc-inc)×3, 3 sc, 3sc-inc (24)
Row 4: BLO: work row even (24)
Rows 5–6: work 2 rows even (24)
Finish Row 6 exactly at the center of the sole. If needed, work a few slip stitches to adjust positioning before continuing.
Row 7: 6 sc, (inv dec)×6, 6 sc (18)
Row 8: 3 sc, (inv dec)×6, 3 sc (12)
Change to warm beige. Do not cut the sage green yarn — bring it to the front and let it rest there. You’ll use it again for the shoe strap.
Row 9: BLO: work row even (12)
That BLO row creates a crisp horizontal ridge that visually separates the shoe from the leg. It’s a tiny detail and it makes the Mary Jane silhouette look so deliberate and neat.
Row 10: (3 sc, inc)×3 (15)
Row 11: work row even (15)
Row 12: 2 sc, inc, (4 sc, inc)×2, 2 sc (18)
Row 13: work row even (18)
Shoe strap: Return to the ridge at Row 9 using the sage green yarn you left at the front. Chain 14. Wrap this chain around the leg at the ridge to form the shoe strap and sew the end of the chain securely to the back at the point where the chain began.
Sole insert (optional): Cut a small oval from stiff cardboard or thin plastic and slip it into the base of the shoe for extra stability before the leg is joined to the body.
Alignment note: After Row 13, fold the top of the leg flat to find the center of the inner leg — the seam point that will sit at the join. On the first leg, work an additional 4 sc to reach this point, then fasten off and cut yarn. On the second leg, work an additional 13 sc to reach this point — do not cut yarn. Continue directly to the body.
Body (×1)
Color: warm beige (changing to dusty rose after Row 15, then back to beige before Row 31)
Starting method: continued from the second leg
Row 14: 18 sc along the first leg + 18 sc along the second leg (36)
Join to the first leg at the stitch immediately after the 4 additional sc you worked at the end of that leg. You’re now working in a round that encircles both legs.
Row 15: 4 sc, inc, (8 sc, inc)×3, 4 sc; additionally work 20 sc to reposition at the new round start (40)
The 40-stitch count is the total for this increase round. After completing it, work 20 additional sc to move your hook to the correct starting position for the new round. Place your stitch marker here.
Change to dusty rose pink and mark the new round beginning.
Row 16: work row even (40)
Row 17: BLO: work row even (40)
Keep those front loops from Row 17 free and accessible — the dress ruffle will be worked back into them after the body is complete.
Rows 18–22: work 5 rows even (40)
Row 23: 4 sc, inv dec, (8 sc, inv dec)×3, 4 sc (36)
Row 24: work row even (36)
Row 25: (7 sc, inv dec)×4 (32)
Row 26: work row even (32)
Row 27: 3 sc, inv dec, (6 sc, inv dec)×3, 3 sc (28)
Row 28: work row even (28)
Row 29: (5 sc, inv dec)×4 (24)
Row 30: join arms symmetrically on both sides. Example: 5 sc, 5 sc working together with arm, 7 sc, 5 sc working together with arm, 2 sc (24)
Change back to warm beige before Row 31.
Row 31: (1 sc, inv dec)×8 (16)
Rows 32–33: work 2 rows even (16)
Stuff the body firmly and evenly before the opening becomes too small to work through comfortably. For tips on getting smooth, lump-free results, our guide to stuffing amigurumi covers exactly how to build the shape you want. Do not fasten off — continue directly to the head.
Head (×1)
Color: warm beige (continued from the neck)
Starting method: continued from body
The head expands quickly from the narrow neck — those first few increase rows are where the shape really starts to emerge.
Row 34: inc in each st (32)
Row 35: (7 sc, inc)×4 (36)
Row 36: (5 sc, inc)×6 (42)
Rows 37–43: work 7 rows even (42)
Row 44: (5 sc, inv dec)×6 (36)
Row 45: 2 sc, inv dec, (4 sc, inv dec)×5, 2 sc (30)
Row 46: (3 sc, inv dec)×6 (24)
Row 47: 1 sc, inv dec, (2 sc, inv dec)×5, 1 sc (18)
Stuff the head firmly and evenly before the opening closes too much. This is also a good moment to roughly position your half-bead eyes against the face to check placement — you’ll glue them properly during assembly.
Row 48: (1 sc, inv dec)×6 (12)
Row 49: (inv dec)×6 (6)
Pull tight to close, fasten off, and weave in the end.
Dress Hem (×1)
Color: blush light pink
Starting method: attach yarn to the front loops of Row 17 of the body
Row 1: With blush light pink, work 3 dc in each front loop of Row 17 of the bear’s body (120)
Fasten off and weave in ends.
This is the moment the dress comes alive. Those 120 double crochets fanning out from a single saved row of front loops create the softest, most delicate ruffle. So, so satisfying to watch it open up.
Flower (×1)
Color: blush light pink
Starting method: slip knot loop
Row 1: Into the slip knot loop, work: (ch 2, 2 dc, ch 2, sl st)×5 (5 petals)
Pull the slip knot loop closed. Fasten off, leaving a long tail for sewing.
Headband (×1)
Color: sage green
Starting method: chain
Row 1: ch 65 (65)
Join the two ends of the chain together. Tie a bow at the center of the headband.
Assembly
- Mark the eye positions. Between Rows 39 and 40 of the head, use two pins to mark a point on each side of the face (P1 and P3) spaced 6 sc apart, centered on the front of the head.
- Mark the secondary points. From P1, mark a second point (P2) exactly 1 sc away. From P3, mark a second point (P4) exactly 1 sc away in the opposite direction.
- Create the eye indentations. Thread a tapestry needle with a length of matching yarn. Insert the needle at P1, bring it out at P3. Then insert from P3 down into P4, coming out at P2. Pull the yarn gently and firmly to create a soft indentation at each eye position. Repeat once more through the same four points to reinforce. These recessed sockets give the face a beautiful doll-like depth — the eyes will appear set into the face rather than sitting on top of it.
- Glue on the eyes. Apply a small drop of super glue to the flat back of each 6mm black half-bead. Press each one firmly into its indented position. Hold until set and allow to dry completely before moving on. (See the detail tip in the “Making It Extra Cute” section before this step.)
- Sew on the muzzle. Add a small pinch of polyfill to the cream muzzle, then pin it to the face centered below the eyes. Sew it down with the long yarn tail and a tapestry needle, checking symmetry from straight on as you work.
- Sew on the ears. Pin the ears to both sides of the head at your preferred height and angle. Sew them down securely.
- Embroider the face details. Using black embroidery thread, add the lash line across the base of each eye, the eyebrows angled gently inward above each eye, and the nose (a small downward vertical line centered at the top of the muzzle, with a short horizontal stitch at the base).
- Attach the flower. Sew the blush light pink flower to the front of the dress. If desired, stitch a few small pearl or decorative beads around the center of the flower.
- Add the headband. Place the sage green chain headband on the head with the bow toward the front-center.
Making This Amigurumi Bear Extra Cute — Finishing Details
This is my favorite part of the whole process. The bear is already adorable at this point — but the finishing details are what take her from sweet to absolutely irresistible. Here’s how I approach each one.
The Eye Indentation Technique
The P1–P4 thread-pulling step is borrowed from soft doll-making, and it genuinely transforms the face. When you pull the yarn through those four points, you’re creating a subtle concave depression in the fabric that makes the eyes look set in rather than stuck on. The result is a face with so much more expression and depth. Work gradually — tighten the thread slowly rather than pulling hard all at once, and check from straight-on as you go. You want a gentle, even indent, not a pinch.
Getting the Half-Bead Eyes Perfectly Placed
Before you touch the super glue: hold the bear at arm’s length and look at her face straight on. Place a pin at each intended eye position and step back. Check that both eyes are at the same height and equally distant from the center of the muzzle. Then check again from slightly above — the symmetry looks different from different angles. Only when both positions feel right do you reach for the glue. You cannot undo glued half-beads once they’ve set. That extra thirty seconds of checking is everything.
The Embroidered Cheeks
A piece isn’t finished without the cheeks. Using blush pink embroidery thread or a thin strand of the light pink yarn, embroider two small soft ovals just below and to the outside of each eye. Four or five short parallel stitches, curved gently — that’s all you need. Keep them soft and subtle; the cheeks should whisper rather than shout. That delicate blush is what makes her face feel warm and alive rather than flat. Okay but those cheeks though.
The Eyebrows
Two or three straight stitches in black embroidery thread, angled gently inward toward the center of the face — not steeply enough to look worried, just enough to look expressive and full of feeling. Position them just above each eye. This is a tiny detail that gives her so much character. Take your time with the angle.
Color Variations
This bear is beautiful in her original warm beige and blush palette, but she’s endlessly adaptable. A few variations I’d love to make:
- Soft ivory body with a dusty lavender dress and lilac bow headband
- Warm caramel body with a mint green dress and peach accents
- Pale cream body with a soft butter yellow dress and a daisy headband
The five-color construction makes swapping palettes so satisfying — each combination feels like an entirely new character. If you love making little bears and want to try a different silhouette, our classic teddy bear amigurumi is a wonderful companion piece — same sweet energy, completely different look.
Chloe’s Final Look
I have been staring at this finished little bear for way too long and I have absolutely zero regrets. The blush ruffle fanning out from that saved Row 17, the tiny sage green shoe straps, the shiny half-bead eyes nestled into their sculpted indentations, the little bow sitting just so on the headband — every single detail is working together and the result is genuinely precious. Make her in three pastel colorways and line them up on a shelf. You will not be able to stop smiling. 🩷
What yarn is best for this amigurumi bear?
This pattern uses DK / Light Worsted weight (CYCA #3) cotton-acrylic blend yarn, such as YarnArt Jeans, which provides beautifully defined stitches at a small gauge.
How long does it take to crochet this amigurumi bear?
The estimated time to complete this detailed bear is between 8 to 12 hours, depending on your crochet speed and experience with assembly.
Can beginners make this amigurumi bear pattern?
This pattern is rated at an intermediate difficulty. It involves color changes, joining legs, and intricate finishing details like sculpting the face.