Free Butterfly Amigurumi Pattern — Tiny Winged Rattle Toy
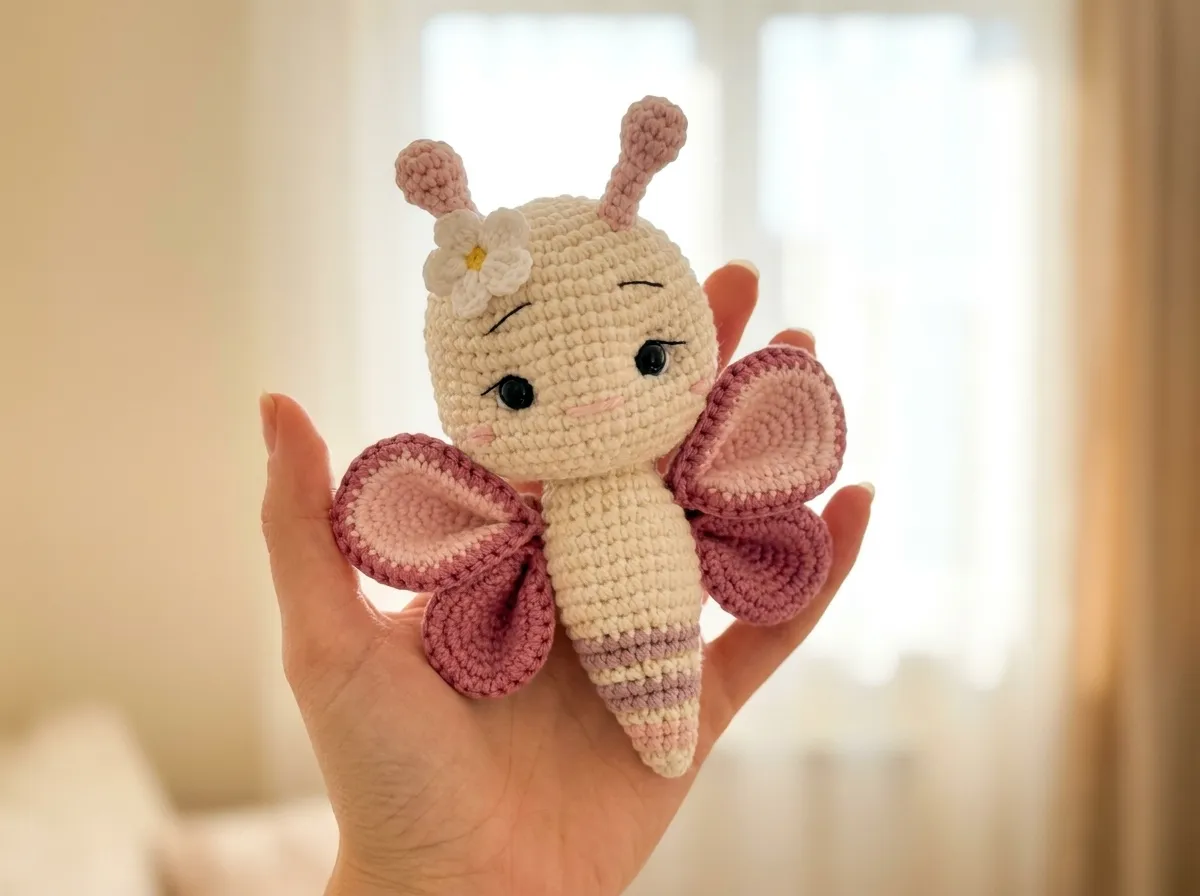
This butterfly amigurumi free pattern creates one of the most enchanting little projects I’ve ever made — a 6.3-inch winged friend with layered dimensional wings, a softly embroidered kawaii face, and a matching crinkle flower rattle that tiny hands will absolutely love. She comes to life in dreamy pastels — soft lavender, warm blush, and mint green — with glossy 8mm safety eyes that catch the light like little stars. The details on this one are everything. Let me show you how it all comes together.
🩷 Pattern Highlights
- Cuteness Rating: 🩷🩷🩷🩷🩷
- Finished Size: Butterfly 6.3 in (16 cm) tall | Flower rattle ~4.3 in (11 cm) diameter
- Difficulty: Intermediate
- Hook Size: B/1 (2.0 mm)
- Yarn Palette: soft lavender, warm blush pink, mint green, creamy off-white — a full dreamy pastel butterfly set
- Key Detail: layered dimensional wings, embroidered eyelashes and rosy cheeks, crinkle flower rattle with beech wood ring
- Estimated Time: 10–14 hours
What You’ll Need for This Butterfly Amigurumi Free Pattern
Yarn
- Yarn Art Jeans (US alternatives: Drops Muskat or Paintbox Simply Cotton DK) — DK / Light Worsted Weight (3), smooth and perfect for tiny stitch definition
- Colors: a soft pastel mix — think dusty lavender, warm blush pink, creamy off-white, and a pop of mint. The original uses shades 03, 05, 65, 74, 01, and 67 from Yarn Art Jeans. Feel free to riff on any pastel combination that makes your heart sing.
- Thin black thread — for embroidering eyelashes, eyebrows, and nose
- White thread — for embroidering eye whites (the secret to that sparkling kawaii expression)
Hook & Tools
- Crochet hook: B/1 (2.0 mm)
- Safety eyes: 8mm × 2 (these are the entire soul of her expression — choose glossy black for maximum sparkle)
- Polyfill stuffing — Poly-Fil works beautifully here; insert gradually to control that round, squishy shape
- Tapestry needle — for sewing parts and weaving in ends
- Scissors
For the Flower Rattle
- Beech wood ring, 55mm — the perfect little grip handle for tiny hands
- Rattle insert, 24mm — fits snugly inside the flower center
- Oven roasting bag — cut into small squares and crinkled for that irresistible rustle sound inside each petal
🩷 Chloe’s Color Note: My absolute favorite combination for this butterfly? Soft lilac wings, blush pink body stripes, and a flower rattle in butter yellow with a warm rose center. If you line up three of them in different pastels on a shelf, I cannot be held responsible for what happens to your heart.
A Note on Toy Safety
If this butterfly is intended as a toy for a child under three, please replace the 8mm safety eyes with embroidered eyes instead — safety eyes are not recommended for very young children. The U.S. Consumer Product Safety Commission has toy safety guidelines worth reviewing before gifting any handmade toy to a little one. Make sure the rattle insert is fully secured inside the closed flower center before it goes into small hands.
Abbreviations Used in This Butterfly Amigurumi Pattern
| Abbreviation | Meaning |
|---|---|
| mr | Magic ring — an adjustable loop start that closes completely to eliminate the center hole |
| ch | Chain |
| sc | Single crochet |
| inc | Increase — 2 sc worked into the same stitch |
| dec | Invisible decrease — insert hook through the front loops only of the next 2 stitches simultaneously, yarn over, pull through, yarn over, pull through 2 loops. This method keeps your surface smooth and gap-free, which matters so much on a piece this sweet. |
| dc | Double crochet |
| sl st | Slip stitch — used here to join rounds and close pieces |
| FLO | Front loop only |
| (…) × n | Repeat the instructions in parentheses n times |
| FO | Fasten off |
Before You Begin — The Details That Make Her Magical
This butterfly amigurumi free pattern has a few techniques that are a little different from a standard amigurumi, and knowing about them before you sit down to crochet makes the whole experience so much more enjoyable. Here’s what to keep in mind.
The Safety Eyes Slot Right Into the Pattern
Row 15 of the Head-Body creates two tiny chain loop openings — and your 8mm safety eyes are inserted directly through those openings rather than pierced through the fabric afterward. This is one of my favorite things about this pattern because the placement is already built in for you. That said, before you press those washers on, hold the piece under a bright lamp and check the symmetry from directly in front. Once the washer clicks, it’s permanent — so take that extra thirty seconds and make sure she’s looking back at you perfectly. If you’d like to brush up on the technique, our how to attach safety eyes tutorial covers everything you need to know about positioning and securing them just right.
🩷 Chloe’s Detail Tip: Before pressing the washers on, I always set the piece down on a flat surface and crouch down to eye level with her. Something about that angle reveals any asymmetry immediately. It feels a little silly but I have never regretted it once.
The Wings Are Built in Layers — and It’s Worth Every Step
Each wing pair consists of two flat circles — a smaller piece and a larger piece — crocheted separately and then stacked and joined together in a final pass. The result is a wing with gorgeous three-dimensional body and depth that you simply cannot achieve any other way. The key thing to remember: when you finish the large piece, do not fasten off. You’ll use that working yarn to join the two pieces together immediately. It feels a little like a magic trick the first time.
Color Changes Shape the Butterfly’s Body
The beautiful striped tail of this butterfly comes from color changes starting at Row 37 of the Head-Body. Changes occur before Rows 37, 39, 40, 42, 43, and 45 — these are the decreasing rows that taper the body into its pointed tail. Plan your color sequence before you begin so you can enjoy watching those stripes appear one by one. For clean color transitions, switch to the new shade on the very last yarn-over of the final stitch of the row before the change. If you’re new to amigurumi and want a full orientation before you dive in, our complete beginner’s guide to amigurumi has everything you need to start with confidence.
Free Butterfly Amigurumi Pattern Instructions
Part 1: Head-Body (×1)
Yarn color: Main color for the head and upper body; color changes begin at Row 37 for the striped tail
Starting method: Magic ring
Row 1: 6 sc in mr (6)
Row 2: 6 inc (12)
Row 3: (1 sc, inc) × 6 (18)
Row 4: (2 sc, inc) × 6 (24)
Row 5: (3 sc, inc) × 6 (30)
Row 6: (4 sc, inc) × 6 (36)
Row 7: (5 sc, inc) × 6 (42)
Row 8: (6 sc, inc) × 6 (48)
Row 9: (7 sc, inc) × 6 (54)
Rows 10–14: 54 sc (5 rows) (54)
The head is fully round now — you can feel that satisfying sphere forming in your hands. Keep your tension nice and tight so the stuffing won’t peek through later.
🩷 Safety Eye Row — Read Before You Begin Row 15: Row 15 creates the two chain loop openings for your 8mm safety eyes. Work through the row carefully, then insert the safety eyes through those loops before continuing. Once Rows 16 onward close up around the head, you won’t be able to insert them anymore.
Row 15: 10 sc, ch, sc in 2nd ch from hook, 10 sc, ch, sc in 2nd ch from hook, 32 sc (54)
→ Insert 8mm safety eyes through the two chain loop openings now. Secure washers from the inside.
Rows 16–19: 54 sc (4 rows) (54)
Row 20: (7 sc, dec) × 6 (48)
Row 21: (6 sc, dec) × 6 (42)
Row 22: (5 sc, dec) × 6 (36)
Row 23: (4 sc, dec) × 6 (30)
Row 24: (3 sc, dec) × 6 (24)
Row 25: (2 sc, dec) × 6 (18)
Row 26: 18 sc (18)
Stuff the head firmly as you work these decrease rows, adding polyfill gradually through the opening. This is also a great moment to gently cinch the muzzle area with your yarn tail to define that sweet, rounded face shape before the opening gets too small.
Row 27: (2 sc, inc) × 6 (24)
Rows 28–29: 24 sc (2 rows) (24)
Row 30: (3 sc, inc) × 6 (30)
Rows 31–35: 30 sc (5 rows) (30)
This is the widest point of the body — the wings will attach right around this section (Rows 29–31). Take a moment to appreciate how round and perfect the silhouette looks right now.
Row 36: (3 sc, dec) × 6 (24)
Rows 37–38: 24 sc (2 rows) (24) — change color before Row 37
Row 39: (2 sc, dec) × 6 (18) — change color before Row 39
Rows 40–41: 18 sc (2 rows) (18) — change color before Row 40
Row 42: (1 sc, dec) × 6 (12) — change color before Row 42
Rows 43–44: 12 sc (2 rows) (12) — change color before Row 43
Row 45: 6 dec (6) — change color before Row 45
Row 46: 6 sc (6)
Those little pastel stripes tapering down into the tail? That’s the moment the butterfly really starts to have a personality. I love watching this section come together.
Finishing: Close the opening and weave in all ends. Cinch the face gently to define the muzzle. Embroider eye whites with white thread, then eyelashes, eyebrows, and nose with thin black thread. Add rosy cheeks. (See the Making It Extra Cute section — this is the whole point.)
Part 2: Antennae (×2)
Starting method: Magic ring
Make two of these — they’re quick and so, so cute with their little round tips.
Row 1: 6 sc in mr (6)
Row 2: 6 inc (12)
Rows 3–4: 12 sc (2 rows) (12)
Row 5: 6 dec (6)
Rows 6–9: 6 sc (4 rows) (6)
Finishing: Pull the yarn tail through to close the opening. Make two antennae total. Sew them between Rows 5 and 8 of the head, spacing them 8–9 stitches apart.
Part 3: Large Wings (×2 complete wings)
🩷 How the Layered Wings Work: Each large wing is made of two flat circles — a small piece and a large piece — that get stacked and crocheted together. Make the small piece first and set it aside. Then make the large piece but do not fasten off. Place the large piece on top of the small piece and use the working yarn to crochet through both layers together in one final pass. The result is a thick, dimensional wing with gorgeous depth. Make two complete wings total.
Small piece (make 2):
Row 1: 6 sc in mr (6)
Row 2: 6 inc (12)
Row 3: (1 sc, inc) × 6 (18)
Row 4: (2 sc, inc) × 6 (24)
Row 5: (3 sc, inc) × 6 (30)
Row 6: (4 sc, inc) × 6 (36)
Row 7: (5 sc, inc) × 6, sl st (42)
Fasten off. Set aside.
Large piece (make 2):
Work Rows 1–7 exactly as the small piece above, but do not fasten off. Place the large piece on top of the small piece and continue crocheting through both pieces together for 42 sc. (42)
Finishing: Fold and sew 6 stitches through both layers at one end to gather the wing into its shape. Make two complete large wings.
Part 4: Small Wings (×2 complete wings)
Same layered construction as the large wings, just a little smaller and even more precious.
Small piece (make 2):
Row 1: 6 sc in mr (6)
Row 2: 6 inc (12)
Row 3: (1 sc, inc) × 6 (18)
Row 4: (2 sc, inc) × 6 (24)
Row 5: (3 sc, inc) × 6, sl st (30)
Fasten off. Set aside.
Large piece (make 2):
Work Rows 1–5 exactly as the small piece above, but do not fasten off. Place the large piece on top of the small piece and continue crocheting through both pieces together for 30 sc. (30)
Finishing: Fold and sew 4 stitches through both layers at one end to gather the wing shape. Make two complete small wings.
Part 5: Small Flower Accessory for Butterfly (×1)
Starting method: Magic ring
This tiny five-petal flower gets sewn right near one of the antennae — the sweetest little hair accessory. Use a contrasting color for maximum cuteness.
Row 1: 5 sc in mr, sl st (5) — change color after Row 1
Row 2: (3 ch, 3 dc, 3 ch, sl st) × 5
Finishing: Fasten off and weave in ends. Sew near one of the antennae.
That little flower is going to make you squeal when you see it in place. I guarantee it.
Part 6: Flower Rattle Petals (×6)
Make six petals — each one gets stuffed with crinkle material for the most delightful sound effect. These use a 5-stitch multiple throughout because the rattle flower is worked on a base of 5.
Starting method: Magic ring
Row 1: 5 sc in mr (5)
Row 2: 5 inc (10)
Row 3: (1 sc, inc) × 5 (15)
Row 4: (2 sc, inc) × 5 (20)
Row 5: (3 sc, inc) × 5 (25)
Rows 6–7: 25 sc (2 rows) (25)
Row 8: (3 sc, dec) × 5 (20)
Row 9: (2 sc, dec) × 5 (15)
Row 10: (1 sc, dec) × 5 (10)
Row 11: 5 dec (5)
🩷 Crinkle Filling Tip: Cut the oven roasting bag into small squares — two or three layered squares per petal gives the best crinkle sound without adding too much bulk. Stuff each petal with the crinkle squares, then fold the petal in half and single crochet through both layers for 5 sc to seal it shut. There is something deeply satisfying about that little crinkle sound on the first squeeze. Repeat for all 6 petals.
Finishing: Close the opening and weave in ends. Make six petals total.
Part 7: Flower Center (×1)
Starting method: Magic ring
This is the heart of the rattle flower — it holds the rattle insert and anchors all six petals.
Row 1: 5 sc in mr (5)
Row 2: 5 inc (10)
Row 3: (1 sc, inc) × 5 (15)
Row 4: (2 sc, inc) × 5 (20)
Row 5: (3 sc, inc) × 5 (25)
Row 6: (4 sc, inc) × 5 (30)
Rows 7–9: 30 sc (3 rows) (30)
🩷 Important — Attach Petals Before You Continue: Before working Row 10, attach all 6 petals evenly spaced around Row 7. Each petal is joined with 5 sc through both layers (6 petals × 5 sts = 30 sts total, working around the full round). Do this before the piece closes up. Then insert the 24mm rattle before fully closing the center in the final rows below.
Row 10: (4 sc, dec) × 5 (25)
Row 11: (3 sc, dec) × 5 (20)
Row 12: (2 sc, dec) × 5 (15)
Row 13: (1 sc, dec) × 5 (10)
Finishing: Insert the 24mm rattle before the opening is fully closed. Close the opening and weave in ends. The flower is complete — give it a little shake. 🩷
Part 8: Ring Sleeve (×1)
The ring sleeve wraps around the 55mm beech wood ring and turns it into the handle of the rattle flower. This piece is worked flat in turned rows — a lovely little change of pace after all those continuous rounds.
Work in turned rows; chain 1 to turn at the end of each row.
Row 1: 20 ch, starting in 2nd ch from hook: 19 sc (19)
Rows 2–9: 19 sc (8 rows) (19)
Finishing: Leave a long tail for sewing. Wrap the finished sleeve around the beech wood ring and sew the long edges together securely to close it around the ring.
Butterfly Amigurumi Assembly
Before you start sewing, lay every piece out in front of you — the little body, both sets of wings, the tiny antennae, the flower. Take a moment. This is genuinely one of the sweetest sights in crochet. Now let’s put her together.
- Sew the antennae between Rows 5 and 8 of the head, spacing them 8–9 stitches apart.
- Sew the large wings between Rows 29 and 30 of the body, spacing them 9 stitches apart.
- Sew the small wings between Rows 30 and 31 of the body, spacing them 11 stitches apart.
- Sew the small flower near one of the antennae — position it like a tiny hair ornament.
- Sew the completed rattle flower to the ring sleeve, attaching through one of the petals.
- Confirm the rattle insert is fully enclosed inside the Flower Center before giving the set to anyone — especially little ones.
Getting the wings perfectly symmetrical and sitting at the right angle is one of those things that benefits from a little patience. Pin them in place before committing to stitches, and check from the front and from above. Our guide to sewing amigurumi parts together has detailed tips for getting clean, invisible attachment points — especially useful for those lovely layered wings.
Making This Butterfly Amigurumi Extra Cute — The Finishing Details
Okay. This is my favorite section in the whole article. The crochet is done. She’s assembled. But right now she’s not quite finished — she’s missing the details that transform a sweet little amigurumi into something completely irresistible. This is where it happens. This is the part that matters most.
Step 1: Embroider the Eye Whites
Using white thread and a tapestry needle, embroider a small oval or soft half-circle of white just above each safety eye. This creates the bright, anime-style highlight that makes her look wide-eyed and wonderfully alive. Keep the whites slightly soft and organic — a perfectly geometric circle can look stiff, but a gently irregular oval looks hand-crafted and charming.
Step 2: Add the Eyelashes and Eyebrows
With thin black thread, embroider 2–3 delicate lash lines curving upward from the outer edge of each eye. Then add tiny arched brows above each eye — just a gentle curved stroke. Keep both lines very fine and close to the eyes. The expression you’ll create is pure kawaii: wide, curious, completely beguiling.
Step 3: Embroider the Nose
Between the eyes and just slightly below, a tiny Y-shape or two short diagonal lines makes the most perfectly dainty butterfly nose. Don’t overthink it. The smallest mark makes the biggest difference.
Step 4: The Rosy Cheeks — This Is Everything
I saved this for last because it’s the detail that completes her. There are two methods, and I personally use both.
Embroidered cheeks: With soft blush pink thread, work 5–6 parallel satin stitches in a small rounded oval shape just below and slightly outside each eye. Close stitches, sitting right next to each other. This creates a soft, slightly raised blush that looks exactly like a kawaii illustration brought to life.
Blush powder method: Dip a cotton swab very lightly into pink makeup blush and dab soft circles onto each cheek area. A fabric sealant spray keeps it from rubbing off over time. This gives a gradient, airbrushed finish — dreamy and soft in a completely different way from embroidery.
🩷 Chloe’s Detail Tip: I do both. I embroider the base cheeks first in soft pink thread, then very lightly layer blush powder over the top for a gradated glow. The effect makes her look like she’s permanently, incurably blushing from being too cute. Which, honestly, is just accurate.
Step 5: Position the Small Flower Just Right
The tiny five-petal flower near the antenna deserves thoughtful placement. Angle it so it sits naturally — like she’s wearing it as an ornament. A contrasting color combination makes it pop: butter yellow petals against a lavender body, or a warm coral flower against mint. One more small detail that makes the whole piece feel complete and cohesive.
Color Variation Ideas
- Sakura Dream: Soft blush pink wings, cream body with pale rose stripes, white flower with a warm honey center
- Lavender & Gold: Dusty lilac wings, soft white body, butter yellow stripes, golden flower — delicate and luminous
- Mint Blossom: Mint green wings, creamy body with soft sage stripes, blush pink flower center — so light and fresh it barely seems real
- Full Pastel Rainbow: Make each wing a different soft hue — sky blue, lavender, blush, and mint all in one butterfly. Chaotic and completely adorable.
Chloe’s Final Look 🩷
I’ve been sitting here staring at this finished butterfly for an unreasonable amount of time and I genuinely do not regret a single second of it. The layered wings have this incredible dimensional quality that photographs beautifully from every angle. The glossy eyes catch the light exactly right. And those tiny embroidered cheeks and lashes — I can’t even handle how much personality she has in that face.
Display her on a shelf next to the flower rattle and she looks like she belongs in a fairy tale. Make three in different pastel colorways and hang them as a mobile — mint, lavender, and blush swaying softly — and you will absolutely not be able to stop smiling. She’s that kind of cute, and she’s all yours now. 🩷
What yarn is best for this butterfly amigurumi free pattern?
Yarn Art Jeans (DK/Light Worsted Weight) is the recommended yarn for its smooth texture and crisp stitch definition at the small 2.0mm gauge. Good US alternatives are Drops Muskat or Paintbox Simply Cotton DK.
How long does it take to crochet this butterfly amigurumi?
The complete set — butterfly body, four layered wings, antennae, small flower accessory, and crinkle flower rattle — takes approximately 10 to 14 hours total.
Can beginners make this butterfly amigurumi free pattern?
This pattern is rated Intermediate. Beginners comfortable with magic rings, increases, decreases, and basic amigurumi assembly can attempt it, but the layered wing construction and body color changes work best with some prior amigurumi experience.