Romantic Amigurumi Collection — Free Crochet Bride, Groom & Sweetheart Pattern
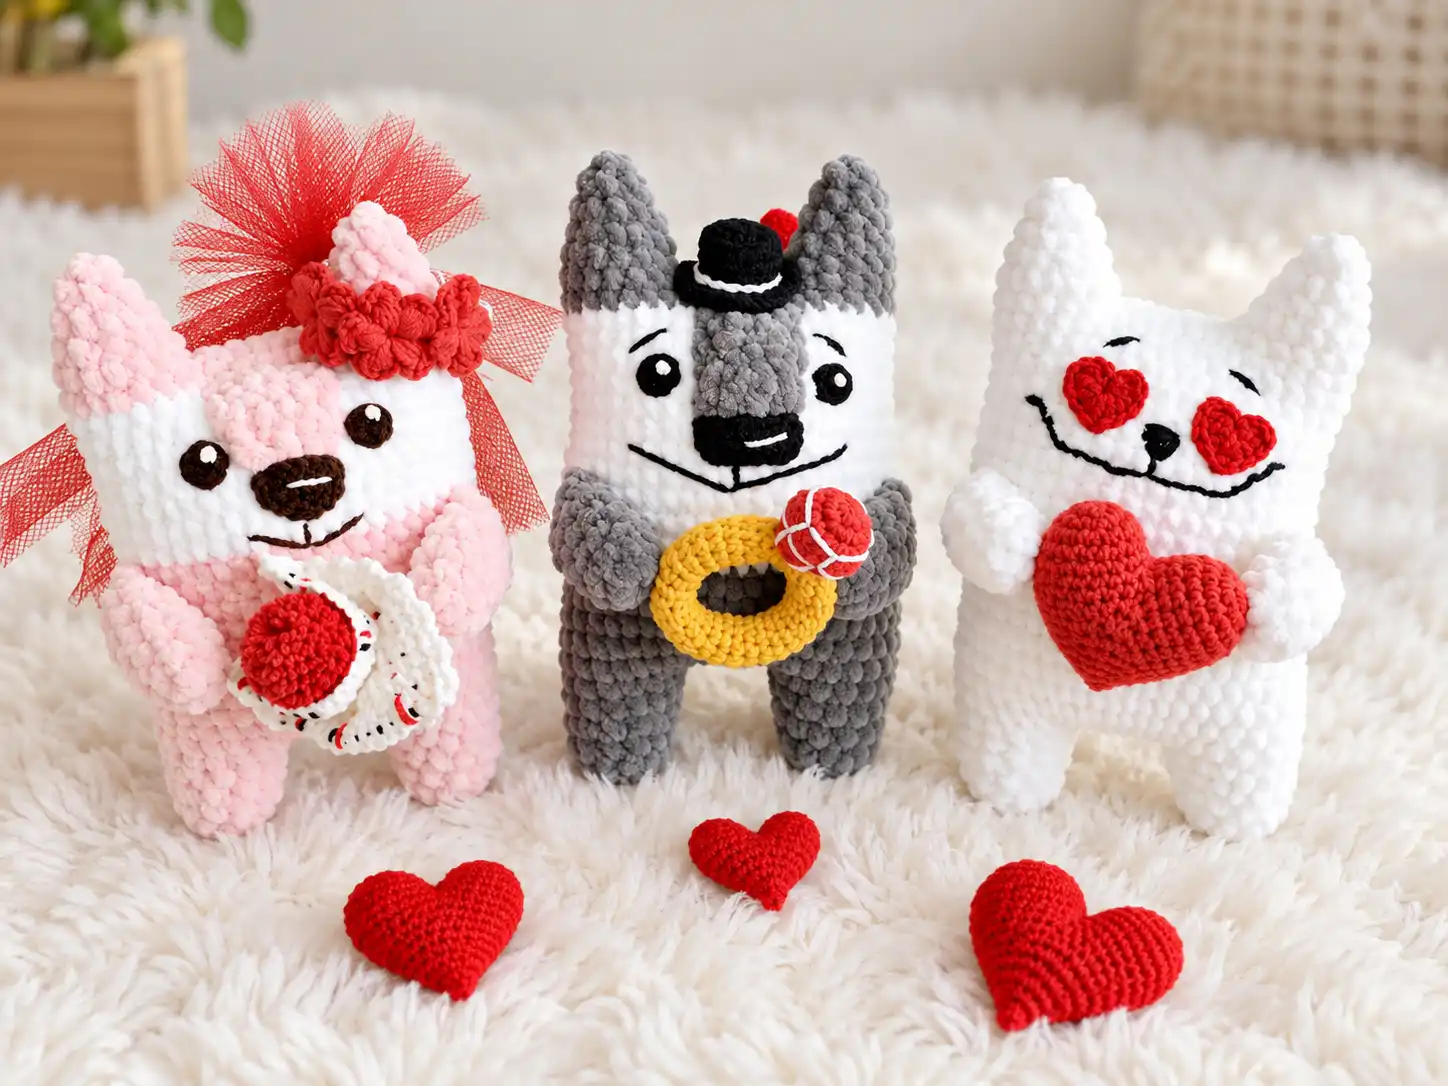
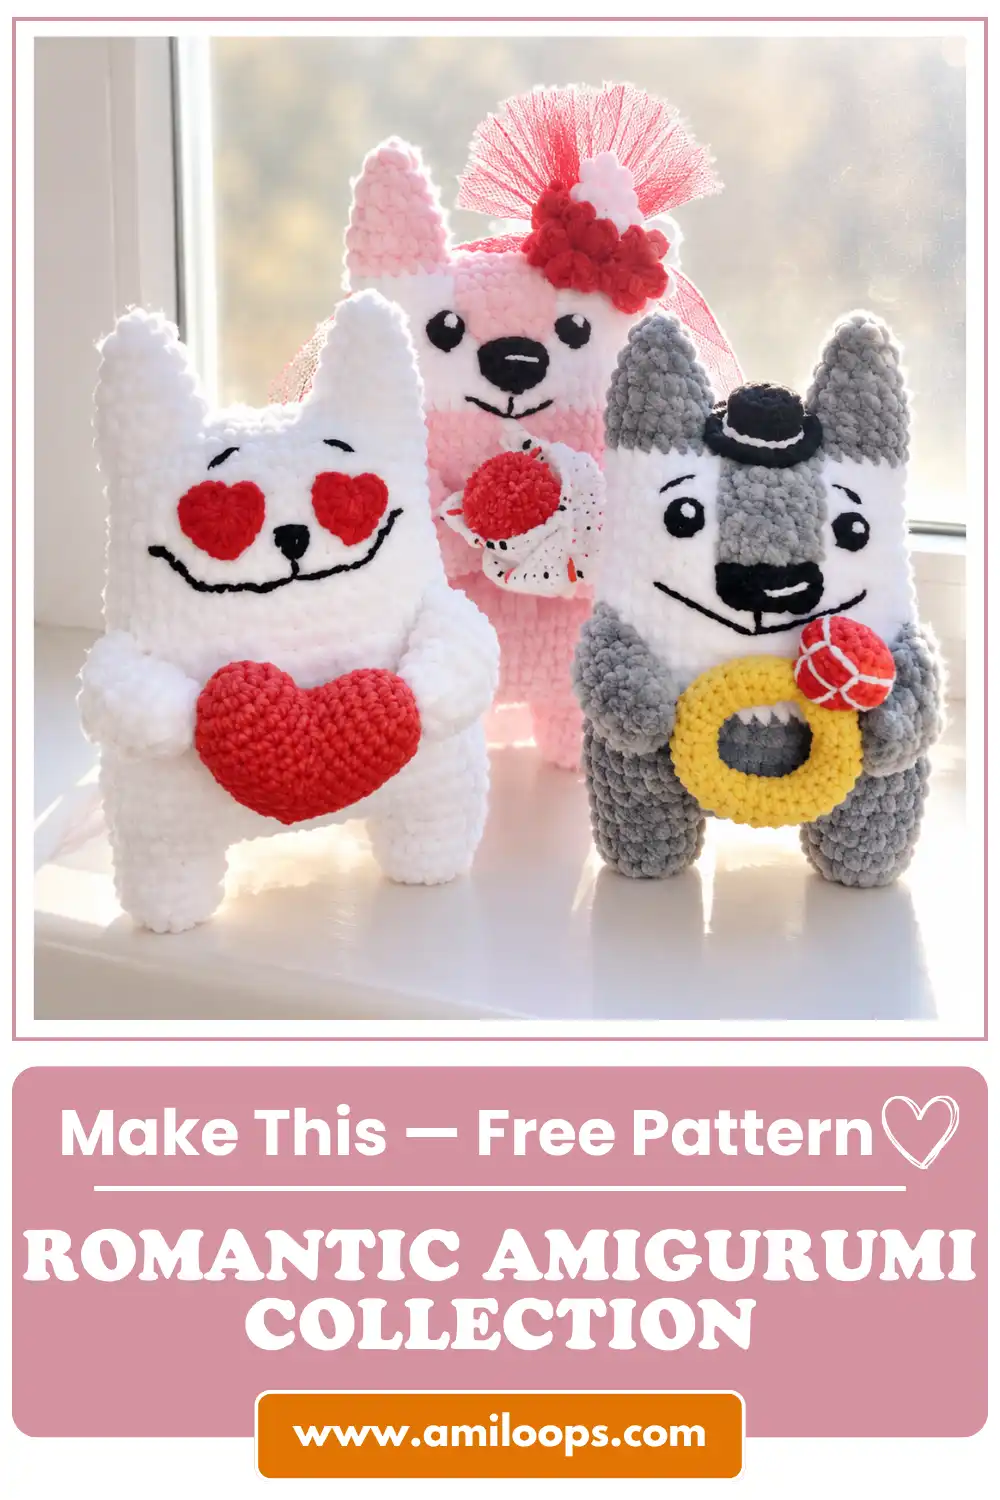
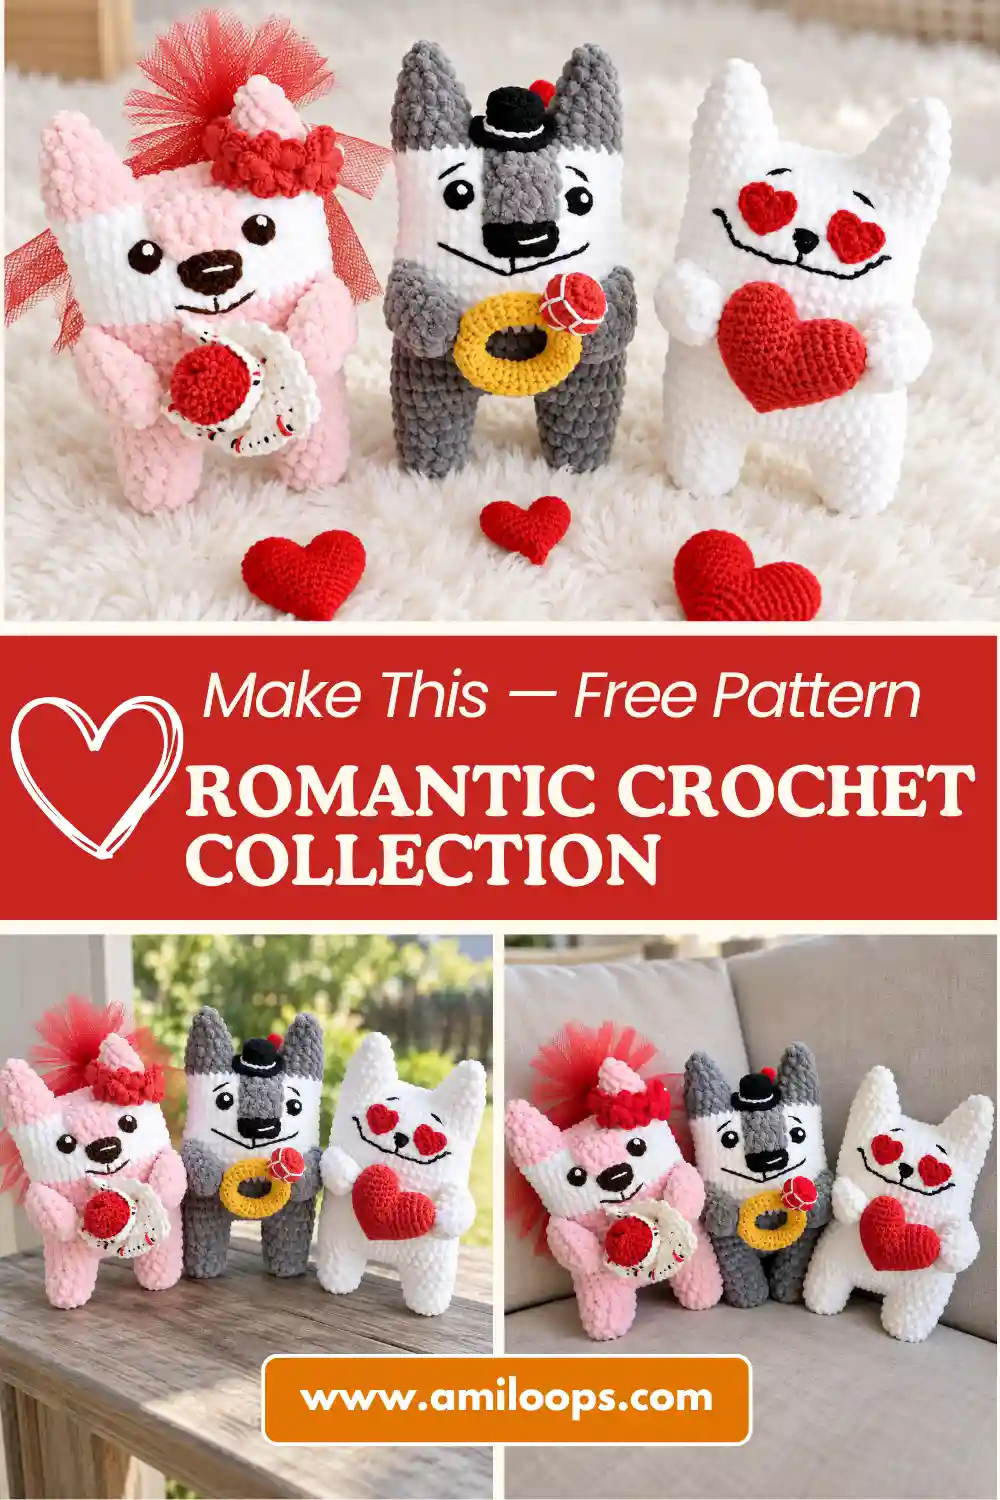
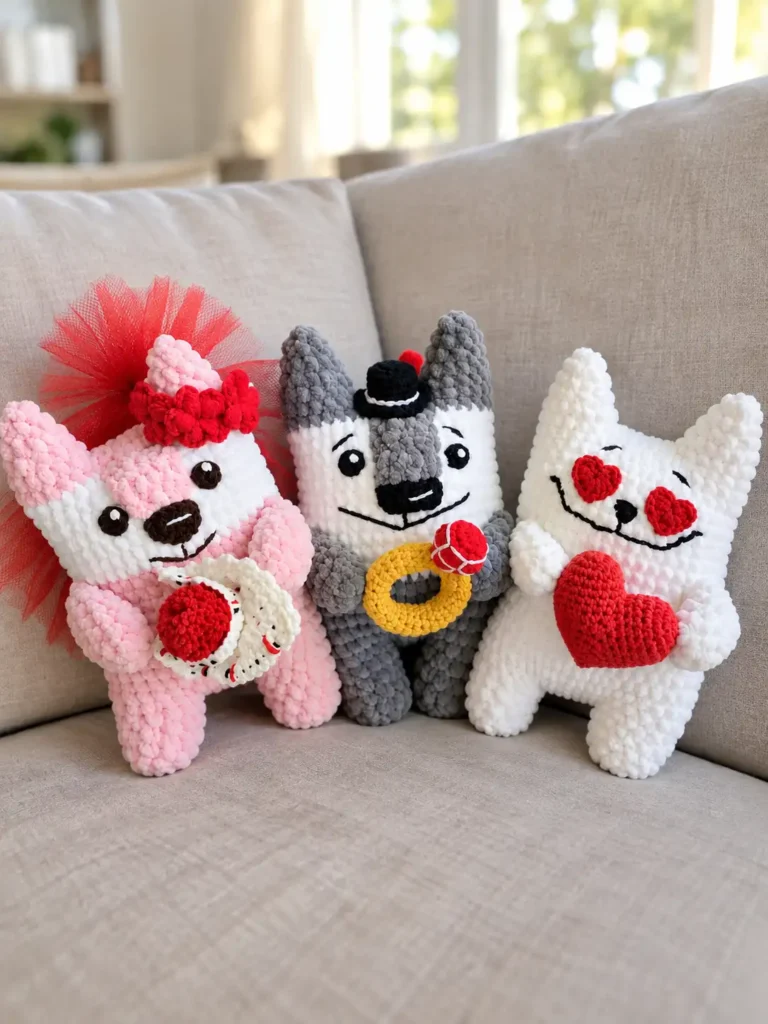
Handcrafted keepsakes bring a timeless charm to special celebrations, and this romantic amigurumi collection offers three expressive animal companions designed to commemorate weddings, anniversaries, and heartfelt milestones. The trio includes a graceful bride fox, a dapper groom wolf, and an affectionate sweetheart cat, each styled with signature heirloom accessories. Working these complementary characters allows crafters to explore diverse textural pairings while constructing balanced, freestanding plush figures that showcase distinct personalities across every finished project.
Each figure combines dense, velvety chenille plush with crisp cotton-acrylic details to achieve both huggable substance and delicate structural refinement. By working the larger body components in bulky fleece textures and accentuating them with fine-gauge accessories, the finished keepsakes balance cozy tactile warmth with precise needlework. Whether creating an entire wedding party set or focusing on an individual celebratory figure, following the foundational techniques ensures clean transitions and durable joins throughout every stage of assembly.
About This Romantic Amigurumi Collection
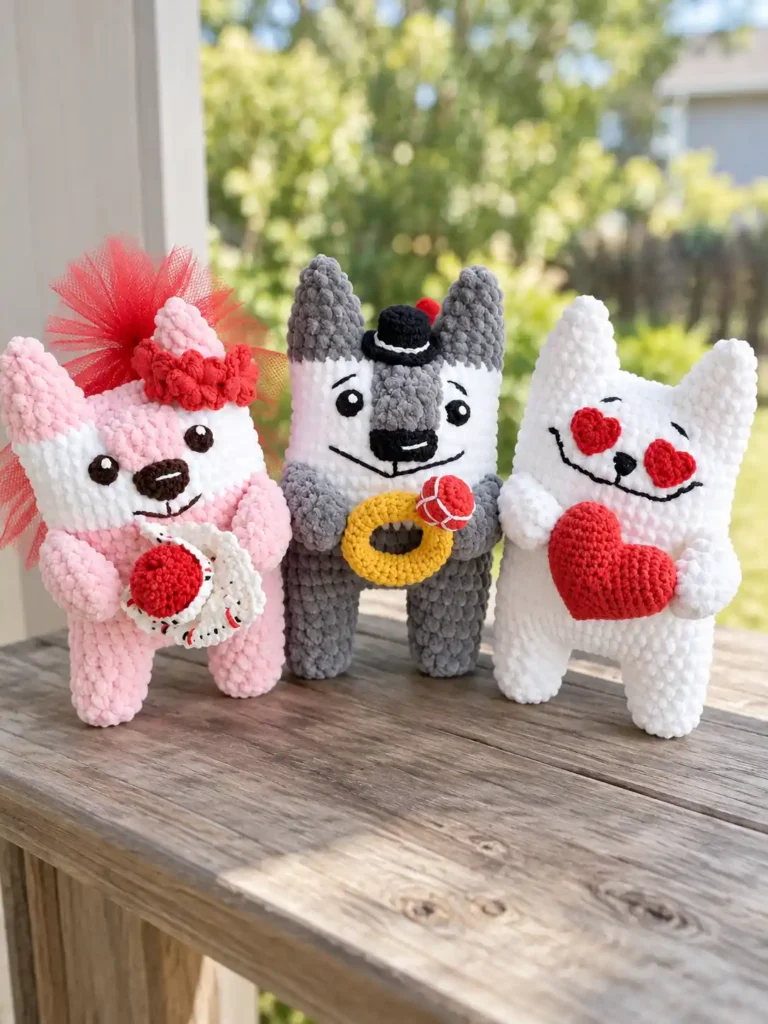
The design framework for this project focuses on thematic storytelling through harmonious proportions and tailored ceremonial accouterments. The bride fox is adorned with a delicate tulle headband framed by textured floral blossoms and carries an intricate waffle-textured bouquet cone. Her partner wolf wears a crisp miniature top hat with an embroidered contrast band while presenting an oversized faceted gem on an engagement ring band. Completing the ensemble, the romantic cat proudly holds a dimensional sculpted plush heart, creating a cohesive trio suited for bridal displays or seasonal gifts.
Beyond their decorative appeal, the characters share an engineered foundation that minimizes post-crochet assembly. The legs, lower torso, neck, and head flow seamlessly upward in continuous progression, creating a stable core that avoids weak seams or wobbly neck joints. Furthermore, the upper ear cones are formed directly from the scalp perimeter without any separate ear attachment sewing, simplifying alignment while ensuring perfectly symmetrical silhouettes across all three animal variations.
This romantic amigurumi collection provides crafters with a thoughtful study in uniform proportions across contrasting animal motifs. While each animal possesses unique facial contours, tail styles, and commemorative accessories, their shared core architecture guarantees that all three stand together in balanced visual harmony. The continuous body progression also allows makers to develop steady working rhythm without constantly shifting between detached anatomical elements.
Materials and Essential Notions
Selecting the proper yarn weight and coordinating tool pairing is critical for maintaining correct gauge and preventing fiber shredding across diverse materials. The primary character bodies are rendered in bulky Himalaya Dolphin Baby chenille yarn worked with a 3.0 mm crochet hook, producing a dense, velvety fabric that securely encapsulates the internal fiberfill. In contrast, the intricate accessories, facial features, and dimensional garments rely on DK-weight cotton-acrylic YarnArt Jeans paired with a 2.0 mm hook to maintain sharp geometric definition. A small remnant of fine tulle fabric completes the bridal ensemble, adding ethereal softness to the floral headpiece.
Maintaining two separate hook sizes ensures that the differing yarn weights behave predictably without compromising stitch tension. The compact 3.0 mm hook locks the chenille filaments together to eliminate gaps where stuffing might show, while the 2.0 mm hook provides the rigid stitch definition required for tiny sculptural items like the faceted gemstone and engagement band. Keeping your yarn needle and sharp scissors close at hand makes managing frequent color transitions and secure finishing seams effortless.
- Himalaya Dolphin Baby yarn, 100g / 120m, 100% polyester: Orange (Color 80316)
- Himalaya Dolphin Baby yarn, 100g / 120m, 100% polyester: White (Color 80301)
- Himalaya Dolphin Baby yarn, 100g / 120m, 100% polyester: Blue (Color 80306)
- YarnArt Jeans yarn, 50g / 160m, 55% cotton, 45% polyacrylic: Red (Color 26)
- YarnArt Jeans yarn, 50g / 160m, 55% cotton, 45% polyacrylic: White (Color 01)
- YarnArt Jeans yarn, 50g / 160m, 55% cotton, 45% polyacrylic: Black (Color 28)
- YarnArt Jeans yarn, 50g / 160m, 55% cotton, 45% polyacrylic: Yellow (Color 35)
- YarnArt Jeans yarn, 50g / 160m, 55% cotton, 45% polyacrylic: Beige (Color 07)
- 3.0 mm crochet hook (for Himalaya Dolphin Baby plush yarn)
- 2.0 mm crochet hook (for YarnArt Jeans cotton-blend yarn)
- Fiberfill stuffing
- Stitch marker (or contrasting color thread)
- Sewing needle (yarn needle)
- Straight pins
- Scissors
- Tulle fabric (small cut, approximately 55 cm x 17 cm)
- Pom-pom maker or regular dinner fork
Standard Crochet Terminology
Every segment in this written pattern adheres strictly to standard United States crochet terminology. Taking time to review stitch definitions before beginning prevents common gauge discrepancies, particularly when working specialized textural techniques such as puff stitches or loop-specific surface ridges. Pay close attention to stitch counts noted in parentheses at the conclusion of each working round to verify proper expansion and shaping before proceeding.
Reading round instructions carefully ensures that directional transitions, such as turning flat rows or working into single loops, execute cleanly. Consistent application of increases and decreases across continuous spirals preserves the symmetrical curves of each animal torso, allowing the pieces to assemble without unintended fabric distortion.
- ch — chain
- sc — single crochet
- inc — single crochet increase (2 single crochet in the same stitch)
- dec — single crochet decrease (single crochet 2 stitches together)
- sl st — slip stitch
- dc — double crochet
- blo — back loop only
- flo — front loop only
- mr — magic ring (or adjustable ring)
- puff st — puff stitch (5 elongated loops pulled together, locked with ch 1)
- st(s) — stitch(es)
- (…) — stitch count at the end of the round/row
- *… — repeat instructions following the asterisk as indicated
Comprehensive Construction Architecture
The primary structural foundation across all three characters utilizes an integrated bottom-up approach. Individual cylindrical legs are crocheted independently from the base paws upward before being linked across an eight-chain bridge in Round 5. By working across both outer perimeters and both sides of the central foundation chain, the join establishes a forty-stitch perimeter without requiring any intermediate cutting or seaming. Round 6 immediately expands the circumference to forty-six stitches through six balanced increases, forming a plump lower abdomen that naturally weights the base and provides stable balance.
As the torso ascends, specialized design details are integrated directly into the fabric to streamline assembly. In Round 7, the pre-crocheted tail is incorporated across three stitches along the spine, anchoring it permanently without auxiliary needle stitching. After completing the torso shaping and facial contouring, the top perimeter of the head is partitioned into two symmetrical fourteen-stitch circular rings. These secondary rings are worked upward into conical points to form the ears directly from the scalp, eliminating awkward seam placement while ensuring rigid structural uniformity.
Colorwork pacing is uniquely calibrated to define each character’s anatomical traits. The fox initiates with vibrant orange, transitions to crisp white for an expansive chest bib between Rounds 17 and 24, and returns to orange at Round 25 to construct the upper cranium and ears. The wolf establishes a sturdy blue base before shifting to an elongated white bib spanning Rounds 12 through 25, finishing with blue head shaping. Meanwhile, the cat maintains an unbroken, pristine white fabric from paw tips to ear apex, highlighting its clean, minimalist aesthetic.
Essential Preparation and Handling Tips
Handling chenille plush yarn requires gentle tension and considerate tool selection to maintain fiber integrity. Traditional plastic locking stitch markers can catch on delicate polyester fibers, stripping chenille fuzz from its inner thread core. Utilizing a smooth strand of lightweight contrasting cotton yarn as a running stitch marker allows effortless round tracking without damaging surrounding stitches. Similarly, if cinching a traditional magic loop causes excessive friction that risks snapping the yarn core, begin the piece with a two-chain foundation and work the initial round directly into the second chain from the hook.
Fiberfill placement directly influences the posture and stability of the finished amigurumi figure. Because the lower body and legs are joined early in the construction sequence, pack the lower extremities firmly before progressing upward past the waistline. Achieving dense, even distribution in the feet and pelvic cavity provides the counterweight necessary for the toy to sit or stand upright. When traversing the central leg bridge, inspect the join for small pinhole gaps and use the interior foundation yarn tail to close the junction internally before filling the upper cavity.
Tension and Stuffing Checkpoint: Pack stuffing firmly into the lower foot chambers and pelvis to establish a solid, self-supporting base before narrowing the stitches around the upper chest and crown.
Complete Romantic Character Pattern
Follow the structured technical instructions below to craft each individual character and its coordinating keepsake accessories. Work plush pieces with steady tension using the designated 3.0 mm hook, reserving the 2.0 mm hook for all cotton-acrylic accent components.
Fox Tail
- Round 1: With White chenille yarn and 3.0 mm hook, ch 2, work 6 sc in 2nd ch from hook. (6 sts)
- Round 2: 6 sc around. (6 sts)
- Round 3: 6 inc. (12 sts)
- Round 4: *1 sc, inc; repeat from * 6 times. (18 sts)
- Rounds 5–7: Change to Orange chenille yarn. 18 sc around for 3 rounds. (18 sts)
- Round 8: *1 sc, dec; repeat from * 6 times. (12 sts)
- Rounds 9–11: 12 sc around for 3 rounds. (12 sts)
- Round 12: 6 dec. (6 sts)
- Rounds 13–14: 6 sc around for 2 rounds. (6 sts)
- Finishing: Stuff lightly, flatten opening, and crochet across both edges with 3 sc to close. (3 sts)
Fox Muzzle
- Row 1: With Orange chenille yarn and 3.0 mm hook, ch 7, starting in 2nd ch from hook: 6 sc, ch 1, turn. (6 sts)
- Row 2: Dec, 2 sc, dec, ch 1, turn. (4 sts)
- Row 3: 4 sc across, ch 1, turn. (4 sts)
- Row 4: 2 dec, ch 1, fasten off leaving a sewing tail. (2 sts)
Fox Arms
- Round 1: With Orange chenille yarn and 3.0 mm hook, ch 2, work 8 sc in 2nd ch from hook. (8 sts)
- Rounds 2–7: 8 sc around for 6 rounds. Flatten top opening and work 4 sc across both layers to close. (8 sts)
Fox Legs, Body, Head & Ears
- Leg 1 (Rounds 1–4): With Orange chenille yarn, work 6 sc in ch 2, 6 inc to 12 sts, then 2 rounds of 12 sc. Fasten off. (12 sts)
- Leg 2 (Rounds 1–4): Repeat Leg 1. Do not fasten off; ch 8 to join. (12 sts)
- Round 5: Work 12 sc around Leg 1, 8 sc along one side of ch-8, 12 sc around Leg 2, 8 sc along opposite side of ch-8. (40 sts)
- Round 6: 5 sc, inc, 8 sc, inc, 5 sc, inc, 4 sc, inc, 8 sc, inc, 4 sc, inc. (46 sts)
- Round 7: 9 sc, join tail across both layers for 3 sc, 34 sc. (46 sts)
- Rounds 8–14: 46 sc around for 7 rounds. (46 sts)
- Round 15: Dec, 21 sc, dec, 21 sc. (44 sts)
- Round 16: 44 sc around. (44 sts)
- Rounds 17–18: Change to White chenille yarn. 44 sc around for 2 rounds. (44 sts)
- Round 19: Dec, 19 sc, dec, 21 sc. (42 sts)
- Rounds 20–24: 42 sc around for 5 rounds. (42 sts)
- Round 25: Change to Orange chenille yarn. 42 sc around. (42 sts)
- Round 26: Work 6 sc, skip middle sts and join with 8 sc across to form first ear ring. (14 sts)
- Round 27: 14 sc around. (14 sts)
- Round 28: *1 sc, dec; repeat from * 4 times, 2 sc. (10 sts)
- Round 29: 10 sc around. (10 sts)
- Round 30: 5 dec. Fasten off and cinch closed. (5 sts)
- Rounds 31–32: Rejoin Orange yarn to remaining 14 ear stitches. 14 sc around for 2 rounds. (14 sts)
- Round 33: *1 sc, dec; repeat from * 4 times, 2 sc. (10 sts)
- Round 34: 10 sc around. (10 sts)
- Round 35: 5 dec. Fasten off and cinch closed. (5 sts)
Fox Eyes
- Round 1: With Black cotton yarn and 2.0 mm hook, 6 sc in mr, sl st to first st to join. (6 sts)
Fox Nose
- Round 1: With Black cotton yarn and 2.0 mm hook, 6 sc in mr. (6 sts)
- Round 2: 6 inc. (12 sts)
- Round 3: 12 sc around. Fasten off leaving a sewing tail. (12 sts)
Fox Headband Base
- Row 1: With White cotton yarn, ch 25, place marker, ch 25. Starting in 2nd ch from hook: inc, 22 sc, 3 sc in next ch, 23 sc. (49 sts)
Fox Flowers
- Round 1: In mr work *ch 3, puff st (5 elongated loops), ch 3, sl st in mr; repeat from * 5 times. (5 petals)
Fox Waffle Bouquet Cone
- Row 1: With Beige cotton yarn and 2.0 mm hook, ch 25, starting in 2nd ch from hook: 24 sc, ch 1, turn. (24 sts)
- Row 2: In flo, 24 sc across, ch 1, turn. (24 sts)
- Row 3: In blo, 24 sc across, ch 1, turn. (24 sts)
- Row 4: In flo, 24 sc across, ch 1, turn. (24 sts)
- Row 5: In blo, 24 sc across, ch 1, turn. (24 sts)
- Row 6: In flo, 24 sc across, ch 1, turn. (24 sts)
- Row 7: In blo, 24 sc across, ch 1, turn. (24 sts)
- Row 8: In flo, 24 sc across, ch 1, turn. (24 sts)
- Row 9: In blo, 24 sc across, ch 1, turn. (24 sts)
- Row 10: In flo, 24 sc across, ch 1, turn. (24 sts)
- Row 11: In blo, 24 sc across, ch 1, turn. (24 sts)
- Row 12: In flo, 24 sc across, ch 1, turn. (24 sts)
- Row 13: In blo, 24 sc across, ch 1, turn. (24 sts)
- Row 14: In flo, 24 sc across, ch 1, turn. (24 sts)
- Row 15: In blo, 24 sc across, ch 1, turn. (24 sts)
- Row 16: In flo, 24 sc across, ch 1, turn. (24 sts)
- Row 17: In blo, 24 sc across, ch 1, turn. (24 sts)
- Row 18: In flo, 24 sc across. Fasten off leaving a tail for sewing. (24 sts)
Wolf Tail
- Round 1: With Blue chenille yarn and 3.0 mm hook, ch 2, work 6 sc in 2nd ch from hook. (6 sts)
- Round 2: 6 inc. (12 sts)
- Round 3: *1 sc, inc; repeat from * 6 times. (18 sts)
- Rounds 4–6: 18 sc around for 3 rounds. (18 sts)
- Round 7: *1 sc, dec; repeat from * 6 times. (12 sts)
- Rounds 8–10: 12 sc around for 3 rounds. (12 sts)
- Round 11: 6 dec. (6 sts)
- Rounds 12–13: 6 sc around for 2 rounds. Stuff lightly and flatten opening. (6 sts)
Wolf Muzzle
- Row 1: With Blue chenille yarn, ch 5, starting in 2nd ch from hook: 4 sc, ch 1, turn. (4 sts)
- Row 2: 4 sc across, ch 1, turn. (4 sts)
- Row 3: 1 sc, dec, 1 sc, ch 1, turn. (3 sts)
- Rows 4–6: 3 sc across for 3 rows, ch 1, turn. Fasten off leaving a tail. (3 sts)
Wolf Arms
- Round 1: With Blue chenille yarn and 3.0 mm hook, ch 2, work 8 sc in 2nd ch from hook. (8 sts)
- Rounds 2–7: 8 sc around for 6 rounds. Flatten top opening and work 4 sc across both layers. (8 sts)
Wolf Legs, Body, Head & Ears
- Leg 1 (Rounds 1–4): With Blue chenille yarn, work 6 sc in ch 2, 6 inc to 12 sts, then 2 rounds of 12 sc. Fasten off. (12 sts)
- Leg 2 (Rounds 1–4): Repeat Leg 1. Do not cut yarn; ch 8 to join. (12 sts)
- Round 5: Work 12 sc around Leg 1, 8 sc along one side of ch-8, 12 sc around Leg 2, 8 sc along opposite side of ch-8. (40 sts)
- Round 6: 5 sc, inc, 8 sc, inc, 5 sc, inc, 4 sc, inc, 8 sc, inc, 4 sc, inc. (46 sts)
- Round 7: 9 sc, join tail across both layers for 3 sc, 34 sc. (46 sts)
- Rounds 8–10: 46 sc around for 3 rounds. (46 sts)
- Round 11: Dec, 21 sc, dec, 21 sc. (44 sts)
- Rounds 12–18: Change to White chenille yarn. 44 sc around for 7 rounds. (44 sts)
- Round 19: 21 sc, dec, 19 sc, dec. (42 sts)
- Rounds 20–25: 42 sc around for 6 rounds. (42 sts)
- Rounds 26–27: Change to Blue chenille yarn. 42 sc around for 2 rounds. (42 sts)
- Round 28: Work 7 sc, join across with 7 sc to form first 14-st ear ring. (14 sts)
- Round 29: 14 sc around. (14 sts)
- Round 30: *1 sc, dec; repeat from * 4 times, 2 sc. (10 sts)
- Round 31: 10 sc around. (10 sts)
- Round 32: 5 dec. Fasten off and cinch closed. (5 sts)
- Rounds 33–34: Rejoin Blue yarn to opposite 14 ear stitches. 14 sc around for 2 rounds. (14 sts)
- Round 35: *1 sc, dec; repeat from * 4 times, 2 sc. (10 sts)
- Round 36: 10 sc around. (10 sts)
- Round 37: 5 dec. Fasten off and cinch closed. (5 sts)
Wolf Eyes
- Round 1: With Black cotton yarn and 2.0 mm hook, 6 sc in mr, sl st to join. (6 sts)
Wolf Nose
- Round 1: With Black cotton yarn, ch 7, starting in 2nd ch from hook: 5 sc, 3 sc in last ch, 4 sc, inc in last ch. (14 sts)
- Round 2: 14 sc around. (14 sts)
- Round 3: Fold flat and crochet across both edges through both layers with 7 sc. (7 sts)
Wolf Top Hat
- Round 1: With Black cotton yarn and 2.0 mm hook, 8 sc in mr. (8 sts)
- Round 2: 8 inc. (16 sts)
- Round 3: In blo, 16 sc around. (16 sts)
- Rounds 4–5: 16 sc around for 2 rounds. (16 sts)
- Round 6: In flo, *1 sc, inc; repeat from * 8 times. (24 sts)
- Round 7: *1 sc, inc, 1 sc; repeat from * 8 times. Fasten off. (32 sts)
Wolf Engagement Ring Band
- Round 1: With Yellow cotton yarn and 2.0 mm hook, 8 sc in mr. (8 sts)
- Round 2: In blo, 8 sc around. (8 sts)
- Rounds 3–30: 8 sc around for 28 rounds. Stuff lightly with a thin cord of fiberfill; sew ends together to form a ring. (8 sts)
Wolf Ring Gemstone
- Round 1: With White cotton yarn and 2.0 mm hook, 6 sc in mr. (6 sts)
- Round 2: 6 inc. (12 sts)
- Round 3: *1 sc, inc; repeat from * 6 times. (18 sts)
- Round 4: In blo, 18 sc around. (18 sts)
- Round 5: In blo, *1 sc, dec; repeat from * 6 times. (12 sts)
- Round 6: Stuff firmly. *Dec, 2 sc; repeat from * 3 times. (9 sts)
- Round 7: 9 sc around. Fasten off leaving a tail. (9 sts)
Cat Tail
- Round 1: With White chenille yarn and 3.0 mm hook, ch 2, work 6 sc in 2nd ch from hook. (6 sts)
- Round 2: 6 inc. (12 sts)
- Round 3: *1 sc, inc; repeat from * 6 times. (18 sts)
- Rounds 4–6: 18 sc around for 3 rounds. (18 sts)
- Round 7: *1 sc, dec; repeat from * 6 times. (12 sts)
- Rounds 8–12: 12 sc around for 5 rounds. (12 sts)
- Round 13: 6 dec. Lightly stuff and flatten opening. (6 sts)
Cat Arms
- Round 1: With White chenille yarn and 3.0 mm hook, ch 2, work 8 sc in 2nd ch from hook. (8 sts)
- Rounds 2–7: 8 sc around for 6 rounds. Flatten top opening and work 4 sc across both layers. (8 sts)
Cat Legs, Body, Head & Ears
- Leg 1 (Rounds 1–4): With White chenille yarn, work 6 sc in ch 2, 6 inc to 12 sts, then 2 rounds of 12 sc. Fasten off. (12 sts)
- Leg 2 (Rounds 1–4): Repeat Leg 1. Do not cut yarn; ch 8 to join. (12 sts)
- Round 5: Work 12 sc around Leg 1, 8 sc along one side of ch-8, 12 sc around Leg 2, 8 sc along opposite side of ch-8. (40 sts)
- Round 6: Inc, *4 sc, inc; repeat from * 2 times, 10 sc, inc, *4 sc, inc; repeat from * 2 times, 8 sc. (46 sts)
- Round 7: 17 sc, join tail across both layers for 3 sc, 26 sc. (46 sts)
- Round 8: 46 sc around. (46 sts)
- Rounds 9–15: 46 sc around for 7 rounds. (46 sts)
- Round 16: 7 sc, dec, 21 sc, dec, 14 sc. (44 sts)
- Rounds 17–19: 44 sc around for 3 rounds. (44 sts)
- Round 20: 6 sc, dec, 20 sc, dec, 14 sc. (42 sts)
- Rounds 21–26: 42 sc around for 6 rounds. (42 sts)
- Round 27: Work 14 sc, join to first st of round with sl st to form first ear ring. (14 sts)
- Round 28: 14 sc around. (14 sts)
- Round 29: *1 sc, dec; repeat from * 4 times, 2 sc. (10 sts)
- Round 30: 10 sc around. (10 sts)
- Round 31: 5 dec. Fasten off and cinch closed. (5 sts)
- Rounds 32–33: Rejoin White yarn to remaining 14 ear stitches. 14 sc around for 2 rounds. (14 sts)
- Round 34: *1 sc, dec; repeat from * 4 times, 2 sc. (10 sts)
- Round 35: 10 sc around. (10 sts)
- Round 36: 5 dec. Fasten off and cinch closed. (5 sts)
Cat Heart Eyes
- Round 1: With Red cotton yarn and 2.0 mm hook, in mr work: ch 2, 2 dc, 2 sc, 1 dc, 2 sc, 2 dc, ch 2, sl st into ring. (10 sts)
Cat Dimensional Heart
- Dome A (Rounds 1–6): In mr work 6 sc, 6 inc to 12 sts, (1 sc, inc)*6 to 18 sts, then 3 rounds of 18 sc. Fasten off. (18 sts)
- Dome B (Rounds 1–6): Repeat Dome A. Do not cut yarn. (18 sts)
- Round 7: Join Domes: 8 sc on Dome A, 16 sc on Dome B, 8 sc on Dome A. (32 sts)
- Round 8: 7 sc, dec, 14 sc, dec, 7 sc. (30 sts)
- Round 9: 5 sc, 2 dec, 11 sc, 2 dec, 6 sc. (26 sts)
- Round 10: 5 sc, dec, 11 sc, dec, 6 sc. (24 sts)
- Round 11: 3 sc, 2 dec, 9 sc, 2 dec, 4 sc. (20 sts)
- Round 12: 4 sc, dec, 8 sc, dec, 4 sc. (18 sts)
- Round 13: Stuff upper chambers. 2 sc, 2 dec, 5 sc, 2 dec, 3 sc. (14 sts)
- Round 14: 2 sc, dec, 5 sc, dec, 3 sc. (12 sts)
- Round 15: 1 sc, 2 dec, 2 sc, 2 dec, 1 sc. (8 sts)
- Round 16: 1 sc, dec, 2 sc, dec, 1 sc. Cinch remaining sts closed. (6 sts)
Detailed Step-by-Step Assembly Instructions
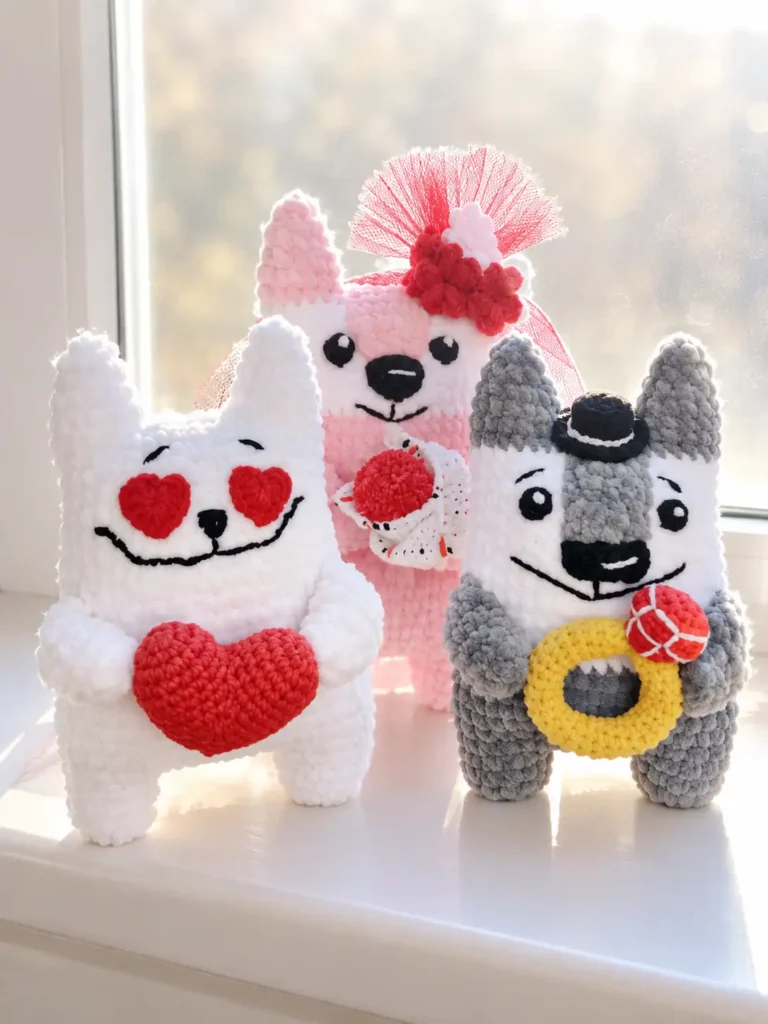
Careful placement during assembly brings balance and expressive warmth to each character. Before securing features permanently with needle and thread, use straight sewing pins to position the muzzles and eyes symmetrically along the vertical center front axis. Pinning muzzles directly over the chest color transition ensures that facial contours align naturally with the chest bibs. Work methodically through each character’s component list, anchoring fine accessories securely into the paw tips once upper limbs are positioned.
Attaching the individual romantic props gives every character its narrative identity. Shape the waffle cone firmly before nestling the bright pom-pom bloom into its opening, stitching through both fabric layers to prevent shifting. In the same way, angle the wolf’s ring band and the cat’s sculpted heart symmetrically between the front paws so the completed figures sit or stand with poised, self-supporting stability.
- Flatten the tail opening and crochet or sew across with 3 sc to attach at Round 7 of the body.
- Flatten the arm openings and sew symmetrically onto the upper body sides around Rounds 24–25.
- Sew the fox muzzle centrally to the face across Rounds 17–21, then attach the black nose and round eyes with white French knot highlights.
- Gather the tulle strip onto the headband, attach the three puff-stitch flowers, and tie the floral wreath around the fox’s head.
- Roll the ribbed waffle square diagonally into a bouquet cone, secure the seam, insert the red yarn pom-pom, and stitch into the fox’s paws.
- Sew the wolf muzzle over Rounds 16–20, sew the folded black nose to its tip, attach eyes with white highlights, and embroider eyebrows and smile.
- Embroider a white hatband onto the black top hat and sew securely between the wolf’s ears.
- Sew the faceted gemstone onto the closed yellow ring band and fasten the ring securely into the wolf’s paws.
- Sew the two heart-shaped eyes symmetrically onto the cat’s face and embroider delicate whiskers and smile.
- Join the two heart domes, complete decreases to form a seamless 3D plush heart, and sew securely between the cat’s paws.
Pattern Notes and Troubleshooting Guide
Preventing Snaps and Friction in Bulky Plush Yarn
Chenille plush yarns possess a delicate central carrier thread surrounded by sheared synthetic pile, which can strip or snap when subjected to abrasive pulling forces. If tightening an adjustable loop causes friction or breaks the core strand, replace the magic ring with an alternative two-chain start. Chaining two and working all required initial single crochet stitches directly into the second chain from the hook forms a secure ring without exposing the yarn core to shearing strain.
Closing Foundation Gaps Along the Leg Bridge
Bridging separate leg cylinders with a foundation chain can occasionally produce small pinhole openings at the inner junctions where the rounds pivot. Rather than attempting to tighten surrounding stitches during Round 5, allow the natural tension to sit smoothly. Once the lower torso rounds are established, thread the starting yarn tail left over from the foundation chain onto a tapestry needle and weave it through the interior gap edges, cinching the junction closed from inside the body cavity.
Securing Facial Embroidery on Plush Fabric
Embroidering fine facial expressions such as smiles, whiskers, and eyebrows directly onto plush chenille fabric requires firm anchoring to prevent stitches from sinking beneath the velvet pile. Always complete all facial needlework before the head cavity is closed at the ear tips. Knot your cotton embroidery tails securely on the reverse interior side of the fabric wall, anchoring the knots through several interior loops so tension remains crisp and stable across years of handling.
Comprehensive Quality Finishing Checklist
Perform a systematic final inspection across each completed figure to verify structural durability, balanced proportions, and secure attachment of all ceremonial accents before displaying or presenting your keepsakes.
Taking time to gently press along the seams and verify internal knot security ensures that your finished wedding figures retain their poise and charm over time. Confirm that the plush fiberfill remains evenly balanced throughout the legs so each completed animal perches squarely without leaning or rolling.
- Verify that all color change yarn tails are securely knotted and buried inside the body cavity.
- Ensure both legs stand evenly and the tail is centered on the lower spine.
- Confirm that the ear tips are cinched tightly with no stuffing visible.
- Check that eyes and muzzles are pinned and sewn symmetrically along the center front axis.
- Verify that the waffle cone bouquet, engagement ring, and plush heart are firmly stitched into the paws.
- Ensure that embroidered facial expressions (eyebrows, mouth, whiskers) are neat and secure.