Kuzya Crochet Amigurumi Pattern — Free Wired Plush Guide
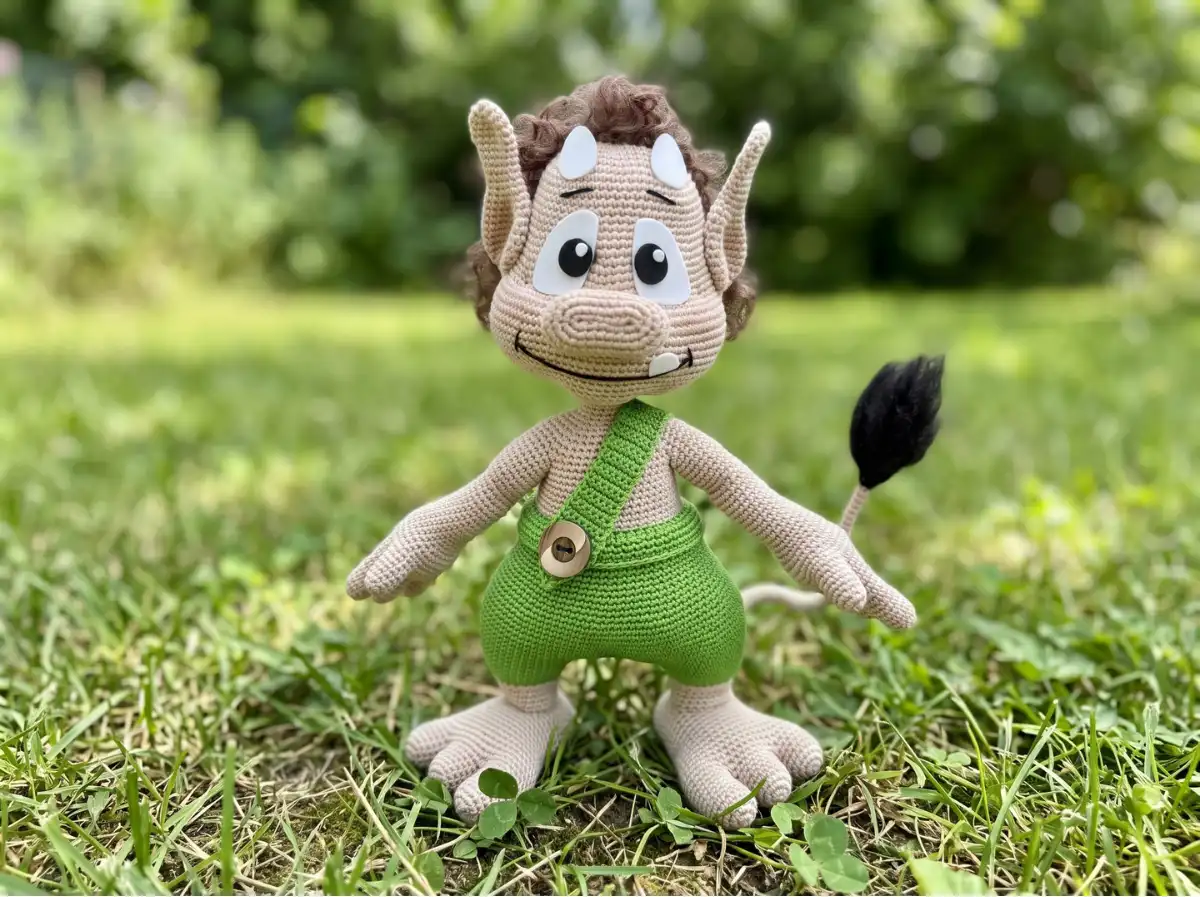
This Kuzya crochet amigurumi pattern is one of the more advanced builds I’ve worked through — a wired, poseable little creature with jointed fingers, jointed toes, a gathered face, and a fluffy tassel tail. If you’ve been wanting to move past basic amigurumi shapes into something with real structure, this is the project. Take your time with the wire armature — it’s worth the extra effort.
📋 Pattern Quick Stats
- Difficulty: Advanced
- Finished Size: Not stated in source
- Hook Size: 0.95mm (no US letter equivalent — see note below)
- Yarn Weight: Fine/lace weight (based on 0.95mm hook)
- Techniques: magic ring, invisible decrease, increase, back loop only, color changes, wire armature, gathering stitches, jointed fingers/toes
- Estimated Time: 10+ hours (advanced multi-part build)
Materials for This Kuzya Crochet Amigurumi Pattern
The original designer worked this piece in a specialty Russian yarn brand that isn’t sold in the US, so I’m noting the closest substitution guidance here rather than a specific product. Look for a fine (fingering/lace) mercerized cotton in a comparable weight — this is very fine work, closer to thread crochet than standard amigurumi.
- Beige fine-weight yarn (main color for head, body, limbs)
- Green fine-weight yarn (for pants/shin sections)
- A few yards of black yarn (for embroidering eyebrows and mouth)
- Black or brown acrylic yarn (for the tail tassel)
- Hook: 0.95mm — this size falls below the standard US letter hook range, so there isn’t a direct US letter equivalent to give you here
- Foamiran or felt in black and white (for eyes and tooth) — polymer clay is a workable substitute if you’d rather sculpt these pieces
- Two small horn shapes, made from felt/foamiran or polymer clay
- Curly doll or toy hair, black or brown
- One small button (for the pants strap)
- Wire, for the internal armature (arms, legs, tail)
- A pet slicker brush (for brushing out the tail tassel)
- Sewing needle, for assembling all parts
- Crystal glue and E6000 glue
- Toy stuffing
- Brown pastel and a shading brush
- Medical adhesive tape (to wrap the wire ends)
Because this pattern works at such a fine gauge, your yarn weight and tension matter more than usual — a slightly heavier yarn will change your finished size noticeably.
Abbreviations Used in This Kuzya Amigurumi Pattern
| Abbreviation | Meaning |
|---|---|
| mr | magic ring |
| inc | increase |
| dec | invisible decrease |
| sc | single crochet |
| hdc | half double crochet |
| even | work this row with no increases or decreases |
Special Techniques for the Kuzya Pattern
This pattern leans on a handful of techniques that are worth reviewing before you dive in, especially since the wired, jointed construction is more advanced than most amigurumi.
Every round starts with a magic ring — if you need a refresher, our step-by-step magic ring tutorial walks through it from scratch.
All decreases in this pattern use the invisible decrease, which is what keeps the fingers, toes, and facial shaping looking clean instead of gappy. If you haven’t used this method yet, take a look at our invisible decrease tutorial before you start the hands and feet — those sections decrease constantly.
You’ll also switch colors partway through the legs, working into the back loop only to transition from beige to green. Our color change tutorial covers this kind of transition if it’s new to you.
Kuzya Crochet Amigurumi Pattern — Head
Yarn: beige. Starting method: magic ring.
Row 1: 6 in mr (6)
Row 2: 6 inc
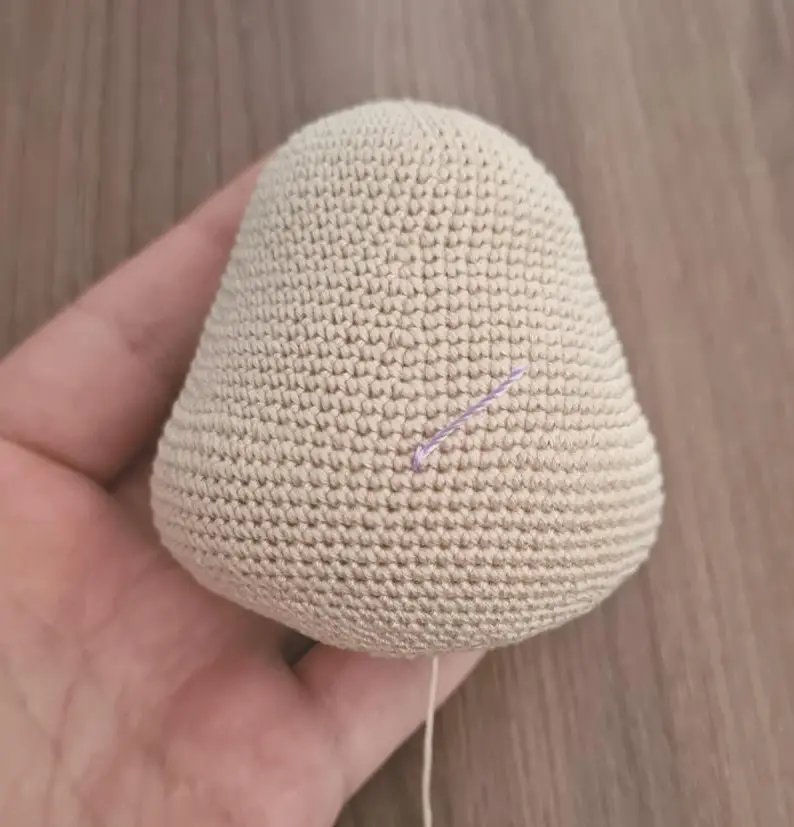
Row 3: (1 sc, inc)*6 times
Row 4: (2 sc, inc)*6 times
Row 5: (3 sc, inc)*6 times
Row 6: (4 sc, inc)*6 times
Row 7: (5 sc, inc)*6 times
Row 8: (6 sc, inc)*6 times
Row 9: (7 sc, inc)*6 times
Rows 10-15: even
Row 16: (8 sc, inc)*6 times
Row 17: even
Row 18: (9 sc, inc)*6 times
Rows 19-20: even
Row 21: (10 sc, inc)*6 times
Rows 22-23: even
Row 24: (11 sc, inc)*6 times
Rows 25-26: even
Row 27: 20 sc, (1 sc, inc)*6 times, 7 sc, mark the center of the face with a contrasting scrap of yarn, 7 sc, (inc, 1 sc)*6 times, 20 sc
Rows 28-34: even
Row 35: even, worked with a 2-stitch offset
Row 36: 20 sc, (1 sc, dec)*6 times, 14 sc, (1 sc, dec)*6 times, 20 sc
Rows 37-38: even
Row 39: (11 sc, dec)*6 times
Row 40: 5 sc, dec, 10 sc, dec, 10 sc, dec, 10 hdc, dec, 10 sc, dec, 10 sc, dec, 5 sc (66)
Row 41: 9 sc, dec, 9 sc, dec, 5 sc, dec, 10 hdc, dec, 9 sc, dec, 9 sc, dec, 3 sc (58)
Row 42: 5 sc, dec, 5 sc, dec, 5 sc, dec, 5 sc, dec, (1 sc, inc)*4 times, dec, 5 sc, dec, 5 sc, dec, 6 sc, dec (58)
Row 43: (4 sc, dec)*9 times, 2 sc (49)
Row 44: (2 sc, dec)*11 times, 3 sc (40)
Row 45: (2 sc, dec)*9 times (30)
Row 46: (1 sc, dec)*9 times (20)
Row 47: 9 dec (10)
💡 Emma’s Tip: Run your stitch marker along the back of the head the whole way through, and in Row 27 mark the exact center of the face with a scrap of contrasting yarn — you’ll use both of these reference points during assembly, so don’t skip them. Stuff firmly, and pay special attention to the cheeks and chin so they hold their shape.
Finishing: Fasten off and leave a tail for sewing.
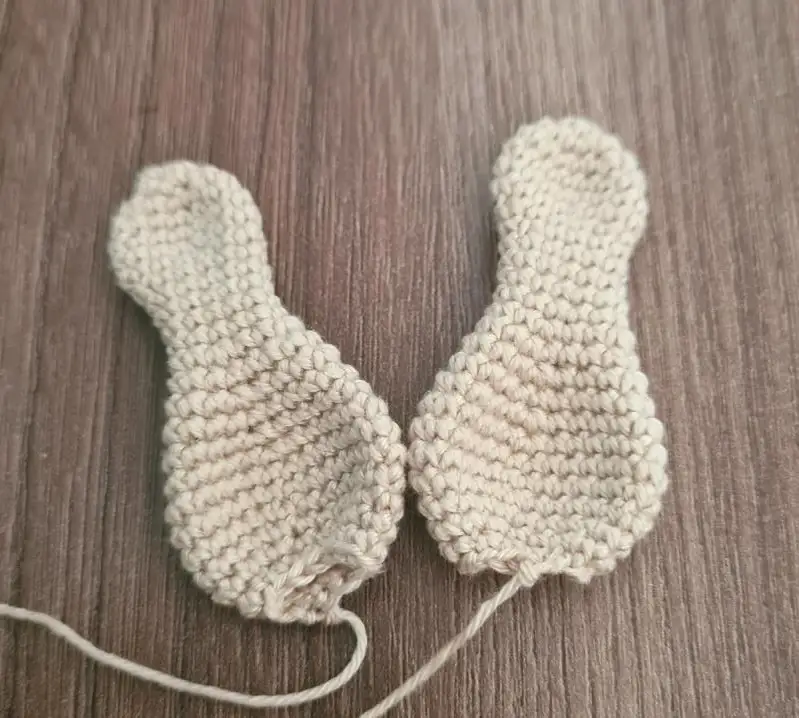
Kuzya Amigurumi Pattern — Ears (make 2)
Yarn: beige. Starting method: magic ring.
Row 1: 6 in mr (6)
Row 2: 6 inc
Row 3: (6 sc, inc)*4 times
Rows 4-6: even
Row 7: (2 sc, dec)*4 times
Rows 8-12: even
Row 13: (2 sc, inc)*4 times
Row 14: even
Row 15: (3 sc, inc)*4 times
Row 16: even
Row 17: (4 sc, inc)*4 times
Row 18: (5 sc, inc)*4 times
Rows 19-20: even
Row 21: (5 sc, dec)*4 times
Row 22: (4 sc, dec)*4 times
Row 23: (3 sc, dec)*4 times
Row 24: (2 sc, dec)*4 times
💡 Emma’s Tip: Work these tightly, and consider dropping to a slightly smaller hook than you used for the head. You don’t want these ears to flop — the finished shape should look like a little double spoon. Don’t stuff them.
Finishing: Fasten off and leave a tail for sewing.
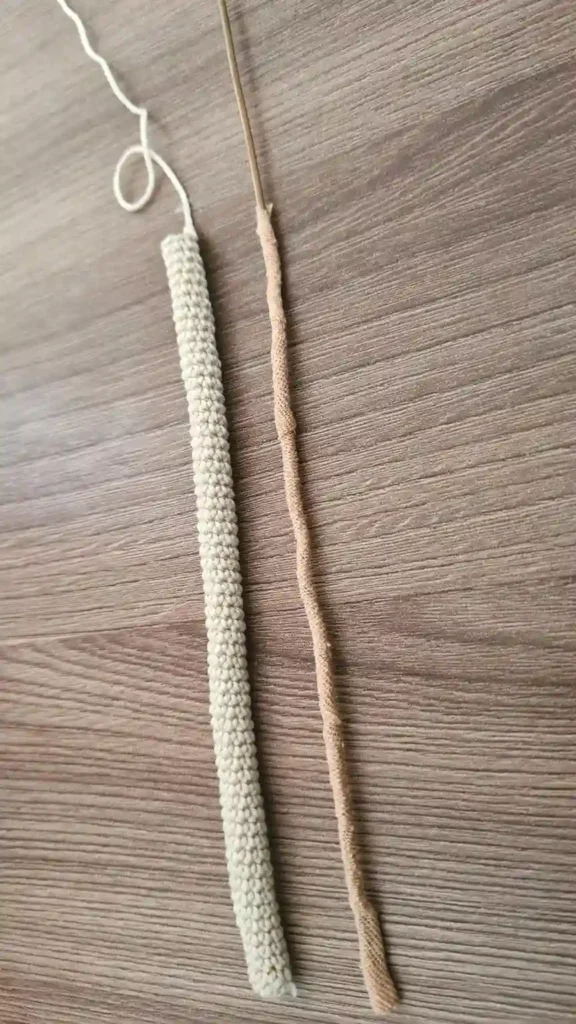
Kuzya Pattern — Tail
Yarn: beige. Starting method: magic ring.
Row 1: 8 sc in mr (8)
Rows 2+: continue even until the tail measures 5.5 in (14 cm)
💡 Emma’s Tip: Cut a piece of wire 11-11.8 in (28-30 cm) long. If it’s plastic-coated, leave the coating on — just wrap one end in medical tape and slide it into the tail. Strip the coating off the opposite end so that portion can be inserted into the body later.
Finishing: Cut yarn.
Nose
Yarn: beige. Starting method: chain.
Row 1: Chain 7, working into the 2nd chain from the hook: inc, 4 sc, 2 inc in the last stitch, 4 sc along the other side of the chain, inc
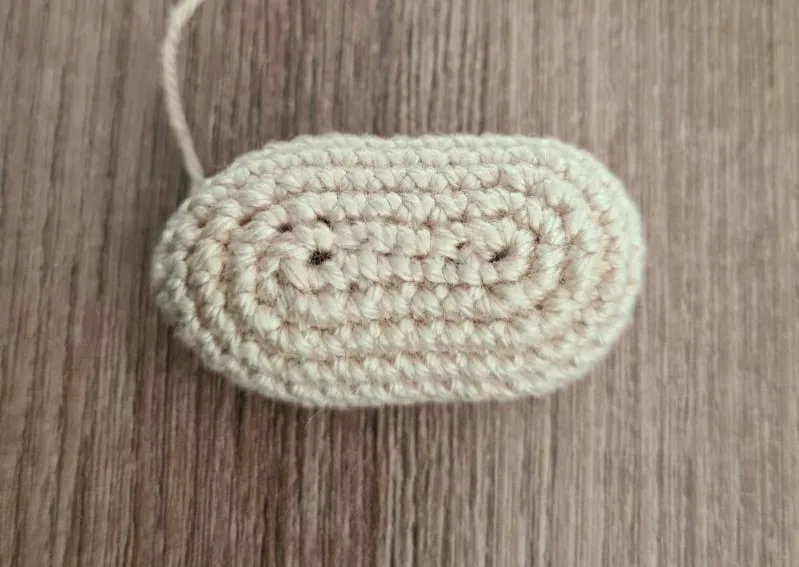
Row 2: 2 inc, 4 sc, 4 inc, 4 sc, 2 inc
Row 3: 3 inc, 6 sc, 6 inc, 6 sc, 3 inc
Row 8: 2 dec, 14 sc, 2 dec, 14 sc
Rows 4-7: even
Finishing: Fasten off and leave a tail for sewing.
Right Hand — Thumb
Yarn: beige. Starting method: magic ring.
Row 1: 6 in mr (6)
Row 2: 6 inc
Rows 3-7: even
Finishing: Fasten off and cut yarn.
Right Hand — Fingers (make 3)
Yarn: beige. Starting method: magic ring.
Row 1: 6 in mr (6)
Row 2: 6 inc
Rows 3-10: even
💡 Emma’s Tip: You need three identical fingers. Fasten off and cut yarn on the first two. On the third, don’t cut the yarn — you’ll continue directly into the hand assembly from there.
Right Hand — Assembly
Yarn: beige. Starting method: join fingers to establish base count.
Finger join row: Join a finger and work 7 sc across it. Join the middle finger and work 12 sc across it. Work 7 sc across the middle finger again, then 6 sc across the third finger. Place a stitch marker (32)
Row 1: 5 sc, dec, 4 sc, dec, 10 sc, dec, 4 sc, dec, 5 sc (28)
Rows 2-4: even (28)
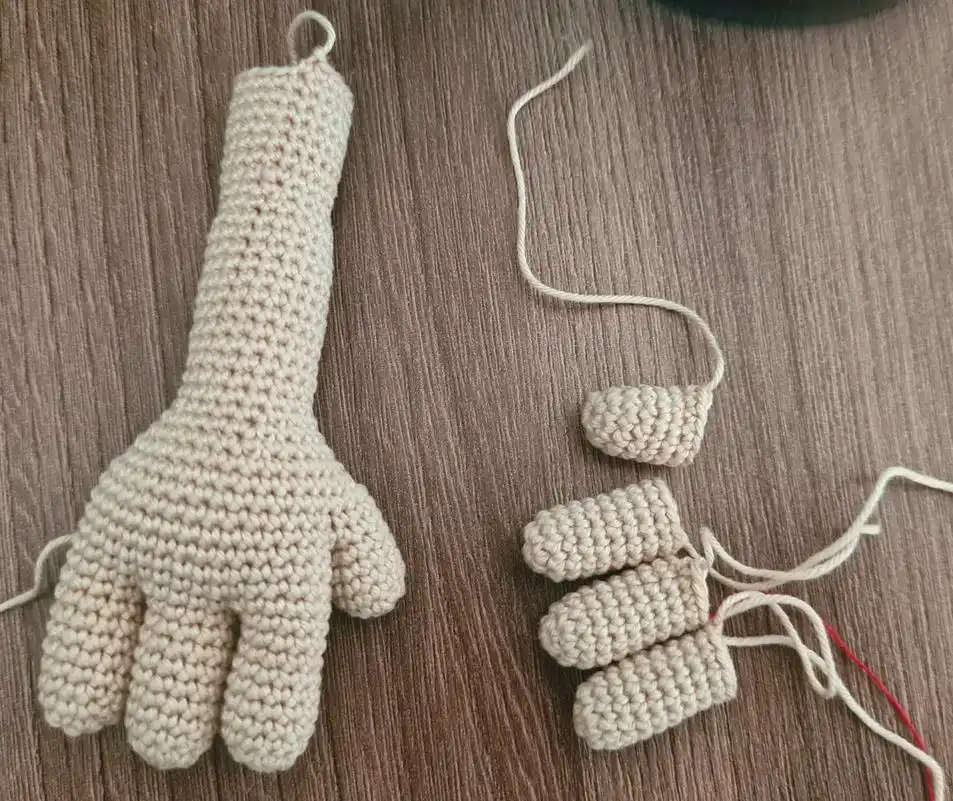
Row 5: 12 sc, join the thumb and work 4 sc together through both, 16 sc around the arm (28)
Row 6: 12 sc, 8 sc along the outer side of the thumb, 16 sc
Row 7: even
Row 8: dec, 14 sc, 2 dec, 14 sc, dec
Row 9: even
Row 10: (6 sc, dec)*4 times
Row 11: (5 sc, dec)*4 times
Row 12: (4 sc, dec)*4 times
Rows 13-25: even
Row 26: (3 sc, dec)*4 times
Row 27: (3 sc, inc)*4 times
Rows 28-34: even
Finishing: Fasten off and cut yarn.
Left Hand — Thumb
Yarn: beige. Starting method: magic ring.
Row 1: 6 in mr (6)
Row 2: 6 inc
Rows 3-7: even
Finishing: Fasten off and cut yarn.
Left Hand — Fingers (make 3)
Yarn: beige. Starting method: magic ring.
Row 1: 6 in mr (6)
Row 2: 6 inc
Rows 3-10: even
💡 Emma’s Tip: Just like the right hand, don’t cut the yarn after the third finger — you’ll continue straight into the hand assembly. Stuff each finger as you go, and insert the wire before you close things up.
Left Hand — Assembly
Yarn: beige. Starting method: continued from the fingers.
Finger join row: Join a finger and work 6 sc across it. Join another finger and work 12 sc across it. Work 6 sc across the middle finger, then 6 sc across the next finger. Place a stitch marker
Row 1: 5 sc, dec, 4 sc, dec, 10 sc, dec, 4 sc, dec, 5 sc
Rows 2-4: even
Row 5: join the thumb and work 4 sc together through both, 28 sc around the arm
Row 6: 8 sc along the outer side of the thumb, 28 sc around the arm
Row 7: even
Row 8: 2 dec, 14 sc, 2 dec, 12 sc (32)
Row 9: even
Row 10: (6 sc, dec)*4 times
Row 11: (5 sc, dec)*4 times
Row 12: (4 sc, dec)*4 times
Rows 13-25: even
Row 26: (3 sc, dec)*4 times
Row 27: (3 sc, inc)*4 times
Rows 28-34: even
💡 Emma’s Tip: Once both arms are stuffed, insert the wire about 6 in (15 cm) deep into each one before you sew them to the body — this is what lets the arms hold a pose later.
Finishing: Fasten off and cut yarn. Stuff and insert wire as noted above.
Right Leg — Toes
Yarn: beige. Starting method: magic ring.
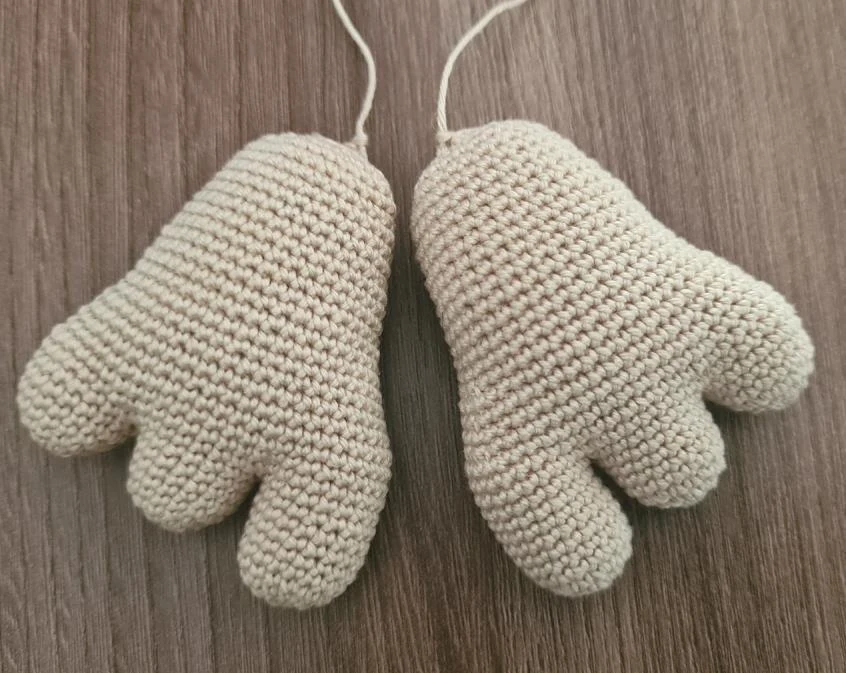
Pinky toe — Row 1: 6 in mr (6)
Row 2: 6 inc
Row 3: (1 sc, inc)*6 times
Rows 4-5: even
Finishing: Fasten off and cut yarn.
Middle toe — Row 1: 6 in mr (6)
Row 2: 6 inc
Row 3: (1 sc, inc)*6 times
Rows 4-7: even
Finishing: Fasten off and cut yarn.
Big toe — Row 1: 6 in mr (6)
Row 2: 6 inc
Row 3: (1 sc, inc)*6 times
Rows 4-9: even
💡 Emma’s Tip: Don’t cut the yarn after the big toe. Continue with 6 sc across the big toe, then join the middle toe and work 9 sc across it, join the pinky toe and work 18 sc, then 9 sc back across the middle toe, then 12 sc across the big toe. Place a stitch marker here — this join is what sets up the whole foot.
Right Leg — Foot and Shin
Yarn: beige, then green. Continued from the toe join.
Row 1: even
Row 2: 5 sc, dec, 8 sc, dec, 15 sc, dec, 8 sc, dec, 10 sc
Row 3: even
Row 4: 20 sc, 2 dec, 20 sc, 2 dec, 2 sc
Row 5: even
Row 6: 20 sc, dec, 20 sc, dec, 2 sc
Row 7: even
Row 8: 20 sc, 2 dec, 16 sc, 2 dec
Row 9: even
Row 10: dec, 16 sc, dec, 20 sc
Row 11: even
Row 12: dec, 15 sc, dec, 19 sc
Row 13: even
Row 14: dec, 14 sc, dec, 18 sc
Row 15: even
Row 16: dec, 15 sc, dec, 15 sc
Row 17: even
Row 18: dec, 14 sc, dec, 14 sc
Row 19: even
Row 20: dec, 13 sc, dec, 13 sc
Row 21: even
Row 22: dec, 12 sc, dec, 12 sc
Row 23: (1 sc, dec)*8 times, dec
Row 24: 8 dec, 1 sc
💡 Emma’s Tip: Stuff the foot firmly and keep it flat while you close the opening — you want a sole that can stand, not a rounded lump.
Finishing: Fasten off and cut yarn, then continue into the shin as follows.
Shin, worked from around Row 7 of the foot join, in beige:
Rows 1-5: 24 sc (24)
Row 6: switch to green, work 24 sc in the back loop only (24)
Row 7: (5 sc, inc)*4 times (28)
Row 8: (6 sc, inc)*4 times (32)
Row 9: (7 sc, inc)*3 times, 3 sc (35)
Finishing: Do not finish the round to the marker. Fasten off and cut yarn.
Left Leg — Toes and Shin
The left leg’s toes (pinky, middle, big) are worked identically to the right leg’s toes above, and the foot-joining sequence for Rows 1-24 is fully identical as well.
Shin, worked from around Row 7, in beige:
💡 Emma’s Tip: Before you pick up stitches for this shin, double check how both legs are positioned side by side — the big toes need to face inward toward each other, or the finished piece will look off.
Rows 1-5: 24 sc (24)
Row 6: switch to green, work 24 sc in the back loop only (24)
Row 7: (5 sc, inc)*4 times
Row 8: (6 sc, inc)*4 times
Row 9: (7 sc, inc)*4 times
💡 Emma’s Tip: Work 4 more sc on the left leg without cutting the yarn, then chain 10. From there, continue: 35 sc across the left leg, 10 sc across one side of the chain, 35 sc across the right leg, 10 sc across the other side of the chain. Place a stitch marker — this is your base for the body.
Base total after joining both legs and the chain: (90)
Kuzya Crochet Amigurumi Pattern — Body
Yarn: green, then beige. Continued from the leg join.
Row 1: (8 sc, inc)*10 times (100)
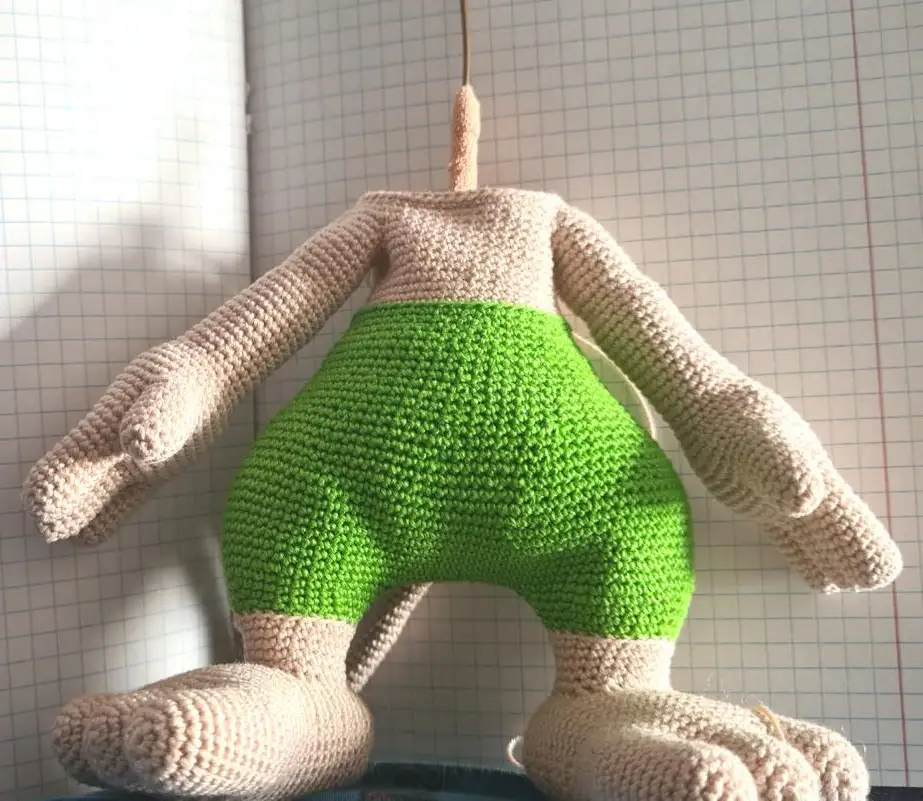
Rows 2-10: even (100)
Row 11: (8 sc, dec)*10 times
Rows 12-13: even
Row 14: (7 sc, dec)*10 times
Row 15: even
Row 16: (6 sc, dec)*10 times
Rows 17-19: even
Row 20: (5 sc, dec)*10 times
Rows 21-26: even
Row 27: (4 sc, dec)*10 times
Rows 28-29: even
Row 30: switch to beige, work in the back loop only, no changes
Rows 31-37: even
Row 38: 10 sc, join the left arm and work 7 sc together through both, 16 sc across the front of the body, 7 sc together with the right arm, 10 sc
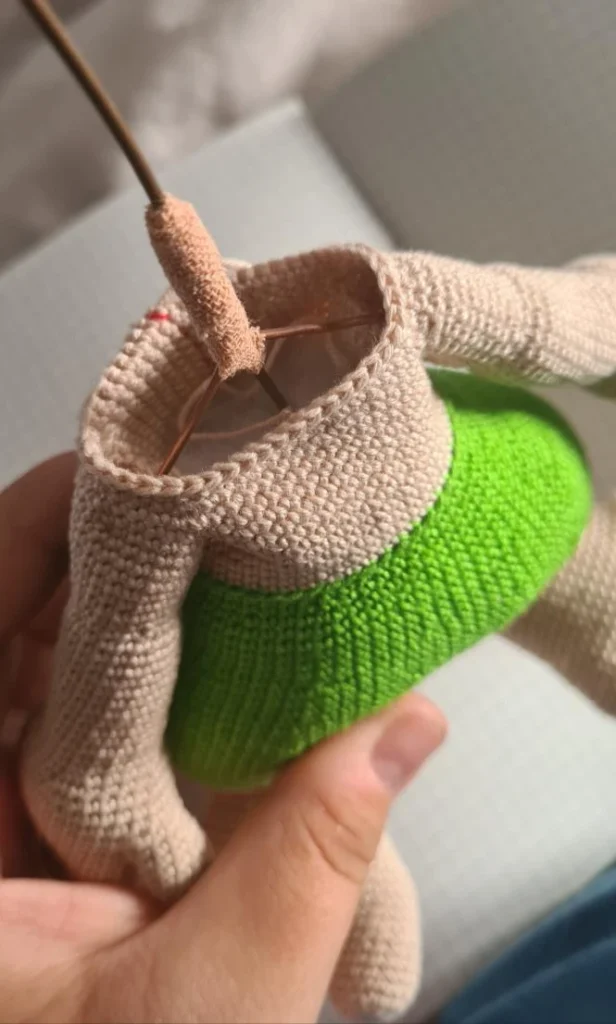
Row 39: 10 sc, 13 sc along the outer side of the arm, 16 sc, 13 sc along the outer side of the other arm, 10 sc
Row 40: 9 sc, dec, 4 sc, dec, 4 sc, dec, 14 sc, dec, 4 sc, dec, 4 sc, dec, 9 sc
Row 41: 9 sc, dec, 3 sc, dec, 3 sc, dec, 13 sc, dec, 3 sc, dec, 3 sc, dec, 8 sc
Row 42: even
Row 43: (6 sc, dec)*6 times
Row 44: (5 sc, dec)*6 times
Row 45: (4 sc, dec)*6 times
Row 46: (3 sc, dec)*6 times
Row 47: (2 sc, dec)*6 times
Rows 48-51: even
💡 Emma’s Tip: Keep your stitch marker aligned so it sits at the exact center back after Row 29 — you’ll want that reference point later. Insert the tail around Row 12, and stuff the body very firmly as you go, since this piece carries the whole figure’s structure. Once you’ve finished Row 39, join the arm wires together inside the body and wrap them with medical tape to lock the pose in place.
Pants Cuff
Yarn: green. Picked up along an edge.
Rows 1-5: Start at the back so the cuff sits with right-side-facing stitches. Work loosely, into the remaining half-stitch, with no increases or decreases across all 5 rows
Pants Strap
Yarn: green. Starting method: chain, worked in turned rows.
Row 1: Chain 2
Row 2: inc
Row 3: 2 inc
Row 4: 4 sc
Row 5: inc, 2 sc, inc
Row 6: even
Row 7: inc, 4 sc, inc
Rows 8-9: even
Row 10: 3 sc, dec, 3 sc
Rows 11-12: even
Row 13: 2 sc, dec, 3 sc
Rows 14-33: even
💡 Emma’s Tip: Try the strap on as you go — depending on your hook and tension, you may need a few more or fewer rows than written here. A round of single crochet along the edge gives it a cleaner finish, if you’d like one.
Finishing: Sew the strap in place and attach the button.
Assembling Your Kuzya Amigurumi
This is the part of the Kuzya crochet amigurumi pattern that takes the most patience — the face is entirely shaped through gathering stitches after the fact, so precision here matters more than anywhere else in the pattern.
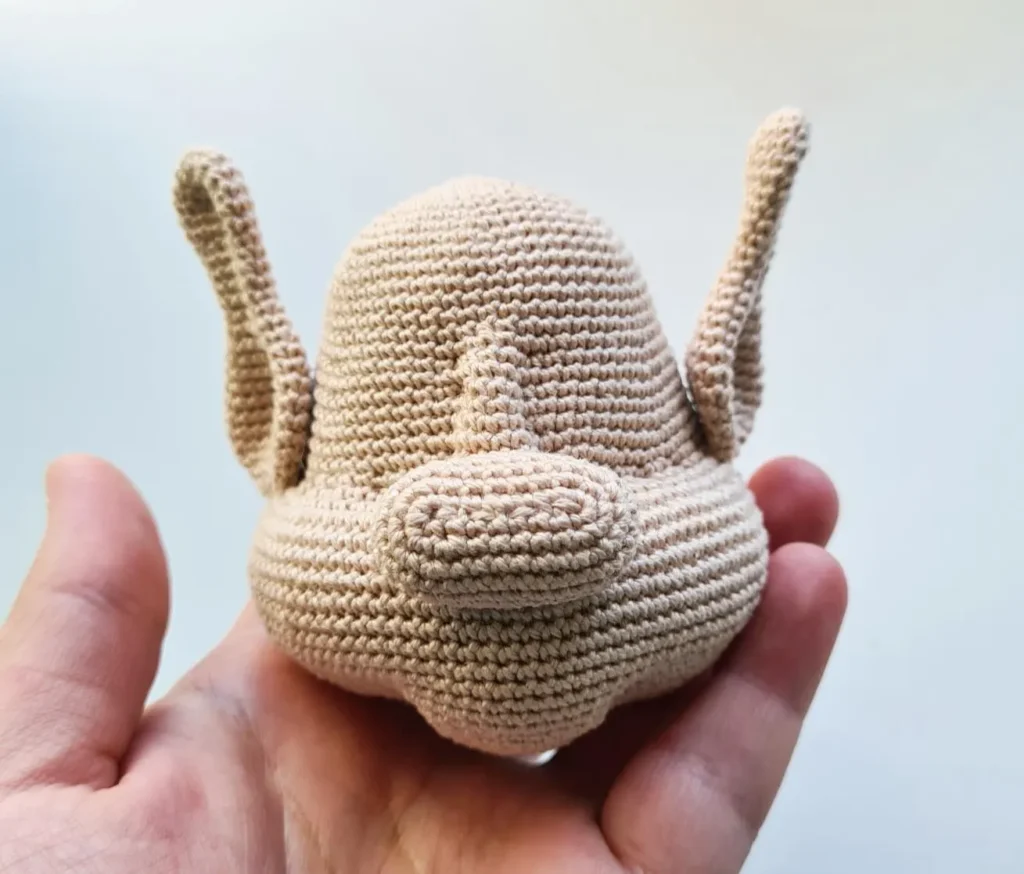
- Pin the following reference points onto the head before you gather anything: points 9 and 10 on Row 15, with 7 sc between them; points 3 and 4 on Row 24, with 9 sc between them; points 1 and 6 on Row 24, positioned 10 sc to either side of points 3 and 4; points 2 and 5 on Row 24, placed between points 9/3 and 10/4; points 7 and 8, also placed between points 9/3 and 10/4; points 11 and 12 on Row 39, with 11 sc between them; points 13 and 14 on Row 41, with 11 sc between them; and point A, the opening at the bottom of the head. Keep everything symmetrical to the center-of-face mark from Row 27.
- Cut a long length of beige yarn and work all gathering stitches doubled, with two strands held together.
- Insert your needle into the opening at point A, leaving a tail of about 4 in (10 cm).
- Work the gathering stitches in this order, catching one single crochet each time: A→3→A (pull tight, tie off), A→2→A (pull tight, tie off), A→1→A (pull tight, tie off), A→4→A (pull tight, tie off), A→5→A (pull tight, tie off), A→6→A (pull tight, tie off).
- Shape the bridge of the nose with a zigzag gathering stitch, catching the stitch one row above or below each time: A→3-4→7→8→9→10→A. Pull tight, tie off, then weave the ends inside the head.
- Shape the chin with two more gathering passes: A→11→(catch the sc one row below)→12→(catch the sc one row below)→A, pulled tight and tied off; then A→13→(catch the sc one row below)→14→(catch the sc one row below)→A, pulled tight and tied off. Weave in all ends.
- Add extra stuffing to the cheeks — front and sides — and to the chin.
- Sew on the nose and stuff it before closing.
- Sew on the ears, then glue where they meet the head to hold them in place.
- Sew the finished head onto the body.
Finishing Touches for the Kuzya Pattern
The decorative details are what really bring this little creature to life, and they’re worth doing carefully rather than rushing through at the end.
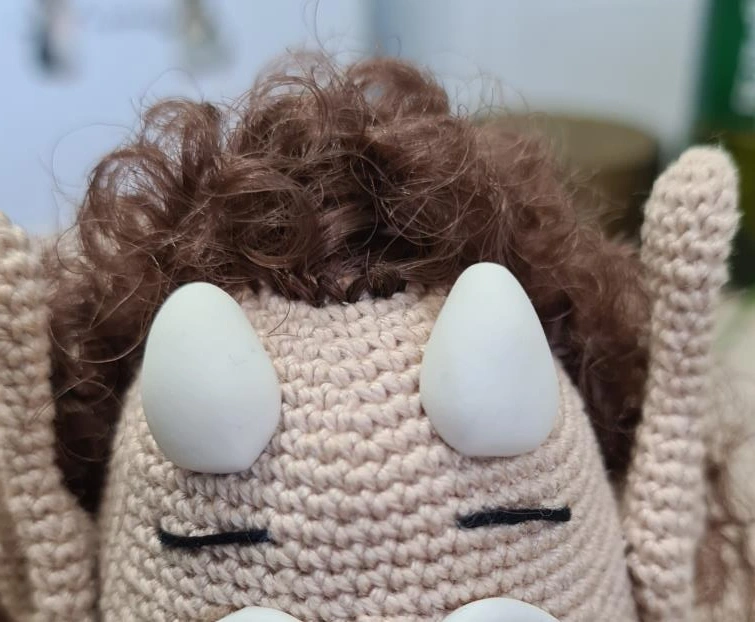
Hair: Pull a thin strand of curly doll hair and cut it to 3-3.5 in (8-9 cm) once stretched out. Fold it in half, insert your hook under a single crochet stitch, catch a loop from the strand, pull it through the stitch, then pull the folded lock through that loop and pull tight. Space the locks every other stitch, every 2 rows, except across the front of the head around rows 3-4, where you’ll attach a lock into every single stitch.
Eyes, horns, and tooth: Draw a template on paper, then cut the eye shapes from felt or foamiran using that template. Glue the layers together, adding painted or material highlights if you like. Make the small tooth and the horns the same way — or sculpt and bake these three pieces from polymer clay instead, slicing them once cooled.
Embroidery: Embroider the mouth and eyebrows, then coat them lightly with E6000 glue if you want them to hold a particular curve.
Attaching: Glue the eyes and tooth in place with E6000 glue. For the horns, apply glue to just the bottom third and set them at the base only.
Tail tassel: Cut four strands of acrylic yarn, each 6.7 in (17 cm) long. Fold them in half together and tie a knot at the center, then brush them out with a pet slicker brush. Repeat this three or four more times. Glue all the knots together with instant glue, trim the ends to shape a tassel, and glue the finished tassel to the tip of the tail with crystal glue.
Shading: Add brown pastel shading between the fingers and toes, at the inner elbows, and around the nose, cheeks, chin, and inside the ears.
Emma’s Note
I’ll be honest — this one pushed my patience more than most patterns I’ve written up. The wired fingers and toes, the gathered face, the tiny felt horns — none of it is difficult on its own, but it all has to come together in the right order, and that’s where the real skill is. If your gathering stitches don’t pull the face into quite the shape you expected the first time, don’t panic — that’s normal on a piece this fine, and a little extra stuffing in the cheeks fixes more than you’d think. Take this one slowly, part by part. Happy hooking.
FAQ
What yarn is best for this Kuzya crochet amigurumi pattern?
A fine (fingering/lace) mercerized cotton yarn is recommended to match the 0.95mm hook and ensure the tiny details and jointed limbs form correctly.
Can beginners make this Kuzya amigurumi pattern?
This is an advanced pattern that requires working with a wire armature, jointed fingers and toes, and complex facial gathering. It is best suited for experienced crocheters.
How long does it take to crochet this Kuzya pattern?
Due to the fine yarn gauge, multi-part limbs, and detailed finishing steps, expect to spend 10+ hours completing this amigurumi project.