Amigurumi Unicorn Free Pattern: Curls, a Heart, and Barely Any Yarn
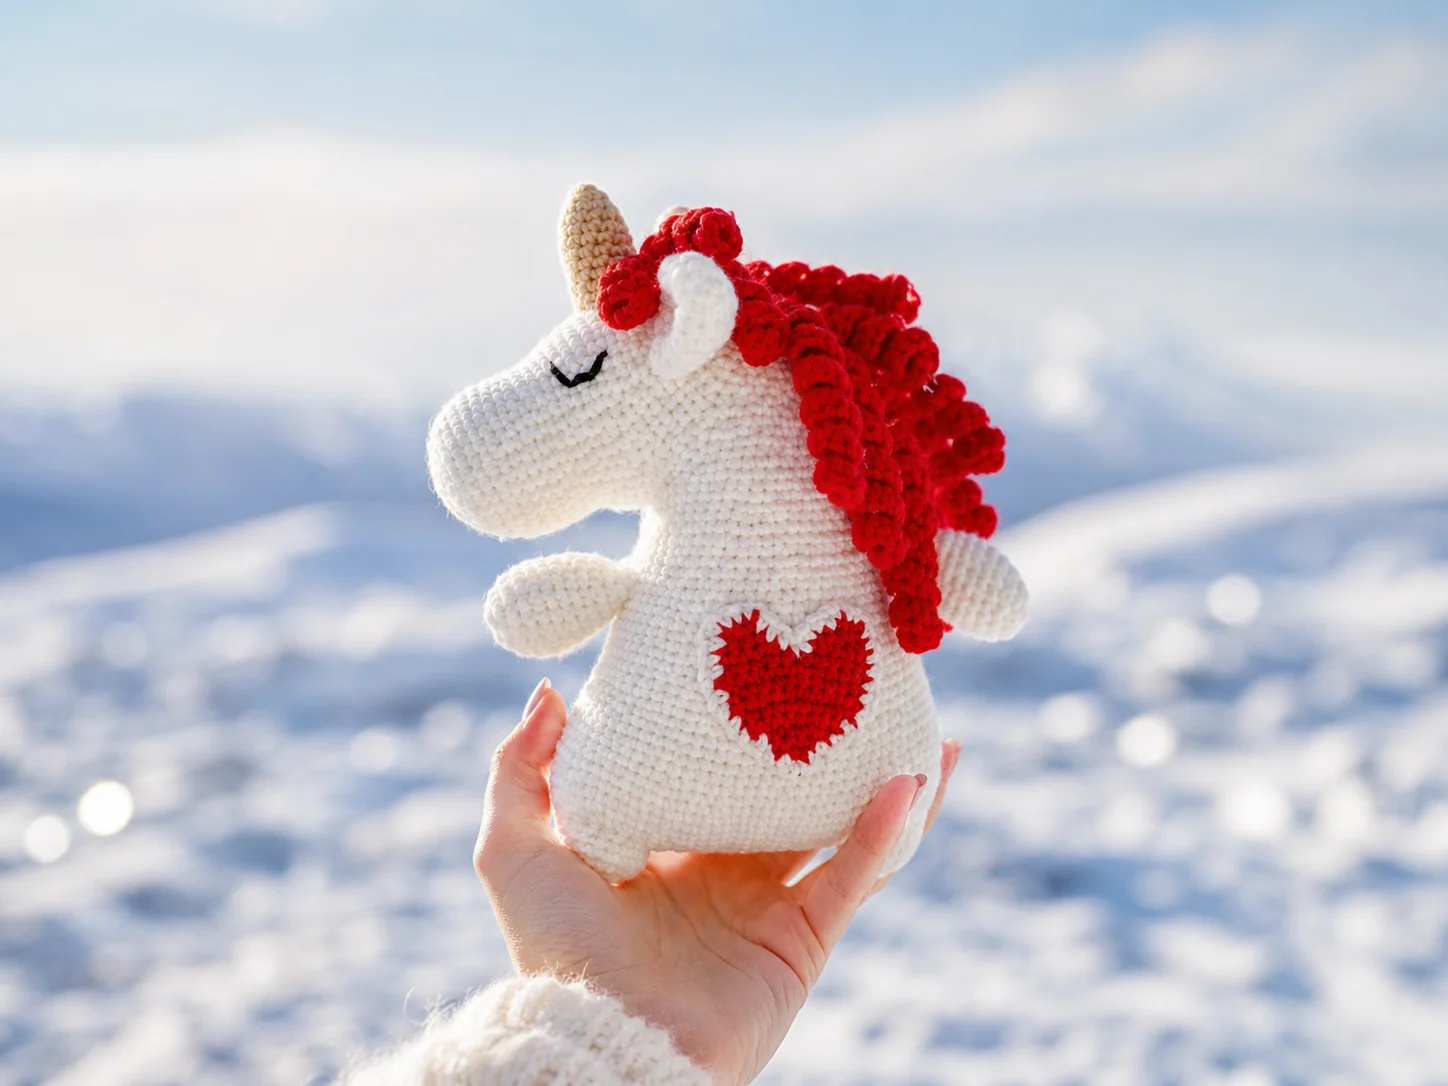
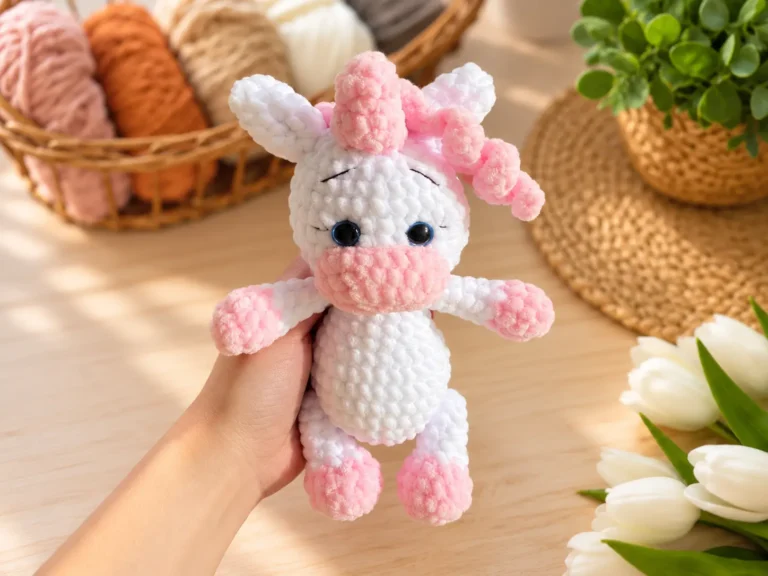
This amigurumi unicorn free pattern is built almost entirely from two leftover skeins — a bulky white plush for the body and a small ball of red for the curly mane and tail — plus a scrap of beige for the horn. It’s a bigger make than my usual keychains, but every part is designed to use what’s already sitting in your stash: legs, arms, ears, and even the little heart charm on the belly are all worked from small, manageable amounts of yarn. Grab your hook. This one’s worth the evening.
🧶 What You’ll Need
- 💰 Yarn Needed: approximately 2 skeins (~330 yds) of bulky white plush for the body, legs, head, arms, and ears; approximately 30g (~65 yds) of red DK/light worsted acrylic for the mane, tail, and heart; a small amount of beige DK/light worsted for the horn — yardage is estimated from stitch counts and should be confirmed with a test make before publishing
- 🎨 Colors: milky white (or any similar bulky plush from your stash), red (or similar DK/light worsted), beige (or similar DK/light worsted) — all “or similar” substitutions welcome
- 🪝 Hook: flagged for review — see Materials note below
- ⏱️ Time: a full weekend project — realistically 6-8 hours across body, mane, and assembly
- 📏 Finished Size: not stated in the source pattern; estimated at roughly 10-11 in tall based on stitch and row counts — needs confirmation from a test make
- 💡 Difficulty: Advanced (turning-row bridge, asymmetric curls, multi-piece head/body join)
- 🎁 Great For: a special-occasion gift, shelf display, or the kind of scrap-bin project that finally uses up that half-skein of red you’ve been holding onto
Materials for This Amigurumi Unicorn Free Pattern
The body of this unicorn is worked in a bulky plush yarn — this falls under Bulky (5) weight, the thick, squishy kind that builds up size fast without burning through yardage. If you don’t have plush yarn specifically, any soft bulky-weight yarn in your stash will substitute just fine. The mane, tail, and heart use a much smaller amount of DK/light worsted red — this is genuinely a use-up-the-odd-ball situation, since the curls only take a few yards each. The horn uses a small scrap of beige DK/light worsted; a leftover cotton-blend ball works perfectly here since it’s such a tiny piece.
You’ll also need a little bit of black thread for embroidering the eyes and standard stuffing.
⚠️ Hook Size — Flagged for Review: The source pattern lists a single hook size of 1.7mm, which has no standard US letter equivalent, and notes it was used for a completely different yarn (Alize Softy) than the bulky plush and DK yarns actually used in this pattern. That sizing doesn’t line up with the yarn weights involved here — a 1.7mm hook is far too small for bulky plush. This looks like a source data mismatch rather than an intentional hook choice. Recommend Brahim confirm actual hook sizes for each yarn weight (bulky body, DK mane/tail/horn) before this goes live, and that we add a note or FAQ entry for the metric-only sizing gap per our usual hook-size convention.
Abbreviations
| Abbreviation | Meaning |
|---|---|
| mr | magic ring |
| ch | chain |
| sc | single crochet |
| dc | double crochet |
| inc | increase (2 sc in same stitch) |
| dec | invisible decrease |
Smart Crafter Tips
Here’s a trick that saves you a headache: place a stitch marker at the start of every round on this one, especially through the bridge and head-join sections — there are a lot of turning rows tucked into an otherwise continuous-round pattern, and it’s easy to lose your place. If magic ring starts still trip you up, our magic ring tutorial covers it in under two minutes.
Every decrease in this pattern should be worked as an invisible decrease, not a basic sc2tog — it keeps the shaping clean on a piece with this much visible surface. Our invisible decrease guide walks through the front-loop technique if you want a refresher.
Stuff as you go, not at the end — this unicorn has several long, narrow sections (the legs, arms, and horn especially) where it’s much easier to pack stuffing in gradually than to try to force it down a finished tube. Our stuffing tutorial has the details if you want to avoid lumps.
Pattern
Legs (make 2)
Yarn: white plush | Start: ch 2 (or mr)
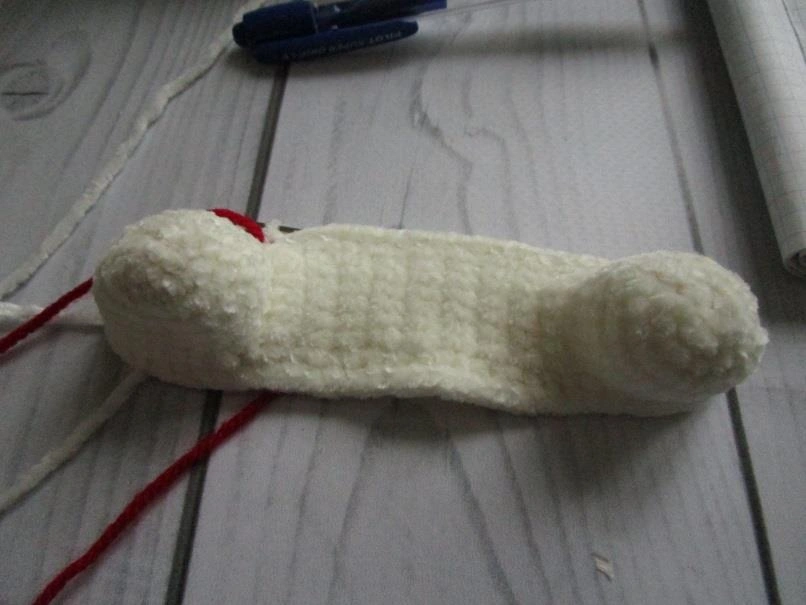
Row 1: Ch 2 and in the 2nd ch from hook, 6 sc (6)
Row 2: 6 inc (12)
Row 3: (inc, 1 sc) x 6 (18)
Row 4: (inc, 2 sc) x 6 (24)
Rows 5-8: 24 sc, 4 rows (24)
🧶 Scrap Check: Each leg is a small, self-contained piece — a great way to test whether your plush yarn substitute is going to work before you commit to the whole body. Place a marker at the start of each round and stuff as you go. If you’d like slightly longer legs, work 2 extra rows of 24 sc before finishing.
Cut yarn and weave in the end on the first leg. Crochet the second leg the same way, but do not cut the yarn — you’ll continue straight into the bridge.
Bridge and Connecting the Legs
Yarn: white plush | Start: continue from the second leg
Row 9: 7 sc, turn for a new row (7)
Rows 10-26: 7 sc, 17 rows, turning at the start of each with ch 1 (7)
Row 27: Connect and crochet the bridge together with the other leg — 7 sc (7)
Row 28: 68 sc (you may end up with +/- 2 sts in the process) (68)
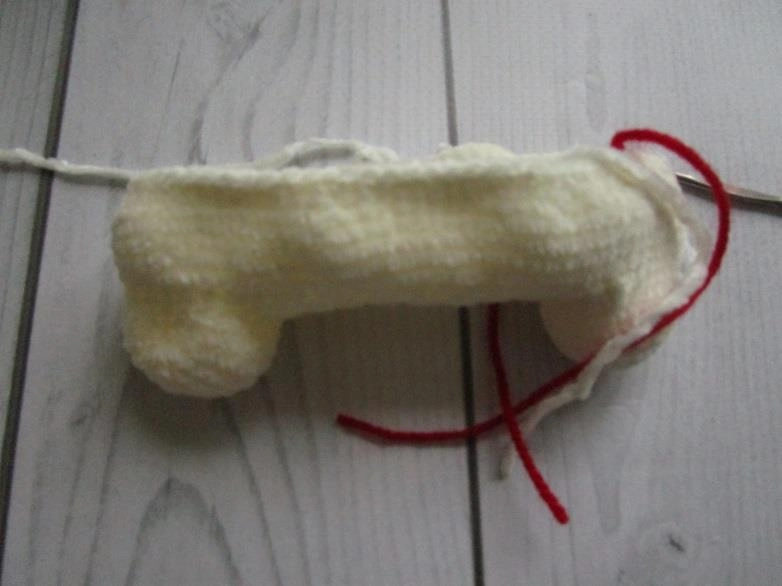
Row 29: (inc, 1 sc) x 34 (102)
Rows 30-31: 102 sc, 2 rows (102)
Row 32: (12 sc, dec) x 7, 4 sc (95)
Row 33: (11 sc, dec) x 7, 4 sc (88)
Row 34: (8 sc, dec) x 8, 8 sc (80)
Rows 35-36: 80 sc, 2 rows (80)
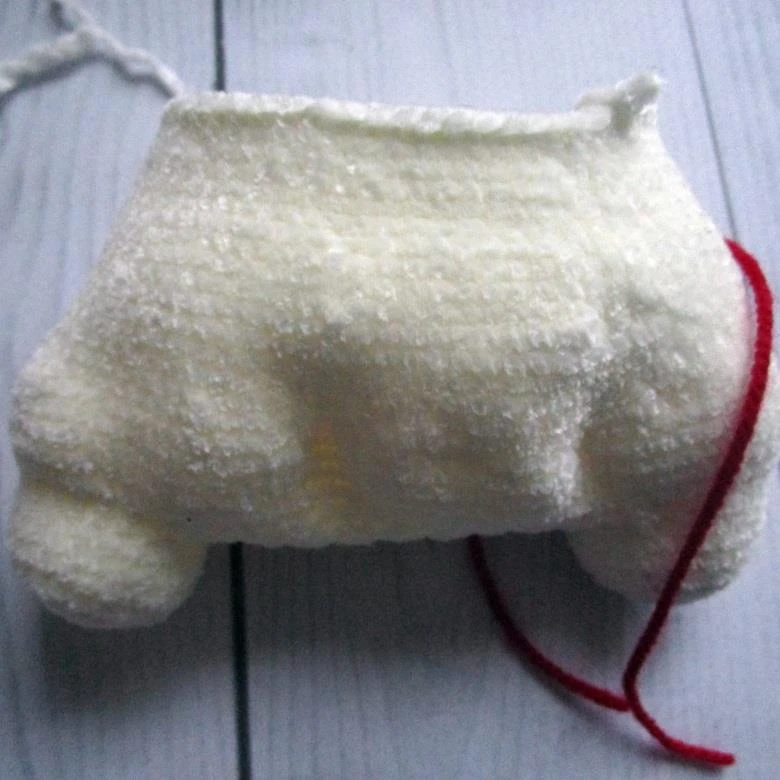
Row 37: (8 sc, dec) x 8 (72)
Rows 38-40: 72 sc, 3 rows (72)
Row 41: (7 sc, dec) x 8 (64)
Rows 42-53: 64 sc, 12 rows (64)
Row 54: (6 sc, dec) x 8 (56)
Rows 55-57: 56 sc, 3 rows (56)
🧶 Scrap Check: Rows 9-26 are worked flat, back and forth, to build the bridge that joins your two legs into one body — chain 1 at the start of every row for turning. At row 28, drop a marker on the last stitch; that becomes the new beginning-of-round point as you switch back to working in continuous rounds for the rest of the body.
Set this piece aside without cutting the yarn.
Head
Yarn: white plush | Start: ch 2 (or mr)
Row 1: Ch 2 and in the 2nd ch from hook, 6 sc (6)
Row 2: 6 inc (12)
Row 3: (1 sc, inc) x 6 (18)
Row 4: (2 sc, inc) x 6 (24)
Row 5: (3 sc, inc) x 6 (30)
Row 6: (4 sc, inc) x 6 (36)
Row 7: (5 sc, inc) x 6 (42)
Rows 8-10: 42 sc, 3 rows (42)
Row 11: (8 sc, dec) x 4, 2 sc (38)
Row 12: 38 sc (38)
Row 13: (6 sc, dec) x 4, 6 sc (34)
Rows 14-15: 34 sc, 2 rows (34)
Row 16: (inc, 5 sc) x 5, 4 sc (39)
Row 17: 39 sc (39)
Row 18: (inc, 5 sc) x 6, 3 sc (45)
Rows 19-20: 45 sc, 2 rows (45)
Row 21: (inc, 7 sc) x 5, 5 sc (50)
🧶 Scrap Check: Place a marker at the beginning of the round and stuff the head as you go so you’re not fighting a fully closed shape later. Don’t cut the yarn at row 21 — the head transitions straight into the body join.
Connecting Head to Body
Yarn: white plush | Start: continue from row 21 of the head and row 57 of the body
Row 22: 13 sc to crochet the side of the head together with the body; place a marker here — this is the new beginning of round — then continue with 80 sc (80)
Row 23: (dec, 8 sc) x 8 (72)
Row 24: 72 sc (72)
Row 25: (dec, 7 sc) x 8 (64)
Row 26: 64 sc (64)
Row 27: (dec, 6 sc) x 8 (56)
Row 28: (dec, 5 sc) x 8 (48)
Row 29: (dec, 4 sc) x 8 (40)
Rows 30-32: 40 sc, 3 rows (40)
Row 33: (dec, 3 sc) x 8 (32)
Row 34: 32 sc (32)
Row 35: (dec, 2 sc) x 8 (24)
Row 36: 24 sc (24)
Row 37: (dec, 1 sc) x 8 (16)
Row 38: 8 dec (8)
Then take this side of the head and join it to the body along the left side. Cut the yarn and close the hole. Stuff the body firmly before you finish closing it up.
Arms (make 2)
Yarn: white plush | Start: ch 2
Row 1: Ch 2, in the 2nd ch from hook, 6 sc (6)
Row 2: 6 inc (12)
Row 3: (inc, 1 sc) x 6 (18)
Rows 4-14: 18 sc, 11 rows (18)
Row 15: (dec, 1 sc) x 6 (12)
🧶 Scrap Check: Place a marker after the first round and stuff lightly as you go — these are small pieces, so it doesn’t take much filling.
Fold the arm in half and crochet through both sides together — 6 sc — to close it flat. Cut the yarn.
Ears (make 2)
Yarn: white plush | Start: ch 2
Row 1: Ch 2, in the 2nd ch from hook, 6 sc (6)
Row 2: 6 inc (12)
Row 3: (inc, 1 sc) x 6 (18)
Row 4: (inc, 2 sc) x 6 (24)
Rows 5-10: 24 sc, 6 rows (24)
Row 11: skip 3 sts, 18 sc (18)
Row 12: skip 3 sts, 15 sc (15)
Place a marker after row 2. Fasten off and cut the yarn — the skipped-stitch rows shape a flat, pointed ear tip without any stuffing needed.
Mane
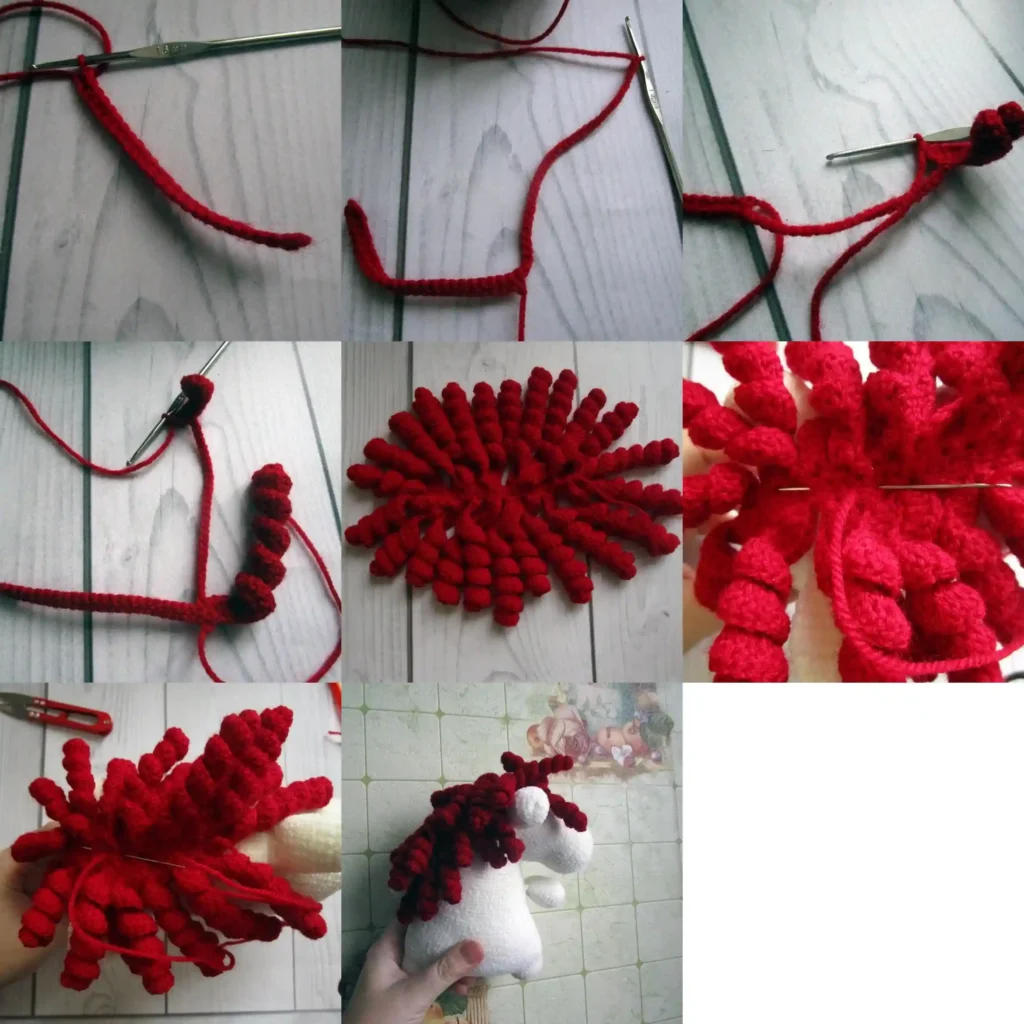
Yarn: red acrylic | Start: chain 25
Row 1: chain 25 (25)
Row 2: in the 2nd ch from hook, 24 sc (24)
Row 3: begin working curls along the sides of the base — see note below
Note: from the last worked stitch, chain 35, work back along that chain crocheting 2 dc into the 2nd ch and each ch after (68 sts), then single crochet the resulting curl onto the base with 1 sc, plus one more sc, and start the next curl from that stitch. Leave 2 sc between curls. After 6 curls of 35-ch, switch to curls made from 30 ch (5 curls), then 25 ch (2 curls). Then move to the other side of the base and work 3 more 25-ch curls — this time with 3 sc between curls instead of 2 — then 2 curls from 30 ch, then 4 curls from 35 ch. The shorter 25-ch curls are meant to sit as bangs at the front.
Cut the yarn once all the curls are complete.
Curly Tail
Yarn: red acrylic | Start: ch 6
Row 1: chain 6 (6)
Row 2: in the 2nd ch from hook, 5 sc, then from the last stitch chain 15 and work back along the chain with 2 dc in each ch to form a curl, join the curl to the base with 2 sc, then chain 15 again for the next curl
⚠️ Interpretation Note: Same curl technique as the mane, worked smaller — the source pattern indicates you’ll end up with 3 curls on each side of the short base (6 curls total), but doesn’t give a final stitch count for the piece. Recommend a test make to confirm the total before this goes to print.
Cut the yarn and leave a tail for sewing.
Horn
Yarn: beige DK/light worsted | Start: mr
Row 1: 6 sc in mr (6)
Row 2: 6 sc (6)
Row 3: (inc, 1 sc) x 3 (9)
Row 4: (inc, 2 sc) x 3 (12)
Rows 5-12: 12 sc, 8 rows (12)
Place a marker after row 2. Cut the yarn and stuff the horn before sewing it on — this tiny piece is a perfect use for a few leftover yards of beige.
Heart
Yarn: red acrylic | Start: ch 2, worked in turning rows
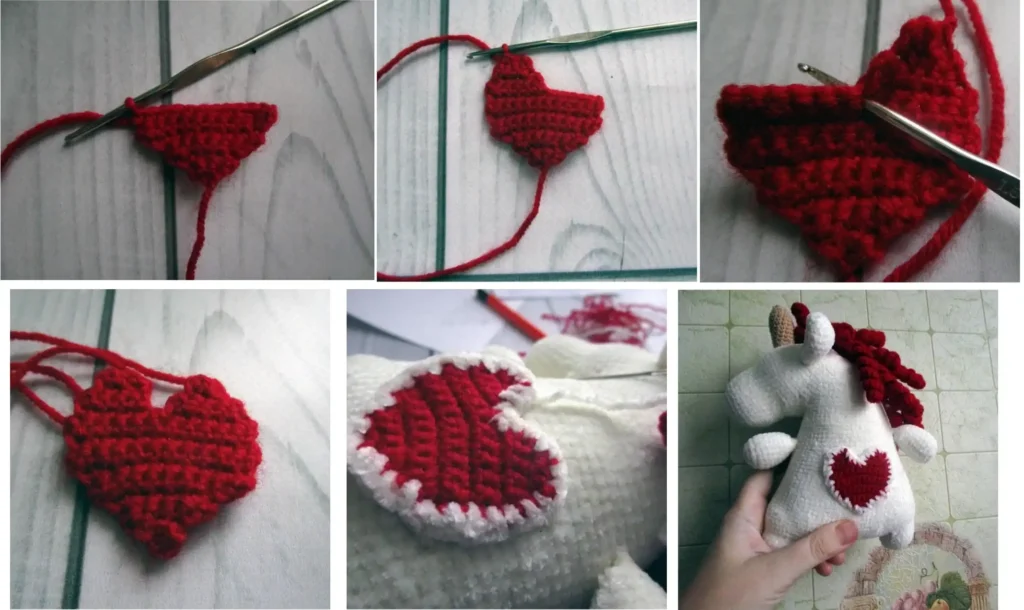
Row 1: ch 2, in the 2nd ch from hook, 3 sc (3)
Row 2: inc, 1 sc, inc (5)
Row 3: inc, 3 sc, inc (7)
Row 4: inc, 5 sc, inc (9)
Row 5: inc, 7 sc, inc (11)
Rows 6-8: 11 sc, ch 1 for turning at the start of each row (11)
Row 9: ch 1 turn, 6 sc, turn; ch 1 turn, from 2nd st: 5 sc, turn; ch 1 turn, from 2nd st: 4 sc, turn; ch 1 turn, from 2nd st: 1 sc, skip 1 st, 1 sc in the last st, fasten off — this shapes the first lobe of the heart
Row 10: attach yarn at the center of the heart piece for the second lobe: 6 sc, turn; ch 1 turn, from 2nd st: 4 sc, turn; ch 1 turn, from 2nd st: 3 sc, turn; ch 1 turn, from 2nd st: 2 sc
Border the finished heart with your white plush yarn to match the body, then cut the red and use the tail to sew the heart onto the unicorn’s belly.
Assembly
- Mark the arm placement and sew both arms on around row 53 of the body (counting from the base of the legs).
- Pin the ears evenly on either side of the muzzle, around row 27 from the beginning of the head, and sew in place.
- Sew the mane base to the head starting around row 25 from the beginning of the head — position it so it begins just in front of the ears — and stitch along the middle of the base with a running stitch.
- Sew the tail along its base at the middle, positioned at the back of the body.
- Sew the horn beside the mane, around row 21 from the beginning of the head.
- Sew the finished, bordered heart onto the belly using the leftover yarn tail from the border round.
- Embroider the eyes with black thread in a soft closed-eye arch shape.
Our sewing guide has tips on keeping all these seams tight and invisible if this is your first multi-piece assembly.
💡 Stretch It Further: The curl technique used for this mane and tail works on almost any amigurumi — try it in pastel scraps for a cotton-candy version, or in a single neutral tone for something calmer. If you’ve got two or three small leftover balls in different reds, pinks, or purples, alternate them curl by curl for an ombré mane instead of a single solid color. The horn and heart are small enough that you could make a whole batch of them from scrap bags for future projects, no extra yarn purchase required.
Mia’s Take
This one’s proof that a big, impressive make doesn’t have to mean a big yarn budget — two skeins of plush and a handful of leftover DK scraps get you a unicorn with a full curly mane and a little sewn-on heart. It’s a weekend project, not a quick one, but almost none of that time is spent worrying about running out of yarn. If you’ve got any red left over when you’re done, the heart pattern alone makes a sweet little standalone charm for your next project.
FAQ
What yarn is best for this amigurumi unicorn free pattern?
A bulky (weight 5) plush yarn in white is ideal for the body to build size quickly, while a DK or light worsted weight yarn is best for crocheting the curly mane, tail, and details.
How long does it take to crochet this amigurumi unicorn?
This is an advanced project that typically takes a full weekend, or roughly 6 to 8 hours, to complete the body, curls, and multi-piece assembly.
Do I need to buy new yarn for the unicorn’s mane?
Not necessarily! The mane, tail, and heart use very small amounts of DK yarn, making it a perfect scrap-busting project for any leftover colorful yarn in your stash.