Free Cat Amigurumi Pattern: What You’ll Need From Your Stash
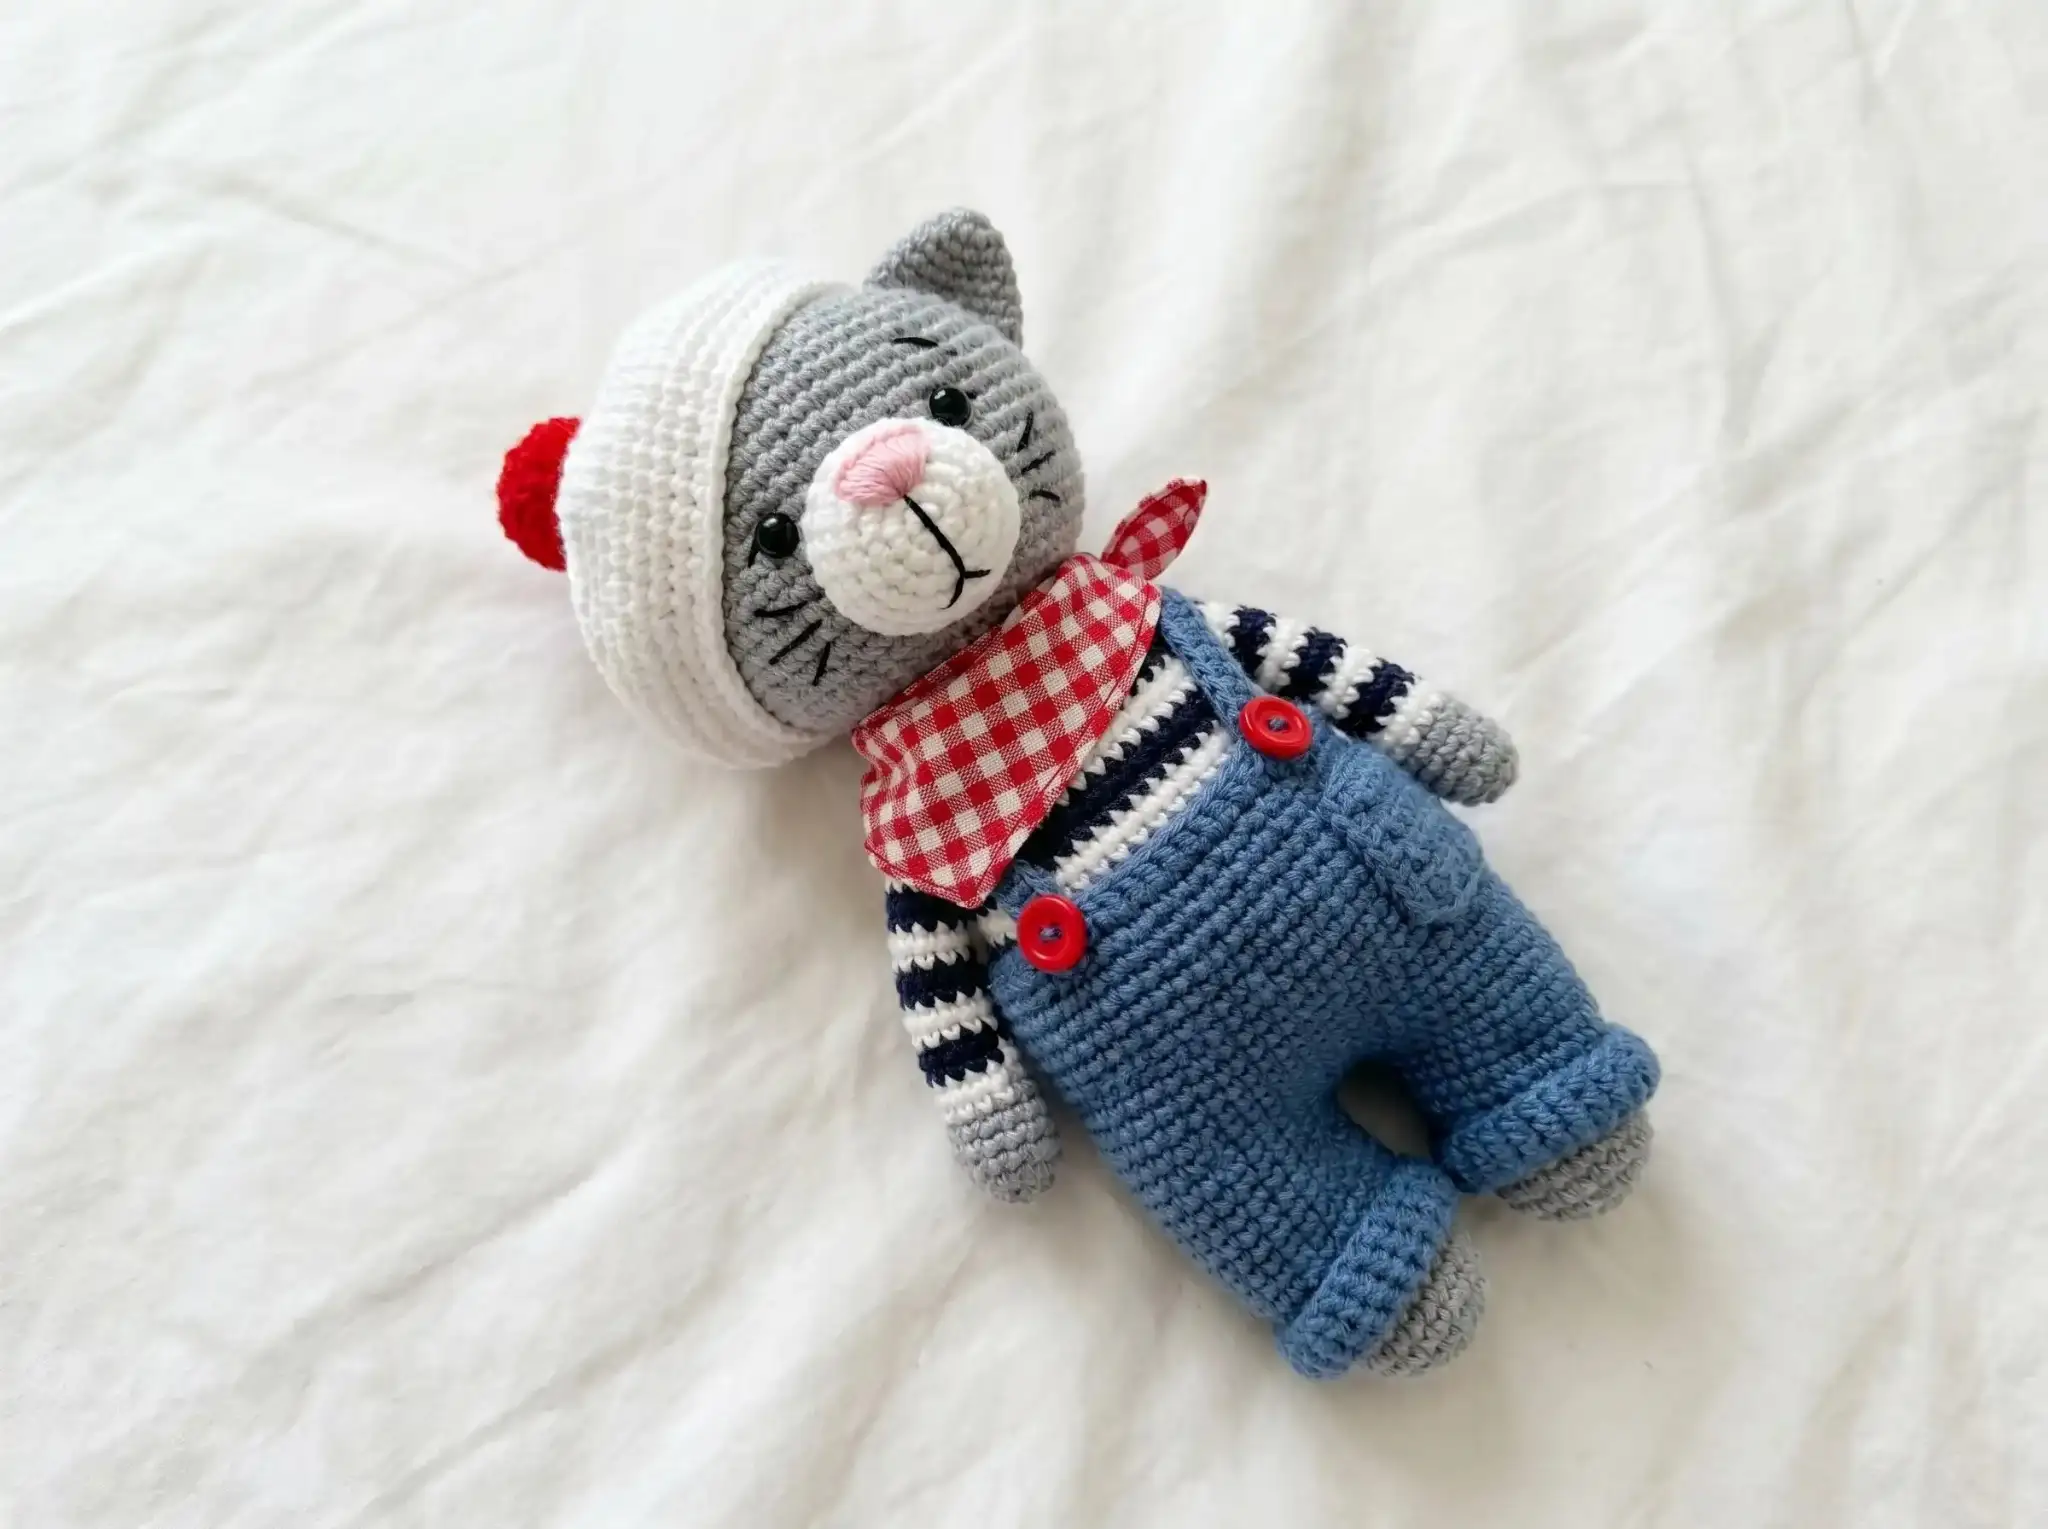
This free cat amigurumi pattern uses five colors of DK yarn — and most of it is coming straight from your scrap bin. Jeremy is a 7.9 in cat amigurumi complete with a striped sweater, tiny denim overalls, and a red pompom beret — every stripe just two rows wide, which means your smallest leftovers count. Pull out the DK scraps and grab your 2.0mm hook. He’s worth the weekend.
🧶 What You’ll Need
- 💰 Yarn Needed: ~400 yards total — gray (~200 yds), denim blue (~85 yds), white (~65 yds), dark blue/navy (~50 yds), red poppy (~15 yds)
- 🎨 Colors: gray (body), denim blue (overalls), dark blue/navy (sweater stripes), white (beret, muzzle, stripes), red poppy (pompom) — any DK scraps in similar shades work
- 🪝 Hook: 2.0mm (Steel 4)
- ⏱️ Time: 6–8 hours
- 📏 Finished Size: 7.9 in (20 cm)
- 💡 Difficulty: Intermediate
- 🎁 Great For: gifts, shelf display, character collections
Materials for This Cat Amigurumi
- Yarn: DK / Light Worsted weight (CYCA 3) in five colors. US alternatives include Lion Brand Pound of Love, Paintbox Simply DK, or any DK cotton-acrylic blend. Mixing brands is fine here — the tight 2.0mm gauge smooths out any slight texture differences.
- Gray: approximately 200 yards (body, head, legs, arms, tail, ears)
- Denim blue: approximately 85 yards (overalls, pocket, straps)
- White: approximately 65 yards (beret, muzzle, sweater stripe rows)
- Dark blue / navy: approximately 50 yards (sweater stripe rows in arms and body)
- Red poppy: approximately 15 yards (pompom only)
- Hook: 2.0mm (Steel 4)
- Polyester fiberfill stuffing
- 2 × 6mm bead eyes
- Small amounts of black, white, and pink embroidery thread or yarn for face embroidery
- Fabric piece: approximately 10.6 × 3.5 in (27 × 9 cm) for the neck scarf — optional; any lightweight fabric works
- 2 decorative buttons for the overalls front
- Tapestry needle, scissors, stitch pins, stitch marker
- Sewing machine (optional) — for finishing the fabric scarf edges; hand-sewing works perfectly too
⚠️ Safety Note: This pattern uses 6mm bead eyes and small buttons — both are choking hazards. This toy is not suitable for children under 3. For a child-safe version, embroider the eyes instead and replace the buttons with embroidered stitches or French knots.
Abbreviations
| Abbreviation | Meaning |
|---|---|
| mr | magic ring |
| sc | single crochet |
| ch | chain |
| dc | double crochet |
| inc | increase — 2 sc worked into the same stitch |
| dec | invisible decrease — insert hook through the front loops only of the next 2 stitches simultaneously, yarn over, pull through, yarn over, pull through 2 loops |
| sl st | slip stitch |
| FO | fasten off |
| st(s) | stitch(es) |
Smart Crafter Tips for This Cat Amigurumi
1. Those sweater stripes were practically built for scrap yarn. Every single stripe section — across both arms and the body — is exactly two rows wide. That’s roughly 4–6 yards of yarn per stripe, per color. If you’ve got any leftover DK in shades of blue and white, you almost certainly have enough for the full striped section without buying anything new.
The trick to keeping all those color changes tidy is carrying the yarn rather than cutting it at every stripe. Our guide to seamless color changes in amigurumi shows you exactly how — you’ll save yourself a dozen ends to weave in and end up with a much cleaner wrong side.
2. Almost every piece starts with a magic ring. The legs, arms, tail, ears, muzzle, beret, and pompom all begin the same way. If that technique is still new to you, five minutes with our magic ring tutorial will make the whole pattern smoother from the first stitch.
3. The legs and body are one continuous piece — and that’s actually less work. You crochet both legs, join them with a short chain, and keep going straight into the body. The tail gets worked in mid-body, the arms get joined at the shoulder rows, and the head follows immediately after — no sewing any of those together. Read the Legs + Body section all the way through before you begin, place your stitch markers generously, and the logic will click. For the parts that do need sewing — ears, muzzle, and overalls details — our guide to sewing amigurumi parts together covers placement, thread tension, and keeping everything neat on the outside.
🧶 Scrap Check: The pompom uses approximately 15 yards of red poppy yarn. The white muzzle uses roughly 10 yards. A small leftover ball from almost any recent project covers both — no new skein needed for either of these pieces.
Free Cat Amigurumi Pattern Instructions
Arms (×2)
Yarn: gray, then alternating white and dark blue/navy stripes | Start: magic ring
Row 1: 6 sc in mr (6)
Row 2: inc in each st (12)
Rows 3–6: 12 sc (12)
Change to white before Row 7.
Rows 7–8: 12 sc (12)
Change to dark blue/navy before Row 9.
Rows 9–10: 12 sc (12)
Change to white before Row 11.
Rows 11–12: 12 sc (12)
Change to dark blue/navy before Row 13.
Rows 13–14: 12 sc (12)
Change to white before Row 15.
Rows 15–16: 12 sc (12)
Change to dark blue/navy before Row 17.
Rows 17–18: 12 sc (12)
Change to white before Row 19.
Rows 19–20: 12 sc (12)
Change to dark blue/navy before Row 21.
Rows 21–22: 12 sc (12)
Change to white before Row 23.
Row 23: Work 6 more sc, then fold the edges of the arm together and work 6 sc through both layers to close. (closes flat)
FO, cut yarn.
Stuffing guide: Stuff the lower paw section firmly, the middle arm section moderately. Leave the upper section — the part that will attach to the body — unstuffed so it lies flat for easy joining.
Make two arms.
🧶 Scrap Check: Each arm uses approximately 20–25 yards across three colors. Both arms together use roughly 45–50 yards — small enough that almost any combination of DK blue and white scraps will cover it.
Tail (×1)
Yarn: gray | Start: magic ring
Row 1: 6 sc in mr (6)
Row 2: inc in each st (12)
Rows 3–25: 12 sc (12)
Stuff the lower section firmly and the middle section moderately. Leave the upper section unstuffed. Fold the edges together and work 6 sc through both layers to close. FO, cut yarn.
Legs + Body (×1 — one continuous piece)
Read this section in full before you begin. Both legs are worked separately, joined with a chain in Row 18, and the body, striped sweater section, arm joins, and head all follow without cutting yarn. Stuff firmly throughout as you go.
Yarn: gray → dark blue/navy and white stripes from Row 29 → gray again from Row 47 | Start: magic ring
Make the First Leg:
Row 1: 6 sc in mr (6)
Row 2: inc in each st (12)
Row 3: (1 sc, inc) × 6 (18)
Row 4: 1 sc, inc, (2 sc, inc) × 5, 1 sc (24)
Rows 5–7: 24 sc (24)
Row 8: 6 sc, 6 dec, 6 sc (18)
Row 9: (4 sc, dec) × 3 (15)
Rows 10–12: 15 sc (15)
Row 13: (4 sc, inc) × 3 (18)
Rows 14–16: 18 sc (18)
Row 17: (5 sc, inc) × 3 (21)
Work 7 more sc after Row 17, then sl st. FO, cut yarn. Set the first leg aside.
Make the Second Leg — same as the first leg through Row 17. Work 18 more sc after Row 17. Do not cut yarn — continue directly to Row 18.
Joining the Legs (Row 18):
Row 18: Ch 6, join to the first leg at the stitch just after the sl st. Work 21 sc across the first leg, 6 sc across the chain, 21 sc across the second leg, 6 sc across the back of the chain. (54)
Make sure both legs are facing forward. Place your stitch marker at the front center of the piece at the end of Row 18.
Rows 19–26: 54 sc (54)
Row 27: 22 sc, join tail (6 sc worked through both layers of the closed tail end), 26 sc (54)
Make sure the tail sits centered at the back. Check and adjust before moving on.
Row 28: (7 sc, dec) × 6 (48)
After Row 28, reposition your stitch marker to the exact center of the back. Change to dark blue/navy in the next stitch — this becomes the beginning of Row 29. Move your marker here.
Change to dark blue/navy before Row 29.
Rows 29–30: 48 sc (48)
Change to white before Row 31.
Row 31: 48 sc (48)
Row 32: (10 sc, dec) × 4 (44)
Change to dark blue/navy before Row 33.
Rows 33–34: 44 sc (44)
Change to white before Row 35.
Rows 35–36: 44 sc (44)
Change to dark blue/navy before Row 37.
Rows 37–38: 44 sc (44)
Change to white before Row 39.
Row 39: 44 sc (44)
Row 40: (9 sc, dec) × 4 (40)
Change to dark blue/navy before Row 41.
Rows 41–42: 40 sc (40)
Change to white before Row 43.
Row 43: (8 sc, dec) × 4 (36)
Row 44: 9 sc, join left arm (6 sc worked through both layers of arm), 12 sc, join right arm (6 sc worked through both layers of arm), 3 sc (36)
Make sure the arms sit symmetrically on both sides of the body before you work through them.
Change to dark blue/navy before Row 45.
Row 45: (4 sc, dec) × 6 (30)
Row 46: 30 sc (30)
Change to gray before Row 47.
Row 47: (3 sc, dec) × 6 (24)
Rows 48–49: 24 sc (24)
Stuff the body very firmly before the opening narrows too much. Do not cut yarn — continue directly to the head.
Head (×1 — continued from body)
Yarn: gray, continuous from body | The head is worked directly from Row 49 without cutting yarn.
Row 50: inc in each st (48)
Row 51: (7 sc, inc) × 6 (54)
Row 52: 4 sc, inc, (8 sc, inc) × 5, 4 sc (60)
Rows 53–64: 60 sc (60)
Row 65: 4 sc, dec, (8 sc, dec) × 5, 4 sc (54)
Row 66: (7 sc, dec) × 6 (48)
Row 67: 3 sc, dec, (6 sc, dec) × 5, 3 sc (42)
Row 68: (5 sc, dec) × 6 (36)
Row 69: 2 sc, dec, (4 sc, dec) × 5, 2 sc (30)
Row 70: (3 sc, dec) × 6 (24)
Row 71: 1 sc, dec, (2 sc, dec) × 5, 1 sc (18)
Row 72: (1 sc, dec) × 6 (12)
FO, leaving a long tail. Use the tail to close the remaining opening, then weave the end inside the head.
Top up the head stuffing as the opening closes — this is your last chance to adjust before it’s sealed.
Ears (×2)
Yarn: gray | Start: magic ring | Do not stuff.
Row 1: 6 sc in mr (6)
Row 2: (1 sc, inc) × 3 (9)
Row 3: (2 sc, inc) × 3 (12)
Row 4: (5 sc, inc) × 2 (14)
Row 5: (6 sc, inc) × 2 (16)
Row 6: (7 sc, inc) × 2 (18)
Row 7: (8 sc, inc) × 2 (20)
FO, cut yarn, leaving a long tail for sewing. Make two ears.
🧶 Scrap Check: Both ears together use roughly 16 yards of gray yarn. A small leftover ball handles this easily — no need to dip into your main gray skein for two flat triangles.
Muzzle (×1)
Yarn: white | Start: magic ring
Row 1: 6 sc in mr (6)
Row 2: inc in each st (12)
Row 3: (1 sc, inc) × 6 (18)
Row 4: 1 sc, inc, (2 sc, inc) × 5, 1 sc (24)
Row 5: (3 sc, inc) × 6 (30)
Row 6: 30 sc (30)
FO, cut yarn, leaving a long tail for sewing.
Overalls (×1)
Yarn: denim blue | Start: starting chain
Row 0: Ch 54 and join into a round with a sl st. (54)
Row 1: Ch 2 (turning chain), 54 dc, sl st. (54)
Row 2: (8 sc, inc) × 6 (60)
Rows 3–7: 60 sc (60)
Row 8: Ch 6, skip 6 sc from the previous row, continue crocheting into the next stitch, 54 sc. (60)
This creates the tail opening. Center it at the back of the piece.
Rows 9–18: 60 sc (60)
Dividing for legs: The work divides as follows — 28 sc (first leg), 2 sc (gap), 28 sc (second leg), 2 sc (gap). Position the tail opening exactly at center back, count 28 sts, and join into a round.
First Leg:
Rows 19–29: 11 rows of 28 sc worked in joined rounds. (28)
End with sl st. FO, cut yarn and weave in end.
Second Leg: Return to the leg division point. Count 2 sc from the first leg (the gap between legs). Attach yarn, leaving a tail of approximately 8 in (20 cm) for seaming. Count 28 sc and join into a round with a sl st.
Rows 19–29: 11 rows of 28 sc worked in joined rounds. (28)
End with sl st. FO, cut yarn and weave in end. Use the reserved 8 in yarn tail to sew the gap between the legs closed.
Note: Row 1 uses double crochet to create a slightly textured waistband ridge — that’s intentional. The overalls legs use joined rounds (rather than continuous rounds) to keep the hems clean and even.
Pocket (×1)
Yarn: denim blue | Start: starting chain | Worked in back-and-forth rows.
Ch 10 + 1 turning chain. Begin Row 1 in the 2nd ch from hook.
Rows 1–8: 10 sc (8 rows)
Work a single crochet edging around the sides of the pocket. FO, cut yarn, leaving a long tail for sewing.
Straps (×2)
Yarn: denim blue | Start: starting chain | Worked in back-and-forth rows. Leave a tail of approximately 8 in (20 cm) at the start for sewing.
Ch 28 + 1 turning chain. Begin Row 1 in the 2nd ch from hook.
Row 1: 28 sc, ch 1 (turning chain). (28)
Row 2: 28 sc. (28)
FO, cut yarn, leaving a tail for sewing. Make two straps.
The starting chain length depends on your gauge. If your overall tension runs looser or tighter than the pattern gauge, adjust accordingly.
Beret (×1)
Yarn: white | Start: magic ring
Row 1: 6 sc in mr (6)
Row 2: inc in each st (12)
Row 3: (1 sc, inc) × 6 (18)
Row 4: (2 sc, inc) × 6 (24)
Row 5: (3 sc, inc) × 6 (30)
Row 6: (4 sc, inc) × 6 (36)
Row 7: (5 sc, inc) × 6 (42)
Row 8: (6 sc, inc) × 6 (48)
Row 9: (7 sc, inc) × 6 (54)
Row 10: (8 sc, inc) × 6 (60)
Row 11: (9 sc, inc) × 6 (66)
Row 12: (10 sc, inc) × 6 (72)
Row 13: (11 sc, inc) × 6 (78)
Row 14: (12 sc, inc) × 6 (84)
Rows 15–17: 84 sc (84)
Row 18: (12 sc, dec) × 6 (78)
Row 19: (11 sc, dec) × 6 (72)
Row 20: (10 sc, dec) × 6 (66)
Row 21: 66 sc (66)
End with sl st. FO, cut yarn and weave in end.
Pompom (×1)
Yarn: red poppy | Start: magic ring
Row 1: 6 sc in mr (6)
Row 2: inc in each st (12)
Row 3: (1 sc, inc) × 6 (18)
Row 4: (2 sc, inc) × 6 (24)
Rows 5–8: 24 sc (24)
Row 9: (2 sc, dec) × 6 (18)
Row 10: (1 sc, dec) × 6 (12)
Stuff as you go. FO, cut yarn, leaving a long tail. Sew the pompom onto the top center of the beret.
Assembling Your Cat Amigurumi
- Muzzle first. Pin the muzzle centered on the head, positioned approximately between Rows 51 and 61. Sew it on with your tapestry needle, adding a small amount of stuffing inside as you close it up. Pull gently for a slightly rounded shape.
- Bead eyes. Mark the eye positions with pins on both sides of the muzzle — between Rows 59 and 60, with approximately 10–11 stitches between the two points. Sew each bead eye on firmly, pulling slightly when you pull the thread to create a gentle indent. That small indent gives the face most of its expression.
- Ears. Pin both ears into position symmetrically, approximately between Rows 61 and 70. Check from the front before committing — a minute of pinning here saves a lot of frogging later. Sew on firmly.
- Overalls details. Sew the straps onto the front of the overalls, then attach the two decorative buttons. Sew the pocket onto the front bib. Dress the cat in the overalls, threading the tail through the tail opening at the back.
- Headscarf (optional). Cut a fabric triangle with a base of approximately 10.6 in (27 cm) and a height of approximately 3.5 in (9 cm), leaving seam allowances of 0.3–0.4 in (0.7–1 cm) on all sides. Finish the edges, fold the hem, stitch, and tie around the cat’s neck. A sewing machine makes this faster, but careful hand-sewing gives the same result.
For a full walkthrough on attaching sewn pieces cleanly — covering placement, thread tension, and hiding knots on the outside — our guide to sewing amigurumi parts together has everything you need.
Face Decoration
- Eye highlights: Use white embroidery thread to add small highlight stitches around each bead eye. Add a short black stitch along the upper lid for a more defined look.
- Nose: Pin the nose position at the center of the muzzle and embroider a small triangle in pink embroidery thread or yarn.
- Mouth, eyebrows, and whiskers: Use black thread or yarn. Embroider the mouth and eyebrows first to establish the expression, then add the whiskers. The whiskers make more difference to the finished face than almost anything else — take your time with them.
💡 Stretch It Further: The body structure and stitch counts work beautifully in completely different color combinations — same pattern, new cat. Swap the denim blue overalls for terracotta, the navy/white stripes for burgundy/cream, and the red pompom for mustard yellow. Three colorways from the exact same pattern gives you an instant gift set for almost nothing in extra yarn. This is one of those projects where mixing partial skeins from different brands and projects is genuinely an advantage — the variety of blues in a scrap bin is half the design. Total yarn runs approximately 400 yards of DK weight (CYCA 3) per cat, which is one of the most common leftover weights in any crochet stash. You might already be done shopping.
Mia’s Take
Five colors, a scrap of fabric, two small buttons, and roughly 400 yards of DK pulled from whatever’s been sitting in the stash — that’s Jeremy. He’s the kind of project that clears out those medium-sized leftovers that aren’t quite enough for a full piece on their own but are exactly enough when you need stripes, a tiny muzzle, and a red pompom. I’ve made two of these from one partial skein of gray and a handful of blue scraps from three different projects, and both looked completely intentional. Make a second one in a different color scheme — our other free crochet cat amigurumi is a different vibe entirely if you want a quicker companion project. Bundle any two together and you’ve already got a handmade gift that costs almost nothing. That’s the math I’m always working with. 🧶
What yarn is best for this cat amigurumi?
DK or light worsted weight yarn (CYCA 3) is best. You can use cotton, acrylic, or a blend, and mix brands as long as you use a tight 2.0mm hook gauge.
How long does it take to crochet this cat?
It takes approximately 6 to 8 hours to complete this intermediate-level cat amigurumi pattern.
Can beginners make this cat pattern?
This pattern is rated Intermediate due to the continuous leg-to-body join and seamless color changes, but confident beginners who know the magic ring and basic stitches can definitely tackle it.