Free Chamomile Doll Amigurumi Pattern | Scrap-Friendly
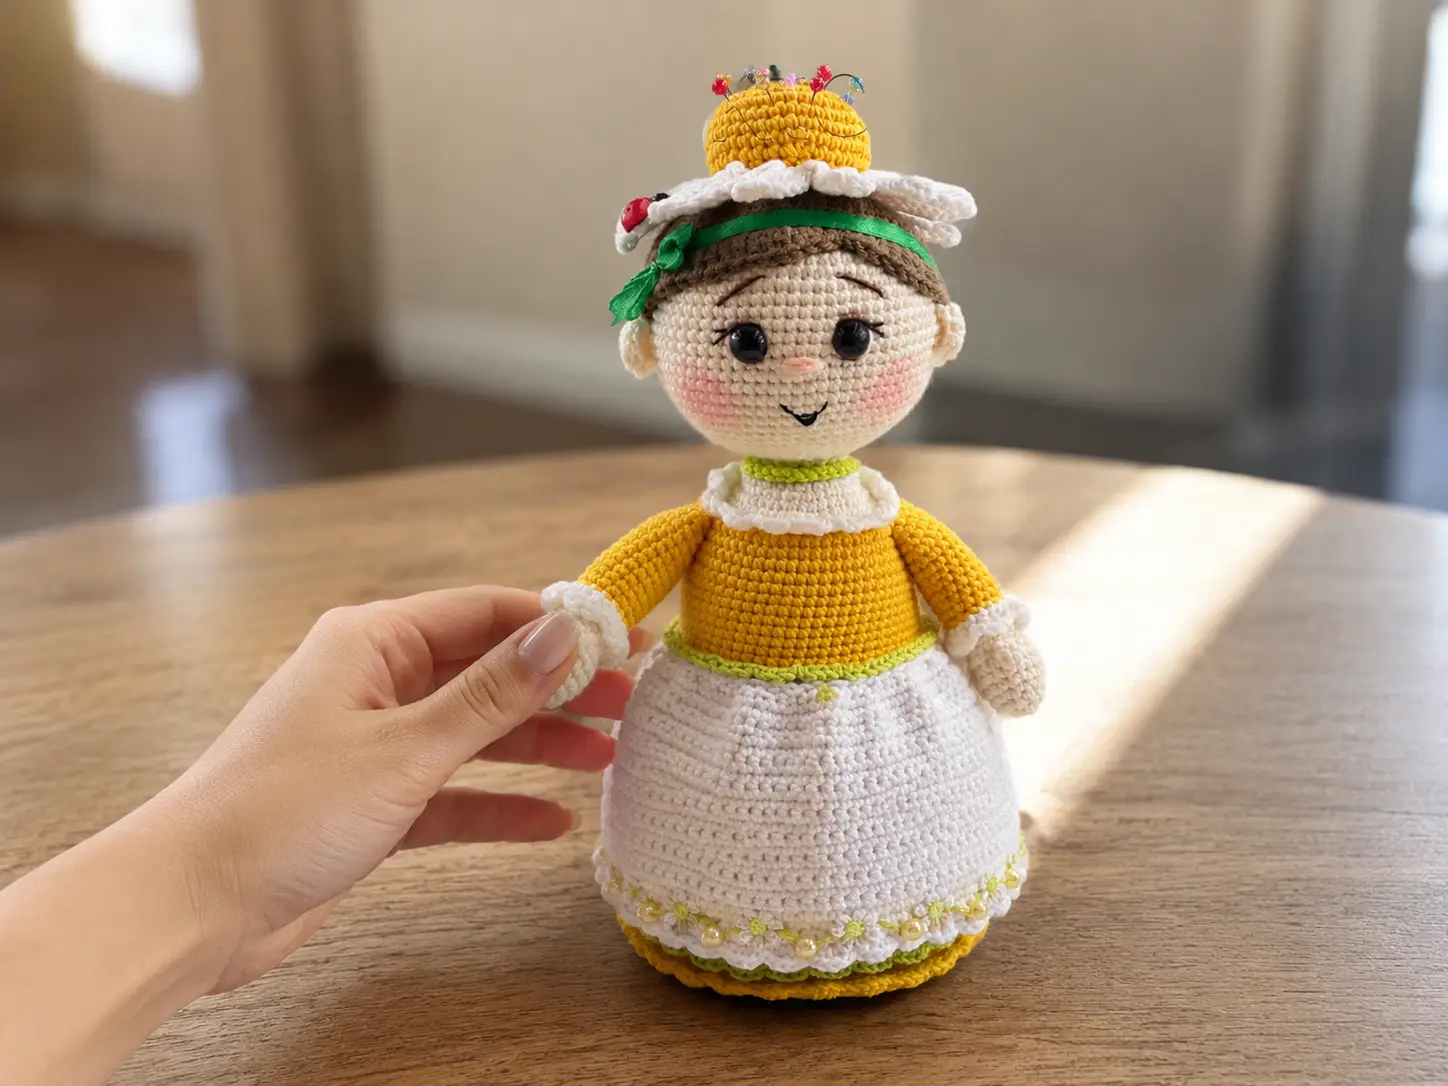
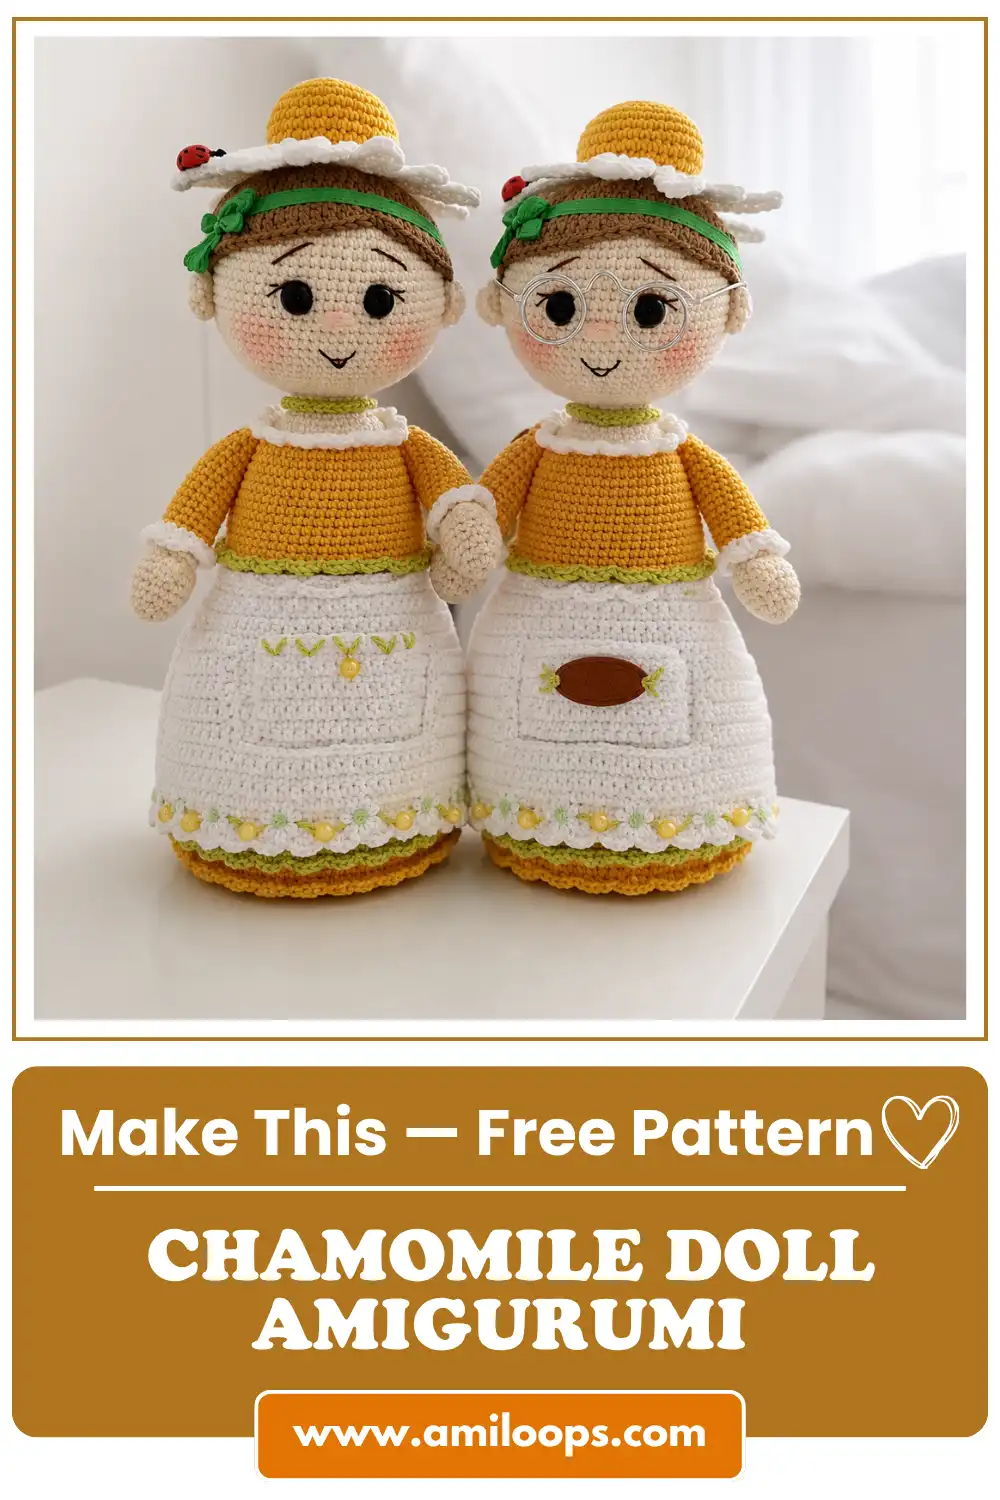
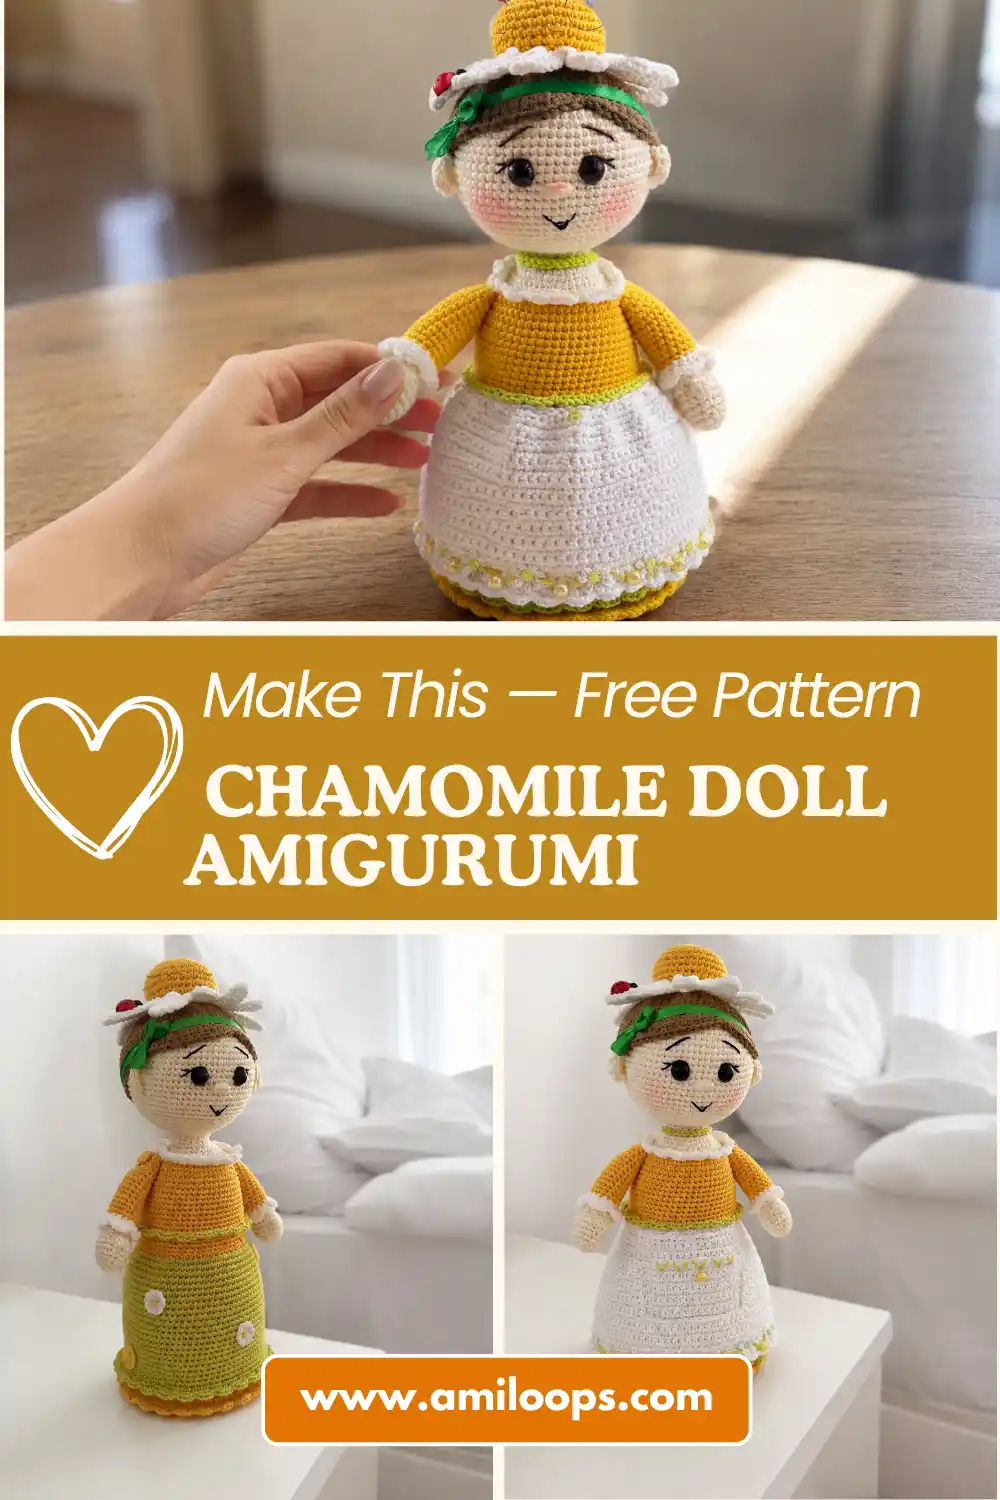
This free chamomile doll amigurumi pattern turns a spare jar from your kitchen cupboard into a soft, storage-ready little helper doll with a hidden pocket skirt, a chamomile flower crown, and a white apron with three working pockets. It’s built entirely from small amounts of DK-weight cotton — the kind of leftover balls you already have from other projects. This one takes patience over a few sessions, but almost nothing out of your wallet.
🧶 What You’ll Need
- 💰 Yarn Needed: a small amount of DK/Light Worsted (3) cotton in five colors (body, skirt, chamomile white, chamomile yellow, and a pink scrap for the jar edging), plus a small amount of worsted-weight brown for the wig — this pattern is genuinely built for scrap bins, not full skeins
- 🎨 Colors: skin tone, bright pistachio green, snow white, bright yellow, brown, and a scrap of pink (or similar colors from your stash)
- 🪝 Hook: 1.9 mm (no standard US letter equivalent — see the flag below)
- ⏱️ Time: 6-8+ hours across multiple sessions (editorial estimate — see flags)
- 📏 Finished Size: 10.2 in (26 cm)
- 💡 Difficulty: Advanced (editorial assignment — see flags)
- 🎁 Great For: gifts, a functional jar-cover storage doll, shelf display
What Makes This Chamomile Doll Amigurumi Pattern Different
Most amigurumi patterns end with a finished shape. This one ends with a shape that does something — the lower body crochets right over a small jar, and the row 17-33 pocket section forms six little hidden pockets around the outside before the piece closes up into a lid. Once she’s assembled, you’ve got a soft, doll-shaped container that can hold pins, buttons, hair ties, or anything else that tends to wander off your desk. That’s the kind of project that earns its shelf space twice over — once as a cute doll, once as actual storage.
You don’t need the exact jar from the original source pattern. Any small, sturdy jar or plastic container around 2.4 in (6 cm) across and 3.9 in (10 cm) tall works — an empty spice jar, a small candle jar with the wax removed, or a mini mason jar all do the job. Empty it, give it a quick wash, and it’s ready.
Materials for This Chamomile Doll Amigurumi Free Pattern
- Base jar or container: approx. 2.4 in (6 cm) diameter, 3.9 in (10 cm) tall — any small jar from your kitchen or craft stash works
- DK/Light Worsted (3) cotton yarn in skin tone (head-body), bright pistachio green (skirt), snow white (chamomile petals, apron), bright yellow (body, skirt, chamomile center), and a scrap of pink (jar edging) — a small amount of each color is plenty; think leftover balls, not new skeins
- Worsted (4) brown yarn — small amount, for the wig
- DK-weight white yarn — small amount, for the sleeve and collar edging
- Iris thread or embroidery floss for the face details
- 8 mm safety eyes
- Floral lace trim or small beads, for the apron decoration (optional — skip if you don’t have any on hand)
- Small flower buttons, for the skirt (optional)
- Green satin ribbon, for the headband
- 2 small buttons (about 1 cm), for jointing the arms
- A scrap of stiff plastic or thick cardboard, cut into a small circle to fit the lid opening
- Polyester fiberfill for stuffing
- Dry pastel or blush powder, for tinting the cheeks (optional)
- Tapestry needle and sewing needle
Abbreviations Used in This Amigurumi Pattern
| Abbreviation | Meaning |
|---|---|
| mr | magic ring |
| st(s) | stitch(es) |
| ch | chain |
| sc | single crochet |
| inc | increase (2 sc worked in the same stitch) |
| inv dec | invisible decrease |
| sl st | slip stitch |
| BLO / FLO | back loop only / front loop only |
| hdc | half double crochet |
| dc | double crochet |
| ( )* | repeat the instructions in parentheses the stated number of times |
Smart Crafter Tips for This Chamomile Doll Pattern
This is a bigger build than most of my scrap-bin patterns, so here’s how to make it painless. If magic rings still trip you up, our magic ring tutorial walks through it step by step — every single part of this doll starts with one, so it’s worth having down before you begin.
Every decrease in this pattern is worked as an invisible decrease rather than a standard sc2tog — it keeps the shaping smooth with no visible gap, which matters a lot on a piece this size. If you haven’t used this method before, our invisible decrease tutorial covers it in a couple of minutes.
This doll has a lot of separate pieces — arms, ears, wig, chamomile, apron, three pockets — so don’t stuff or sew anything until you’ve crocheted all the parts and laid them out next to the body. It’s much easier to catch a color mismatch or a sizing issue before anything is sewn down. Our guide to sewing amigurumi parts together has tips on keeping seams tidy when you’re attaching this many pieces.
🧶 Scrap Check: Nearly every part of this doll — the ears, the chamomile bun, the collar, the sleeve edging — uses only a few yards of yarn. If you’ve got small leftover balls in white, yellow, pink, or green sitting in your stash, this is exactly the project to finally use them.
Chamomile Doll Amigurumi Pattern
Lower Part (Jar Cover)
Yarn: any color from your stash (pink shown in the original) | Starting method: mr
Row 1: 6 sc in mr (6)
Row 2: 6 inc (12)
Row 3: (1 sc, inc)*6 (18)
Row 4: 1 sc, inc, (2 sc, inc)*5, 1 sc (24)
Row 5: (3 sc, inc)*6 (30)
Row 6: 2 sc, inc, (4 sc, inc)*5, 2 sc (36)
Row 7: (5 sc, inc)*6 (42)
Row 8: 3 sc, inc, (6 sc, inc)*5, 3 sc (48)
Row 9: (7 sc, inc)*6 (54)
Row 10: 4 sc, inc, (8 sc, inc)*5, 4 sc (60)
Row 11: BLO, 60 sc (60)
Rows 12-16: 60 sc each row (5 rows) (60)
Row 17: BLO, 60 sc (60)
Rows 18-32: 60 sc each row (15 rows) (60)
Row 33: BLO, 60 sc (60)
Row 34: 60 sc (60)
Set this piece aside without fastening off — you’ll crochet the hidden pockets directly onto the leftover front loops from Row 17 before coming back to finish it.
Hidden Pockets
Yarn: same color as the lower part | Starting method: attach yarn to the remaining front loops in Row 17
Row 1: (9 sc, inc)*6 (66)
Rows 2-7: 66 sc each row (6 rows) (66)
To form the six pockets: work a slip stitch attaching this piece to the main lower part, then 11 sc, another slip stitch attaching to the main part, and repeat around. Pocket sizes don’t need to be perfectly even — they can vary a little. Fasten off and weave in the end.
Petticoat
Yarn: bright yellow | Starting method: attach yarn to the front loops in Row 33 of the lower part
Row 1: 60 sc (60)
Row 2: (4 sc, inc)*12 (72)
Rows 3-21: 72 sc each row (19 rows) (72)
Row 22: (4 sc in one stitch, sl st, skip 1 stitch)* to end of row (scalloped edge — stitch count not fixed by design)
Separately, attach bright pistachio green yarn to the front loops left in Row 11 of the lower part and work one row of crab stitch (reverse single crochet) around. Fasten off.
Lower Part — Continued
Yarn: same color as the lower part
Before continuing, empty the jar and insert it into the crocheted cover (a dab of super glue on the base will keep it from shifting).
Row 35: 4 sc, inv dec, (8 sc, inv dec)*5, 4 sc (54)
Fasten off and weave in the end.
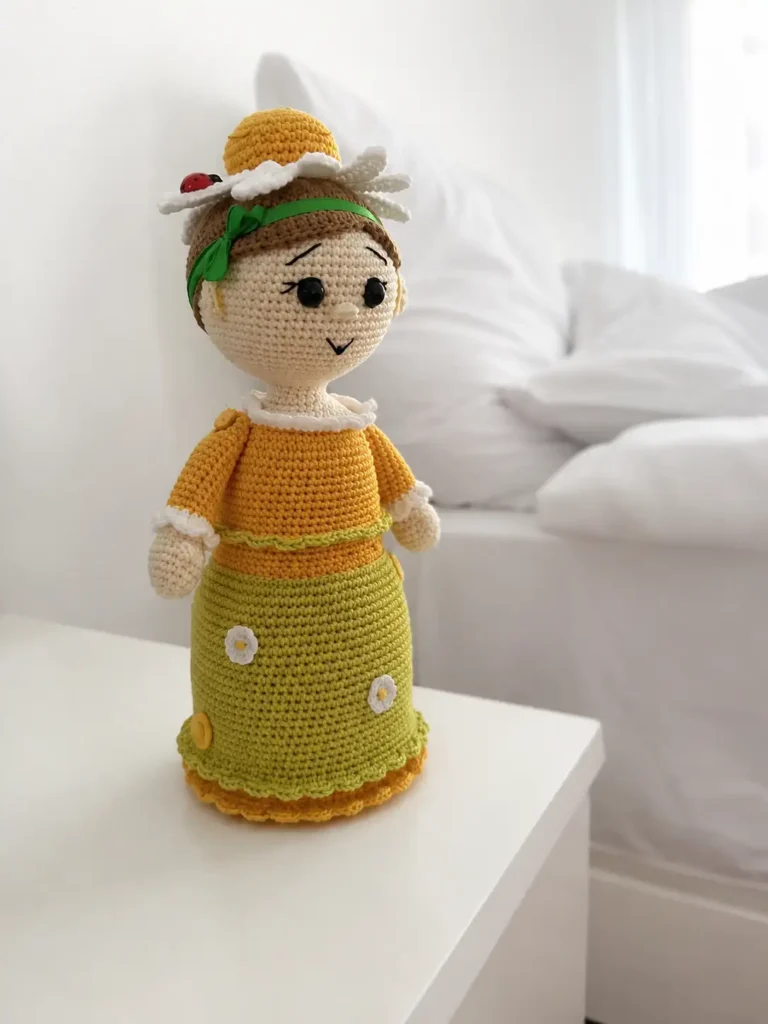
Upper Part (Lid and Skirt) for This Chamomile Doll Amigurumi Free Pattern
Yarn: bright yellow, then bright pistachio green | Starting method: mr
Row 1: 6 sc in mr (6)
Row 2: 6 inc (12)
Row 3: (1 sc, inc)*6 (18)
Row 4: 1 sc, inc, (2 sc, inc)*5, 1 sc (24)
Row 5: (3 sc, inc)*6 (30)
Row 6: 2 sc, inc, (4 sc, inc)*5, 2 sc (36)
Row 7: (5 sc, inc)*6 (42)
Row 8: 3 sc, inc, (6 sc, inc)*5, 3 sc (48)
Row 9: (7 sc, inc)*6 (54)
Row 10: 4 sc, inc, (8 sc, inc)*5, 4 sc (60)
Row 11: BLO, 60 sc (60)
Rows 12-14: 60 sc each row (3 rows) (60)
Row 15: switch to bright pistachio green — (2 sc, inc)*20 (80)
Rows 16-37: 80 sc each row (22 rows), in bright pistachio green (80)
Row 38: (4 sc in one stitch, sl st, skip 1 stitch)* to end of row (scalloped edge — stitch count not fixed by design)
Separately, attach bright pistachio green to the front loops left in Row 11 and work: (4 sc in one stitch, sl st, skip 1 stitch)* to the end of the row. Fasten off both threads.
Head-Body
Yarn: skin tone, then bright yellow | Starting method: mr
Row 1: 6 sc in mr (6)
Row 2: 6 inc (12)
Row 3: (1 sc, inc)*6 (18)
Row 4: 1 sc, inc, (2 sc, inc)*5, 1 sc (24)
Row 5: (3 sc, inc)*6 (30)
Row 6: 2 sc, inc, (4 sc, inc)*5, 2 sc (36)
Row 7: (5 sc, inc)*6 (42)
Row 8: 3 sc, inc, (6 sc, inc)*5, 3 sc (48)
Row 9: (7 sc, inc)*6 (54)
Row 10: 4 sc, inc, (8 sc, inc)*5, 4 sc (60)
Row 11: (9 sc, inc)*6 (66)
Row 12: 5 sc, inc, (10 sc, inc)*5, 5 sc (72)
Rows 13-23: 72 sc each row (11 rows) (72)
This is where the eyes go — place your 8 mm safety eyes between Rows 17 and 18, about 8 sc apart. Our safety eye guide covers spacing and installation if you want a closer look.
Row 24: 5 sc, inv dec, (10 sc, inv dec)*5, 5 sc (66)
Row 25: (9 sc, inv dec)*6 (60)
Row 26: 4 sc, inv dec, (8 sc, inv dec)*5, 4 sc (54)
Row 27: (7 sc, inv dec)*6 (48)
Row 28: 3 sc, inv dec, (6 sc, inv dec)*5, 3 sc (42)
Row 29: (5 sc, inv dec)*6 (36)
Row 30: 2 sc, inv dec, (4 sc, inv dec)*5, 2 sc (30)
Add stuffing to the head now, before the neck closes further.
Row 31: (3 sc, inv dec)*6 (24)
Row 32: 1 sc, inv dec, (2 sc, inv dec)*5, 1 sc (18)
Rows 33-35: 18 sc each row (3 rows) — this is the neck (18)
Row 36: 18 inc (36)
Row 37: (5 sc, inc)*6 (42)
Row 38: 3 sc, inc, (6 sc, inc)*5, 3 sc (48)
Row 39: (7 sc, inc)*6 (54)
Row 40: switch to bright yellow — BLO, 54 sc (54)
Row 41: 4 sc, inc, (8 sc, inc)*5, 4 sc (60)
Rows 42-52: 60 sc each row (11 rows) (60)
Row 53: Fold the body over the finished skirt/lid piece and join behind the remaining front loops on the skirt with sc, working around. After 35 sc, add stuffing and insert the plastic or cardboard circle, then continue sc around to close (join row — stitch count not fixed by design)
Don’t overstuff this section — a soft body sits and drapes better than a firm one.
Collar
Yarn: white | Starting method: attach to the front loops left in Row 40 of the head-body
Row 1: 54 sc (54)
Row 2: (4 sc in one stitch, sl st, skip 1 stitch)* to end of row (scalloped edge — stitch count not fixed by design)
Fasten off and weave in the end.
Arms (Make 2)
Yarn: skin tone, then bright yellow | Starting method: mr
Row 1: 6 sc in mr (6)
Row 2: 6 inc (12)
Row 3: 12 sc (12)
Row 4: (1 sc, inc)*6 (18)
Row 5: 18 sc (18)
Row 6: 8 sc, work a 4-dc bobble stitch, 9 sc (18)
Row 7: 18 sc (18)
Row 8: (1 sc, inv dec)*6 (12)
Stuff the fist lightly here, then continue stuffing as you go.
Row 9: 12 sc (12)
Row 10: (3 sc, inc)*3 (15)
Row 11: 15 sc (15)
Row 12: switch to bright yellow — BLO, 15 sc (15)
Rows 13-25: 15 sc each row (13 rows) — keep this section only lightly stuffed (15)
Row 26: (3 sc, inv dec)*3 (12)
Row 27: 6 inv dec (6)
Close the opening, fasten off, and weave in the end.
Sleeve Edging (Make 2)
Yarn: white | Starting method: attach to the front loops left at the color-change round on the arm
Row 1: 15 sc (15)
Row 2: (4 sc in one stitch, sl st, skip 1 stitch)* to end of row (scalloped edge — stitch count not fixed by design)
Ears (Make 2)
Yarn: skin tone | Starting method: mr
Row 1: 6 sc in mr — pull the ring tight but do not join, ch 1, turn (6)
Row 2: 6 sc (6)
Leave a yarn tail for sewing, then cut.
Wig
Yarn: brown | Starting method: mr
Row 1: 6 sc in mr (6)
Row 2: 6 inc (12)
Row 3: (1 sc, inc)*6 (18)
Row 4: 1 sc, inc, (2 sc, inc)*5, 1 sc (24)
Row 5: (3 sc, inc)*6 (30)
Row 6: 2 sc, inc, (4 sc, inc)*5, 2 sc (36)
Row 7: (5 sc, inc)*6 (42)
Row 8: 3 sc, inc, (6 sc, inc)*5, 3 sc (48)
Row 9: (7 sc, inc)*6 (54)
Row 10: 4 sc, inc, (8 sc, inc)*5, 4 sc (60)
Row 11: (9 sc, inc)*6 (66)
Row 12: 5 sc, inc, (10 sc, inc)*5, 5 sc (72)
Rows 13-17: 72 sc each row (5 rows) (72)
Row 18: 26 sc, 2 hdc, 8 dc, 2 hdc, 1 sc, 1 sl st, 1 sc, 2 hdc, 4 dc, 2 hdc, 23 sc (72)
Leave a long yarn tail for sewing, fasten off, and cut.
Chamomile Crown for This Doll Amigurumi Pattern
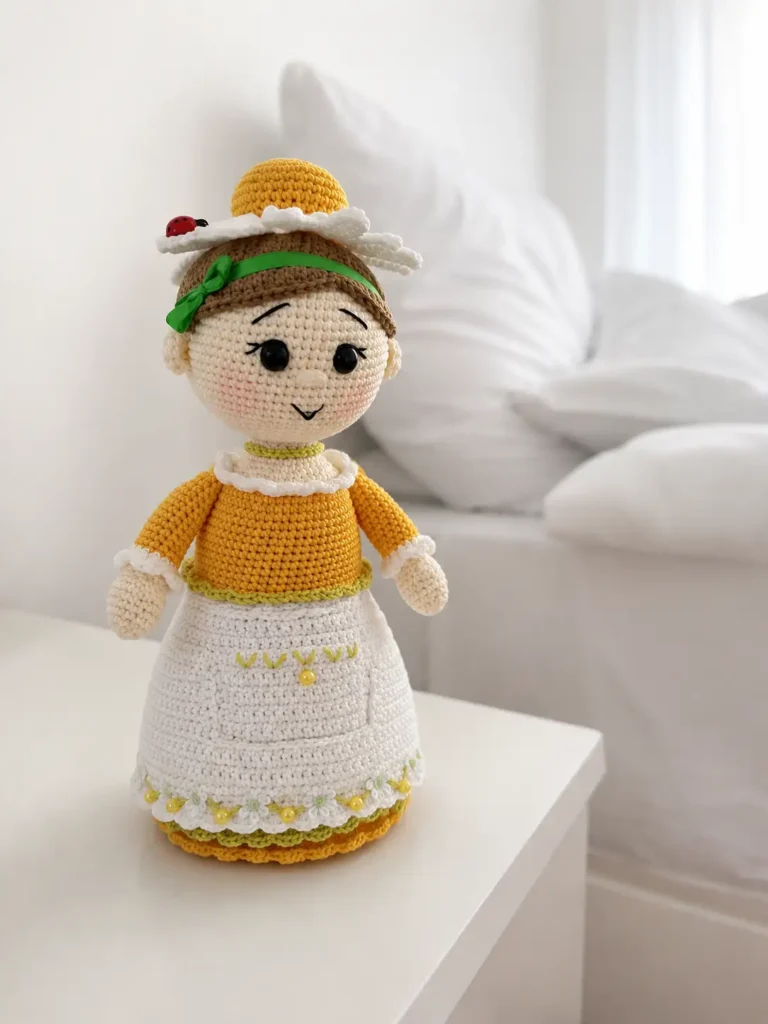
Chamomile Bun (Center)
Yarn: bright yellow | Starting method: mr
Row 1: 6 sc in mr (6)
Row 2: 6 inc (12)
Row 3: (1 sc, inc)*6 (18)
Row 4: 1 sc, inc, (2 sc, inc)*5, 1 sc (24)
Row 5: (3 sc, inc)*6 (30)
Row 6: 2 sc, inc, (4 sc, inc)*5, 2 sc (36)
Rows 7-9: 36 sc each row (3 rows) (36)
Row 10: 2 sc, inv dec, (4 sc, inv dec)*5, 2 sc (30)
Row 11: (3 sc, inv dec)*6 (24)
Row 12: BLO, 24 sc (24)
Leave a yarn tail for sewing, then cut.
Chamomile Petals (Make 12, worked directly onto the bun)
Yarn: white | Starting method: attach to the front loops left in Row 12 of the bun
Petal: chain 10, sc in the 3rd chain from the hook, then 1 hdc, 4 dc, 1 hdc, 1 sc, 2 sl st into the front loop of the center. Repeat 12 times total to form all the petals. (12 petals)
Work a round of sl st around all the petals, working 2 sc into one stitch at the top of each petal. Press the petals gently under a damp cloth so they lie flat instead of curling, then add a little stuffing inside the center before closing. Fasten off.
Apron
Apron Base
Yarn: snow white | Starting method: chain 25
Row 1: starting in the 2nd chain from the hook, 24 sc, ch, turn (24)
Row 2: 24 sc, ch, turn (24)
Row 3: inc, 22 sc, inc, ch, turn (26)
Row 4: 26 sc, ch, turn (26)
Row 5: inc, 24 sc, inc, ch, turn (28)
Row 6: 28 sc, ch, turn (28)
Row 7: inc, 26 sc, inc, ch, turn (30)
Row 8: 30 sc, ch, turn (30)
Row 9: inc, 28 sc, inc, ch, turn (32)
Row 10: 32 sc, ch, turn (32)
Row 11: inc, 30 sc, inc, ch, turn (34)
Row 12: 34 sc, ch, turn (34)
Row 13: inc, 32 sc, inc, ch, turn (36)
Row 14: 36 sc, ch, turn (36)
Row 15: BLO, 36 sc, ch, turn (36)
Rows 16-20: 36 sc each row (5 rows), ch, turn (36)
Row 21: BLO, 36 sc, ch, turn (36)
Row 22: 36 sc, ch, turn (36)
Row 25: 1 sc, (4 sc in one stitch, sl st, skip 1 stitch)* to end of row (scalloped edge — stitch count not fixed by design)
Note: the original pattern’s own row numbering skips from Row 22 to Row 25 — this gap is preserved as written rather than corrected, since it doesn’t affect the finished piece.
Crochet a row of sc around the whole apron. When you reach the waistband, chain 45 for a tie, then slip stitch back down the chain. Sc across to the opposite side, chain another 45 for the second tie, and slip stitch back down. Continue with sc around the rest of the edge. Fasten off.
Side Pocket 1
Yarn: snow white | Starting method: attach to the front loops left in Row 21 of the apron
Row 1: inc, 34 sc, inc, ch, turn (38)
Rows 2-4: 38 sc each row (3 rows), ch, turn (38)
Row 5 (pocket flap begins): 9 sc, ch, turn (9)
Rows 6-7: 9 sc each row, ch, turn (9)
Row 8: 7 sc, inv dec, ch, turn (8)
Row 9: 8 sc, ch, turn (8)
Row 10: 6 sc, inv dec, ch, turn (7)
Row 11: 7 sc, ch, turn (7)
Row 12: 5 sc, inv dec, ch, turn (6)
Row 13: 6 sc (6)
Crochet around the side of the pocket flap: 2 sc in the corner stitch, then 7 sc down the side. Continuing on the pocket base (Row 5 of this section): 10 sc, slip stitch joining to the apron below the front loops of Row 15, 10 sc, slip stitch joining again, 9 sc. Do not cut the yarn — move directly into Side Pocket 2.
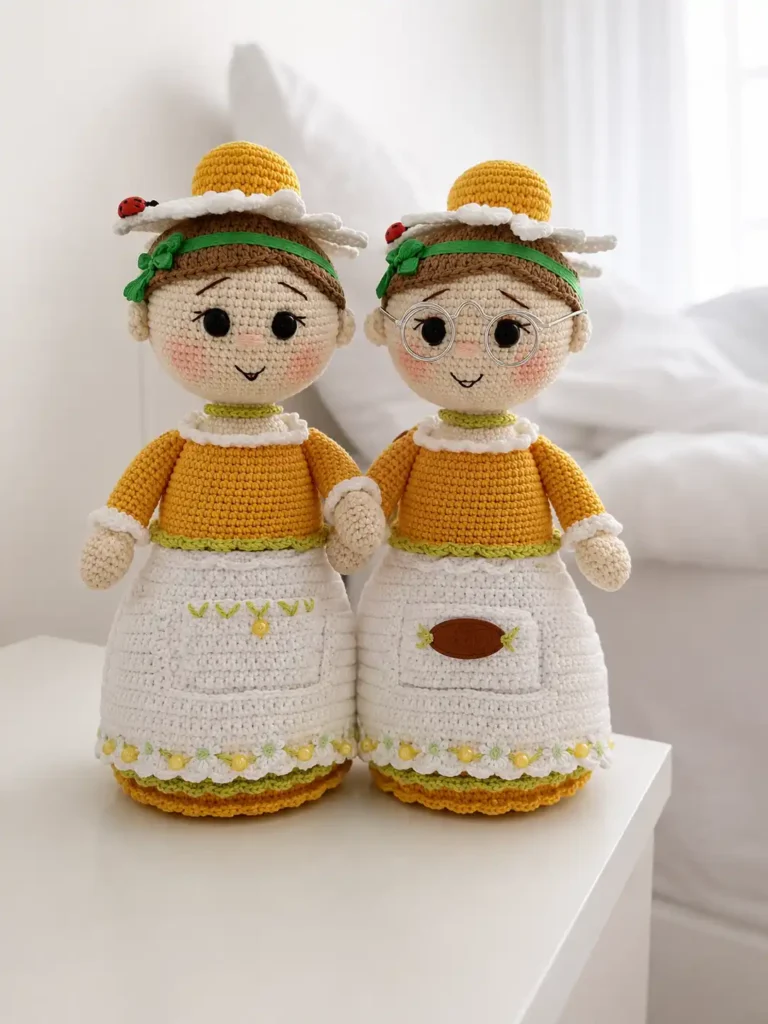
Side Pocket 2
Yarn: continues from Side Pocket 1
Rows 1-4: 9 sc each row (4 rows), ch, turn (9)
Row 5: inv dec, 7 sc, ch, turn (8)
Row 6: 8 sc, ch, turn (8)
Row 7: inv dec, 6 sc, ch, turn (7)
Row 8: 7 sc, ch, turn (7)
Row 9: inv dec, 5 sc, ch, turn (6)
Row 10: 6 sc, ch, turn (6)
Row 11: 6 sc (6)
Crochet around the side of the pocket: 2 sc in the corner stitch, then 9 sc down the side. Leave a yarn tail for sewing, then cut.
Middle Pocket
Yarn: snow white | Starting method: work through the front loops of Row 15 of the apron. Mark 7 stitches out from the center in each direction (14 stitches total) and attach the yarn.
Row 1: 14 sc, ch, turn (14)
Row 2: inc, 12 sc, inc (16)
Rows 3-8: 16 sc each row (6 rows), ch, turn (16)
Row 9: 16 sc (16)
Leave a long yarn tail for sewing the sides down, then cut.
Upper Part of Apron (Bib)
Yarn: snow white | Starting method: attach to the front loops of the waistband, at the 7th stitch from the tie
Row 1: chain 5, skip 2 stitches, sl st in the 3rd stitch; chain 5 again, skip 2 stitches, sl st; chain 5 a third time, skip 2 stitches, sl st (strap detail — stitch count not fixed by design)
Fasten off and weave in the ends.
Assembly
- Sew the arms to the body using button jointing (a small button on the inside and outside of each arm, stitched through the body) about 2 rows below the collar.
- Sew the ears on at eye level, positioning them 9 sc away from the eyes on each side.
- Attach the wig along the edge of the ears, sewing along that edge, then work a few securing stitches moving up toward the crown.
- Sew the finished chamomile crown onto the crown of the head, catching both the wig and the head underneath as you stitch, so it stays firmly in place.
- Sew the sides of the middle apron pocket down with the tail left for that purpose — keep the stitching loose rather than tight, so the pocket sits slightly puffed and dimensional instead of flat.
- Sew the side pockets down using their yarn tails, stitching through the back loops only so the seam stays flat against the apron.
Face and Finishing Details
Mark the eye placement between Rows 17-18 of the head, spacing them 8 sc apart, then insert the 8 mm safety eyes and secure with a small drop of glue. Embroider the whites of the eyes in white yarn. Using iris thread or embroidery floss, stitch a small arched line above each eye, a short stitch to the side, and a short stitch along the bottom lash line.
Embroider the nose in skin-tone yarn between the eyes, worked in two strands over about 3 sc for size. Embroider the mouth two rows below the nose. Mark and embroider the eyebrows above the eyes. If you’d like rosy cheeks, tint them lightly with dry pastel or blush powder.
Sew flower buttons onto the skirt if you’re using them. Tie the green satin ribbon around the head as a headband and lightly singe the cut ends so they don’t fray — a few small drops of glue will help keep it in place. For a necklace, chain 31, then work 30 sl st back down the chain, fasten off, and sew it around the neck at the back.
If you have floral lace and beads on hand, cut small flowers from the lace, sew them along the bottom hem of the apron, and stitch a few beads in between and onto the middle pocket for extra detail. This step is entirely optional — the doll looks complete without it.
⚠️ Safety Note: The button-jointed arms, small beads, and glued-on safety eyes make this piece unsuitable as a toy for young children. It’s designed as a decorative storage doll for display, not for play. See the U.S. Consumer Product Safety Commission for general guidance on small parts and toy safety.
💡 Stretch It Further: This pattern is really a formula once you’ve made it once — swap the chamomile crown for a different flower, change the apron color to match a season, or make her without the jar insert as a plain shelf doll if you don’t have a container on hand. Try a set of two or three in different colorways using scraps from past projects; since almost every part only uses a small amount of yarn, this is one of the few “big” projects where a second one costs you almost nothing extra.
Mia’s Take
This one takes more sessions than most of what I share, but it’s worth it for what you end up with — a doll that’s also genuinely useful. Six colors, a jar you already own, and a lot of small pieces that individually cost you almost nothing. Once she’s assembled, she’ll sit on a shelf holding pins or hair ties while looking like she’s just there to be cute. That’s the kind of project I keep coming back to: something that earns its spot instead of just taking up space. 🧶
FAQ
What kind of jar do I need for this chamomile doll amigurumi pattern?
You can use any small, sturdy jar or plastic container that is approximately 2.4 inches (6 cm) in diameter and 3.9 inches (10 cm) tall. Empty spice jars or mini candle jars work perfectly.
Can beginners make this chamomile doll?
This is rated as an advanced pattern because it features many small, separate pieces, button jointing, and complex assembly, so it is best for experienced crocheters.
What yarn is best for this amigurumi?
This pattern is highly scrap-friendly! You only need small amounts of DK/Light Worsted (3) cotton yarn for the body and clothing, plus a tiny bit of worsted weight yarn for the wig.