Free Unicorn Amigurumi Pattern — Crochet Dreamy Plush
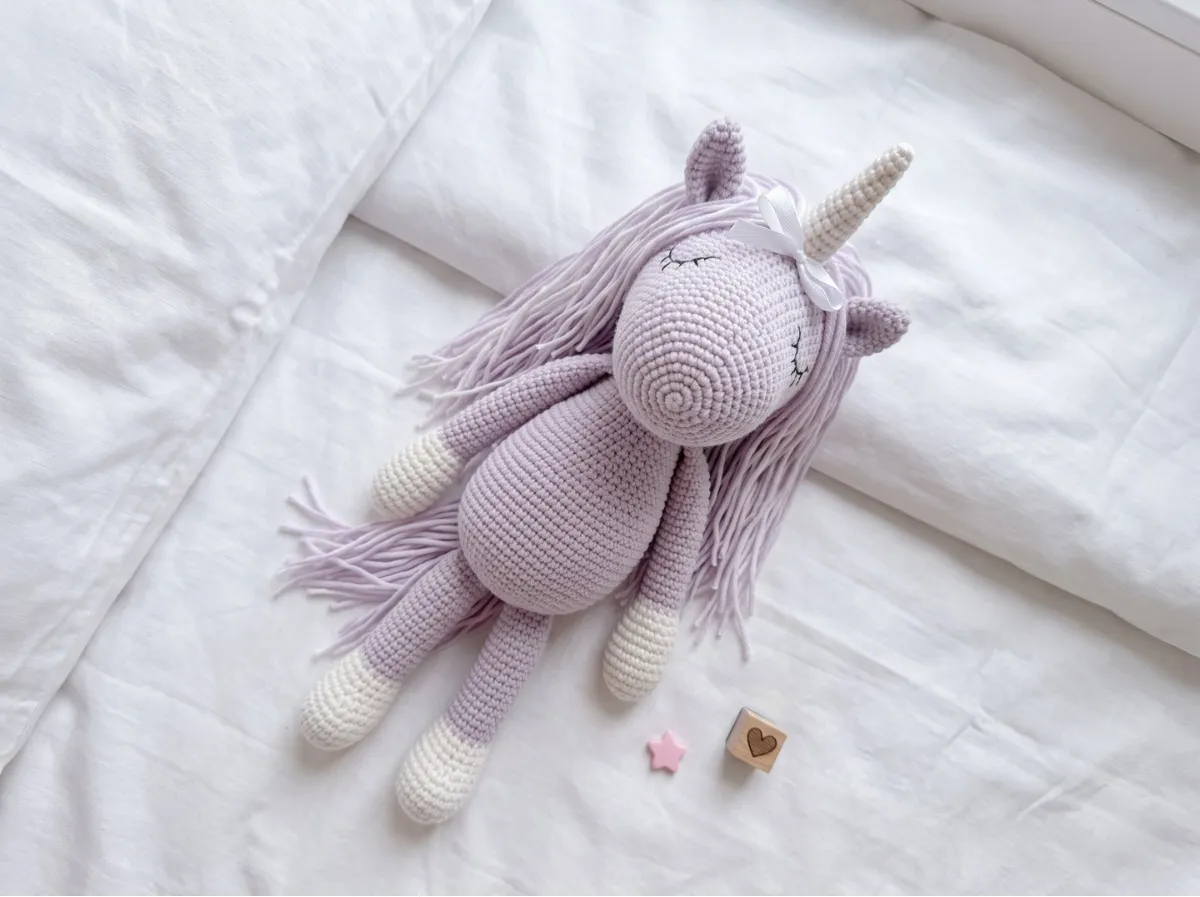
This free unicorn amigurumi pattern is one of those projects I keep coming back to — there’s something about the combination of the mane, the sleeping eyes, and that cream horn that makes the finished piece feel genuinely magical. I’ve taken this original design, checked every round, and formatted it so you can follow along without second-guessing a single stitch count. Whether you’re making her as a gift or just because you deserve something beautiful on your hook, this one delivers.
📋 Pattern Quick Stats
- Difficulty: Intermediate
- Finished Size: approx. 11.8 in (30 cm)
- Hook Size: 2.5 mm (approx. US C/2)
- Yarn Weight: DK / Light Worsted (3) — cotton-acrylic blend
- Techniques: magic ring, invisible decrease, color changes, yarn fringe mane & tail, eye embroidery
- Estimated Time: 8–12 hours
Materials for Your Free Unicorn Amigurumi Pattern
- Yarn A — Cream: DK / Light Worsted (3), cotton-acrylic blend — approx. 100–120 yds. Good US alternatives: Paintbox Simply DK (Cotton Mix), Lion Brand 24/7 Cotton (DK weight), or Drops Safran.
- Yarn B — Light Lilac: DK / Light Worsted (3), same weight and fiber as Yarn A — approx. 200–250 yds. Good US alternatives: Paintbox Simply DK in Dusty Lilac or Lion Brand 24/7 Cotton in Thistle.
- Hook: 2.5 mm (approx. US C/2) — I always work tight, and this hook keeps the fabric dense so no stuffing peeks through. If your tension runs looser, drop to a 2.25 mm.
- Polyester fiberfill — enough to stuff the head, body, horn, and all four limbs firmly
- Tapestry needle — for sewing parts and weaving in ends
- Black embroidery thread or sewing thread (folded 3×) — for the sleeping eyes and eyelashes
- Stitch marker — essential for tracking continuous rounds
- Scissors
- Pins — for placement before sewing
Both yarns in this pattern fall under the DK / Light Worsted (3) category on the Craft Yarn Council yarn weight system — useful to know when choosing a substitute at your local craft store.
💡 Emma’s Tip: I strongly recommend using the same yarn brand and weight for both colors. A cotton-acrylic blend is ideal here — it holds its shape well, takes embroidery cleanly, and gives you that slightly matte finish that photographs beautifully. Pure acrylic can look too shiny for a unicorn this size.
Abbreviations Used in This Free Unicorn Amigurumi Pattern
| Abbreviation | Meaning |
|---|---|
| ch | chain |
| sc | single crochet |
| sl st | slip stitch |
| inc | increase — 2 sc worked into the same stitch |
| dec | invisible decrease — insert hook through front loops only of next 2 stitches simultaneously, yarn over, pull through, yarn over, pull through 2 loops |
| mr | magic ring |
| st(s) | stitch(es) |
| ( ) × N | repeat the sequence in parentheses N times |
| Bold (N) | stitch count at end of round |
Special Techniques
This unicorn amigurumi uses a handful of core techniques that will determine how polished your finished piece looks. If any of them are new to you, don’t skip the tutorials — they make a real difference.
- Magic Ring: Every part in this pattern starts with one. If you’ve ever ended up with a hole at the center of your amigurumi, the magic ring is the fix. See our step-by-step magic ring tutorial to get it right from the start.
- Invisible Decrease: This is the only decrease method I use for amigurumi. It works through the front loops only and eliminates the visible gap you get with a standard sc2tog. Every closure in this pattern will look clean if you use it consistently. Our complete invisible decrease tutorial walks through it stitch by stitch.
- Color Changes: The legs and arms in this pattern transition from cream (hooves/hands) to lilac partway through. The switch happens mid-piece, so you’ll want a clean handoff. Our seamless color change guide shows exactly how to do it without a visible blip.
- Stuffing: The head and body both need to be stuffed firmly at specific points mid-construction. Waiting too long makes it much harder to get the filling distributed evenly.
💡 Emma’s Tip: Work all rounds in continuous spirals — no slip stitch joins at the end of each round unless the pattern explicitly says so. Move your stitch marker up as you go. This is what keeps the seam invisible.
Free Unicorn Amigurumi Pattern Instructions
Head (× 1)
Yarn: Light Lilac | Start: Magic Ring
Row 1: 6 sc in mr (6)
Row 2: inc in each st (12)
Row 3: (1 sc, 1 inc) × 6 (18)
Row 4: (2 sc, 1 inc) × 6 (24)
Row 5: (3 sc, 1 inc) × 6 (30)
Row 6: 30 sc (30)
Row 7: (4 sc, 1 inc) × 6 (36)
Row 8: 36 sc (36)
Row 9: (5 sc, 1 inc) × 6 (42)
Rows 10–11: 42 sc (2 rows) (42)
Row 12: (6 sc, 1 inc) × 6 (48)
Row 13: (7 sc, 1 inc) × 6 (54)
Rows 14–24: 54 sc (11 rows) (54)
Row 25: (8 sc, 1 inc) × 6 (60)
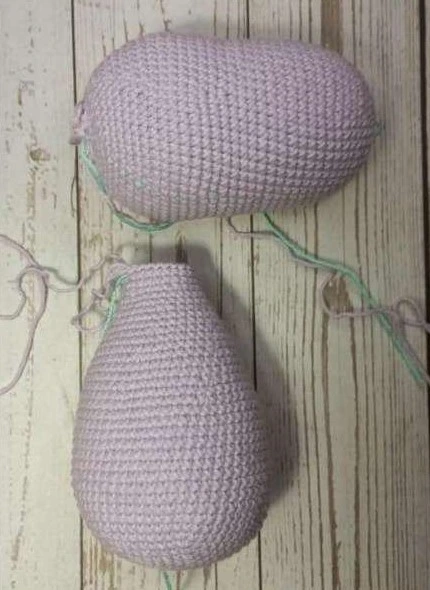
Rows 26–30: 60 sc (5 rows) (60)
Row 31: (8 sc, 1 dec) × 6 (54)
Row 32: 54 sc (54)
Row 33: (7 sc, 1 dec) × 6 (48)
Row 34: 48 sc (48)
Row 35: (6 sc, 1 dec) × 6 (42)
Row 36: 42 sc (42)
Row 37: (5 sc, 1 dec) × 6 (36)
💡 Emma’s Tip: Stuff the head firmly after Row 37, before continuing the decrease rounds. The head is large — take your time getting the fiberfill into the top of the piece evenly. I usually do this in several small handfuls rather than one big one.
Row 38: (4 sc, 1 dec) × 6 (30)
Row 39: (3 sc, 1 dec) × 6 (24)
Row 40: (2 sc, 1 dec) × 6 (18)
Row 41: (1 sc, 1 dec) × 6 (12)
Row 42: 6 dec (6)
Finishing: Close the opening, weave in ends.
Body (× 1)
Yarn: Light Lilac | Start: Magic Ring
Row 1: 6 sc in mr (6)
Row 2: inc in each st (12)
Row 3: (1 sc, 1 inc) × 6 (18)
Row 4: (2 sc, 1 inc) × 6 (24)
Row 5: (3 sc, 1 inc) × 6 (30)
Row 6: (4 sc, 1 inc) × 6 (36)
Row 7: (5 sc, 1 inc) × 6 (42)
Row 8: (6 sc, 1 inc) × 6 (48)
Row 9: (7 sc, 1 inc) × 6 (54)
Row 10: (8 sc, 1 inc) × 6 (60)
Rows 11–22: 60 sc (12 rows) (60)
Row 23: (8 sc, 1 dec) × 6 (54)
Row 24: 54 sc (54)
Row 25: (7 sc, 1 dec) × 6 (48)
Rows 26–27: 48 sc (2 rows) (48)
Row 28: (6 sc, 1 dec) × 6 (42)
Rows 29–30: 42 sc (2 rows) (42)
Row 31: (5 sc, 1 dec) × 6 (36)
Rows 32–33: 36 sc (2 rows) (36)
Row 34: (4 sc, 1 dec) × 6 (30)
Rows 35–36: 30 sc (2 rows) (30)
Row 37: (3 sc, 1 dec) × 6 (24)
Rows 38–41: 24 sc (4 rows) (24)
Finishing: Finish with a sl st and leave a long tail for sewing. Stuff the body firmly before closing.
💡 Emma’s Tip: The body is worked from the bottom up. Make sure it’s packed solidly — this is a large piece and a loosely stuffed body will look saggy once the head and limbs are attached. Check out our guide on how to stuff amigurumi properly if you want tips on getting an even, lump-free result.
Ears (× 2)
Yarn: Light Lilac | Start: Magic Ring
Row 1: 6 sc in mr (6)
Row 2: (1 sc, 1 inc) × 3 (9)
Row 3: (2 sc, 1 inc) × 3 (12)
Row 4: 12 sc (12)
Row 5: (3 sc, 1 inc) × 3 (15)
Rows 6–8: 15 sc (3 rows) (15)
Row 9: (3 sc, 1 dec) × 3 (12)
Row 10: 12 sc (12)
Finishing: Finish with a sl st and leave a long tail for sewing. Fold the bottom edge in half and sew the base closed as shown in the assembly photos. Do not cut the yarn — you’ll use the tail to attach the ear to the head.
Legs (× 2)
Yarn: Cream (Rows 1–15), then Light Lilac (Row 16 onward) | Start: Magic Ring
Row 1: 6 sc in mr (6)
Row 2: inc in each st (12)
Row 3: (1 sc, 1 inc) × 6 (18)
Row 4: (2 sc, 1 inc) × 6 (24)
Rows 5–13: 24 sc (9 rows) (24)
Row 14: (2 sc, 1 dec) × 6 (18)
Row 15: 18 sc (18)
💡 Emma’s Tip: Switch to Light Lilac before starting Row 16. Change at the last pull-through of the final stitch of Row 15 so the first stitch of Row 16 is already in the new color — that’s the cleanest handoff.
Rows 16–28: 18 sc (13 rows) [light lilac] (18)
Row 29: (7 sc, 1 dec) × 2 (16)
Rows 30–31: 16 sc (2 rows) (16)
Row 32: (6 sc, 1 dec) × 2 (14)
Row 33: 14 sc (14)
Row 34: (5 sc, 1 dec) × 2 (12)
Finishing: Fold the opening flat and work 6 sc across both layers to close. Leave a long tail for sewing. Stuff the hoof section (cream, bottom half) firmly; stuff the upper lilac section less firmly to allow some flexibility at the join.
Arms (× 2)
Yarn: Cream (Rows 1–13), then Light Lilac (Row 14 onward) | Start: Magic Ring
Row 1: 6 sc in mr (6)
Row 2: inc in each st (12)
Row 3: (1 sc, 1 inc) × 6 (18)
Rows 4–11: 18 sc (8 rows) (18)
Row 12: (1 sc, 1 dec) × 6 (12)
Row 13: 12 sc (12)
💡 Emma’s Tip: Switch to Light Lilac before starting Row 14, the same way as for the legs.
Rows 14–37: 12 sc (24 rows) [light lilac] (12)
Finishing: Fold the opening flat and work 6 sc across both layers to close. Leave a long tail for sewing. Stuff the hand section (cream, bottom) firmly; stuff the upper section less firmly.
Horn (× 1)
Yarn: Cream | Start: Magic Ring
Row 1: 6 sc in mr (6)
Row 2: 6 sc (6)
Row 3: (1 sc, 1 inc) × 3 (9)
Rows 4–6: 9 sc (3 rows) (9)
Row 7: (2 sc, 1 inc) × 3 (12)
Rows 8–15: 12 sc (8 rows) (12)
Finishing: Finish with a sl st and leave a long tail for sewing. Stuff the horn — it’s narrow at the top, so pack it carefully with small bits of fiberfill using a pencil or the blunt end of your hook to push it in.
Assembly
Take your time with assembly — this is where the unicorn’s personality comes from. Pin everything in place before you sew a single stitch. For detailed technique guidance, our tutorial on how to sew amigurumi parts together covers placement, anchoring, and invisible joins.
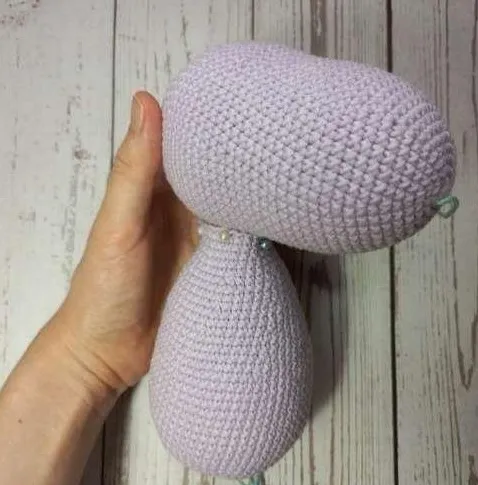
- Head to body:
Sew the head to the open top of the body. The neck join should feel solid — work around the circumference at least twice.
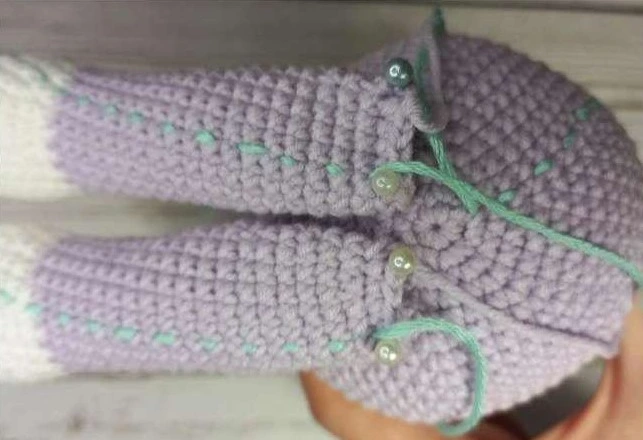
2. Legs:
Position both legs along the bottom front half of the body, spaced 2 stitches apart from each other at the center. Pin in place and sew firmly. The legs should point forward, not straight down.
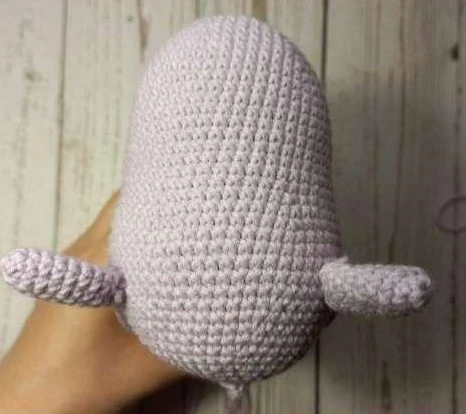
3. Arms:
Sew the arms between Rows 1 and 2 of the body, counting from the head (just below the neck join). They should sit high and feel secure.
4. Ears:
Sew both ears between Rows 28 and 29 of the head, counting from the magic ring. Fold and base-sew them before attaching so they have that natural cupped shape
5. Horn:
Sew the horn between Rows 25 and 28 of the head, counting from the magic ring — centered, just in front of the ears.
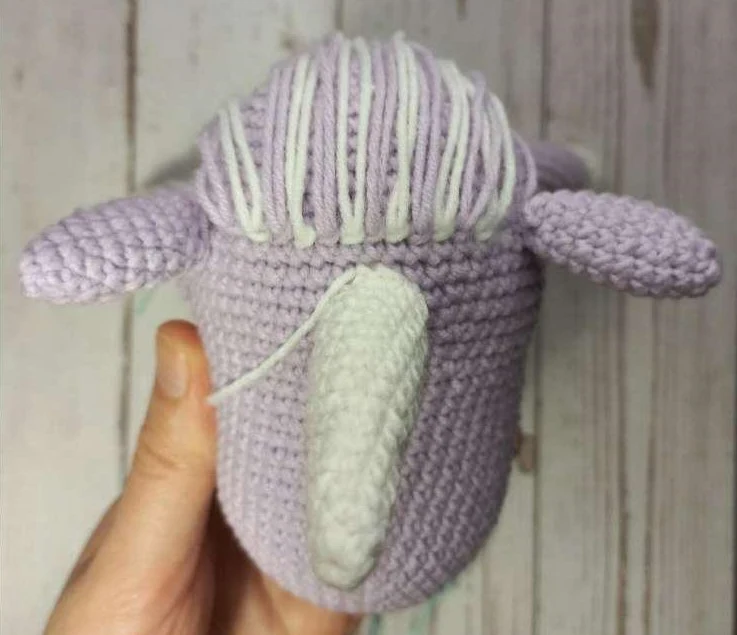
💡 Emma’s Tip: I always attach the ears first, then the horn — that way I can see exactly where the horn needs to sit in relation to the ears. Getting that placement right makes a big difference in how finished the face looks.
Finishing Details: Mane, Tail & Eyes
Mane
- Cut strands of both cream and light lilac yarn to 11.8–13.8 in (30–35 cm) each.
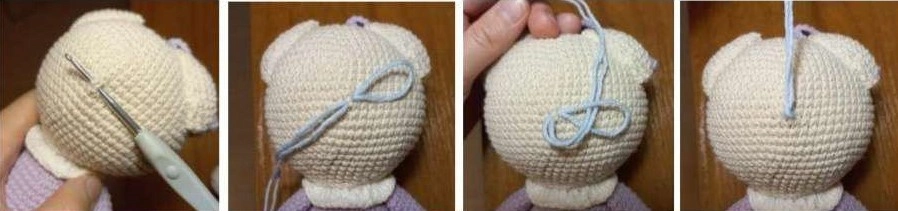
- Fold each strand in half. Insert your hook under a stitch between the ears, pull the folded loop partway through, then pass the two ends through the loop and pull tight (a lark’s head knot). Alternate cream and lilac strands.
- Attach 12 strands in the first row between the ears. Continue down the back of the head for 11 more rows, gradually reducing the number of strands per row as the mane tapers.
- Near the horn, add bangs — 5 strands on the right side and 5 on the left, angled toward the forehead.
- Trim the bangs to length. Trim the mane evenly with sharp scissors — even a few uneven strands will catch the eye, so take your time here.
Tail
- Cut strands of both colors to 7.9 in (20 cm) each.
- Attach between Rows 12 and 15 of the body at the back center, using the same lark’s head knot method as the mane.
- Trim evenly once all strands are attached.
Eyes
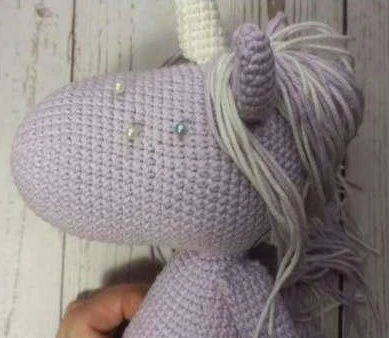
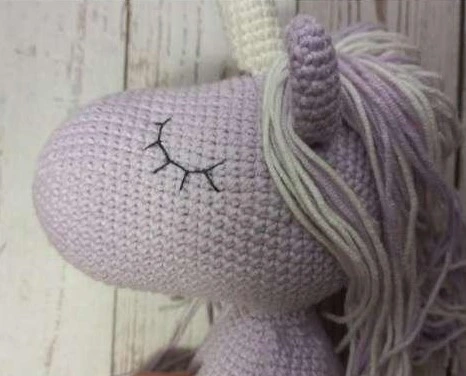
- Using black embroidery thread (or sewing thread folded 3 times for thickness), embroider closed sleeping eyes with eyelashes on the front of the head.
- Position them symmetrically on the widest part of the face, roughly at Row 20 counting from the magic ring — but use pins to mark placement first and step back to check before committing.
- Each eye is a curved arc of straight stitches forming the closed lid, with 3–4 small lash stitches fanning out above.
💡 Emma’s Tip: The sleeping eyes make this unicorn — they give her that dreamy, soft expression. Mark the placement with pins (or a water-soluble fabric marker if you have one) before you pick up your needle. Symmetry matters more here than with open eyes, because the arcs are harder to adjust once sewn. Work slowly, and use a magnifying glass if you need to.
Emma’s Note
I’ve made a few unicorns over the years, and this one has quickly become a favorite — the proportions are lovely, and the mane gives you so much room to play with color. If you want to make her your own, try mixing in a third color in the mane, or swapping the cream for white or blush pink. The sleeping eyes are a small detail that takes patience, but they’re worth every careful stitch. I hope she turns out exactly as beautiful as you’re imagining. Happy hooking. 🧶
Looking for your next project? Try our free unicorn pattern, or browse our free bunny amigurumi for something equally sweet.
FAQ
What yarn is best for this unicorn amigurumi?
A cotton-acrylic blend in DK / Light Worsted (3) weight is highly recommended. It holds its shape well, takes embroidery cleanly, and provides a slightly matte finish.
How long does it take to crochet this unicorn?
It generally takes between 8 to 12 hours to complete this free unicorn amigurumi pattern, depending on your crochet speed and experience level.
What size hook do I need for this pattern?
A 2.5 mm crochet hook is suggested to keep the stitches tight so no stuffing peeks through. If your tension is naturally loose, you can drop down to a 2.25 mm hook.