Free Dragon Amigurumi Pattern — Meet Vesper, the Forest Dragon
A Dragon Amigurumi Worth Every Hour
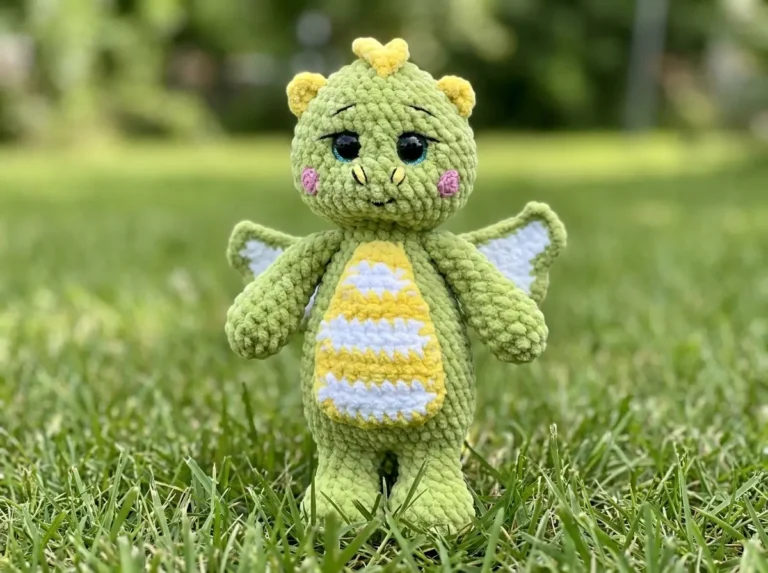
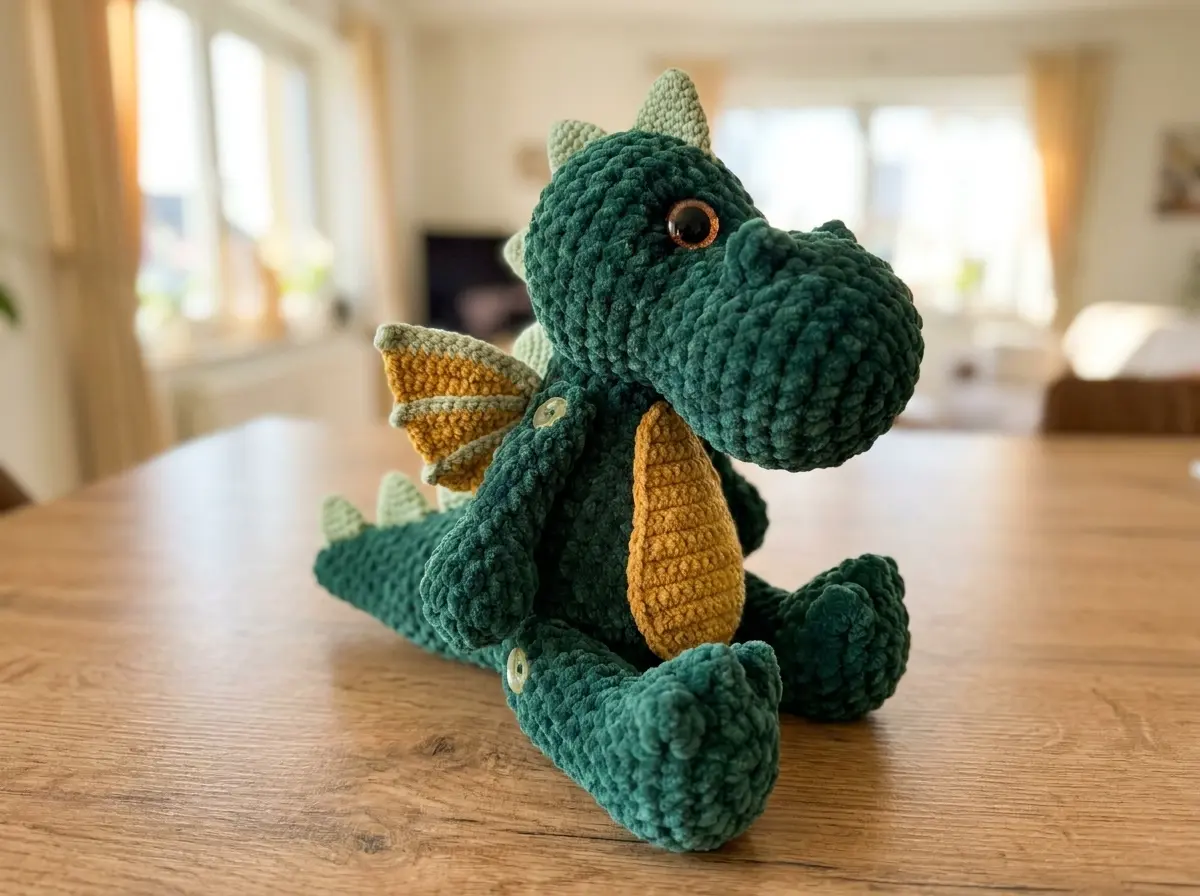
Dragon amigurumi has a way of becoming something more than just a crocheted toy — the moment you position the wings and tilt the head just right, something shifts. This is Vesper. She’s the kind of dragon that looks like she’s thinking about something important, with soft spines trailing down her back and wings she keeps mostly folded. If you’ve been waiting for the right character to bring to life, she’s been waiting too.
📖 Meet Vesper
- 🌟 Personality: thoughtful, quiet, ancient-curious
- 🎨 Color Palette: deep forest green with soft golden amber belly and pale sage spines
- 📏 Size: ~11.8 in (30 cm)
- 🪝 Hook: H/8 (5.0 mm) for main body; 1.5 mm for spikes and wings
- ⏱️ Time: 14–20 hours
- ✨ Signature Detail: fully jointed arms and legs on button pivots — she actually moves
- 💡 Difficulty: Intermediate
What You’ll Need for This Dragon Amigurumi
Main Yarn
Vesper is crocheted in chenille — that soft, velvet-surface fiber that gives larger amigurumi a plush, almost storybook quality. You have two yarn options depending on what you prefer to work with:
- YarnArt Dolce (or US alternatives: Bernat Baby Velvet, Premier Parfait) — Bulky (5) chenille, used with an H/8 (5.0 mm) hook
- Himalaya Dolphin Baby (or US alternatives: Bernat Baby Velvet, Premier Parfait) — Bulky (5) chenille, used with a G/6 (4.0 mm) hook
The matte velvet surface of these yarns gives Vesper a grounded, mossy presence — less sparkle, more ancient forest. Available at Joann, Michaels, Hobby Lobby, or Amazon US.
Accent Yarns
- Light green yarn — for the spikes. The finer the better: the original uses mercerized cotton or US size 10 crochet thread (fingering-weight cotton works well). Finer thread means sharper, more defined spike tips. Use with a 1.5 mm hook.
- Soft gold or warm yellow yarn — for the belly. That golden oval against deep forest green is where Vesper’s character lives.
- Dark green and light green yarn — for the wings (Option 1). Two tones together create the membrane effect — the darker shade for the bone-like edge structure, the lighter for the fill between.
Tools and Hardware
- H/8 (5.0 mm) or G/6 (4.0 mm) crochet hook — for main body parts
- 1.5 mm crochet hook — for spikes and wing details (no US letter equivalent)
- 4 identical shank buttons, 15 mm diameter — for jointed limb attachment. Match color to spike yarn if possible. Alternatively: use standard 16 mm buttons and crochet over them with fine cotton thread.
- 16 mm safety eyes
- Standard doll lashes or fashion false lashes
- Polyfill stuffing
- Knitting needle or wooden skewer — for marking the limb axis before attaching joints
- Long tapestry needle
- Sewing thread
- Stitch marker
Abbreviations Used in This Dragon Amigurumi Pattern
| Abbreviation | Meaning |
|---|---|
| mr | magic ring |
| ch | chain |
| sl st | slip stitch |
| sc | single crochet |
| hdc | half double crochet |
| dc | double crochet |
| tr | treble crochet |
| dtr | double treble crochet |
| inc | increase — 2 sc worked into the same stitch |
| dec | decrease |
| BLO | back loop only |
| FO | fasten off |
| st(s) | stitch(es) |
Before Vesper Wakes — Notes on Technique
Vesper is a patient project. She rewards the maker who doesn’t rush. A few things worth knowing before you begin:
On decreases: This pattern uses “dec” throughout. For the cleanest result — especially across the head, where the shaping defines her expression — use the invisible decrease: insert your hook through the front loops only of the next two stitches simultaneously, yarn over, pull through, yarn over, pull through both loops. It eliminates the gap left by a standard sc2tog, and on chenille especially, that smoothness shows. Our guide to the invisible decrease walks through it step by step if you’d like to practice before starting.
On the magic ring: All eight of Vesper’s spikes begin with a magic ring. With a 1.5 mm hook and fine cotton thread, those rings will feel very small and precise — take your time pulling them closed. If the magic ring is still new to you, our magic ring tutorial covers the adjustable start that closes completely, which is what keeps spike tips from developing a small hole at the center.
On the button joints: This is what makes Vesper poseable. The shank buttons thread through the body at a marked axis point, allowing the limbs to pivot freely. Use a knitting needle or wooden skewer to mark the axis location before you start sewing — it takes an extra few minutes, but it’s the difference between limbs that hang evenly and limbs that list. Precise placement matters here.
On the safety eyes: The 16 mm eyes are attached between Rows 14 and 15 of the head, with the lashes added at the same time. Once the washer clicks into place, they’re permanent — so take a long look before you commit. The spacing (3–5 sc apart) is genuinely at your discretion and will define Vesper’s expression more than any other single decision. If you’re making her as a gift for a child under three years old, the U.S. Consumer Product Safety Commission recommends avoiding button-style components; embroider the eyes instead.
✨ Sophie’s Note: I named this one during the belly section — something about that soft golden oval taking shape felt like late afternoon light filtering through leaves, and Vesper arrived before I’d even reached the spine. Names come when they’re ready. Yours might arrive at a completely different moment — or not until the eyes are in and she’s looking back at you.
The Dragon Amigurumi Pattern — Part by Part
Head (×1)
Main color chenille. Starting method: 2 ch, work 6 sc into the 2nd ch from hook.
Row 1: 6 sc in 2nd ch from hook (6)
Row 2: (inc) × 6 (12)
Row 3: (sc, inc) × 6 (18)
Row 4: (2 sc, inc) × 6 (24)
Row 5: (3 sc, inc) × 6 (30)
Rows 6–9: 30 sc (4 rows) (30)
Row 10: 3 dc in one st, 6 sc, 3 dc in one st, 22 sc (30)
Row 11: sc, dec, 3 sc, dec, 3 sc, dec, 3 sc, dec, 3 sc, dec, 3 sc, dec, 2 sc (24)
Row 12: 2 sc, dec, 6 sc, dec, 6 sc, dec, 4 sc (21)
Row 13: 2 sc, inc, 6 sc, inc, 6 sc, inc, 4 sc (24)
Row 14: 2 sc, inc, 7 sc, inc, 7 sc, inc, 5 sc (27)
Row 15: 2 sc, inc, 8 sc, inc, 8 sc, inc, 6 sc (30)
Rows 16–19: 30 sc (4 rows) (30)
✨ Sophie’s Note: Attach the safety eyes and lashes between Rows 14 and 15 — before you close the opening. The spacing, 3–5 sc apart, is yours to decide. Hold the head at arm’s length and let the expression tell you. Eyes set closer together read as more focused and serious; further apart, more open and wondering. Once you’re happy with the placement and the lashes are on, click the washer. That’s the moment the face begins.
Row 20: (dec, 3 sc) × 6 (24)
Row 21: (dec, 2 sc) × 6 (18)
Row 22: (dec, sc) × 6 (12)
Row 23: (dec) × 6 (6)
Pull the loop closed. Secure yarn and cut, leaving about a 4 in (10 cm) tail; hide the tail inside the head. This tail is not used for sewing — but cut it too close to the knot and the work will unravel. Tuck it away rather than trimming it short.
Set the head down on your desk and look at it straight on. Even without a body, without the spines or wings — there’s already something there. A shape with a point of view.
Body (×1)
Main color chenille. Starting method: 2 ch, work 6 sc into the 2nd ch from hook.
Row 1: 6 sc in 2nd ch from hook (6)
Row 2: (inc) × 6 (12)
Row 3: (sc, inc) × 6 (18)
Row 4: (2 sc, inc) × 6 (24)
Row 5: (3 sc, inc) × 6 (30)
Row 6: (4 sc, inc) × 6 (36)
Row 7: (5 sc, inc) × 6 (42)
Rows 8–13: 42 sc (6 rows) (42)
Row 14: sc, (dec) × 4, 33 sc (38)
Row 15: sc, (dec) × 2, 16 sc, dec, 15 sc (35)
Row 16: 2 dec, 15 sc, dec, 14 sc (32)
Row 17: dec, 9 sc, dec, 8 sc, dec, 9 sc (29)
Row 18: sc, dec, 9 sc, dec, 5 sc, dec, 8 sc (26)
Row 19: dec, 9 sc, dec, 2 sc, dec, 9 sc (23)
Row 20: dec, 8 sc, dec, sc, dec, 8 sc (20)
Row 21: dec, 8 sc, dec, 8 sc (18)
Row 22: (4 sc, dec) × 3 (15)
Finish with a sl st. Leave a 12 in (30 cm) yarn tail for sewing the head on later.
Tail (×1)
Main color chenille. Starting method: 2 ch, work 6 sc into the 2nd ch from hook.
Row 1: 6 sc in 2nd ch from hook (6)
Row 2: (2 sc, inc) × 2 (8)
Row 3: (3 sc, inc) × 2 (10)
Row 4: (4 sc, inc) × 2 (12)
Row 5: (5 sc, inc) × 2 (14)
Row 6: (6 sc, inc) × 2 (16)
Row 7: (7 sc, inc) × 2 (18)
Row 8: (8 sc, inc) × 2 (20)
Row 9: 9 sc, inc, 4 sc, inc, 4 sc, inc (23)
Row 10: 10 sc, inc, 5 sc, inc, 5 sc, inc (26)
Row 11: 11 sc, inc, 6 sc, inc, 6 sc, inc (29)
Row 12: 12 sc, inc, 7 sc, inc, 7 sc, inc (32)
✨ Sophie’s Note: Hold the tail against the assembled body before fastening off. If it looks too modest relative to the rounded backside, work one additional Row 12. If it reads as too large, stop at Row 10. The tail is one of those parts that looks wrong in isolation and right once everything is together — let proportion guide you, not anxiety.
Arms (×2)
Main color chenille. Starting method: 2 ch, work 6 sc into the 2nd ch from hook. Make two. Do not stuff.
Row 1: 6 sc in 2nd ch from hook (6)
Row 2: (inc) × 6 (12)
Rows 3–4: 12 sc (2 rows) (12)
Row 5: (2 sc, dec) × 3 (9)
Row 6: (sc, dec) × 3 (6)
Rows 7–12: 6 sc (6 rows) (6)
Do not stuff. Fold in half and close. The arms attach later with button joints; the axis runs between Rows 3 and 4 down from the top of the body.
Legs (×2)
Main color chenille. Starting method: 2 ch, work 6 sc into the 2nd ch from hook. Make two. Stuff firmly.
Row 1: 6 sc in 2nd ch from hook (6)
Row 2: (inc) × 6 (12)
Row 3: (sc, inc) × 6 (18)
Row 4: (2 hdc in 1 st) × 4, 14 sc (22)
Row 5: BLO 22 sc (22)
Row 6: 22 sc (22)
Row 7: 4 dec, 14 sc (18)
Row 8: 3 dec, 12 sc (15)
Row 9: 3 dec, 9 sc (12)
Rows 10–13: 12 sc (4 rows) (12)
Row 14: (dec) × 6 (6)
Fold in half, join with sl st, sc, sl st. Hide the yarn tail carefully. The legs attach at the axis between Rows 9 and 10 of the body, spaced 16 sc apart.
Big Spike (×1)
Light green yarn — mercerized cotton or fingering-weight cotton thread. 1.5 mm hook. Magic ring start.
Row 1: 6 sc in mr (6)
Row 2: (2 sc, inc) × 2 (8)
Row 3: (3 sc, inc) × 2 (10)
Row 4: (4 sc, inc) × 2 (12)
Row 5: (5 sc, inc) × 2 (14)
Row 6: (6 sc, inc) × 2 (16)
Row 7: (7 sc, inc) × 2 (18)
Row 8: 7 sc, sl st
Leave yarn for assembly. Do not cut until the spike has been joined to the others in the strip.
Small Spikes (×7)
Light green yarn. 1.5 mm hook. Magic ring start. Make seven.
Row 1: 6 sc in mr (6)
Row 2: (2 sc, inc) × 2 (8)
Row 3: (3 sc, inc) × 2 (10)
Row 4: (4 sc, inc) × 2 (12)
Row 5: (5 sc, inc) × 2 (14)
Row 6: (6 sc, inc) × 2 (16)
Row 7: 6 sc, sl st
Leave yarn for joining. You’ll need 8 spikes total: 1 big + 2 small for the head strip, and 5 small for the body and tail spine. Hold each strip against the dragon as you join — the length matters more than an exact count. The underlying rule for any spike: Row 1 is always 6 sc in mr, then 2 evenly spaced increases per row to form a cone. Work to your desired size, work a few additional sc up to the increase point, then finish with a sl st so the spike stands straight.
Belly (×1)
Soft gold or warm yellow yarn. Worked flat in turning rows. The finished shape is an oval; adjust size as needed by holding it against the body while you work.
Row 1: Ch 8. Then ch 1 for turning, and starting in the 3rd ch from hook, work 7 sc to end of row (8)
Row 2: Work 1 inc at each side (10)
Row 3: 10 sc (10)
Row 4: Work 1 inc at each side (12)
Row 5: 12 sc (12)
Continue in this manner — one row with 1 inc at each side, one plain row — until you reach 20 sc.
Work 10 rows of 20 sc.
Then begin decreasing: alternate one row with 1 dec at each side, and one row with 1 dec in the center. Repeat this alternating pattern for 6 rows.
Finish by working a round of reverse sc (crab stitch) around the entire edge to create a clean, defined border.
✨ Sophie’s Note: The belly can also be cut from soft felt or fleece and stitched on — both methods work. If you go the crocheted route, keep the body nearby and hold the oval against it as you go. It should sit comfortably from chest to just above where the tail begins. Adjust the row count to fit your specific Vesper — every dragon is slightly different.
Wings — Right Wing, Option 1 (×1)
Dark green and light green yarn. Foundation chain of 16 ch. Worked flat in turning rows. The dark green forms the edge structure, like bone; the light green fills the membrane between. The colors alternate and are carried rather than cut between rows.
Row 1 [dark green]: Work back along foundation chain in sc (15)
Row 2 [light green]: 3 sc; 3 dc; 2 tr worked together (decrease); 2 tr; 2 dtr worked together (decrease); 2 dtr
✨ Sophie’s Note: The dark green yarn is not cut after Row 1 — it is carried along the loops of Row 1 and ends up hidden inside the stitches as you work Row 2 in light green. When working the last dtr of Row 2, bring the dark green yarn up. Before turning to Row 3, work 2 ch with dark green yarn.
Row 3 [dark green]: 13 sc + 1 sc into the very first foundation ch (so the wing “skeleton” appears to originate from a single point). Switch yarn, ch 1 for turning [light green] (14)
Row 4 [light green]: 3 sc; 3 tr; 2 tr worked together (decrease); 2 tr; 2 dtr worked together (decrease); 1 dtr
✨ Sophie’s Note: When completing the last stitch of Row 4, bring up the dark green yarn and finish that stitch with it. Then work 2 ch with dark green yarn before turning.
Row 5 [dark green]: 13 sc. Switch yarn, ch 1 for turning [light green] (13)
Row 6 [light green]: 3 sc; 2 dc worked together (decrease); 2 dc; 2 consecutive decreases by working pairs of tr together; 1 tr
Switch to dark green yarn, work 2 ch.
Row 7 [light green]: 3 sc; 2 dc worked together (decrease); 1 dc; 2 consecutive decreases by working pairs of tr together
Switch yarn, work 2 ch with dark green yarn.
Row 8 [dark green]: 9 sc, then turn work and continue in reverse sc (crab stitch) back to the top point of the wing (9)
Wings — Left Wing, Option 1 (×1)
Dark green and light green yarn. Foundation chain of 16 ch. A mirror of the right wing — the shaping runs in the opposite direction.
Row 1 [dark green]: Work back along foundation chain in sc (15)
Row 2: 1 hdc [dark green]. Then [light green]: 4 ch (replacing 1 dtr); 1 dtr; 2 dtr worked together (decrease); 2 tr; 2 tr worked together (decrease); 3 dc; 3 sc
Switch yarn, work 1 sc in the beginning of the previous row, ch 1 for turning [dark green].
Row 3 [dark green]: Skip first st, 12 sc, 2 ch (12)
Row 4: 1 sc [dark green]. Then [light green]: 4 ch; 2 dtr worked together (decrease); 2 tr; 2 tr worked together (decrease); 3 dc; 3 sc
Switch yarn, 1 sc, ch 1 for turning [dark green].
Row 5 [dark green]: Skip first st, 11 sc, 2 ch (11)
Row 6: 1 sc [dark green]. Then [light green]: 3 ch; 2 decreases by working pairs of tr together; dc, 2 dc worked together (decrease); 3 sc
Switch yarn, 1 sc, ch 1 [dark green].
Row 7 [dark green]: Skip first st, 9 sc, 2 ch (9)
Row 8 [dark green]: 1 sc (1)
FO. Cut yarn and weave in all ends carefully.
Assembly — Pieces Become a Dragon
This is the part where everything waiting in small piles on your desk becomes one character. The assembly is the most narrative section of the whole project — every step makes Vesper a little more herself. For technique guidance on sewing joints cleanly and without visible seams, our guide to sewing amigurumi parts together is worth a read before you begin.
- Join the head spikes into a strip. You need 3 spikes for the head: 1 big, 2 small. Attach yarn to the corner of the big spike and work sc across half of it (9 sc). Ch 2, then work sc across half of the first small spike (8 sc). Ch 2, then work all 16 sc across the second small spike. Ch 2, then 8 sc back across the first small spike, ch 2, then 9 sc back across the big spike, sl st. Leave a long tail for sewing. If the strip feels tight, use 3 ch between spikes instead of 2 — hold it against the head as you go to judge the length.
- Join the body spikes into a strip. Join the 5 remaining small spikes the same way. Hold the strip against the spine of the body as you work — it should reach from the neck attachment down to the tip of the tail. Adjust the ch count between spikes to fit.
- Attach the belly. Sew or stitch the crocheted (or felt/fleece) belly piece onto the front of the body. Center it carefully — the oval should sit evenly from the chest down to just above where the tail begins.
- Attach the legs with button joints. Take a knitting needle or wooden skewer and mark the axis on the body: between Rows 9 and 10, with the two points spaced 16 sc apart. Thread yarn through a shank button, through the body at the axis, then back out again. Pull tight. Tie off firmly. The legs should swing freely from the pivot. Take the time to get the axis centered — lopsided legs are a small thing that catches the eye.
- Attach the arms with button joints. The axis for the arms runs between Rows 3 and 4 down from the top of the body. Same technique as the legs. The arms are lighter and shorter — they should rest gently at the sides, or be posed slightly outward if you prefer an open, reaching expression.
- Sew the spike strips along the spine. Attach the head strip along the top of the head, with the largest spike sitting at the crown. Attach the body strip along the spine, running from the nape of the neck all the way to the tip of the tail. This ridge is what gives Vesper her silhouette.
- Attach the wings. Sew the finished wings to the back of the body, one on each side. Their angle is a meaningful decision — wings angled downward give a resting, settled feeling; angled slightly upward and the whole character becomes more alert. Hold them in place before committing. A pin or two helps.
- Join the head to the body. Use the 12 in (30 cm) yarn tail from the body. Work around the opening evenly. A slight forward tilt of the head — just a few degrees — changes the expression from waiting to watching. Once you find the position that feels right, keep it there while you sew.
Meet Vesper
She’s on the edge of my desk right now, wings settled, head tilted a few degrees to the left — like she caught a sound she hasn’t identified yet and isn’t quite sure whether it’s worth investigating. The sage green spine runs from the crown all the way to the tip of her tail, a pale ridge against the deep forest green. Something about the way the golden belly catches the light gives her a warmth that the rest of her coloring doesn’t — like she’s carrying a quiet ember somewhere inside.
That’s the thing about a dragon amigurumi at almost a foot tall: there’s room for real character. The jointed arms and legs mean she can be posed — sitting upright, leaning slightly, arms forward, settled into a corner of a shelf. She has opinions about where she belongs. Try next to a reading lamp, or guarding a stack of books, or tucked into the window ledge where the light changes through the day. You’ll know the right spot when you find it.
Name yours before you finish. Names come when they’re ready — sometimes during the spines, sometimes not until the eyes go in and she’s looking back at you for the first time. Either way, she’ll have been waiting for it. 🧶
What yarn is best for this dragon amigurumi?
A bulky (size 5) chenille yarn gives Vesper her soft, plush velvet finish. In the US, Bernat Baby Velvet and Premier Parfait are widely available alternatives to the original YarnArt Dolce or Himalaya Dolphin Baby.
How long does it take to crochet this dragon amigurumi pattern?
Vesper takes approximately 14 to 20 hours of crochet time. The button-jointing technique and two-color wings add to the project length — plan for the higher end if either is new to you.
Is this dragon amigurumi pattern suitable for beginners?
This pattern is rated intermediate. Crocheters comfortable with single crochet, increases, and decreases can work most sections, but experience with poseable jointed construction and two-color work is helpful before starting.