The Free Octopus Amigurumi Pattern Your Scrap Bin Has Been Waiting For
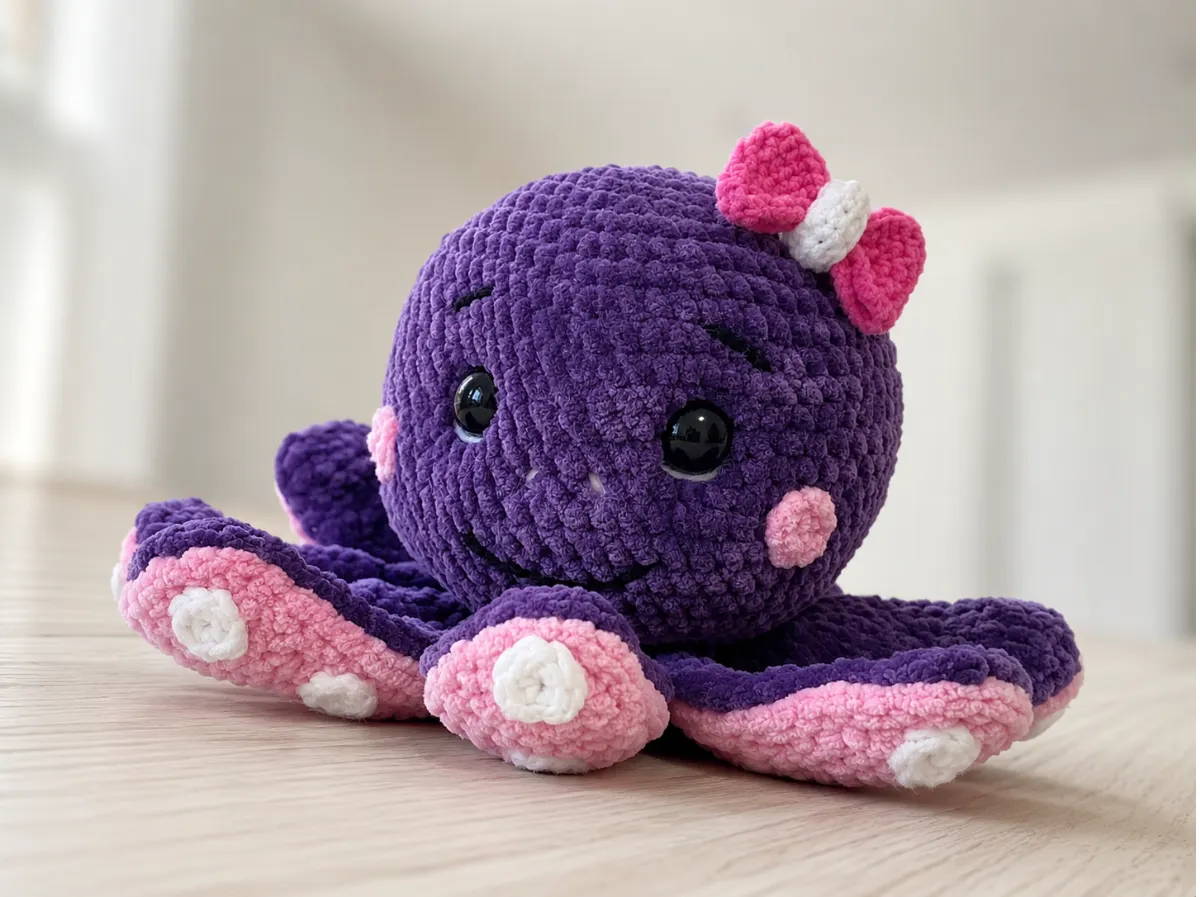
This free octopus amigurumi pattern is one of the most scrap-friendly builds I’ve come across — two body sections in bulky chenille, a handful of tiny white suction cups, and a bow that uses up DK-weight leftovers you probably forgot you had. The whole thing comes together from three colors, and if you’ve made anything bulky recently, there’s a good chance you already have enough yarn sitting in your stash right now. Two contrasting colors for the body, a scrap of white, and a small hook for the details. That’s it. Let’s go.
🧶 What You’ll Need From Your Stash
- 💰 Yarn Needed: ~80g purple bulky chenille, ~60g pink bulky chenille, ~30g white bulky or worsted, small amount of DK/Light Worsted in pink (for the bow)
- 🎨 Colors: purple, pink, white (or any two contrasting bulky colors + white from your stash)
- 🪝 Hook: G/6 (4.0mm) for body; 3.0mm for details; 2.0mm (steel 4) for bow
- ⏱️ Time: 4–6 hours (including all 16 tentacles and 24 suction cups)
- 📏 Finished Size: Approximately 7–8 in (18–20 cm) tall — not verified, inferred from stitch counts and yarn weight
- 💡 Difficulty: Intermediate
- 🎁 Great For: shelf display, nursery decor, handmade gifts, market tables
Materials for Your Octopus Amigurumi Pattern (Free Stash Pull)
- Purple bulky chenille yarn — approximately 80g. Himalaya Dolphin Baby (color 80340) or US alternatives: Bernat Baby Velvet, Premier Parfait. Any Bulky (5) weight chenille in a deep purple will work — this is your main body color.
- Pink bulky chenille yarn — approximately 60g. Himalaya Dolphin Baby (color 80309) or the same US alternatives as above in pink. This covers the bottom body section, cheeks, and bow base.
- White yarn — approximately 30g. Kartopu Cozy Wool (color K010) or any similar Bulky to Worsted weight white yarn from your stash. Used for suction cups only — a leftover ball is more than enough.
- Pink DK / Light Worsted yarn — a small amount (approximately 10–15 yards). YarnArt Jeans or US alternatives: Drops Muskat, Paintbox Cotton DK. This is used only for the bow — perfect for a 10-yard scrap.
- 15mm black safety eyes — 1 pair
- Black thread — for embroidering eyebrows, mouth, and nose
- White thread — for sewing the two body halves together (thread, not yarn — this matters for the look)
- Polyester fiberfill / stuffing — enough to fill the round body section; tentacles are not stuffed
- Tapestry needle with a large eye
- Stitch marker
- Hooks: G/6 (4.0mm) for the body and tentacles; 3.0mm for detail pieces; 2.0mm (steel 4) for the bow
🧶 Scrap Check: The bow section uses about 10–15 yards of DK-weight pink yarn. If you’ve got any pink cotton or cotton-blend DK sitting around, that’s all you need. No new skein required.
⚠️ Hook size note: The 3.0mm hook used for detail pieces does not have a standard US letter equivalent. A US C/2 (2.75mm) or US D/3 (3.25mm) are the closest options — use whichever gives you tighter, neater small circles. See our amigurumi hook size guide for help choosing between them.
Abbreviations
| Abbreviation | Meaning |
|---|---|
| sc | single crochet |
| dc | double crochet |
| tr | treble crochet |
| inc | increase — 2 sc worked into the same stitch |
| dec | decrease — 2 sc worked together |
| mr | magic ring |
| ch | chain |
| sl st | slip stitch |
| FO | fasten off |
| BLO | back loop only |
| FLO | front loop only |
⚠️ Decrease note: The source pattern specifies “dec” without clarifying the method. For the cleanest finish on the rounded body section, use the invisible decrease (working through front loops only) — it eliminates the visible gap that standard sc2tog leaves in chenille.
Smart Crafter Tips for This Octopus Amigurumi Pattern (Free Version)
1. The body starts with 2 ch, not a magic ring. This pattern opens with 2 chain stitches and works 6 sc into the first chain — a common alternative starting method in chenille patterns, since chenille can be harder to pull tight through a magic ring center. It behaves similarly to a magic ring start; just work all 6 sc into that first chain and pull the tail to close. If you prefer the magic ring method, our magic ring tutorial walks through both techniques.
2. Chenille hides dec gaps — but inv dec still wins. One of the few perks of chenille is that it disguises mistakes. That said, invisible decrease still gives you a rounder, cleaner dome on the head. The extra two seconds per stitch is worth it when you’ve invested this much yarn.
3. The 16-tentacle system is clever, but read the note carefully before you start. Both body sections end with 30 stitches and generate 8 tentacles each — but 8 tentacles from 30 stitches doesn’t divide evenly (8 × 4 = 32). The pattern accounts for this by sharing the boundary stitch between tentacles 4 and 5, and again between tentacles 8 and 1. Mark your starting stitch with a stitch marker before you begin and count carefully at the transition points. It’s less complicated than it reads, but read it before you crochet, not during.
🧶 Scrap Check: The 24 suction cups (tiny 6-sc circles) use a small amount of white yarn — well under 10 yards total. This is a perfect one-skein-end project if you have a tail of white left over from anything.
Octopus Amigurumi Pattern — Free Instructions
This pattern is worked with a G/6 (4.0mm) hook and bulky chenille yarn unless otherwise noted. Work in continuous rounds using a stitch marker to track the beginning of each round.
Part 1: Main Body / Head (×1)
Yarn: Purple bulky chenille
Starting method: 2 ch, work 6 sc into the first ch
Row 1: 2 ch, work 6 sc into the first ch (6)
Row 2: 6 inc (12)
Row 3: (1 sc, inc) × 6 (18)
Row 4: (2 sc, inc) × 6 (24)
Row 5: (3 sc, inc) × 6 (30)
Row 6: (4 sc, inc) × 6 (36)
Row 7: (5 sc, inc) × 6 (42)
Row 8: (6 sc, inc) × 6 (48)
Row 9: (7 sc, inc) × 6 (54)
Row 10: (8 sc, inc) × 6 (60)
Rows 11–20: Work 10 rows of 60 sc (60)
Row 21: (8 sc, dec) × 6 (54)
Row 22: (7 sc, dec) × 6 (48)
Row 23: (6 sc, dec) × 6 (42)
Row 24: (5 sc, dec) × 6 (36)
Row 25: (4 sc, dec) × 6 (30)
👁️ Eye placement: Insert the 15mm safety eyes between Rows 14 and 15, with 10 stitches between them. Eyes must be inserted and locked in place before you close the piece — review our guide on how to safely attach safety eyes if this is your first time. Begin stuffing gradually as you decrease. Do not close the piece yet — you’ll continue into the tentacles.
Do not fasten off. Continue directly into the tentacles.
Part 2: Main Body Tentacles (×8)
Yarn: Purple bulky chenille (continuing from main body)
Starting method: Worked directly from the 30 remaining stitches of the main body, in turned rows
📐 Construction note: You have 30 stitches and need 8 tentacles of 4 stitches each (8 × 4 = 32). The pattern does not add stitches to make up the difference. Instead: after the 4th tentacle, begin the 5th tentacle from the last stitch of the 4th tentacle. After the 8th tentacle, the final stitch is shared with the 1st stitch of the 1st tentacle. Work in turned rows throughout. Mark your Round 25 starting stitch before beginning so you can track the full loop.
For each tentacle:
Row 1: 4 sc, 1 ch, turn (4)
Rows 2–8: 4 sc, 1 ch, turn — repeat for 7 rows (4)
Row 9: 1 dec, 2 sc, 1 ch, turn (3)
Rows 10–14: 3 sc, 1 ch, turn — repeat for 5 rows (3)
Row 15: Work 1 dec through all 3 sc at once (1)
Finishing each tentacle: Sc 14 stitches along the side of the completed tentacle back to the main body. Begin the next tentacle from the next free stitch on the main body. Repeat for all 8 tentacles, noting the shared-stitch exception at tentacles 4–5 and 8–1. Once all 8 tentacles are complete, sc around the full outer edges of all tentacles to neaten. FO and cut yarn.
Part 3: Bottom Body Section (×1)
Yarn: Pink bulky chenille
Starting method: 2 ch, work 6 sc into the first ch
Row 1: 2 ch, work 6 sc into the first ch (6)
Row 2: 6 inc (12)
Row 3: (1 sc, inc) × 6 (18)
Row 4: (2 sc, inc) × 6 (24)
Row 5: (3 sc, inc) × 6 (30)
Do not fasten off. Continue directly into the bottom tentacles.
Part 4: Bottom Tentacles (×8)
Yarn: Pink bulky chenille (continuing from bottom body section)
Starting method: Worked directly from the 30 stitches of the bottom section, in turned rows
📐 Construction note: Same shared-stitch system as the purple tentacles. 30 stitches, 8 tentacles, shared stitches at the 4th–5th and 8th–1st tentacle boundaries. The finished bottom section should lie flat — do not stuff the tentacles.
For each tentacle:
Row 1: 4 sc, 1 ch, turn (4)
Rows 2–8: 4 sc, 1 ch, turn — repeat for 7 rows (4)
Row 9: 1 dec, 2 sc, 1 ch, turn (3)
Rows 10–14: 3 sc, 1 ch, turn — repeat for 5 rows (3)
Row 15: Work 1 dec through all 3 sc at once (1)
Finishing each tentacle: Sc 14 stitches along the side of the tentacle back to the bottom body. Begin the next tentacle from the next free stitch. Repeat for all 8 tentacles with the same boundary exceptions. Sc around the outer edges of all tentacles. FO and cut yarn.
🧶 Scrap Check: The pink bottom section and its 8 tentacles use the bulk of your 60g pink skein. If you’re using a different pink chenille, keep the full skein on hand — you’ll also use pink for the cheeks and the bow center.
Part 5: Suction Cups (×24)
Yarn: White (bulky or worsted weight)
Hook: 3.0mm (nearest US options: C/2 at 2.75mm or D/3 at 3.25mm)
Starting method: 2 ch, work 6 sc into the first ch
Row 1: 2 ch, work 6 sc into the first ch (6)
Finishing: FO and cut yarn, leaving a tail for sewing. Make 24 total — 3 per tentacle across all 8 pink tentacles.
🧶 Scrap Check: 24 tiny circles at 6 stitches each. This is well under 10 yards of white total. Literally any white yarn scrap you have will cover this — weight doesn’t need to match exactly since these are decorative surface pieces.
Part 6: Cheeks (×2)
Yarn: Pink (bulky chenille or similar)
Hook: 3.0mm
Starting method: 2 ch, work 4 sc into the first ch
Row 1: 2 ch, work 4 sc into the first ch (4)
Finishing: FO and cut yarn, leaving a tail for sewing. Make 2.
Part 7: Bow (×1)
Yarn: Pink DK / Light Worsted (YarnArt Jeans or similar)
Hook: 2.0mm (steel 4)
Starting method: 30 ch
Row 1: Join 30 ch into a ring, 1 turning ch (30)
Row 2: 2 sc, 3 dc, 6 tr, 3 dc, 3 sc, 3 dc, 6 tr, 3 dc, 1 sc (30)
Row 3: 2 sc, 3 dc, 6 tr, 3 dc, 3 sc, 3 dc, 6 tr, 3 dc, 1 sc (30)
Row 4: 2 sc, 3 dc, 6 tr, 3 dc, 3 sc, 3 dc, 6 tr, 3 dc, 1 sc (30)
Finishing: Cut yarn. The taller stitches (dc and tr) at the sides create the flared bow shape. Pinch the center to form the bow silhouette.
Part 8: White Bow Strip (×1)
Yarn: White DK or Light Worsted
Hook: 2.0mm (steel 4)
Starting method: 10 ch
Row 1: Join 10 ch into a ring (10)
Row 2: 10 sc (10)
Finishing: Cut yarn. This strip wraps around the bow center to cinch it into shape.
Assembly
- Join the two body halves. Place the purple main body and the pink bottom section with tentacles wrong sides together (tentacles facing outward and away from each other). Using white thread — not yarn, sew the two sections together around the edge using a basting stitch. Thread gives you a finer, less visible seam on chenille.
- Final stuffing check. Before closing completely, press the round body section gently — if there are hollow spots, add a small amount of fiberfill now. The bottom section should remain flat; the tentacles are not stuffed at all.
- Attach suction cups. Sew 3 white suction cup circles onto each of the 8 pink tentacles, spaced evenly along the inner (flat) side. 24 circles total. Use white thread to keep the attachment points invisible.
- Assemble the bow. Wrap the white strip around the center of the pink bow to cinch it. Sew to secure. Attach the finished bow to the top of the purple body.
Face Embroidery
All face details are embroidered using thread (not yarn) after assembly.
- Eye sculpting: Thread a needle with white thread. Make several parallel stitches directly below each eye, pulling them gently downward toward the center base of the body to create a subtle pull effect that shapes the face.
- Eyebrows: Using black thread, make a single diagonal stitch one row above each eye, equal in width to the eye. Angle slightly upward toward the outer edge.
- Mouth: Count 3 rows down from the bottom edge of the eyes. Using black thread, make a horizontal stitch spanning the distance between the eyes. To create a smile shape: bring your thread out from the center of the mouth one row lower, catch the horizontal stitch from behind, and secure — this pulls the center of the “mouth” downward into a subtle curve.
- Cheeks: Count 3 stitches outward from the bottom edge of each eye. Sew a pink chenille cheek circle at each point.
- Nose: From the bottom edge of the eyes, count 3 stitches inward toward center. Make a single small diagonal stitch.
💡 Stretch It Further: The two-tone body system in this free octopus amigurumi pattern is made for color play. Swap the purple for teal and the pink for coral for a completely different mood — same construction, zero extra yarn purchased. Make a purple-and-pink version, a teal-and-yellow version, and a deep navy-and-white version from a single trip through your stash. Three octopuses in a little kraft box, maybe with a handwritten tag — that’s a gift that costs almost nothing and looks like you tried very hard. Which you did, but efficiently.
Mia’s Take
About 170g of chenille total, a scrap of DK for the bow, and some white thread — that’s the full bill of materials for this one. The tentacle system is the clever part: 16 tentacles worked directly from the body edges, no seaming required, and the slight color contrast between the purple and pink halves does most of the visual work for you. This octopus is the kind of project that gets a reaction well out of proportion to the effort it took. Make it in whatever two colors you have the most of, because honestly, it’s going to look great regardless. 🧶
What yarn is best for this octopus amigurumi pattern free of charge?
Bulky (weight 5) chenille yarn like Himalaya Dolphin Baby or Bernat Baby Velvet works best for the main body to give it a soft, plush texture.
How long does it take to crochet this octopus amigurumi?
This pattern takes approximately 4 to 6 hours to complete, including the time needed to crochet and attach all 16 tentacles and 24 suction cups.
Can beginners make this octopus amigurumi pattern?
This pattern is rated at an intermediate difficulty due to the un-stuffed tentacle construction and tiny detail work, but adventurous beginners comfortable with basic stitches can certainly complete it.