The Most Precious Crochet Amigurumi Bunny You’ll Ever Make — Bunny in the Flower Garden
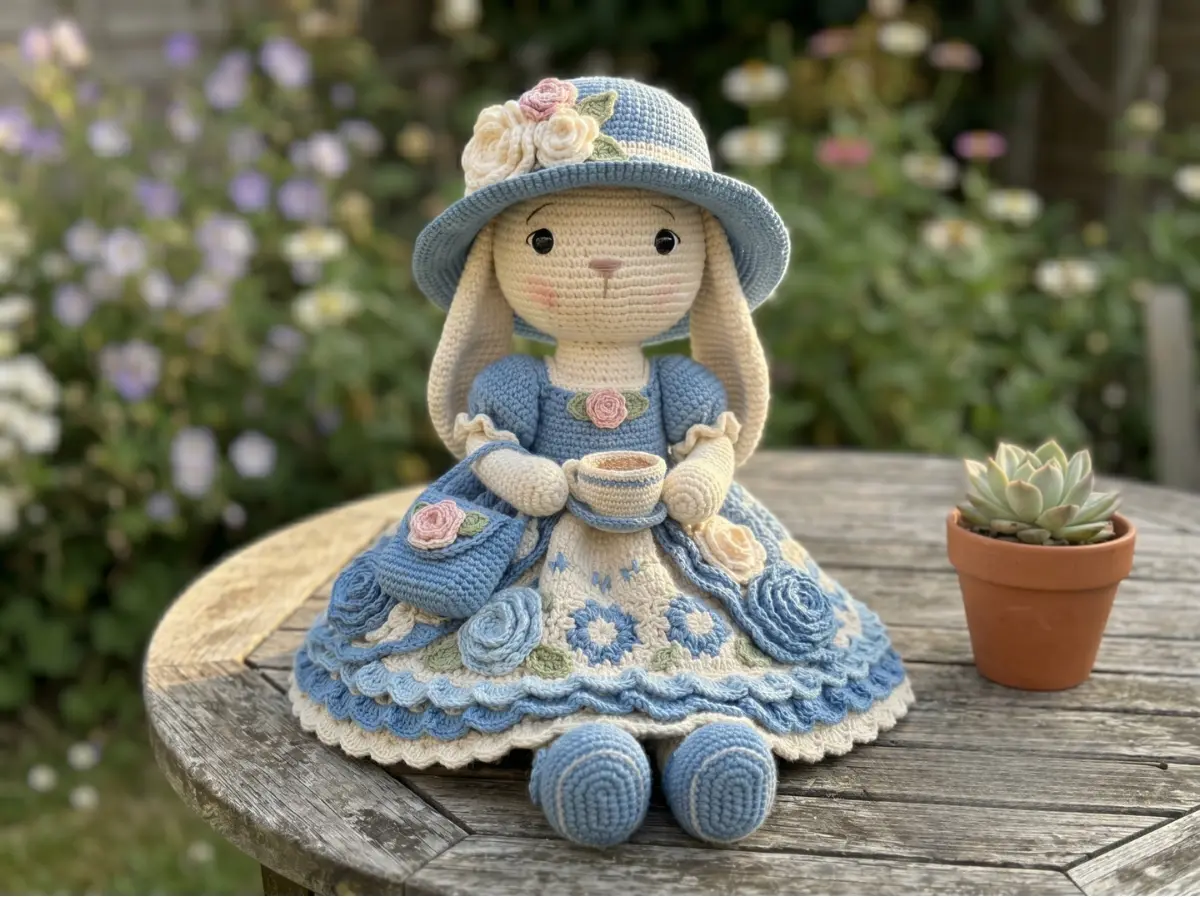
This free crochet amigurumi bunny pattern is honestly one of the most enchanting things I’ve ever had the privilege of making — two full bunny dolls dressed in the most dreamy pastel outfits, surrounded by tiny roses, ruffled skirts, miniature teacups, and even a little picnic set. The Helper Bunny wears a dusty blue pinafore with a cream petticoat peeking out, and the Picnic Bunny is dressed in the softest blush pink dress with a wide ivory hat. Both of them are somewhere between 11 and 14 inches tall, and both of them have the glossiest little safety eyes you’ve ever seen. If you’ve been looking for a crochet amigurumi bunny that feels truly special — one you’d frame if you could — this is the one. Let’s make something unforgettable together.
🩷 Pattern Highlights
- Cuteness Rating: 🩷🩷🩷🩷🩷
- Finished Size: Helper Bunny approx. 13–14 in | Picnic Bunny approx. 11–13 in
- Difficulty: Patient Beginner to Confident Advanced Beginner
- Hook Size: 2.25mm (US B/1) for main dolls; 2.0mm for tiny accessories and lace trim
- Yarn Palette: Dusty blue, soft cream, pale blue, blush pink, leaf green, ivory, warm brown
- Key Detail: Layered ruffled skirts, hand-rolled crochet roses, glossy 10mm safety eyes, and embroidered pink cheeks — this set is all about the finishing details
- Estimated Time: 15–25+ hours (this is a full doll set — take your time and love every row)
Materials for Your Crochet Amigurumi Bunny Flower Garden Set
Yarn — Helper Bunny
- Cream — Sport weight (2) or DK/Light Worsted (3) cotton; body, legs, head, ears, arms (e.g., Lion Brand 24/7 Cotton, Paintbox Cotton DK, or Drops Muskat)
- Dusty blue — same weight; shoes, pinafore bodice, bib, overskirt, hat, teacup, purse
- Pale blue — same weight; overskirt ruffle accent
- Soft blush pink — same weight; crochet roses and appliqués
- Leaf green — same weight; floral motif leaves
Yarn — Picnic Bunny
- Warm cream — Sport (2) or DK/Light Worsted (3) cotton; head, ears, arms, petticoat, map, blanket
- Blush pink — same weight; shoes, dress panels, bodice, sleeves, purse
- Ivory — same weight; hat
- Gold/mustard gold — same weight; necklace chain accent and neck trim
- White — same weight; lace trim for petticoat and sleeve ruffle
- Dark brown — same weight; trunk accessory
All yarns are classified as Sport (CYCA 2) or DK / Light Worsted (CYCA 3) — lightweight, smooth, and perfect for capturing every tiny stitch detail in these intricate outfits.
Tools and Notions
- 2.25mm (US B/1) crochet hook — main dolls
- 2.0mm hook — tiny accessories, lace, and rose trim
- 10mm black safety eyes — Helper Bunny
- 8mm black safety eyes — Picnic Bunny
- Polyester fiberfill stuffing (Poly-Fil by Fairfield, available at Joann or Michaels)
- Tapestry needle
- Stitch markers
- Sewing pins or clips
- Soft pink textile blush or chalk pastels — for embroidered cheeks
- Very thin millinery wire (optional — for poseable ears)
- Fabric glue (optional — for securing tiny rose appliqués)
Abbreviations
| Abbreviation | Meaning |
|---|---|
| mr | magic ring |
| ch | chain |
| sl st | slip stitch |
| sc | single crochet |
| hdc | half double crochet |
| dc | double crochet |
| tr | treble crochet |
| inc | increase — 2 sc in the same stitch |
| dec | invisible decrease — insert hook through front loops only of next 2 stitches simultaneously |
| BLO | back loop only |
| FLO | front loop only |
| rep | repeat |
| st / sts | stitch / stitches |
| FO | fasten off |
Before You Begin Your Crochet Amigurumi Bunny
Because this pattern is a full doll set with two bunnies and a whole world of accessories, a little bit of preparation makes everything so much more enjoyable. Here are the things I’d want you to know before you pick up your hook.
Work in continuous rounds unless instructed otherwise. Both bunnies use the standard amigurumi method — no joining, no visible seam. If you’re new to this, our guide to working in continuous rounds will make it completely clear before you begin.
The invisible decrease is everything here. With so many rounds of decreasing on the heads, bodies, and tiny accessories, clean invisible decreases keep the surface smooth and the shapes round. If you’d like a refresher, our invisible decrease tutorial shows exactly how it’s done through the front loops only — it’s the secret to that perfectly neat finish.
Take your time with the magic ring start. Nearly every part of both dolls begins with a magic ring, and closing that center hole completely is what gives these tiny pieces their perfect roundness. Our magic ring step-by-step tutorial is right here if you need it.
🩷 Chloe’s Detail Tip: For a project this detailed, I recommend sorting your yarn colors into small bags or bowls before you start. Picking up the exact right shade of “dusty blue” versus “pale blue” mid-row saves so much frogging. The palette on this set is carefully balanced — those color contrasts are what make the outfits look so polished.
Pattern — Helper Bunny
The Helper Bunny is the dreamier, more formal of the two — dusty blue pinafore, ruffled cream petticoat, a wide garden hat with rolled roses, a little purse, and tiny teacup. She’s approximately 13–14 in tall. Start with her legs and work upward.
Helper Bunny: Legs and Shoes (Make 2)
Colors: dusty blue (shoe), cream (leg) | Start with a magic ring.
Row 1: 6 sc in mr. [dusty blue] (6)
Row 2: inc in each st around. (12)
Row 3: (sc, inc) x 6. (18)
Row 4: (2 sc, inc) x 6. (24)
Row 5: BLO sc around. (24)
Row 6: 7 sc, 5 dec, 7 sc. (19)
Row 7: 5 sc, 4 dec, 6 sc. (15)
Row 8: sc around. (15)
Row 9: Change color to cream. BLO sc around. [cream] (15)
Rows 10–22: 13 rows of sc around. (15)
Strap 1: Join dusty blue to the outside of the leg opening at Row 9. Ch 6. Bring the loop across the front of the foot and sl st to the opposite side of the shoe opening. [dusty blue] (6)
Strap 2: Turn and sc 5 back along the chain. (5)
Stuff the shoe firmly. Lightly stuff the lower leg. Flatten the top opening slightly. Sew and attach the strap neatly. Add a tiny cream knot. Do not cut the yarn on the second leg.
🩷 Chloe’s Detail Tip: That little cream knot on the shoe strap is one of those tiniest details that makes the whole outfit look intentional. Don’t skip it — it takes ten seconds and it’s so sweet.
Helper Bunny: Body
Color: cream | Begins from the second leg.
Row 23: On the second leg, 15 sc, ch 3, join to the first leg, 15 sc around the first leg, 3 sc along the other side of the chain. (36)
Row 24: sc around. (36)
Row 25: (5 sc, inc) x 6. (42)
Rows 26–29: 4 rows of sc around. (42)
Row 30: (5 sc, dec) x 6. (36)
Row 31: sc around. (36)
Row 32: (4 sc, dec) x 6. (30)
Row 33: sc around. (30)
Row 34: (3 sc, dec) x 6. (24)
Row 35: sc around. (24)
Row 36: BLO sc around. (24)
Row 37: (2 sc, dec) x 6. (18)
Row 38: sc around. (18)
Row 39: (sc, dec) x 6. (12)
Stuff the hips firmly; leave the upper chest slightly softer. FO, leaving a long yarn tail for sewing the body to the head later.
Helper Bunny: Head
Color: cream | Start with a magic ring.
Row 1: 6 sc in mr. (6)
Row 2: inc in each st around. (12)
Row 3: (sc, inc) x 6. (18)
Row 4: (2 sc, inc) x 6. (24)
Row 5: (3 sc, inc) x 6. (30)
Row 6: (4 sc, inc) x 6. (36)
Row 7: (5 sc, inc) x 6. (42)
Row 8: (6 sc, inc) x 6. (48)
Row 9: (7 sc, inc) x 6. (54)
Rows 10–20: 11 rows of sc around. (54)
Insert 10mm safety eyes between rows 16 and 17, with 11 stitches between them. This is the moment — hold the head up to a lamp before you press those washers in and make sure they’re perfectly level.
Row 21: (7 sc, dec) x 6. (48)
Row 22: sc around. (48)
Row 23: (6 sc, dec) x 6. (42)
Row 24: (5 sc, dec) x 6. (36)
Row 25: (4 sc, dec) x 6. (30)
Row 26: (3 sc, dec) x 6. (24)
Row 27: (2 sc, dec) x 6. (18)
Row 28: (sc, dec) x 6. (12)
Row 29: dec x 6. (6)
Stuff firmly. FO and close the head.
Helper Bunny: Ears (Make 2)
Color: cream | Start with a magic ring.
Row 1: 6 sc in mr. (6)
Row 2: sc around. (6)
Row 3: (sc, inc) x 3. (9)
Row 4: sc around. (9)
Row 5: (2 sc, inc) x 3. (12)
Rows 6–7: sc around. (12)
Row 8: (3 sc, inc) x 3. (15)
Rows 9–10: sc around. (15)
Row 11: (4 sc, inc) x 3. (18)
Rows 12–28: 17 rows of sc around. (18)
Add just a little stuffing to the bottom 4–5 rows only; leave the rest unstuffed. Flatten the top opening.
Helper Bunny: Arms (Make 2)
Color: cream | Start with a magic ring.
Row 1: 6 sc in mr. (6)
Row 2: (sc, inc) x 3. (9)
Rows 3–13: 11 rows of sc around. (9)
Stuff only the hand and forearm. Flatten the top part and secure with 4 sc through both layers. FO, leaving a long yarn tail.
Helper Bunny: Puff Sleeve Covers (Make 2)
Colors: dusty blue, cream | Start with a chain.
Row 1: Ch 18, join carefully, sc around. (18)
Row 2: (2 sc, inc) x 6. (24)
Row 3: sc around. (24)
Row 4: (3 sc, inc) x 6. (30)
Row 5: sc around. (30)
Ruffle: (sl st in next st, 2 hdc in next st) around. [cream]
Slide each cover onto a completed arm before sewing.
Helper Bunny: Bodice Waistband
Color: dusty blue | Join to Row 36 of body (the BLO row).
Row 1: sc around the waist. (24)
Row 2: sc around. (24)
Helper Bunny: Front Bib and Shoulder Straps
Colors: dusty blue, cream | Join to the front 12 sts of the waistband.
Row 1: Join dusty blue to the first marked front st, sc across 12 sts. (12)
Rows 2–6: ch 1, turn, sc to the end of the row. (12)
Strap Left: Row 7 — sc in first 4 sts only. Turn. Work 5 more rows of 4 sc. (4)
Strap Right: Join yarn to the last 4 sts of Row 6. Work 6 rows of 4 sc. (4)
Edging: Work one row of sl st or surface sl st along the top edge of the bib and straps. [cream]
Sew the straps to the waistband at the back.
Helper Bunny: Petticoat / Underskirt
Color: cream | Join to waist, under the waistband.
Row 1: sc around. (24)
Row 2: (3 sc, inc) x 6. (30)
Row 3: sc around. (30)
Row 4: (4 sc, inc) x 6. (36)
Row 5: sc around. (36)
Row 6: (5 sc, inc) x 6. (42)
Row 7: sc around. (42)
Row 8: (6 sc, inc) x 6. (48)
Row 9: sc around. (48)
Row 10: (7 sc, inc) x 6. (54)
Row 11: sc around. (54)
Row 12: (8 sc, inc) x 6. (60)
Row 13: sc around. (60)
Row 14: (9 sc, inc) x 6. (66)
Row 15: sc around. (66)
Row 16: (10 sc, inc) x 6. (72)
Rows 17–18: sc around. (72)
Do not fasten off — continue to the Petticoat Hem Trim.
Helper Bunny: Petticoat Hem Trim
Color: cream | Continuation of petticoat.
Row 1: Work 2 sc in each st around the last row. (144)
Row 2: (Skip 1 st, 5 dc in next st, skip 1 st, sl st in next st) around.
🩷 Chloe’s Detail Tip: That shell-stitch hem is where the cream petticoat really starts to look like something from a dollhouse. Work it slowly and evenly — the scallops should all be the same size. If yours looks a little uneven, blocking with a light mist of water fixes it beautifully.
Helper Bunny: Blue Floral Motifs (Make 5) and Leaves (Make 10)
Colors: dusty blue (flowers), leaf green (leaves)
Flower: In mr — (ch 2, 2 dc, ch 2, sl st) 5 times. [dusty blue] Pull ring tight. FO.
Leaf 1: Ch 5. [leaf green]
Leaf 2: Starting from second ch from hook: sl st, sc, hdc, sl st. FO.
Sew flowers and leaves to the center front hem of the cream petticoat.
Helper Bunny: Blue Overskirt
Colors: dusty blue, pale blue, cream | Join to waist (18 sts).
Row 1: sc across all 18 sts. (18)
Row 2: ch 1, turn, inc, sc to last st, inc. (20)
Row 3: sc across. (20)
Row 4: inc, sc to last st, inc. (22)
Row 5: sc across. (22)
Row 6: inc, sc to last st, inc. (24)
Row 7: sc across. (24)
Row 8: inc, sc to last st, inc. (26)
Row 9: sc across. (26)
Row 10: inc, sc to last st, inc. (28)
Row 11: sc across. (28)
Row 12: inc, sc to last st, inc. (30)
Row 13: sc across. (30)
Row 14: inc, sc to last st, inc. (32)
Row 15: sc across. (32)
Row 16: inc, sc to last st, inc. (34)
Rows 17–18: sc across. (34)
Ruffle 1: Work 2 sc in each st evenly across the bottom. [pale blue]
Ruffle 2: (Skip 1 st, 5 dc in next st, skip 1 st, sl st in next st) across. [pale blue]
Ruffle 3: (skip 1 st, 3 hdc in next st, skip 1 st, sl st in next st). [cream]
FO. The three-layer ruffle in pale blue and cream is what makes this overskirt so dreamy — take your time layering each one.
Helper Bunny: Roses and Leaves (Appliqués)
Colors: soft pink (roses), leaf green (leaves) | Start with a chain.
Small Rose 1: Ch 19. [soft pink]
Small Rose 2: Starting from second ch from hook — 2 sc in next 4 sts, 2 hdc in next 5 sts, 2 dc in next 6 sts, 3 dc in remaining 3 sts.
Large Rose 1: Ch 31.
Large Rose 2: Starting from second ch from hook — 2 sc in next 5 sts, 2 hdc in next 8 sts, 2 dc in next 10 sts, 3 dc in last 7 sts.
Leaves 1: Ch 7. [leaf green]
Leaves 2: Starting from second ch from hook: sl st, sc, hdc, dc, hdc, sc.
Leaves 3: Work opposite side of chain: sc, hdc, dc, hdc, sc.
FO with a long tail. Roll each rose tightly from the narrow end and sew through the base to secure. Attach leaves underneath each rose.
Helper Bunny: Purse
Color: dusty blue | Start with a chain.
Row 1: Ch 11, sc in second ch from hook and across. (10)
Rows 2–8: ch 1, turn, sc to the end of the row. (10)
Row 9: ch 1, turn, dec, 6 sc, dec. (8)
Row 10: ch 1, turn, sc to the end of the row. (8)
Row 11: ch 1, turn, dec, 4 sc, dec. (6)
Back: In Ch 11, work 8 rows of 10 sc. (10)
Strap 1: Ch 24.
Strap 2: Starting from second ch from hook, sl st back across the chain for a sturdy strap.
FO. Sew the front to the back.
Helper Bunny: Hat
Colors: dusty blue, cream (ribbon), soft pink (roses) | Start with a magic ring.
Row 1: 6 sc in mr. [dusty blue] (6)
Row 2: inc around. (12)
Row 3: (sc, inc) x 6. (18)
Row 4: (2 sc, inc) x 6. (24)
Row 5: (3 sc, inc) x 6. (30)
Row 6: (4 sc, inc) x 6. (36)
Row 7: (5 sc, inc) x 6. (42)
Row 8: (6 sc, inc) x 6. (48)
Row 9: (7 sc, inc) x 6. (54)
Row 10: (8 sc, inc) x 6. (60)
Rows 11–17: sc around. (60)
Row 18: BLO sc around. (60)
Row 19: sc around. (60)
Row 20: (9 sc, inc) x 6. (66)
Row 21: sc around. (66)
Row 22: (10 sc, inc) x 6. (72)
Rows 23–25: sc around. (72)
Hat Rose 1: Ch 25. [cream or soft pink]
Hat Rose 2: Starting from second ch from hook — 2 sc in next 4 sts, 2 hdc in next 6 sts, 2 dc in next 8 sts, 3 dc in last 6 sts.
FO. Attach the cream ribbon with surface sl st around the hat band. Roll the roses and sew them to the hat band.
Helper Bunny: Teacup
Colors: cream, dusty blue | Start with a magic ring.
Row 1: 6 sc in mr. [cream] (6)
Row 2: inc around. (12)
Row 3: BLO sc around. (12)
Rows 4–5: sc around. (12)
Row 6: Change color to dusty blue, sc around. [dusty blue] (12)
Row 7: Change color to cream, sc around. [cream] (12)
Handle 1: Ch 5.
Handle 2: Starting from second ch from hook, sl st back along the chain.
FO. Sew the handle to the side of the cup.
Helper Bunny: Mini Props — Basket and Cupcake
Colors: warm brown (basket), dusty blue (cupcake base), white (cupcake top)
Basket Row 1: 6 sc in mr. [warm brown] (6)
Basket Row 2: inc around. (12)
Basket Row 3: BLO sc around. (12)
Basket Rows 4–5: sc around. (12)
Basket Handle: Ch 8. sl st back along the chain.
Cupcake Base Row 1: 6 sc in mr. [dusty blue] (6)
Cupcake Base Row 2: inc around. (12)
Cupcake Base Rows 3–4: sc around. (12)
Cupcake Top Row 1: 6 sc in mr. [white] (6)
Cupcake Top Row 2: inc around. (12)
Cupcake Top Row 3: (sc, inc) x 6. (18)
Sew the cupcake top to the base. Attach basket handle. These tiny props are the whole personality of this doll — don’t rush them.
Pattern — Picnic Bunny
The Picnic Bunny is a little more relaxed in spirit — she’s heading to a meadow with her trunk, a map, a blanket, and the most gorgeous blush pink dress you’ve ever crocheted. She’s approximately 11–13 in tall.
Picnic Bunny: Legs and Body
Colors: pink (shoes), cream (legs and body) | Start with a magic ring.
Legs Row 1: 6 sc in mr. [pink] (6)
Legs Row 2: inc around. (12)
Legs Row 3: (sc, inc) x 6. (18)
Legs Row 4: sc around. (18)
Legs Row 5: 5 sc, 4 dec, 5 sc. (14)
Legs Row 6: BLO sc around. (14)
Legs Row 7: Change color to cream, sc around. [cream] (14)
Legs Row 8: sc around. (14)
Legs Row 9: 5 sc, dec, 7 sc. (13)
Legs Row 10: sc around. (13)
Legs Row 11: 4 sc, dec, 7 sc. (12)
Legs Rows 12–20: sc around. (12)
Body Row 21: Ch 4 and join the second leg to the first leg, sc in the first leg, 12 sc around the first leg, 4 sc along the chain, 12 sc around the second leg, 4 sc on the opposite side of the chain. (32)
Body Row 22: 12 sc, inc, 2 sc, inc, 12 sc, inc, 2 sc, inc. (36)
Body Row 23: sc around. (36)
Body Row 24: (8 sc, inc) x 4. (40)
Body Row 25: sc around. (40)
Body Row 26: (8 sc, dec) x 4. (36)
Body Row 27: sc around. (36)
Body Row 28: (7 sc, dec) x 4. (32)
Body Row 29: sc around. (32)
Body Row 30: (6 sc, dec) x 4. (28)
Body Row 31: sc around. (28)
Body Row 32: (5 sc, dec) x 4. (24)
Body Row 33: sc around. (24)
Body Row 34: BLO sc around. (24)
Body Rows 35–38: sc around. (24)
Body Row 39: (4 sc, dec) x 4. (20)
Body Row 40: sc around. (20)
Picnic Bunny: Neck
Color: gold or cream
Neck Row 41: With gold or cream yarn, BLO sc around. (20)
Neck Row 42: sc around. (20)
Neck Row 43: (3 sc, dec) x 4. (16)
Neck Row 44: sc around. (16)
Picnic Bunny: Head
Color: cream | Start fresh with a magic ring.
Head Row 1: 6 sc in mr. (6)
Head Row 2: inc around. (12)
Head Row 3: (sc, inc) x 6. (18)
Head Row 4: (2 sc, inc) x 6. (24)
Head Row 5: (3 sc, inc) x 6. (30)
Head Row 6: (4 sc, inc) x 6. (36)
Head Row 7: (5 sc, inc) x 6. (42)
Head Row 8: (6 sc, inc) x 6. (48)
Head Row 9: (7 sc, inc) x 6. (54)
Head Rows 10–18: sc around. (54)
Insert 8mm safety eyes between rows 13 and 14, with 11 visible stitches between them. Spend a moment here — check the placement from the front before pressing the washers in.
Head Row 19: (7 sc, dec) x 6. (48)
Head Row 20: sc around. (48)
Head Row 21: (6 sc, dec) x 6. (42)
Head Row 22: (5 sc, dec) x 6. (36)
Head Row 23: (4 sc, dec) x 6. (30)
Head Row 24: (3 sc, dec) x 6. (24)
Head Row 25: (2 sc, dec) x 6. (18)
Head Row 26: (sc, dec) x 6. (12)
Head Row 27: dec around. (6)
Stuff firmly. FO and close.
Picnic Bunny: Ears (Make 2)
Color: cream | Start with a magic ring.
Row 1: 6 sc in mr. (6)
Row 2: inc around. (12)
Row 3: (sc, inc) x 6. (18)
Row 4: (2 sc, inc) x 6. (24)
Rows 5–8: sc around. (24)
Row 9: (10 sc, dec) x 2. (22)
Rows 10–14: sc around. (22)
Row 15: (9 sc, dec) x 2. (20)
Rows 16–22: sc around. (20)
Row 23: (8 sc, dec) x 2. (18)
Rows 24–30: sc around. (18)
Flatten and sew closed. These ears are longer and wider than the Helper Bunny’s — they’re meant to hang gracefully from under the hat.
Picnic Bunny: Arms (Make 2)
Colors: cream (arm), pink (sleeve cuff) | Start with a magic ring.
Row 1: 6 sc in mr. [cream] (6)
Row 2: (sc, inc) x 3. (9)
Row 3: sc around. (9)
Row 4: 2 sc, inc, 6 sc. (10)
Rows 5–8: sc around. (10)
Row 9: dec, 8 sc. (9)
Row 10: sc around. (9)
Row 11: At the end of the row change color to pink, sc around. [pink] (9)
Row 12: BLO sc around. (9)
Rows 13–18: sc around. (9)
Flatten the top and sew closed.
Picnic Bunny: Dress — Petticoat
Colors: cream, white (lace) | Attach yarn to body at the BLO row (Row 34).
Petticoat Row 1: Attach cream yarn and work (2 sc in each st) around. [cream] (48)
Petticoat Row 2: (7 sc, inc) x 6. (54)
Petticoat Row 3: sc around. (54)
Petticoat Row 4: (8 sc, inc) x 6. (60)
Petticoat Rows 5–8: sc around. (60)
Lace Row 1: (sc, ch 2) around, sl st. [white]
Lace Row 2: In each ch-2 space work (sc, hdc, 3 dc, hdc, sc).
This lace hem is the most delicate thing. Work it slowly — each little fan should be crisp and even. The white against the cream is so pretty.
Picnic Bunny: Dress — Panels (Make 2)
Color: blush pink | Start with a chain.
Panel Row 0: Ch 20. [pink]
Panel Row 1: Starting from second ch from hook, 19 sc, ch 1, turn. (19)
Panel Row 2: inc, 17 sc, inc, ch 1, turn. (21)
Panel Row 3: 21 sc, ch 1, turn. (21)
Panel Row 4: inc, 19 sc, inc, ch 1, turn. (23)
Panel Row 5: 23 sc, ch 1, turn. (23)
Panel Row 6: inc, 21 sc, inc, ch 1, turn. (25)
Panel Rows 7–16: 25 sc, ch 1, turn. (25)
Panel Row 17: dec, 21 sc, dec, ch 1, turn. (23)
Panel Row 18: 23 sc, ch 1, turn. (23)
Panel Row 19: dec, 19 sc, dec, ch 1, turn. (21)
Panel Row 20: 21 sc, FO. (21)
Add one row of gold trim along each panel edge. Secure panels only at the waist so the front stays open — that open-front drape is what gives this dress its elegance.
Picnic Bunny: Dress — Bodice
Color: blush pink
Bodice Row 0: Ch 12. [pink]
Bodice Row 1: 11 sc, ch 1, turn. (11)
Bodice Rows 2–8: 11 sc, ch 1, turn. (11)
Picnic Bunny: Dress — Sleeves (Make 2)
Colors: blush pink, white (ruffle)
Sleeves Row 1: 12 sc in mr. [pink] (12)
Sleeves Row 2: (sc, inc) x 6. (18)
Sleeves Row 3: sc around. (18)
Sleeves Row 4: FLO sc around. (18)
Sleeves Row 5: (sc, dec) x 6. (12)
Weave a white ruffle into the front loops left behind from Row 4. That tiny white ruffle at the sleeve cuff is everything.
Picnic Bunny: Hat
Color: ivory | Start with a magic ring.
Row 1: 6 sc in mr. (6)
Row 2: inc around. (12)
Row 3: (sc, inc) x 6. (18)
Row 4: (2 sc, inc) x 6. (24)
Row 5: (3 sc, inc) x 6. (30)
Row 6: (4 sc, inc) x 6. (36)
Row 7: (5 sc, inc) x 6. (42)
Rows 8–14: sc around. (42)
Row 15: FLO, (6 sc, inc) x 6. (48)
Row 16: sc around. (48)
Row 17: (7 sc, inc) x 6. (54)
Row 18: sc around. (54)
Row 19: (8 sc, inc) x 6. (60)
Row 20: sc around. (60)
Row 21: (9 sc, inc) x 6. (66)
Row 22: sc around. (66)
Row 23: (10 sc, inc) x 6. (72)
Row 24: sc around. (72)
This wide-brimmed ivory hat is what gives the Picnic Bunny her whole garden-party feeling. The FLO at Row 15 creates that clean line where the crown meets the brim.
Picnic Bunny: Accessories
Colors: blush pink (purse), cream (map, blanket), dark brown (trunk)
Purse Row 0: Ch 9. [pink]
Purse Row 1: Starting from second ch, 7 sc, 3 sc in last ch, 6 sc on the opposite side, 2 sc in first ch. (18)
Purse Row 2: inc, 6 sc, 3 inc, 6 sc, 2 inc. (24)
Purse Rows 3–6: sc around. (24)
Flap Row 1: 12 sc across front half, ch 1, turn. (12)
Flap Rows 2–4: 12 sc, ch 1, turn. (12)
Flap Row 5: dec, 8 sc, dec, ch 1, turn. (10)
Flap Row 6: 10 sc, ch 1, turn. (10)
Flap Row 7: dec, 6 sc, dec. (8)
Map Row 0: Ch 13. [cream]
Map Rows 1–10: 12 sc, ch 1, turn. (12)
Trunk Row 0: Ch 11. [dark brown]
Trunk Row 1: Starting from second ch, 9 sc, 3 sc in last ch, 8 sc on the opposite side, 2 sc in first ch. (22)
Trunk Row 2: inc, 8 sc, 3 inc, 8 sc, 2 inc. (28)
Trunk Rows 3–7: sc around. (28)
Blanket Row 0: Ch 18. [cream]
Blanket Rows 1–8: 17 sc, ch 1, turn. (17)
Assembly
Helper Bunny Assembly
- Sew the head to the body.
- Sew the ears to the head approximately between rows 8 and 10 of the head, positioned slightly behind the eye line.
- Sew the arms to the sides of the upper body. Slide the puff sleeve covers onto the arms and sew them in place.
- Sew both arms inward so they curve together around the teacup — this is one of those positioning details that gives her so much personality.
- Sew the bodice bib and straps to the main piece; sew straps to the back waistband.
- Sew and shape the petticoat.
- Sew the blue overskirt over the petticoat, leaving the cream front section visible. Add ruffles, rose swirls, and floral motifs last.
- Sew the purse to her left side.
- Place the hat low on her head so it frames her face, and sew it in place.
Picnic Bunny Assembly
- Sew the head to the body so the face is centered directly above the feet.
- Attach the ears high and slightly back — they should hang naturally from under the hat’s brim.
- Sew the sleeves just below the puff point and angle them slightly forward so she looks like she’s reaching for something.
- Secure the dress panels only at the waist so the front remains open and draped. Add flower appliqués last, after all structural sewing is done.
- Position the hat at a very slight angle and secure with stitches in two or three inconspicuous places.
- Attach the map to one arm and hang the purse on the other.
For a detailed guide on getting every seam neat and invisible, our guide to sewing amigurumi parts together is full of tips that are especially useful for multi-piece dolls like these.
Making Your Crochet Amigurumi Bunny Extra Cute — The Finishing Details
This is the part I live for. The whole point of a pattern this detailed is what happens in these final minutes. The faces, the cheeks, the decorative trim — this is where your bunnies go from finished to unforgettable.
Helper Bunny Face
Between rows 20 and 21 of her head, embroider a small pink triangular nose — the point facing downward. Add a short vertical line down from the nose tip and a slight curve on each side for a soft smile. Embroider thin black eyebrows just above the safety eyes. Apply a gentle blush of soft pink chalk or textile paste under each eye, blending with your fingertip in a soft circular motion.
Picnic Bunny Face
Embroider the nose in soft pink as a small inverted triangle. Add thin curved brown or beige eyebrows — keep them soft and arched, not sharp. Apply the same gentle blush under both eyes. The Picnic Bunny’s expression should feel a little dreamier, a little more wide-eyed with wonder.
🩷 Chloe’s Detail Tip: For the blush cheeks on both bunnies, apply your pink chalk or paste very lightly at first — you can always add more, but you can’t take it away. I use a tiny flat brush and apply in a soft downward-sweeping motion from just under the eye. The effect should look like she just came in from a morning in the garden.
Safety Eye Symmetry
Before you press the washers onto either bunny’s safety eyes, hold the head at arm’s length and look at it straight on. Then tip it slightly left, then right. The eyes should look perfectly level from every angle. I use a strip of masking tape between the two eye positions as a guide — it makes such a difference. Once those washers click in, there’s no going back, so take your extra thirty seconds now.
Decorative Trim — Picnic Bunny
- Necklace: With gold thread, crochet a small chain around the neck. Add a tiny rolled pink rose as a pendant — the same technique as the hat roses, just even tinier.
- Bodice embroidery: Embroider a row of tiny white French knots across the bodice for a delicate buds effect.
- Shoes: Use pink yarn to neatly embroider around each shoe opening and add a small horizontal stitch at the front — it gives the impression of a little bow.
- Gold surface trim: Work a surface sl st with gold thread along the neckline, bodice seams, skirt panel edges, bag flap, and hat ribbon. This is the detail that ties the whole palette together.
Color Variation Ideas
The Helper Bunny’s dusty blue and cream combination is classic and soft. But imagine her in sage green and ivory, or lavender and white. The Picnic Bunny’s blush pink is gorgeous, but she’d be equally dreamy in peach and cream, or in a soft marigold yellow with ivory trim. The rose appliqués look beautiful in any of these palettes — just keep the roses one shade deeper than the main dress color for that pretty contrast.
If you loved making this crochet amigurumi bunny set, our free bunny amigurumi pattern is a slightly simpler single bunny that’s perfect for practicing the same shapes, and our sweet little amigurumi bunny is a wonderful companion piece with a slightly different aesthetic.
Chloe’s Final Look
I genuinely cannot stop looking at these two finished together. The Helper Bunny with her teacup and her ruffled cream hem peeking out from under the blue overskirt. The Picnic Bunny with her wide ivory hat tipped just so, map in hand, purse on her arm, ready for the most enchanting picnic in the most imaginary garden. The glossy eyes, the pink cheeks, the rolled roses — every single detail earned its place. Display them on a shelf side by side if you can, or nestle them into a little basket together. Either way, you made something genuinely precious. That’s not nothing — that’s everything. 🩷
What yarn is best for this crochet amigurumi bunny set?
Sport (CYCA 2) or DK/Light Worsted (CYCA 3) cotton yarn is ideal for capturing the tiny stitch details, crisp ruffles, and clean lines in these intricate outfits.
How long does it take to crochet this amigurumi bunny set?
This is a full, highly detailed doll set. You should expect to spend an estimated 15 to 25+ hours to complete both bunnies and all of their accessories.
Can beginners make this amigurumi bunny pattern?
This pattern is best suited for patient beginners to confident advanced beginners who are comfortable with continuous rounds, invisible decreases, and attaching very small details.