The Sweetest Little Bear in a Dress You’ll Ever Make
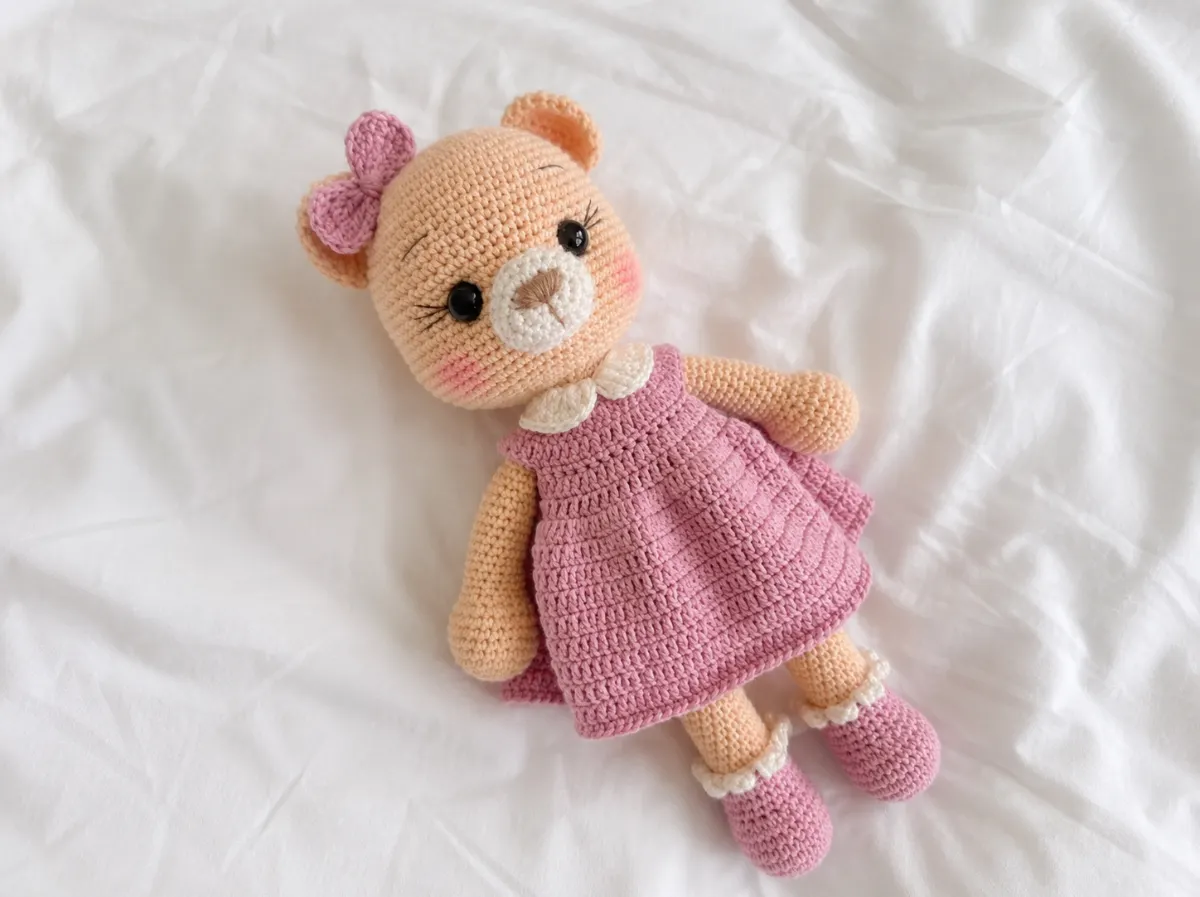
This free crochet bear pattern creates the most precious little bear imaginable — warm caramel fur, a beautifully flouncy blush-pink dress that blooms out from a fitted yoke, a dainty bow at the neckline, and those 10mm glossy eyes that make her look like she has actual feelings. She’s about 8 inches tall, solid and squishy, and every single detail on her — the rounded muzzle, the soft ears, the picot-edged hem — has been designed to be just a little bit heartbreaking in the best way. Let me show you how she comes together.
🩷 Pattern Highlights
- Cuteness Rating: 🩷🩷🩷🩷🩷
- Finished Size: approx. 8 in (20 cm) tall
- Difficulty: Intermediate
- Hook Size: 2.5mm (approx. US C/2)
- Yarn Palette: warm caramel, soft blush pink (or dusty lavender), optional accent for bow
- Key Detail: top-down flouncy dress, 10mm glossy safety eyes at Row 17, embroidered pink blush cheeks, picot hem edging
- Estimated Time: 5–7 hours
What You Need for This Free Crochet Bear Pattern
The whole character of this bear lives in her color palette — getting those shades right is half the magic. Here’s everything you’ll need to bring her to life:
- Yarn A — Bear body: Fingering weight (weight 1), warm caramel or honey tan — that soft, biscuit-y shade that reads exactly like a classic teddy bear. Approx. 150–200 yds.
- Yarn B — Dress: Fingering weight (weight 1), soft blush pink, dusty lavender, or powder blue — your favourite pastel. The dress is substantial, so budget approx. 100–150 yds.
- Yarn B accent (optional): A slightly deeper or contrasting pastel for the bow, if you’d like it to stand out from the dress.
- Hook: 2.5mm (approx. US C/2) — tight enough to keep the stuffing completely hidden and every stitch crisp and defined
- Safety eyes: Two 10mm black safety eyes — glossy finish, because those liquid-dark pupils are everything
- Polyfill stuffing: Poly-Fil or similar polyester fiberfill, available at Joann, Michaels, or Hobby Lobby
- Stitch markers: At least 2 — one for the round beginning and one to pre-mark the eye positions at Row 17
- Tapestry needle: For sewing parts together and weaving in ends
- Pink embroidery floss or thin yarn: For the blush cheeks — the most important detail on the whole bear
- Scissors
Fingering weight is classified as weight 1 by the Craft Yarn Council — lightweight, smooth, and perfect for showing off every tiny stitch detail on small-scale amigurumi.
Abbreviations Used in This Free Crochet Bear Pattern
| Abbreviation | Meaning |
|---|---|
| sc | Single crochet |
| inc | Increase — 2 sc worked into the same stitch |
| inv dec | Invisible decrease — insert hook through front loops only of next 2 stitches simultaneously, yarn over, pull through, yarn over, pull through 2 loops |
| dc | Double crochet |
| dc-inc | Double crochet increase — 2 dc worked into the same stitch |
| mr | Magic ring |
| ch | Chain |
| sl st | Slip stitch |
| FO | Fasten off |
🩷 Chloe’s Detail Tip: All decreases in the bear’s body parts are worked as invisible decreases — insert your hook through the front loops only of the next two stitches simultaneously before completing the stitch. This keeps the surface smooth and gapless. It’s the single technique that separates a great amigurumi from a truly polished one. If you’d like to master it before you begin, our invisible decrease tutorial walks through it step by step with photos.
Before You Begin — Three Things That Will Make Her Extra Precious
Before you start, a few things are worth knowing about this particular pattern. The finishing details carry a lot of the cuteness weight here, and a little planning goes a long way.
1. All body parts are worked in continuous rounds. Every amigurumi piece (except the dress) is worked in a continuous spiral without joining at the end of each round. Place a stitch marker at the first stitch of every round and move it up as you work — this is what gives amigurumi that seamless, rounded shape. If you’re new to this method, our guide to working in continuous rounds explains everything clearly.
2. The safety eyes go in at Row 17 — plan ahead. The 10mm safety eyes are installed in Row 17 of the head, positioned 8 stitches apart. I always mark both positions with stitch markers first, hold the head in front of a mirror, and check they’re perfectly level before I touch the actual eyes. Once the washers click into place inside the head, there is no going back. Take those extra thirty seconds. Our safety eyes attachment tutorial has all the positioning guidance you need.
3. The dress is worked top-down — and it’s brilliant. You start with the yoke (the fitted upper portion), work chain-5 bridges to create the armhole openings, then in a single dramatic row the skirt triples in stitch count and blooms out into a full, sweeping flounce. It’s easier than it sounds, and the moment that skirt opens up is genuinely one of the most satisfying moments in this whole project.
Free Crochet Bear Pattern — Complete Instructions
Head (×1) — Yarn A, warm caramel
Start with your magic ring. If you’ve never worked one before, our magic ring tutorial shows you exactly how — it’s the key to a clean, closed center on every round piece you’ll ever make. The head is the largest piece and the one that carries the whole expression, so take your time with the increases. Watch the shape bloom with every round.
Row 1: 6 sc in mr (6)
Row 2: 6 inc (12)
Row 3: (1 sc, inc)*6 (18)
Row 4: (2 sc, inc)*6 (24)
Row 5: (3 sc, inc)*6 (30)
Row 6: (4 sc, inc)*6 (36)
Row 7: (5 sc, inc)*6 (42)
Row 8: (6 sc, inc)*6 (48)
Row 9: (7 sc, inc)*6 (54)
Row 10: (8 sc, inc)*6 (60)
Row 11: (9 sc, inc)*6 (66)
Rows 12–22: 66 sc (11 rows) (66)
🩷 Eye placement — do this now, in Row 17: As you complete Row 17 (six rows into the straight section), place stitch markers at your two eye positions — 8 stitches apart, centered on the face. Hold the head at arm’s length and look at it from directly in front. Both markers should sit at exactly the same height. Once you’re happy, insert the 10mm safety eyes and press the washers firmly on the inside. Add a little stuffing at this point to give the head its shape — it makes the symmetry check so much easier.
Row 23: (9 sc, inv dec)*6 (60)
Row 24: (8 sc, inv dec)*6 (54)
Row 25: (7 sc, inv dec)*6 (48)
Row 26: (6 sc, inv dec)*6 (42)
Row 27: (5 sc, inv dec)*6 (36)
Row 28: (4 sc, inv dec)*6 (30)
Row 29: (3 sc, inv dec)*6 (24)
Row 30: (2 sc, inv dec)*6 (18)
Row 31: (1 sc, inv dec)*6 (12)
Finish stuffing the head firmly and evenly before the opening closes too much to reach inside comfortably. Fasten off, leaving a long tail for sewing to the body later.
Muzzle (×1) — Yarn A, warm caramel
The muzzle gives this little bear her soft, slightly pouty expression. The slip stitch section at Row 6 creates a natural flat edge along the bottom of the oval — that’s the part you’ll position downward when you sew her to the face. This is where her personality starts to emerge.
Row 1: 6 sc in mr (6)
Row 2: 6 inc (12)
Row 3: (1 sc, inc)*6 (18)
Row 4: (2 sc, inc)*6 (24)
Row 5: 3 inc, 9 sc, 3 inc, 9 sc (30)
Row 6: 22 sc, 8 sl st (30)
Fasten off, leaving a long tail for sewing. The slip stitch section creates the flat bottom edge — orient this downward when attaching the muzzle to the face.
Ears (×2) — Yarn A, warm caramel
Round, full, classic teddy bear ears. They don’t need to be stuffed — just flattened slightly and sewn flat to the head. Make two identical pieces.
Row 1: 6 sc in mr (6)
Row 2: 6 inc (12)
Row 3: (1 sc, inc)*6 (18)
Row 4: (2 sc, inc)*6 (24)
Rows 5–6: 24 sc (24)
Do not stuff. Fasten off, leaving a long tail for sewing. Pinch the ear very gently at the base before sewing — it creates a subtle cupped shape that looks incredibly natural against the head.
Legs and Body (×1) — Yarn A, warm caramel
This is the most involved piece — the legs and body are all worked as one continuous construction, which gives the finished bear a beautifully solid, unified shape. You make two legs separately, then join them at Row 26 with a chain bridge and crochet the body upward from there. It sounds more complicated than it is, and the moment the two legs connect and you start building the body is genuinely exciting.
Make the first leg and fasten off after Row 25. Make the second leg identically, but do not fasten off — continue directly to Row 26 to join the legs and begin the body.
Row 1: 6 sc in mr (6)
Row 2: 6 inc (12)
Row 3: (1 sc, inc)*6 (18)
Row 4: (2 sc, inc)*6 (24)
Row 5: (3 sc, inc)*6 (30)
Rows 6–8: 30 sc (30)
Row 9: 9 sc, 6 inv dec, 9 sc (24)
Row 10: (2 sc, 1 inv dec)*6 (18)
Row 11: 2 sc, (1 inv dec, 1 sc)*3, 7 sc (15)
Rows 12–25: 15 sc (14 rows) (15)
🩷 Joining the legs: Fasten off and leave a tail on the first leg. For the second leg, do not cut the yarn. You’ll chain 3 from the last stitch of the second leg, then join across to the first leg to begin the body. The 3-chain bridge becomes the inner join between the legs — 3 sc along each side of that bridge will be included in Row 26’s stitch count.
Row 26: Ch 3 from the last stitch of the second leg. Join to the first leg and crochet 15 sc along it, 3 sc along the chain bridge, 15 sc along the second leg, 3 sc along the other side of the chain bridge (36)
Row 27: (5 sc, 1 inc)*6 (42)
Rows 28–34: 42 sc (7 rows) (42)
Row 35: (5 sc, inv dec)*6 (36)
Rows 36–37: 36 sc (36)
Row 38: (4 sc, 1 inv dec)*6 (30)
Rows 39–43: 30 sc (5 rows) (30)
Row 44: (3 sc, inv dec)*6 (24)
Row 45: 24 sc (24)
Row 46: (2 sc, inv dec)*6 (18)
Row 47: 18 sc (18)
Row 48: (1 sc, inv dec)*6 (12)
Rows 49–53: 12 sc (5 rows) (12)
Stuff the legs and body firmly and evenly as you work upward — a well-filled body is what gives this bear her satisfying, hold-in-both-hands squishy weight. The neck tube (Rows 49–53) should be stuffed a little more lightly so the head can sit naturally without tipping. Fasten off, leaving a long tail for sewing the head on.
Arms (×2) — Yarn A, warm caramel
These little arms taper so sweetly from the rounded paw end upward — the gentle single decrease per row from Rows 7–10 creates a natural, slightly curved shape. They look like they’re just waiting to be posed. Make two identical pieces.
Row 1: 6 sc in mr (6)
Row 2: 6 inc (12)
Row 3: (1 sc, inc)*6 (18)
Rows 4–6: 18 sc (3 rows) (18)
Row 7: 1 inv dec, 16 sc (17)
Row 8: 1 inv dec, 15 sc (16)
Row 9: 1 inv dec, 14 sc (15)
Row 10: 13 sc, 1 inv dec (14)
Rows 11–21: 14 sc (11 rows) (14)
Stuff lightly — the arms look most natural with just enough filling to hold their shape, soft enough to drape at her sides. Fasten off, leaving a long tail for sewing to the body.
Dress (×1) — Yarn B, soft blush pink
Here she is. The piece that makes this bear her.
The dress is worked top-down, starting with a flat foundation chain that becomes the yoke. You’ll work double crochet increases across the first two rows to build the fitted upper section, then create armhole openings in Row 3 by working chain bridges over skipped stitches. From there, one glorious row triples the entire stitch count as the skirt fans out dramatically, and a picot edging at the hem adds the most delicate little scalloped loops. The moment Row 5 opens up into 102 stitches and the skirt starts to flounce — I may have made a noise. I can’t confirm or deny.
Row 1: Chain 18. Starting from the 3rd ch from the hook, work 16 dc-inc (32)
Row 2: (1 dc, 1 dc-inc)*16 (48)
Row 3: 6 sc, ch 5, skip 12 stitches, 12 sc, ch 5, skip 12 stitches, 6 sc (34 sc + 2 chain bridges for armholes)
Row 4: 34 dc (34)
Row 5: 3 dc in each stitch (102)
Rows 6–14: 102 dc (9 rows) (102)
Row 15: (ch 3, skip 1 stitch, 1 sl st)* repeat to end of round — picot edging
🩷 Chloe’s Detail Tip: In Row 3, the two chain-5 bridges create the armhole openings — your bear’s arms will peek through here once she’s dressed. The 6 sc on each side become the front and back yoke panels. When you reach Row 5 and work 3 dc into every single stitch, the skirt triples to 102 stitches in one go and immediately starts to move and fall with that beautiful full-circle weight. Work the nine rows of the skirt at a slightly relaxed tension if you can — it gives the fabric a softer, more drapey feel that suits a little dress perfectly.
Bow (×1) — Yarn B or accent pastel
The bow is worked from a visual stitch chart using a combination of chains, single crochets, double crochets, and treble crochets arranged symmetrically around a center ring — creating a classic rounded bow shape with slightly pointed wing tips on each side. The finished piece sits flat and looks exactly like a dainty little ribbon bow.
Work the bow following the original visual chart. The finished bow should be small and flat, with two defined wings flanking a gathered center. Use the same blush pink as the dress for a tonal look, or pick a slightly deeper or contrasting shade (dusty rose, soft mauve) to make it pop. Once complete, wrap a short length of yarn tightly several times around the center and knot it firmly at the back to create the gathered knot before sewing in place.
Assembly — Building Your Little Bear
- Sew the muzzle to the head. Position the muzzle centrally, just below and between the safety eyes, with the slip stitch edge at the bottom. Pin it in place before committing to any sewing — the muzzle position shapes the entire expression. Use your tapestry needle and matching caramel yarn to sew around the entire edge with small, invisible stitches. Leave a small gap to add a tiny pinch of stuffing inside the muzzle for a gently rounded look, then close it.
- Embroider the nose and mouth. Before attaching the muzzle, or just after — whichever you prefer — embroider a small satin stitch nose at the center top of the muzzle in a slightly deeper brown or dusty mauve floss. A short downward V for the mouth below it completes her expression beautifully.
- Sew the ears to the head. Hold both ears against the head at the same time before sewing either one — it’s the only way to check they’re at exactly the same height and angle. Position them at the upper sides of the head, slightly pinched at the base for that natural cupped look. Our guide to sewing amigurumi parts together has all the tips for clean, invisible joins.
- Sew the head to the body. Use the long tail at the base of the head to sew it to the neck tube (Rows 49–53 of the body). Work all the way around, pulling gently as you go to create a slight natural neck definition.
- Sew the arms to the body. Position the arms at approximately Row 27 of the body, one on each side, with the rounded paw end pointing downward. Hold both against the body simultaneously to check they sit at the same height before sewing either one.
- Dress the bear. Slip the dress over the head — the yoke opening at Rows 1–2 slides over the neck. Guide each arm out through the armhole openings at Row 3. Adjust the dress so it sits evenly and the front panel is centered.
- Attach the bow. Sew the bow to the front center of the neckline, just above the yoke. A few firm stitches through the gathered center knot are all it takes to hold it perfectly in place.
Making It Extra Cute — The Finishing Details That Make Her Irresistible
This is my favourite moment in every project — the part where a nice amigurumi becomes something you genuinely cannot stop looking at. For this little bear, the final details are everything.
The blush cheeks. Thread your tapestry needle with pink embroidery floss or a thin strand of soft pink yarn. Work two small, softly rounded oval patches — one on each cheek, positioned just below and slightly outward from the safety eyes. Use satin stitch, keeping each patch to about the diameter of a small button. Build up a few layers for a gently raised blush effect. These cheeks are non-negotiable. A bear without blush is a bear who hasn’t yet reached her final form.
The eye level check — one last time. Before you start assembly, set the finished head on a flat surface and look at it from directly in front at eye level. Both 10mm eyes should sit at exactly the same height, 8 stitches apart, catching the light in the same way. If something feels even one stitch off, you will notice it every time you look at her. Take the extra minute now.
The muzzle placement. The muzzle position subtly shifts the whole expression — slightly higher gives a rounder, younger look; slightly lower gives a softer, dreamier one. Play with the placement before you sew a single stitch. Pin it, hold her up, look at her from a distance. This is the part that takes a little extra love, and it is so worth it.
Dress tension. If the dress feels stiff after working 102 dc for multiple rows, give it a very light steam block over your hand before dressing the bear. It softens the fabric beautifully and helps the skirt fall in proper gentle waves.
Color variations to try:
- Soft ivory bear, dusty sage dress, cream bow — for a quieter, botanical feel
- Warm cocoa bear, powder blue dress, white bow — classic and sweet
- Pale champagne bear, lilac dress, deeper violet bow — so soft together
- Classic caramel bear, soft peach dress, blush bow — the warmest, most golden combination
If you love this little bear, our classic teddy bear pattern is another beautifully made amigurumi in a slightly different style — and our sweet little amigurumi bunny would make the most perfect companion piece sitting right alongside her.
Chloe’s Final Look 🩷
I have been staring at this little bear for an embarrassing amount of time and I have zero regrets. The way the blush pink skirt falls in soft waves around her feet, the caramel fur warm and round against it, the glossy eyes catching the light just so, that tiny bow sitting at exactly the right angle — she is genuinely everything. Make her in three different dress colors and line them up on a shelf. You won’t be able to stop smiling, I promise. 🩷
What yarn is best for this free crochet bear pattern?
Fingering weight (weight 1) yarn is highly recommended for this amigurumi bear. It ensures smooth, crisp stitches and creates a lightweight yet detailed finish.
How long does it take to crochet this bear?
This intermediate-level pattern generally takes around 5 to 7 hours to complete, including crocheting the flouncy dress and sewing all parts together.
What size hook do I need for this amigurumi?
You will need a 2.5mm crochet hook (approx. US C/2) to ensure tight stitches that keep the polyfill stuffing completely hidden.