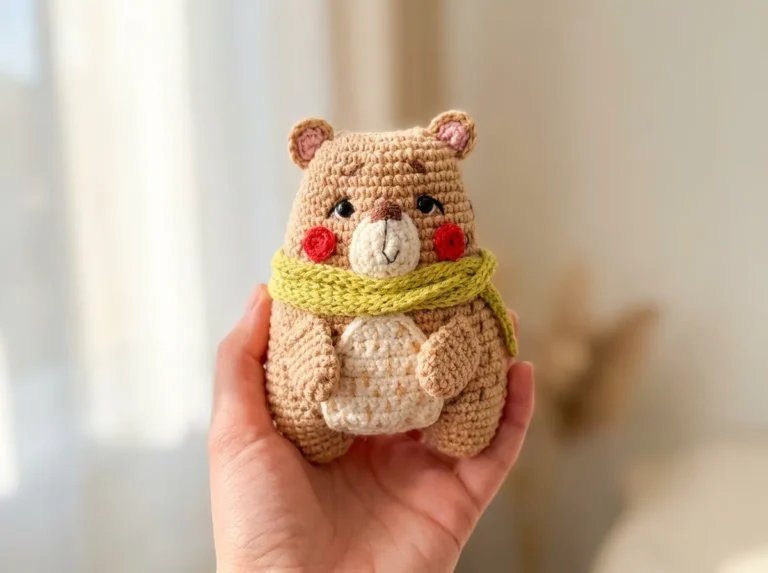
Crochet Teddy Bear Pattern — Free Easy Amigurumi
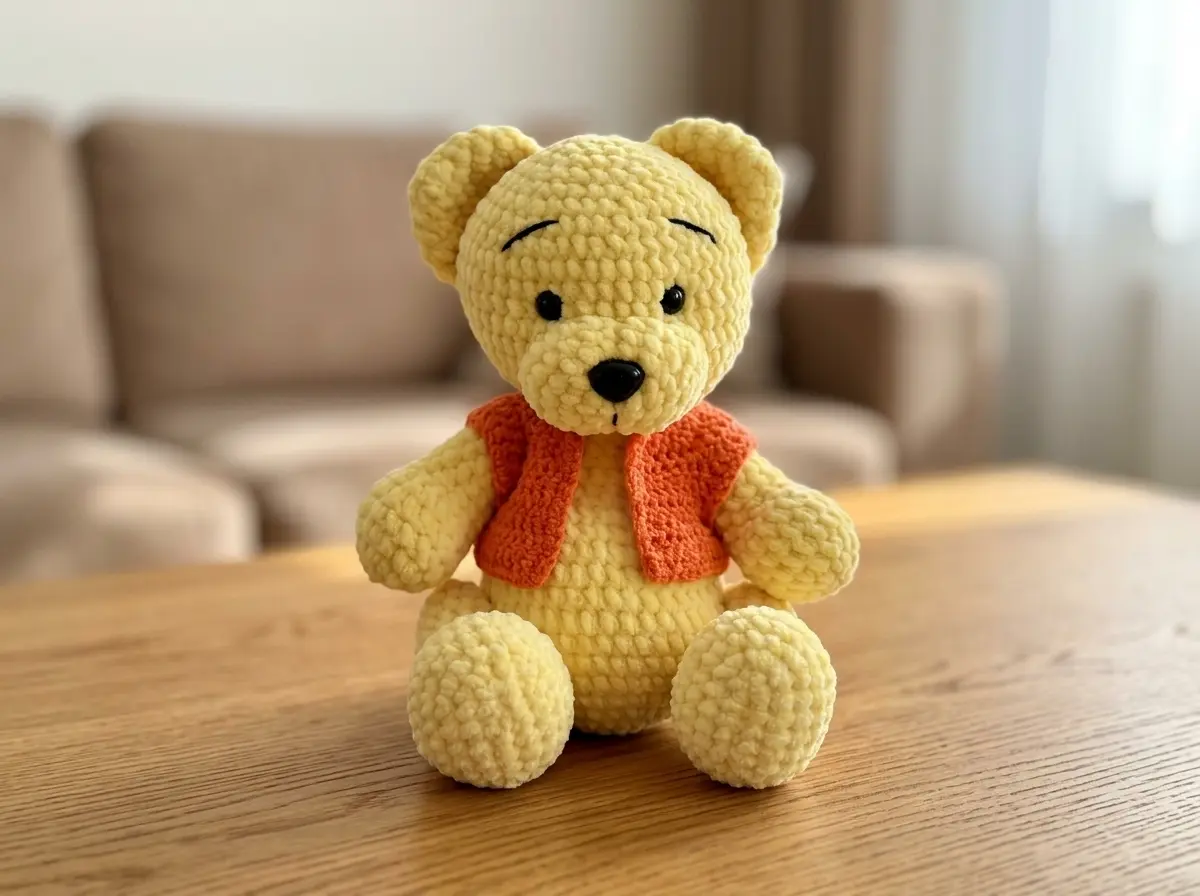
This crochet teddy bear pattern free easy amigurumi project is one of the most satisfying projects I make — a big, squishy chenille bear built with an integrated body-and-head construction that keeps the shaping clean and reduces seam work. I designed this to ensure it doesn’t cut corners: every round is counted, every stitch is tested. At 11 inches, this bear has real presence. Grab your hook and your best chenille yarn.
📋 Pattern Quick Stats
- Difficulty: Intermediate
- Finished Size: approx. 11 in (28 cm)
- Hook Size: E/4 (3.5mm) or G/6 (4.0mm)
- Yarn Weight: Bulky (5) — chenille/velvet
- Techniques: magic ring, foundation chain oval, invisible decrease, continuous rounds, joined ears
- Estimated Time: 8–12 hours
What You’ll Need for This Crochet Teddy Bear Pattern
- Chenille/velvet yarn, Bulky (5): Bernat Baby Velvet or Premier Parfait both work beautifully in the US. You’ll need approximately 200–250 yds. The plush texture does most of the visual work here — do not substitute with a smooth acrylic. The weight is classified as Bulky (5) on the Craft Yarn Council yarn weight system, and it’s important to stay in that range to hit gauge on this bear.
- Crochet hook: E/4 (3.5mm) for tighter, denser fabric, or G/6 (4.0mm) for a slightly softer result. My tension runs tight, so I’d reach for the E/4 — but work a small test swatch and see what feels right for your hands. The fabric should be firm enough that stuffing doesn’t peek through.
- 12mm safety eyes — 1 pair
- 20mm safety nose — 1 piece
- Polyfill stuffing — Poly-Fil by Fairfield is my go-to. Available at Joann, Michaels, and Hobby Lobby.
- Tapestry needle for sewing parts together and weaving in ends
- Stitch marker — non-negotiable. You will lose count in the long body-and-head section without one.
Abbreviations Used in This Free Easy Amigurumi Pattern
| Abbreviation | Meaning |
|---|---|
| mr | magic ring |
| ch | chain |
| sc | single crochet |
| hdc | half double crochet |
| inc | increase — 2 sc worked into the same stitch |
| dec | invisible decrease — see note below |
💡 Emma’s Note on Decreases: Wherever this pattern calls for dec, I always use the invisible decrease method — inserting the hook through the front loops of both stitches before completing the stitch. With chenille yarn the effect is less dramatic than with smooth cotton, but I still get cleaner, tighter closures that way. If you’re not familiar with the technique, our complete invisible decrease tutorial walks through it step by step.
Techniques to Review Before Starting This Crochet Teddy Bear Amigurumi
This crochet teddy bear pattern uses a handful of techniques worth reviewing before you cast on — especially if this is one of your earlier amigurumi projects.
- Magic Ring: Most parts begin with a magic ring (mr). It’s the cleanest way to start working in the round and completely closes the center hole. If yours tends to slip open or you’ve never done one before, our step-by-step magic ring tutorial covers everything clearly.
- Foundation Chain Oval: The legs are the exception — they start with a 7-chain foundation that you work around on both sides to create the oval sole of the foot. It’s straightforward once you understand the method, but read through Rows 1 and 2 of the leg instructions carefully before you start.
- Invisible Decrease: Used throughout the bear wherever dec appears. See the note in the abbreviations table above, and check our invisible decrease tutorial if you want a visual reference.
- Stuffing in stages: The body and head are one continuous piece, which means you must stuff the body gradually as you work through the decrease rows — not all at once at the end. The opening gets too narrow too quickly. Our guide on how to stuff amigurumi without lumps covers the timing and technique in detail.
- Safety Eyes and Safety Nose: Both must be installed before closing the pieces they go into. For the 12mm eyes: install them in the head during the straight rows, before the decrease section begins. For the 20mm nose: install it through the muzzle while it’s still a flat piece in your hand. Once the backing clicks on, that’s permanent.
Crochet Teddy Bear Pattern Instructions
Work in continuous rounds throughout unless otherwise noted. Place a stitch marker in the first stitch of each new round and move it up as you go. All stitch counts appear at the end of each row in bold.
Legs — Make 2
The legs begin with a foundation chain to create an oval base — this gives the foot its flat, rounded sole shape. Work carefully around both sides of the starting chain in Row 2.
Row 1: 7 ch (7)
Row 2: Starting from the 2nd ch from hook: 5 sc, 3 sc in the last ch, turn and work along the other side: 4 sc, inc (14)
Row 3: inc, 4 sc, 3 inc, 4 sc, 2 inc (20)
Row 4: sc, inc, 5 sc, inc, 3 sc, inc, 5 sc, inc, 2 sc (24)
Row 5: 2 sc, inc, (5 sc, inc) × 3, 3 sc (28)
Rows 6–7: 28 sc (2 rows) (28)
Row 8: 5 sc, (sc, dec) × 6, 5 sc (22)
Row 9: 5 sc, 6 dec, 5 sc (16)
Rows 10–17: 16 sc (8 rows) (16)
Row 18: 8 dec (8)
💡 Emma’s Tip: After Row 18, you have 8 stitches remaining. Fasten off and leave a long tail. Thread the tail through a tapestry needle, pass through all 8 remaining loops, and pull tight to close. Flatten the top of the leg slightly before you set it aside — this helps it sit flush against the body base when you sew it on. Add a small, firm amount of stuffing to the foot section only. The upper tube can be left unstuffed or very lightly filled; an overstuffed leg won’t sit naturally.
Arms — Make 2
Row 1: 6 sc in mr (6)
Row 2: inc × 6 (12)
Row 3: (sc, inc) × 6 (18)
Rows 4–6: 18 sc (3 rows) (18)
Row 7: 5 sc, 4 dec, 5 sc (14)
Rows 8–15: 14 sc (8 rows) (14)
Row 16: 7 dec (7)
💡 Emma’s Tip: After Row 16, you have 7 stitches remaining. Close the same way as the legs — fasten off, thread tail through all 7 remaining loops, pull tight. Leave a long tail for sewing. Stuff the rounded hand end lightly; leave the upper arm tube empty. A flat, unstuffed upper arm sews on cleanly and sits more naturally against the body.
Ears — Make 2
The ears are worked flat as a full circle, then folded in half on the final row to create the rounded, semi-circular ear shape. No stuffing needed.
Row 1: 6 sc in mr (6)
Row 2: inc × 6 (12)
Row 3: (sc, inc) × 6 (18)
Row 4: (2 sc, inc) × 6 (24)
Row 5: 24 sc (24)
Row 6: Fold in half, sc together through both layers: 12 sc (12)
💡 Emma’s Tip: Hold the two edges of the folded circle together carefully and align them evenly before you begin Row 6. This row works through double thickness — slow down and make sure each stitch catches both layers. Leave a long tail for sewing. The flat folded edge is what you’ll pin and sew against the head.
Body and Head — One Continuous Piece
This is the centerpiece of the free crochet teddy bear amigurumi — and one of the things I love most about this design. The body and head are worked as a single uninterrupted piece, with no seam at the neck. The body builds outward from a magic ring, shapes through the belly, narrows to a 12-stitch neck at Row 22, and then the head expands directly from there. You never cut the yarn between the two sections.
⚠️ Important: Begin stuffing the body gradually after Row 14. Do not wait until the piece is fully closed — by then the opening will be too small to get stuffing in evenly. Stuff firmly but smoothly; the body should feel full and hold its shape without any lumps or flat spots. Our guide on how to stuff amigurumi properly covers the timing and technique in more detail.
— Body Rows —
Row 1: 6 sc in mr (6)
Row 2: inc × 6 (12)
Row 3: (sc, inc) × 6 (18)
Row 4: (2 sc, inc) × 6 (24)
Row 5: (3 sc, inc) × 6 (30)
Row 6: (4 sc, inc) × 6 (36)
Row 7: (5 sc, inc) × 6 (42)
Rows 8–13: 42 sc (6 rows) (42)
Row 14: (5 sc, dec) × 6 (36)
Row 15: (4 sc, dec) × 6 (30)
Row 16: 9 sc, 6 dec, 9 sc (24)
💡 Emma’s Tip: Row 16 shapes the belly with 6 consecutive decreases grouped at the front. This is intentional — it creates a slight flattening on the front face of the body that gives the bear a more natural, dimensional silhouette. Make sure you’ve stuffed the body firmly up to this point before the opening narrows further.
Rows 17–18: 24 sc (2 rows) (24)
Row 19: (2 sc, dec) × 6 (18)
Rows 20–21: 18 sc (2 rows) (18)
Row 22: (sc, dec) × 6 (12)
⚠️ Do not fasten off after Row 22. You’re now at the neck — 12 stitches. Continue directly into Row 23 to begin the head. Verify that the body is fully and firmly stuffed before you move on. Once the head expands outward, you won’t be able to reach back inside to adjust.
— Head Rows (continued directly from Row 22) —
Row 23: 12 inc (24)
Row 24: (3 sc, inc) × 6 (30)
Row 25: (4 sc, inc) × 6 (36)
Row 26: (5 sc, inc) × 6 (42)
Row 27: (6 sc, inc) × 6 (48)
Row 28: (7 sc, inc) × 6 (54)
Rows 29–34: 54 sc (6 rows) (54)
💡 Emma’s Tip: Rows 29–34 are your window for installing the 12mm safety eyes. Position them at approximately Row 31–32, with about 8–10 stitches between them. Hold the head up, look at it from the front, and take your time. A few stitches one way or the other will change the whole expression of the finished bear. Once the backing snaps on, there’s no adjusting. If your placement doesn’t feel right, frog back — it’s worth it. Trust me on this.
Row 35: (7 sc, dec) × 6 (48)
Row 36: (6 sc, dec) × 6 (42)
Row 37: (5 sc, dec) × 6 (36)
Row 38: (4 sc, dec) × 6 (30)
⚠️ Start stuffing the head at Row 38. Add stuffing gradually as you continue the remaining decrease rows. The head should feel round, full, and firm — no flat spots, no lumps. Don’t wait until Row 41 to start stuffing or you won’t be able to get enough in evenly.
Row 39: (3 sc, dec) × 6 (24)
Row 40: (2 sc, dec) × 6 (18)
Row 41: (sc, dec) × 6 (12)
Row 42: 6 dec (6)
Fasten off and leave a long tail. Thread through all 6 remaining loops with a tapestry needle, pull tight to close, and weave in the end securely.
Muzzle
The muzzle is worked as a flat oval using a mix of sc and hdc. The hdc stitches in Row 3 give the muzzle its slightly raised center — that gentle puff is what makes it read as dimensional once it’s sewn onto the face.
Row 1: 6 sc in mr (6)
Row 2: inc × 6 (12)
Row 3: (3 hdc, 3 inc) × 2 (18)
Row 4: (2 sc, inc) × 6 (24)
Row 5: (3 sc, inc) × 6 (30)
Row 6: 30 sc (30)
Fasten off and leave a long tail for sewing.
💡 Emma’s Tip: Before sewing the muzzle onto the head, install the 20mm safety nose through the center of the muzzle now — while it’s still a flat piece in your hand. Position it at approximately Rows 3–4, centered. Snap the backing on firmly. Doing this after the muzzle is attached to the head is awkward and you’ll end up distorting the placement. Do it first, while you have full access.
Assembly Instructions for Your Free Easy Amigurumi Teddy Bear
Assembly is where the bear either comes together beautifully or looks slightly off — and the difference is almost always whether you pinned first or jumped straight to sewing. I always pin every part in place, step back, look from multiple angles, and only then commit. It’s worth the extra time.
- Attach the legs. Position the legs at the base of the body, spaced evenly on either side of the belly shaping from Row 16. The flattened top of each leg should sit flush against the bottom of the body. Pin them in place and check the spacing before you sew a single stitch. Sew through several stitch loops on both sides of each leg for a secure, stable attachment — this bear needs to support its own weight.
- Attach the arms. Position the arms on either side of the body at approximately Rows 18–20 (measured from the bottom of the body), or roughly at chest height. The closed top of each arm should sit flat against the body. Pin, check symmetry, then sew securely all the way around the attachment point.
- Attach the ears. Position the ears on top of the head at approximately Row 27–28, spaced about 8–10 stitches apart on either side of center. The flat folded edge of each ear sits against the head. Pin them, look at the placement from the front, then sew firmly along the full length of the flat edge. An ear that’s only partially sewn will shift and look uneven over time.
- Attach the muzzle. With the 20mm safety nose already installed, center the muzzle on the lower half of the face — approximately at Rows 32–36, directly below the safety eyes. Pin it in place and sew around the full perimeter with small, neat stitches. No gaps around the edge. The muzzle should sit flat and flush against the face.
- Final check. Before you weave in all your ends, check every attachment point. Give each limb a firm but gentle tug. If anything feels loose, reinforce it now.
💡 Emma’s Tip: I always sew with the same yarn I crocheted with — it disappears completely into the fabric. For a detailed walkthrough of sewing techniques, hiding knots, and getting clean seam lines, our guide to sewing amigurumi parts together has everything you need.
Finishing Your Crochet Teddy Bear Amigurumi
Once all parts are assembled, weave in every remaining end thoroughly. With chenille yarn I run each end back and forth through the fabric at least three times — chenille can be slippery, and you don’t want anything working loose.
At this point, step back and take a proper look at the finished bear. The head should feel solid and round. The body should be full and hold its shape. The limbs should hang or sit naturally at their attachment points, and the bear should stand — or sit — steadily without leaning.
If you want to add any embroidered face details — a small eyebrow arch above each eye, a gentle smile curve below the muzzle, or a nose bridge line — now is the time. Use a tapestry needle threaded with a length of yarn or embroidery thread in a contrasting color. Small stitches go a long way here. A few carefully placed marks can give the bear a completely different expression.
I’ve made this crochet teddy bear pattern several times now, and every version turns out slightly different — that’s part of the charm of chenille amigurumi. What I always notice is how much the eye placement changes the finished bear’s personality. Take your time on that step and don’t let yourself rush it. The integrated body-and-head construction is something I genuinely love about this design: no seam at the neck means cleaner shaping and a more seamless silhouette from every angle. If you enjoyed making this bear, you might also like our free crochet cat amigurumi or the free bunny amigurumi pattern — both are built with the same dense fabric approach and have the same attention to clean structure. Happy hooking! 🧶
What yarn is best for this crochet teddy bear amigurumi?
Bulky (5) chenille or velvet yarn, such as Bernat Baby Velvet or Premier Parfait, is ideal for achieving the signature squishy, plush look and hitting the 11-inch finished size.
Can complete beginners make this free easy amigurumi teddy bear pattern?
This pattern is rated as intermediate due to techniques like the foundation chain oval and integrated body-and-head construction, but clear row counts and tips make it accessible for ambitious advanced beginners.
What size crochet hook should I use?
An E/4 (3.5mm) hook is recommended for tighter, denser fabric to prevent stuffing from peeking through, or a G/6 (4.0mm) hook if your natural tension runs extremely tight.