Free Totoro Crochet Pattern — Giant Chenille Plush
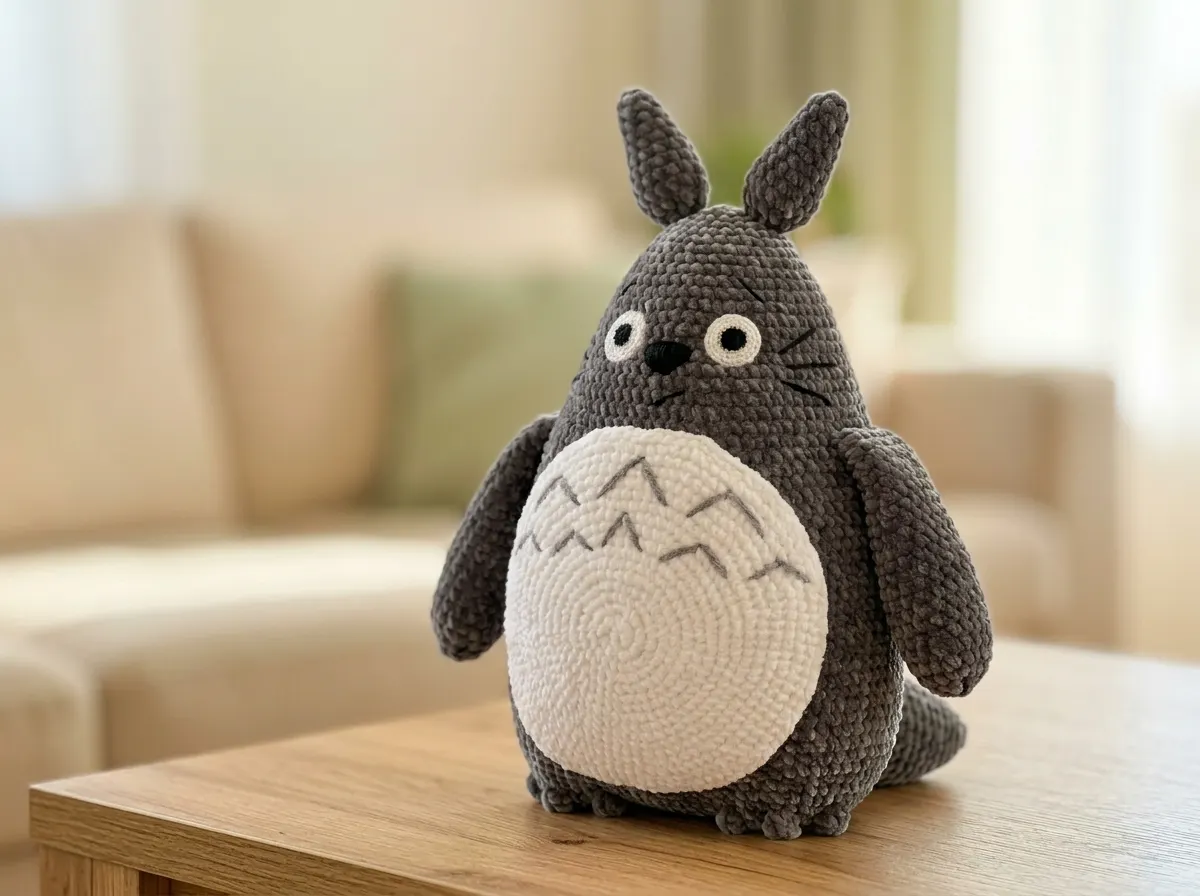
This free totoro crochet pattern makes a 17-inch chenille plush on four skeins of gray and a small amount of white for the belly — that’s the full material list. Bulky chenille works up fast, the embroidered details come together quickly, and the finished piece is the kind of handmade gift that stops people in their tracks. No tiny hooks, no eyestrain. Grab your G/6.
🧶 What You’ll Need
- 💰 Yarn Needed: ~880 yards gray bulky chenille (4 skeins); ~150 yards white bulky chenille (less than 1 skein); small amounts of black and white lace-weight or fingering thread for the eyes; black and gray embroidery thread for face details and belly chevrons
- 🎨 Colors: gray (main), white (belly only), black (eye center and face embroidery)
- 🪝 Hook: G/6 (4.0 mm) for all body parts; 1.2 mm steel hook for crocheted eyes
- ⏱️ Time: 10–15 hours
- 📏 Finished Size: ~17.7 in (45 cm) tall
- 💡 Difficulty: Intermediate
- 🎁 Great For: statement gift, nursery décor, craft fair centerpiece, collector shelf
Materials for Your Totoro Crochet Project
The list is short for a plush this size. Here’s what you actually need:
- Gray bulky chenille yarn — approximately 880 yards total (4 skeins). YarnArt Dolce or Bernat Baby Velvet are both ideal choices. Any Bulky (5) weight chenille in a medium gray works — this covers the body, legs, arms, ears, and tail. The whole piece is gray except the belly.
- White bulky chenille yarn — approximately 150 yards or less (well under one skein). Used only for the flat belly panel. If you have leftover white chenille from any previous project, check there first before opening a new skein.
- Black and white lace-weight or fingering thread — small amount of each. Used for the crocheted eye pieces, which are made separately with a fine steel hook. Iris embroidery thread or any similar weight works.
- Black embroidery thread — for the face: nose, mouth, eyebrows, whisker lines, and claw marks on the arms.
- Gray embroidery thread — for the chevron markings on the white belly. You can also pull a single ply from a strand of your leftover gray yarn instead of buying separate thread — same color, already in your hand.
- Polyfill stuffing — the body, legs, tail, and arms all need stuffing. A standard bag from Joann, Michaels, or Hobby Lobby covers the whole project.
- Hook: G/6 (4.0 mm) for all main pieces; 1.2 mm steel hook for the crocheted eyes (no US letter equivalent — look in the steel hook section at any craft store)
- Tapestry needle — for sewing all seven parts together and weaving in ends
- Scissors, stitch markers
🧶 Scrap Check: The white belly uses well under 150 yards of white chenille — if you’ve got half a skein left over from a baby project, a holiday blanket, or anything white and bulky sitting in your bin, that’s your belly. No need to open a fresh skein for one panel.
Abbreviations Used in This Totoro Crochet Pattern
| Abbreviation | Meaning |
|---|---|
| mr | magic ring — an adjustable loop start that closes completely; used for every round piece in this pattern |
| sc | single crochet — insert hook, yarn over, pull through, yarn over, pull through both loops |
| inc | increase — 2 single crochets worked into the same stitch |
| dec | invisible decrease — insert hook through front loops only of next 2 stitches simultaneously, yarn over, pull through, yarn over, pull through 2 loops |
| ch | chain |
| BLO | back loop only — work into the back loop of the stitch only; creates a visible ridge |
| bobble | ch 3 worked at one stitch position to create a raised toe bump; works into 1 stitch of the previous row and does not add to the stitch count |
| sl st | slip stitch |
Smart Crafter Tips Before You Start
1. Chenille hides your tension. Bulky chenille is one of the most forgiving yarns for a large amigurumi — the plush texture fills in any slight unevenness, there’s no risk of stuffing showing through small gaps, and every stitch is easy to see. If you’ve been putting off a large plush project because big pieces feel intimidating, chenille is the yarn to start with.
2. Make both legs before starting the body. The legs attach directly to the body at Row 4 — they need to be fully finished and sitting ready before you begin the body. Make both legs first, set them aside, and you’ll have a smoother assembly process with no frantic mid-project finishing. If this is your first time starting a piece with a magic ring, our magic ring tutorial walks through it clearly — the technique is identical in any yarn weight.
3. Stuff the body gradually, starting early. The body runs 52 rows. Start adding polyfill around Row 20 rather than waiting until the piece is nearly closed — trying to push stuffing into a tight, almost-finished opening is one of the most frustrating parts of any large amigurumi. A little at a time gives you a much more even shape. Our guide on stuffing amigurumi without lumps covers the technique in detail if you want to get it right the first time.
4. Plan your assembly before you start sewing. This pattern has seven separate parts. Before you sew anything permanently, lay all the pieces on a flat surface and position them against the finished body — belly, eyes, arms, ears, and tail. Move them around until the proportions look right, then mark placement with stitch markers. Five minutes of planning here saves you from re-sewing later. Our guide to sewing amigurumi parts together covers placement and technique step by step.
5. The gray embroidery thread hack. You don’t need a separate purchase for the belly chevrons. Pull a single ply from a strand of your leftover gray chenille and use that for the belly embroidery. Same color family, already in your hand, costs nothing.
Free Totoro Crochet Pattern — Complete Instructions
Work all pieces in continuous rounds unless otherwise noted. Use a stitch marker to track the beginning of each round. Make legs first.
Legs (×2)
Yarn: gray | Start: magic ring
Row 1: 6 sc in mr (6)
Row 2: 6 inc (12)
Row 3: 12 inc (24)
Row 4: (3 sc, inc)×6 (30)
Row 5: (4 sc, inc)×6 (36)
Row 6: BLO: 4 sc, bobble, (3 sc, bobble)×2, 23 sc (36)
Row 7: 36 sc (36)
💡 Bobble note: Each bobble is made by working ch 3 at that stitch position. It creates a small raised loop that forms one toe. The bobble occupies one stitch of the previous row and does not add to your count — the total stays at 36 after Row 6. You’ll have 3 bobble toes per leg. Working Row 6 in BLO gives the foot a slight ridge, separating the sole from the leg.
Fasten off, cut yarn. Make two identical legs and set them aside — they attach at Row 4 of the body.
Body (×1)
Yarn: gray | Start: magic ring
Have both finished legs within reach. They join at Row 4 — position them so the bobble toes face forward.
Row 1: 6 sc in mr (6)
Row 2: 6 inc (12)
Row 3: 12 inc (24)
Row 4: Attach legs: 3 sc, 6 sc together with leg, 6 sc, 6 sc together with leg, 3 sc (24)
Row 5: 3 sc along body, 30 sc along remaining part of leg, 6 sc along body, 30 sc along remaining part of leg, 3 sc (72)
Row 6: (11 sc, inc)×6 (78)
Row 7: (12 sc, inc)×6 (84)
Row 8: (13 sc, inc)×6 (90)
Rows 9–14: 90 sc (90)
Row 15: (14 sc, inc)×6 (96)
Rows 16–20: 96 sc (96)
Row 21: (14 sc, dec)×6 (90)
Rows 22–26: 90 sc (90)
Row 27: (13 sc, dec)×6 (84)
Rows 28–32: 84 sc (84)
Row 33: (12 sc, dec)×6 (78)
Rows 34–35: 78 sc (78)
Row 36: (11 sc, dec)×6 (72)
Row 37: 72 sc (72)
Row 38: (10 sc, dec)×6 (66)
Row 39: 66 sc (66)
Row 40: (9 sc, dec)×6 (60)
Rows 41–42: 60 sc (60)
Row 43: (8 sc, dec)×6 (54)
Row 44: 54 sc (54)
Row 45: (7 sc, dec)×6 (48)
Row 46: (6 sc, dec)×6 (42)
Row 47: (5 sc, dec)×6 (36)
Row 48: (4 sc, dec)×6 (30)
Row 49: (3 sc, dec)×6 (24)
Row 50: (2 sc, dec)×6 (18)
Row 51: (1 sc, dec)×6 (12)
Row 52: 6 dec (6)
Stuff firmly as you work — start adding polyfill around Row 20 and continue adding as you decrease. Fasten off and close the opening.
Belly (×1)
Yarn: white | Start: magic ring
This is a flat circle — no stuffing, no closing, just a flat panel that gets sewn to the front of the body later. The piece expands steadily with a standard inc-every-stitch formula across 18 rows.
🧶 Scrap Check: The belly is a flat white disc. The whole thing uses under 150 yards of white chenille — if any white bulky yarn is sitting in your stash, this is its moment.
Row 1: 6 sc in mr (6)
Row 2: 6 inc (12)
Row 3: 12 inc (24)
Row 4: (3 sc, inc)×6 (30)
Row 5: (4 sc, inc)×6 (36)
Row 6: (5 sc, inc)×6 (42)
Row 7: (6 sc, inc)×6 (48)
Row 8: (7 sc, inc)×6 (54)
Row 9: (8 sc, inc)×6 (60)
Row 10: (9 sc, inc)×6 (66)
Row 11: (10 sc, inc)×6 (72)
Row 12: (11 sc, inc)×6 (78)
Row 13: (12 sc, inc)×6 (84)
Row 14: (13 sc, inc)×6 (90)
Row 15: (14 sc, inc)×6 (96)
Row 16: (15 sc, inc)×6 (102)
Row 17: (16 sc, inc)×6 (108)
Row 18: (17 sc, inc)×6 (114)
Fasten off. Leave a long tail for sewing. You can sew this on using your white chenille tail or switch to a fine thread for easier control — both work, but the finer thread gives a neater edge and is easier to pull through the chunky body fabric.
Ears (×2)
Yarn: gray | Start: magic ring
Row 1: 6 sc in mr (6)
Row 2: 6 sc (6)
Row 3: (1 sc, inc)×3 (9)
Row 4: 9 sc (9)
Row 5: (2 sc, inc)×3 (12)
Row 6: 12 sc (12)
Row 7: (3 sc, inc)×3 (15)
Row 8: 15 sc (15)
Row 9: (4 sc, inc)×3 (18)
Row 10: 18 sc (18)
Row 11: BLO: (1 sc, dec)×6 (12)
Row 12: 6 dec (6)
Row 13: 6 sc (6)
Fasten off. Leave a long tail for sewing. The BLO decrease in Row 11 creates a sharp ridge at the base of the ear that gives it its characteristic pointed cone shape — that ridge is intentional. Make two identical ears.
Tail (×1)
Yarn: gray | Start: magic ring
The tail is large and teardrop-shaped — it adds significant volume to the finished silhouette. Stuff it lightly enough that it holds its shape but still has some give.
Row 1: 6 sc in mr (6)
Row 2: 6 inc (12)
Row 3: (1 sc, inc)×6 (18)
Row 4: (2 sc, inc)×6 (24)
Row 5: (3 sc, inc)×6 (30)
Row 6: (4 sc, inc)×6 (36)
Row 7: (5 sc, inc)×6 (42)
Row 8: (6 sc, inc)×6 (48)
Row 9: (7 sc, inc)×6 (54)
Rows 10–14: 54 sc (54)
Row 15: (7 sc, dec)×6 (48)
Rows 16–18: 48 sc (48)
Row 19: (6 sc, dec)×6 (42)
Rows 20–22: 42 sc (42)
Row 23: (5 sc, dec)×6 (36)
Rows 24–26: 36 sc (36)
Fasten off. Leave a long tail for sewing. The open end of the tail attaches flat against the center back of the body.
Arms (×2)
Yarn: gray | Start: chain of 4
The arms start from a chain rather than a magic ring, which creates the rounded hand shape at the base. Read through the closing note before you start Row 25.
Row 1: Starting from 2nd ch from hook: inc, 1 sc, 4 sc in last ch, 1 sc, inc (10)
Row 2: 2 inc, 1 sc, 4 inc, 1 sc, 2 inc (18)
Row 3: (2 sc, inc)×6 (24)
Rows 4–13: 24 sc (24)
Row 14: (6 sc, dec)×3 (21)
Rows 15–19: 21 sc (21)
Row 20: (5 sc, dec)×3 (18)
Rows 21–25: 18 sc (18)
💡 Closing the arm: At the end of Row 25, work any offset stitches needed to bring both sides into alignment. Fold the arm flat and sc through both edges — 9 stitches — to close the top end. This creates the finished flat shoulder edge that will sew cleanly onto the body. Fasten off, leaving a long tail for sewing.
Make two identical arms.
Eyes (×2)
Yarn: black and white lace-weight or fingering thread | Hook: 1.2 mm steel | Start: magic ring
The eyes are crocheted flat circles worked in two colors: black for the inner pupil, white for the outer eye. Switch from black to white at the start of Row 4.
Row 1: [black] 6 sc in mr (6)
Row 2: [black] 6 inc (12)
Row 3: [black] (1 sc, inc)×6 (18)
Row 4: [white] (2 sc, inc)×6 (24)
Row 5: [white] (3 sc, inc)×6 (30)
Row 6: [white] (4 sc, inc)×6 (36)
Row 7: [white] (5 sc, inc)×6 (42)
Fasten off the white, leaving a long tail for sewing. Make two identical eye pieces — the black center will face outward when sewn onto the face.
Assembling Your Totoro Crochet Plush
Assembly is the most time-intensive part of this totoro crochet project. Plan for 30–45 minutes and don’t rush placement — once you start sewing with chenille, undoing stitches is genuinely unpleasant. Lay all seven pieces against the finished body first, move them around until the proportions feel right, and mark placement with stitch markers before you commit to a single stitch.
- Belly first. Sew the flat white belly to the front of the body between Rows 7 and 34. Center it carefully, pin it down with stitch markers on both sides, and confirm it’s balanced before sewing. The belly is your visual anchor — everything else gets positioned relative to it.
- Eyes. Sew both eye pieces flat onto the face above the belly, centered on the front of the head. The black center faces outward. Getting the eyes level and symmetrically placed makes the single biggest difference in the finished face.
- Arms. Sew both arms at the level of Row 34 on either side of the body. The closed flat edge from your sc seam attaches against the body; the rounded hand end hangs free.
- Ears. Sew symmetrically on top of the head. Step back and look at the piece from the front before committing — ear placement has a large visual impact on the overall silhouette.
- Tail. Sew to the center back between Rows 7 and 12 of the body. The open end lies flat against the back. It can be positioned slightly higher if you prefer — check the visual balance with the belly panel in front.
Decorating Your Totoro: Face and Belly Details
The embroidery is what makes this totoro crochet plush recognizable. Take your time — careful stitching on chenille reads much better than rushed lines, and this is the last step before you’re done.
Claws: Using black embroidery thread, stitch 4–5 short parallel lines on the upper surface of each arm (the hand end). Keep them evenly spaced and consistent in length.
Nose: A small oval or rounded triangle shape centered between the two eyes, in black thread.
Mouth: A simple curved arc below the nose in black thread. Subtle reads better here — a small, gentle curve has more charm than an oversized grin in bulky chenille.
Eyebrows: Two short diagonal lines above the eyes in black thread, angled inward slightly toward the center. The angle creates the characteristic expression.
Whiskers: Three lines on each side of the face in black thread, radiating outward from the nose area. Keep them straight, clean, and evenly spaced.
Belly chevrons: Using gray embroidery thread (or a single ply pulled from your leftover gray chenille), embroider V-shaped chevron markings across several rows on the white belly panel. Work from the center outward and keep the V shapes consistent in size and spacing.
🧶 Thread hack: No gray embroidery thread on hand? Split a single ply from a strand of your leftover gray chenille. It’s the right color, it’s already in your stash, and it costs nothing. That’s how these things are supposed to work.
💡 Stretch It Further: The same pattern at a smaller gauge gives you a whole second version to work with. Drop down to DK weight yarn with a US E/4 (3.5 mm) hook and the same instructions produce a compact 8–9 inch plush — ideal as a travel-sized companion to the large one, a bag charm without the tail, or a market item at a lower price point. Use the same gray chenille in a lighter or darker shade and the set reads as intentionally coordinated. If you want to build out your character collection, our Baby Yoda amigurumi and free Stitch crochet pattern both use similar bulky chenille construction and work up just as satisfyingly.
Mia’s Take
Four skeins of gray, a handful of white for the belly, and whatever thin thread you have for the face — that’s genuinely the whole supply list for a 17-inch plush that people will ask about the moment they see it. The chenille does most of the work; the embroidery finishes it. If you’ve been holding onto a gray skein waiting for the right project, this is it. Make a smaller version with leftover DK weight next, and you’ve got a matching set for almost nothing. 🧶
What yarn is best for this Totoro crochet pattern?
Bulky (5) weight chenille yarn, like YarnArt Dolce or Bernat Baby Velvet, is ideal for creating a super-soft, oversized 17-inch plush.
How long does it take to crochet this Totoro plush?
It typically takes between 10 to 15 hours to complete all seven parts, assembly, and detailed facial embroidery.
Can beginners make this Totoro amigurumi pattern?
This pattern is rated as Intermediate. While chenille yarn is forgiving, joining the legs directly to the body and sewing multiple pieces require some prior experience.