Free SpongeBob Crochet Pattern — Boxy Amigurumi Figure
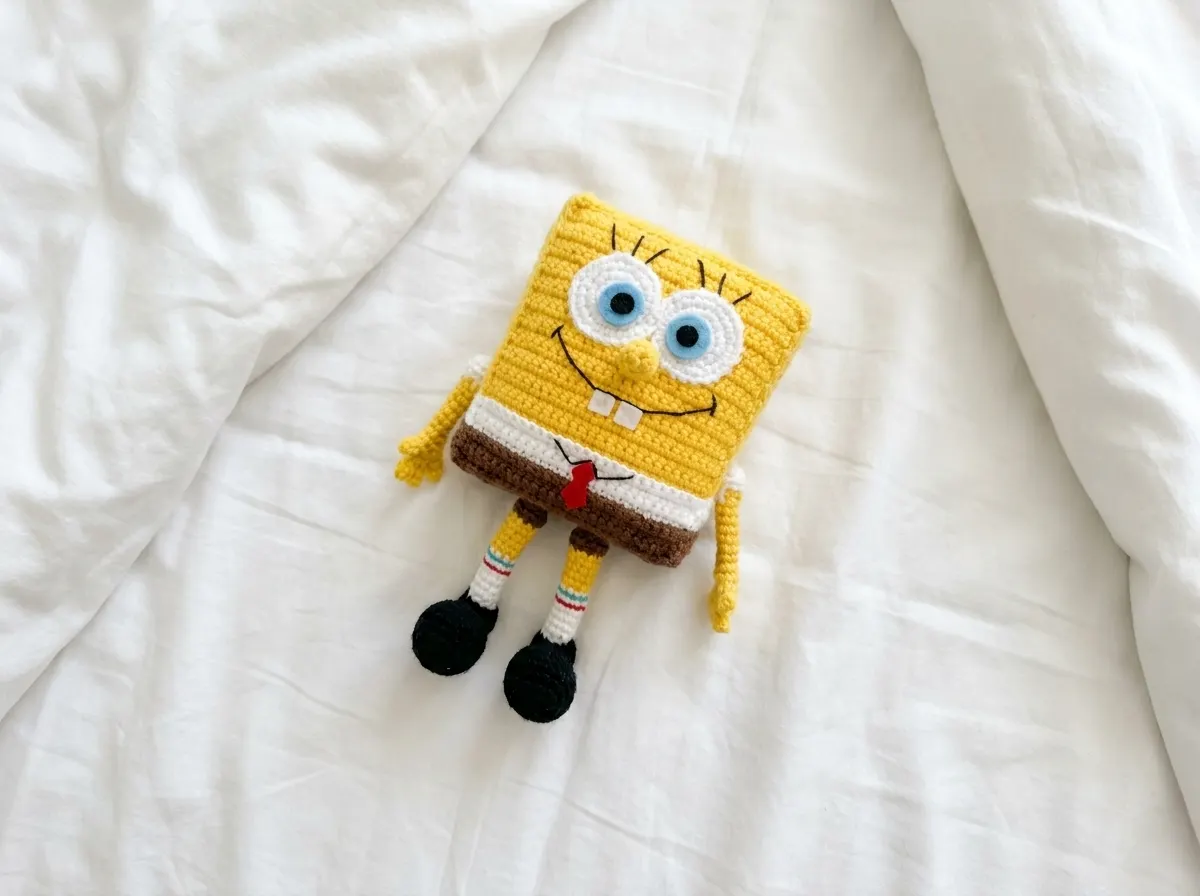
This free SpongeBob crochet pattern builds him the right way — boxy, bright, and completely unmistakable. SpongeBob crochet isn’t like your typical round amigurumi; you’re constructing flat panels and assembling them into a 3D rectangle, which sounds intimidating until you realize it’s mostly just rows of single crochet. Yellow does most of the work here (keep a full skein out), and the brown, white, and black sections are small enough to pull from scraps. Let’s get that square built.
🧶 What You’ll Need From Your Stash
- 💰 Yarn Needed: ~350 yards total (yellow ~180yd, brown ~60yd, white ~60yd, black ~50yd)
- 🎨 Colors: yellow (main), brown, white, black — any worsted or DK weight from your stash works
- 🪝 Hook: 3.5mm (approx. US E/4) recommended — adjust for your yarn weight
- ⏱️ Time: 8–12 hours (panels go fast; assembly takes patience)
- 📏 Finished Size: approximately 7 in tall with legs
- 💡 Difficulty: Intermediate
- 🎁 Great For: fan gift, shelf display, character collection, desk décor
Materials for This SpongeBob Crochet Pattern
- Yellow yarn: approximately 180 yards — this is your main color. Any worsted or DK weight works. Got a big leftover skein from a blanket project? Now you know where it’s going.
- Brown yarn: approximately 60 yards — the pants section, bottom panel, and leg tops. Stash territory.
- White yarn: approximately 60 yards — the shirt section, arms, eye bases, and sock area on the legs.
- Black yarn: approximately 50 yards — the boots. This is a closed, fully crocheted piece, so you’ll use more black than you’d expect.
- Hook: 3.5mm (approx. US E/4) — go down a size if your tension is loose and stitches look open
- Plastic canvas sheet — cut to fit inside the body panels to hold SpongeBob’s boxy shape. Available at any US craft store in the needlepoint section.
- Polyester fiberfill — for stuffing the limbs and nose
- Felt sheets: blue, black, and white — for the eye layers and teeth
- Tapestry needle
- Stitch markers
- Scissors
- Optional: red felt or red embroidery floss for the tie, black embroidery floss for freckles and smile details
No brand requirements here — any worsted (4) or DK (3) weight yarn in these four colors will work. This is genuinely a pattern you can build from your scrap bin as long as you have enough yellow.
🧶 Scrap Check: Brown, white, and black together add up to about 170 yards — that’s three small leftover skeins or a handful of scraps from previous projects. The yellow is the only color you’ll likely need a fresh skein for.
Abbreviations
| Abbreviation | Meaning |
|---|---|
| ch | chain |
| sc | single crochet |
| inc | increase — 2 sc worked into the same stitch |
| inv dec | invisible decrease — insert hook through front loops only of next 2 stitches simultaneously, complete as one sc |
| mr | magic ring |
| BLO | back loop only — work into the back loop of each stitch in that row/round only |
| FO | fasten off |
| st(s) | stitch(es) |
Note on decreases: All decreases in this pattern are worked as invisible decreases (inv dec). This gives cleaner results on all curved sections — boots, legs, and nose — compared to the standard sc2tog method.
Smart Crafter Tips for Your SpongeBob Crochet Project
Tip 1 — The magic ring sections stack up fast. The arms, boots, legs, eyes, and nose all start with a magic ring, so you’ll be making six separate pieces before you even touch the body panels. Work them in batches — knock out both boots in one sitting, both arms the next. If you haven’t done a magic ring before, our magic ring tutorial gets you there in under two minutes. It’s simpler than it looks.
Tip 2 — The BLO color change rows are doing more than you think. Rows 5 and 9 of the body and side panels are worked in back loop only — this isn’t just a technique note, it creates a visible ridge line that marks the pants waistband and shirt collar on the finished figure. Work these rows carefully. If you want perfectly crisp color lines, change your yarn color at the end of the previous row (not at the beginning of the BLO row). Our seamless color change guide covers exactly how to make this look clean.
Tip 3 — Cut your plastic canvas before you start the body panels. The rectangular body needs a plastic canvas insert to hold its shape — without it, the panels will collapse inward no matter how tightly you stuff. Cut two pieces to fit inside the front/back panels and two narrower strips for the side panels before you start crocheting. You’ll thank yourself during assembly when everything lines up properly. For more on getting the assembly right, our guide to sewing amigurumi parts together is worth a read before you start joining panels.
SpongeBob Crochet Pattern — Every Part, Step by Step
Body — Front and Back Panels (Make 2)
Yarn: brown, white, yellow | Method: foundation chain | Worked in flat rows, turn at end of each row
Row 1: ch 28, sc in 2nd ch from hook, 26 sc [brown] (27)
Rows 2–4: 27 sc [brown] (27)
Row 5: BLO 27 sc [white] (27)
Rows 6–8: 27 sc [white] (27)
Row 9: BLO 27 sc [yellow] (27)
Rows 10–31: 27 sc [yellow] (27)
FO, leave a long tail for seaming.
📌 Color Notes: Change to white before starting Row 5. Change to yellow before starting Row 9. Rows 5 and 9 are both worked in BLO — this creates the visible ridge lines for SpongeBob’s waistband (Row 5) and shirt collar (Row 9). The brown section = pants. The white section = shirt. The yellow section = body.
🧶 Scrap Check: Each front/back panel uses approximately 15 yards of brown (rows 1–4), 15 yards of white (rows 5–8), and 55 yards of yellow (rows 9–31). Make both panels back-to-back before moving on.
Side Panels (Make 2)
Yarn: brown, white, yellow | Method: foundation chain | Worked in flat rows, turn at end of each row
Row 1: ch 9, sc in 2nd ch from hook, 7 sc [brown] (8)
Rows 2–4: 8 sc [brown] (8)
Row 5: BLO 8 sc [white] (8)
Rows 6–8: 8 sc [white] (8)
Row 9: BLO 8 sc [yellow] (8)
Rows 10–31: 8 sc [yellow] (8)
FO, leave a long tail for seaming.
📌 Color Notes: Same color change timing as the front/back panels — change to white before Row 5, change to yellow before Row 9. Rows 5 and 9 in BLO. These narrower panels form the left and right sides of SpongeBob’s body block.
Top Panel (Make 1) and Bottom Panel (Make 1)
Yarn: yellow (top panel), brown (bottom panel) | Method: foundation chain | Worked in flat rows, turn at end of each row
Row 1: ch 9, sc in 2nd ch from hook, 7 sc (8)
Rows 2–27: 8 sc (8)
FO, leave a long tail for seaming.
Make one in yellow (top of body) and one in brown (bottom of body). These are identical in construction — only the color changes.
🧶 Scrap Check: Each of these panels uses approximately 18 yards. The brown bottom panel can easily come from stash — you’re already using brown for the leg tops and pants section on the main panels.
Arms (Make 2)
Yarn: white (rows 1–3), yellow (rows 4–14) | Method: magic ring | Worked in continuous rounds
Round 1: 6 sc in mr [white] (6)
Round 2: (1 sc, inc) × 3 [white] (9)
Round 3: 9 sc [white] (9)
Round 4: BLO (1 sc, inv dec) × 3 [yellow] (6)
Rounds 5–11: 6 sc [yellow] (6)
Round 12: (1 sc, inc) × 3 [yellow] (9)
Round 13: (2 sc, inc) × 3 [yellow] (12)
Round 14: 12 sc [yellow] (12)
Fingers: Without cutting the yarn, continue as follows — ch 3, sc in 2nd ch from hook, 2 sc. Fold the arm flat and sc 6 sts together to close. Ch 4, sc in 2nd ch from hook, 3 sc. Repeat once more for a third finger. FO and weave in ends.
📌 Construction Note: The white section (rounds 1–3) forms SpongeBob’s gloved hand. Round 4 switches to yellow and works in BLO — this creates the ridge line at the wrist/cuff. The arm narrows at the wrist via the inv dec in round 4, then gradually widens toward the shoulder through rounds 12–14.
Boots (Make 2)
Yarn: black | Method: magic ring | Worked in continuous rounds
Round 1: 6 sc in mr (6)
Round 2: 6 inc (12)
Round 3: (1 sc, inc) × 6 (18)
Round 4: 6 inc, 12 sc (24)
Rounds 5–7: 24 sc (24)
Round 8: 6 inv dec, 12 sc (18)
Round 9: (1 sc, inv dec) × 6 (12)
Round 10: 12 sc (12)
Round 11: (3 sc, inc) × 3 (15)
Rounds 12–14: 15 sc (15)
Round 15: (3 sc, inv dec) × 3 (12)
Round 16: 6 inv dec (6)
FO, leave a long tail. Do not stuff — the leg will insert into the open top of the boot.
📌 Construction Note: Rounds 1–7 build the toe of the boot (expanding to an oval). Rounds 8–9 close the toe with inv dec. Rounds 10–16 form the boot shaft — it widens slightly at the ankle (rounds 11–14) then closes at the top. The white end of the leg will sit inside this top opening during assembly.
🧶 Scrap Check: Each boot uses approximately 22–25 yards of black. Both boots together will use close to your full 50-yard black allocation — don’t cut this one too close.
Legs (Make 2)
Yarn: brown (rounds 1–3), yellow (rounds 4–8), white (rounds 9–14) | Method: magic ring | Worked in continuous rounds
Round 1: 6 sc in mr [brown] (6)
Round 2: 6 inc [brown] (12)
Round 3: 12 sc [brown] (12)
Round 4: BLO (2 sc, inv dec) × 3 [yellow] (9)
Rounds 5–8: 9 sc [yellow] (9)
Rounds 9–14: 9 sc [white] (9)
Do not FO. Leave open — the white end inserts into the boot top during assembly.
📌 Construction Note: The brown section (rounds 1–3) forms the wide top of the leg that attaches to the body bottom. Round 4 narrows the leg via BLO + inv dec and switches to yellow. Rounds 9–14 in white are the sock section — this is the end that slides into the boot.
Eyes (Make 2)
Yarn: white | Method: magic ring | Worked in continuous rounds
Round 1: 6 sc in mr (6)
Round 2: 6 inc (12)
Round 3: (1 sc, inc) × 6 (18)
Round 4: (2 sc, inc) × 6 (24)
FO, leave a long tail for sewing. These are flat circles — do not stuff.
📌 Finishing Note: The white crocheted circles are just the base of the eyes. The blue iris, black pupil, and eyelashes are all added with felt and embroidery during the decoration stage. Cut blue felt circles slightly smaller than the white base, then black felt smaller still for the pupil.
Nose (Make 1)
Yarn: yellow | Method: magic ring | Worked in continuous rounds
Round 1: 8 sc in mr (8)
Rounds 2–3: 8 sc (8)
Round 4: (2 sc, inv dec) × 2 (6)
Round 5: 6 sc (6)
FO, leave a long tail. Stuff lightly before closing — the nose has a slight taper from base to tip.
Assembling Your SpongeBob Crochet Figure
- Cut plastic canvas pieces. Cut two rectangles to fit snugly inside the front and back panels, and two narrow strips for the side panels. These keep the body boxy and prevent the panels from caving in once stuffed.
- Join the body box. Sew the front, back, side, top, and bottom panels together with your tapestry needle and matching yarn, forming a hollow rectangle. Align the brown, white, and yellow color sections precisely across all panels — the stripe lines should run evenly around all four sides.
- Insert plastic canvas and stuff. Slide the canvas pieces into the body cavity against the inner walls, then fill the remaining space with polyester fiberfill. Close the last seam once stuffed to your desired firmness.
- Attach the arms. Sew the white (glove) end of each arm to the white shirt section of the side panels, one arm on each side. The arm should emerge from approximately the middle of the white section width-wise.
- Assemble the legs and boots. Insert the white sock end of each leg into the open top of a boot and sew to secure. Then attach the brown (wide) end of each completed leg-boot unit to the bottom panel of the body — one leg toward each front corner.
- Attach the eyes. Position both white eye circles on the upper portion of the front panel so they touch in the middle. Sew flat against the surface. Add felt layers (blue → black) and embroider eyelashes above each eye in black.
- Attach the nose. Sew the wider base of the nose directly below and between the eyes, pointing outward from the face.
- Embroider the face details. Use black embroidery floss or thin black yarn for the wide smile and the small brown freckles (2–3 on each cheek). Add red cheeks with a small brush of red yarn or felt circles. Attach white felt teeth at the bottom of the smile — SpongeBob has two prominent front teeth.
- Add the clothing details. Embroider a black collar and red tie onto the white shirt section. Add a dashed black horizontal line at the top of the brown pants section for the belt. Optional: add thin blue and red stripes across the white sock sections on the legs.
- Add the sponge holes. Using a slightly darker yellow or olive green yarn or embroidery floss, embroider small irregular circles scattered across the yellow body sections on all four sides. Keep the shapes uneven — SpongeBob’s holes are organic-looking, not geometric.
💡 Stretch It Further: The panel construction in this SpongeBob crochet pattern is reusable. Swap yellow for pink and brown for pink on the pants section and you’ve got the bones of a Patrick Star figure. Make both together as a matched set — they look great displayed side by side and cost under $8 in yarn total. Or skip the face embroidery and hang the finished SpongeBob from a bag strap with a lobster clasp for a bold keychain. One pattern, three ways to use it. Looking for more character patterns? Our free Stitch amigurumi pattern uses a more traditional round construction if you want a different build style, and our Baby Yoda amigurumi is another great add to a pop culture shelf display.
Mia’s Take
About 350 yards, four colors, a sheet of plastic canvas, and a few felt scraps — that’s everything it took to build one of the most recognizable shapes in cartoon history. The panel construction looks complicated on a materials list but it’s honestly just rectangles: make them, sew them into a box, add the details. Most of the color work comes from your stash. If you’ve got a leftover yellow skein from anything — a hat, a granny square project, a half-finished baby blanket you abandoned — this is where it ends up. Make one for a fan and bundle it with our Stitch pattern for an instant handmade character gift set that costs almost nothing. That’s the kind of project I’m here for. 🧶
What yarn is best for this SpongeBob crochet project?
Any worsted (weight 4) or DK (weight 3) yarn works perfectly. Since SpongeBob is boxy, using a slightly stiffer acrylic yarn can help maintain his shape.
Why does this pattern use plastic canvas?
SpongeBob is a rectangle, not a sphere. Plastic canvas inserts prevent the sides from bulging out when stuffed, keeping him “square” as intended.
How difficult is the assembly for this SpongeBob crochet pattern?
It is rated as Intermediate. While the crochet stitches are simple (mostly single crochet), sewing the panels together and aligning the color stripes requires patience and precision.