The Baby Bull Amigurumi Keychain Pattern You’ll Keep Making on Repeat
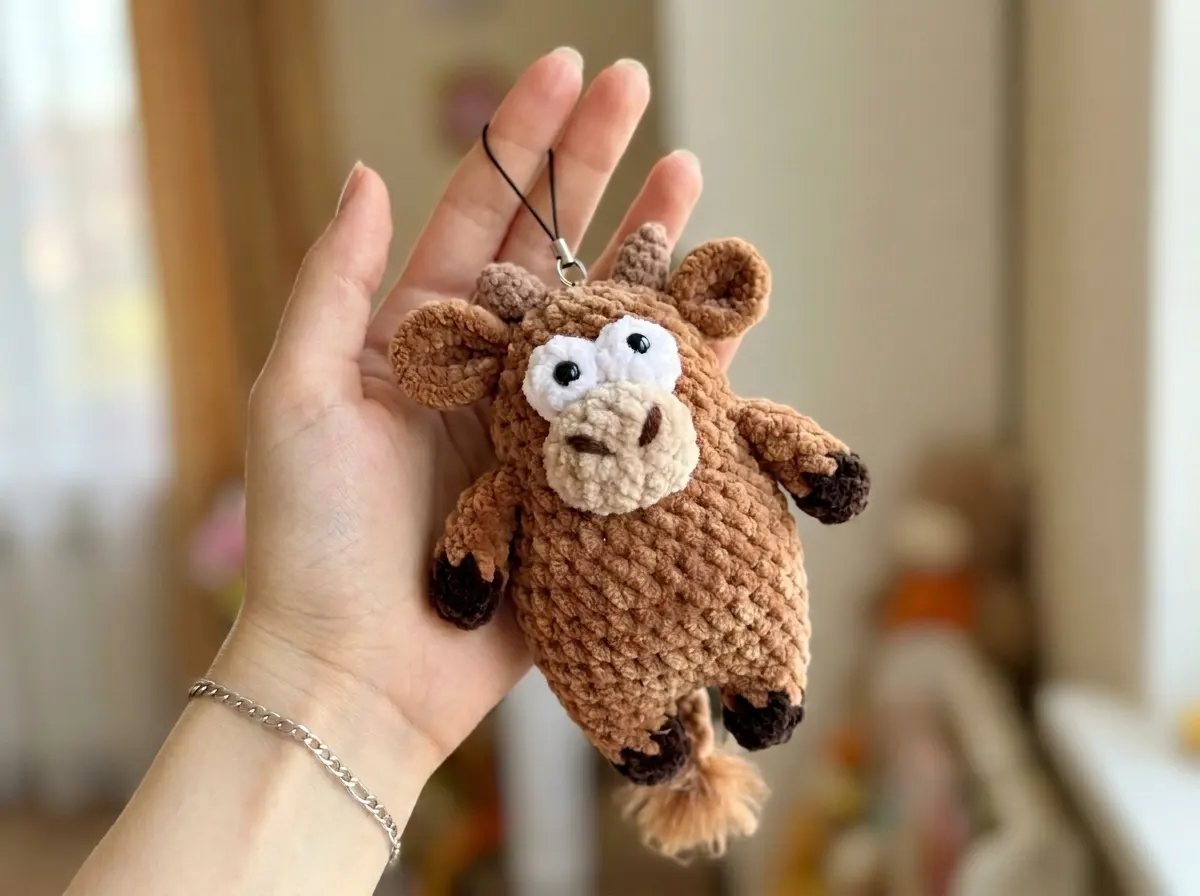
This baby bull amigurumi keychain pattern is one I keep coming back to — there’s something about those tiny stubbed horns and the built-in crocheted tail that makes him genuinely irresistible clipped onto a bag or dangling from a set of keys. I made this in chenille for maximum density and that velvety texture you just can’t put down. Every round has been counted twice. He works up faster than you’d expect. Let’s make him.
📋 Pattern Quick Stats
- Difficulty: Intermediate
- Finished Size: approx. 5.1 in (13 cm) including horns
- Hook Size: G/6 (4.0 mm) for all body parts; B/1 (2.25 mm) for horns
- Yarn Weight: Bulky (5) chenille/velvet for body; DK/Light Worsted (3) for horns and sewing
- Techniques: magic ring, increase, invisible decrease, leg joining, built-in tail, continuous rounds
- Estimated Time: 4–6 hours
Materials for This Amigurumi Keychain Pattern
The chenille yarn is what makes this bull — that dense, almost plush fabric hides the stuffing completely and holds its shape beautifully. Here’s exactly what you’ll need.
Yarn
- Bulky (5) chenille/velvet yarn in four colors:
- Brown — main body color
- Dark brown — hooves (small amount)
- White — optional eye backing circles (very small amount)
- Light brown — muzzle (small amount)
- DK/Light Worsted (3) yarn in a color matching the brown body — used for crocheting the horns (on the smaller hook) and for sewing all parts together. US alternatives: Drops Muskat or Paintbox Simply DK Cotton. A small amount goes a long way here.
- Novelty/eyelash yarn — a very small amount in brown or tan for the tail finish. Look for something fluffy with texture at your local craft store — any eyelash or boucle yarn with movement works well.
Chenille is classified as Bulky (5) on the Craft Yarn Council yarn weight system. If you substitute, match that weight category and your finished size should stay consistent.
Tools
- G/6 (4.0 mm) crochet hook — for all body, arm, leg, ear, muzzle, and eye backing parts
- B/1 (2.25 mm) crochet hook — for horns only
- 6–8 mm black safety eyes (×2)
- Polyfill stuffing — Poly-Fil by Fairfield is my go-to, widely available at US craft stores
- Blunt-tip tapestry needle for sewing parts together
- Stitch marker
- Scissors
- Pet slicker brush — optional, for fluffing out the novelty yarn tail
- Optional: Keychain ring or lobster clasp to finish as an actual keychain
💡 Emma’s Tip: Chenille yarn is wonderful but it does make it harder to see your individual stitches. Work under good light and place a stitch marker at the start of every single round — no exceptions. I count out loud when I’m working chenille. Not silently. Out loud. You’ve been warned.
Abbreviations Used in This Pattern
| Abbreviation | Meaning |
|---|---|
| mr | magic ring |
| ch | chain |
| sc | single crochet |
| inc | increase — 2 sc worked into the same stitch |
| dec | decrease — see important note below |
| sl st | slip stitch |
| FLO | front loop only |
| BLO | back loop only |
| FO | fasten off |
| ( ) × n | repeat the sequence in parentheses the specified number of times |
| (number) | total stitch count at the end of that row |
⚠️ Important note on decreases: Wherever this pattern calls for dec, I always use the invisible decrease method — inserting the hook through the front loops only of two stitches simultaneously. It eliminates the visible gap that a standard sc2tog leaves behind, and on chenille that gap shows more than you’d expect. If you’ve never done it before, our complete invisible decrease tutorial walks through it stitch by stitch. It’s one of those techniques that genuinely changes the look of your finished piece.
Special Techniques in This Amigurumi Keychain Pattern
This pattern is rated intermediate — not because the individual stitches are difficult, but because of two structural elements that are new to many crocheters: the leg-joining method and the built-in tail. Read through both descriptions before you start. Neither is hard once the logic clicks.
- Magic Ring: Every part in this pattern begins with a magic ring. The adjustable start closes completely, leaving no hole at the center — which matters for a piece this small. If you’re not confident with yours yet, our step-by-step magic ring tutorial covers it thoroughly.
- Leg Joining: The body is worked continuously starting from the second leg. You’ll ch 2 to bridge the two legs and then work sc stitches around both in a single round. The first time I did this I frogged back once — it felt confusing in description but obvious once I had it in my hands. Read Row 5 slowly before you begin, and hold both legs side by side before you hook in.
- Built-in Tail: Row 8 of the body builds the tail directly into the round using chains and slip stitches. No sewing required for the tail base. It needs to land between the legs — if it doesn’t, work an extra sc before the chain to shift its position.
- Safety Eyes: Eyes go in between Rows 19 and 20 of the body, before you close up. If you’re making this as a keychain for a child under 3 years old, embroider the eyes instead of using plastic safety eyes — the U.S. Consumer Product Safety Commission provides toy safety guidance worth reviewing before gifting to small children.
If this is your first amigurumi project, I’d recommend starting with our complete beginner’s guide to amigurumi — it covers magic rings, continuous rounds, stuffing, and assembly from the very beginning before you tackle a pattern with joining steps.
Free Baby Bull Amigurumi Keychain Pattern
Work in continuous rounds throughout unless otherwise noted. Use a stitch marker at the beginning of every round. All parts are worked with the G/6 (4.0 mm) hook unless the instructions specify otherwise.
Arms (Make 2)
Colors: Dark brown for Rows 1–2, brown for Rows 3–7
Start: Magic ring
Row 1: 6 sc in mr [dark brown] (6)
Row 2: 6 sc [dark brown] (6)
Rows 3–6: 6 sc per row (4 rows) [brown] (6)
Row 7: Fold the piece in half and work 3 sc through both layers simultaneously (3)
💡 Note: Switch to brown after completing Row 2. Do not stuff the arms — keeping them flat ensures they fold correctly and attach cleanly in Row 16 of the body.
Ears (Make 2)
Color: Brown
Start: Magic ring
Row 1: 6 sc in mr (6)
Row 2: inc × 6, sl st (12)
FO, cut yarn, leave a tail for sewing.
Legs (Make 2)
Colors: Dark brown for Rows 1–2 (hooves), brown from Row 3 onward
Start: Magic ring
Row 1: 6 sc in mr [dark brown] (6)
Row 2: 6 sc [dark brown] (6)
Row 3: 6 sc [brown] (6)
Row 4: (1 sc, inc) × 3 (9)
💡 Note: For the first leg: FO and cut yarn after Row 4. Set aside.
For the second leg: do NOT fasten off after Row 4 — continue directly into Row 5 of the body below.
Body and Head (Make 1)
Color: Brown
Start: Continued from the second leg
Row 5: Ch 2, then work 10 sc around the first leg (the 10th sc is worked into the first stitch of the first leg, under the chain), 2 sc into the ch-2 space, 10 sc around the second leg, 2 sc into the ch-2 space (24)
⚠️ Leg joining tip: Take your time with Row 5. Hold both legs side by side, flat against each other, before you hook in. You’re working around each leg and bridging them with a ch-2 at each gap. If your count doesn’t reach exactly 24 at the end of this row, frog back to the beginning of Row 5 and try again. Getting this foundation right makes everything else fall into place.
Row 6: (3 sc, inc) × 6 (30)
Row 7: 30 sc (30)
Row 8: 29 sc, ch 4, starting from the 2nd ch from hook work 3 sl st along the chains, then 1 sl st back into the same body stitch (this forms the tail), 1 sc (30)
💡 Tail placement: The tail should land between the legs after Row 8. If it’s sitting to the side, work 1–2 extra sc before the chain sequence to shift its position. This is one of those details that makes all the difference in the final look.
Rows 9–12: 30 sc per row (4 rows) (30)
Row 13: (3 sc, dec) × 6 (24)
Rows 14–15: 24 sc per row (2 rows) (24)
Row 16: 4 sc, 3 sc worked together with first arm (insert hook through both the body stitch and the edge of the arm simultaneously for each of the 3 stitches), 9 sc, 3 sc worked together with second arm, 5 sc (24)
💡 Arm alignment: If the arms aren’t sitting straight when you reach Row 16, work 1–2 extra offset stitches before beginning this row. It corrects the alignment without changing the total stitch count. I’ve had to do this almost every time — don’t panic if the arms look slightly sideways before you attach them.
Rows 17–19: 24 sc per row (3 rows) (24)
⚠️ Insert safety eyes now — between Rows 19 and 20, before the opening gets too small. If you’re making the optional white eye backing circles, insert the safety eyes through the center of those first, then push through the body at your chosen position. Press the locking washers firmly. Finish stuffing the body firmly before continuing to Row 20.
Row 20: (2 sc, dec) × 6 (18)
Row 21: 4 sc, 2 sc worked together with first ear (fold the ear in half, catch the edge stitches from both sides in the same sc), 7 sc, 2 sc worked together with second ear, 3 sc (18)
Row 22: (1 sc, dec) × 6 (12)
Row 23: dec × 6 (6)
Close the opening, FO, cut yarn, and weave in the end.
Muzzle (Make 1)
Color: Light brown
Start: Ch 4 foundation chain
Row 1: inc in 2nd ch from hook, 1 sc, 4 sc in last ch, then continue working along the other side of the foundation chain: 1 sc, inc (10)
Row 2: 1 sc, inc, 1 sc, inc, 2 sc, inc, 1 sc, inc, 1 sc (14)
Row 3: 14 sc, sl st (14)
FO, cut yarn, leave a long tail for sewing.
Eye Backings — Optional (Make 2)
Color: White
Start: Magic ring
Row 1: 6 sc in mr, sl st (6)
FO, cut yarn. Insert a safety eye through the center of each circle before attaching to the body.
💡 Note: If you’ve already inserted safety eyes directly into the body between Rows 19–20, skip this piece entirely. The white backing circles are an optional finishing detail — they give the eyes a more expressive look, but the bull works beautifully either way.
Horns (Make 2)
Hook: B/1 (2.25 mm) — switch to the smaller hook for these
Yarn: DK/Light Worsted (3), color matching brown
Start: Magic ring
Row 1: 6 sc in mr (6)
Row 2: 6 sc (6)
Row 3: (1 sc, inc) × 3 (9)
Rows 4–5: 9 sc per row (2 rows) (9)
Stuff lightly. FO, leave a long tail for sewing.
💡 Hook note: The B/1 (2.25 mm) hook gives the horns a tight, defined structure that holds its shape once sewn in place. Using the smaller hook on the DK yarn here is intentional — the resulting fabric is stiff enough to stand upright. Trust me, it’s worth the hook swap.
Assembly
- Eyes: If using white backing circles, ensure the safety eye is already inserted through each circle. Position both eyes symmetrically at Rows 19–20 and press the locking washers firmly from the inside. Once locked, they cannot be repositioned — so take your time with placement before committing.
- Muzzle: Center the oval muzzle below and between the eyes. Pin it in place before you start sewing — I cannot stress this enough. Add a small amount of stuffing as you sew to give the muzzle a subtle rounded shape. Sew all the way around the edge cleanly.
- Horns: Sew the horns to the top of the head just above where the ears were attached during Row 21 of the body. Space them evenly and angle them slightly outward if you’d like a little more character.
- Tail finishing: Thread a small length of fluffy novelty yarn through the crocheted tail tip (formed in Row 8). Tie a secure knot, then brush out the novelty yarn gently with a pet slicker brush and trim to your desired length. Even a half-inch of fluffy tail reads beautifully at small scale.
- Keychain finishing (optional): Attach a keychain ring through the loop of a horn or through a small added chain at the crown of the head. A jump ring or lobster clasp both work well with chenille. This is what turns the bull from a plushie into an amigurumi keychain — a small detail that makes it much more giftable.
Finishing Details and Embroidery
Once all parts are sewn in place, do a final pass over the whole piece. The body should feel firm and evenly stuffed — no lumps at the sides, no soft spots. If you find one, open a small gap and add a little more stuffing before sealing.
Weave in all ends carefully. Chenille has a tendency to work loose at the tails over time, so I always double-knot before weaving and tuck at least an inch of end inside the body cavity. It takes an extra minute and it’s always worth it.
For the nose, the muzzle can stay plain or you can embroider two small nostrils with the DK yarn — two short vertical lines, a few stitches each, placed symmetrically in the lower half of the muzzle. This is one of those details that makes all the difference. The whole face shifts the moment you add them. I always do the nostrils last, and every time it feels like meeting the bull for the first time.
Emma’s Note
I’ve made this little bull more times than I expected to, and he’s become one of my go-to recommendations for anyone who wants a satisfying intermediate project that doesn’t take forever. The leg joining feels intimidating in the written instructions and clicks instantly once you’re holding it in your hands — that’s just how it is with structural joins. If your tail ends up somewhere it shouldn’t be, frog back to Row 8 and shift a stitch. If your arms aren’t straight, work that offset stitch before Row 16. Every count in this pattern adds up exactly — I’ve checked twice. Happy hooking! 🧶
What yarn is best for this baby bull amigurumi keychain pattern?
Bulky (5) chenille or velvet yarn gives the best results — the dense, plush fabric hides stuffing completely and holds its shape well at small scale. US options like Bernat Baby Velvet or Premier Parfait work beautifully and are widely available at craft stores.
How long does it take to crochet this amigurumi keychain pattern?
Most intermediate crocheters complete this baby bull in 4–6 hours. The leg-joining step may add a little extra time on your first try, but once that logic clicks the rest works up quickly.
Can beginners make this baby bull amigurumi keychain pattern?
This pattern is rated intermediate because of two structural techniques — leg joining and the built-in tail. If you’re new to amigurumi, we recommend working through our complete beginner’s guide first. Confident beginners who have made a basic amigurumi before should be comfortable tackling it.