The Cutest Hamster Amigurumi You’ll Ever Make
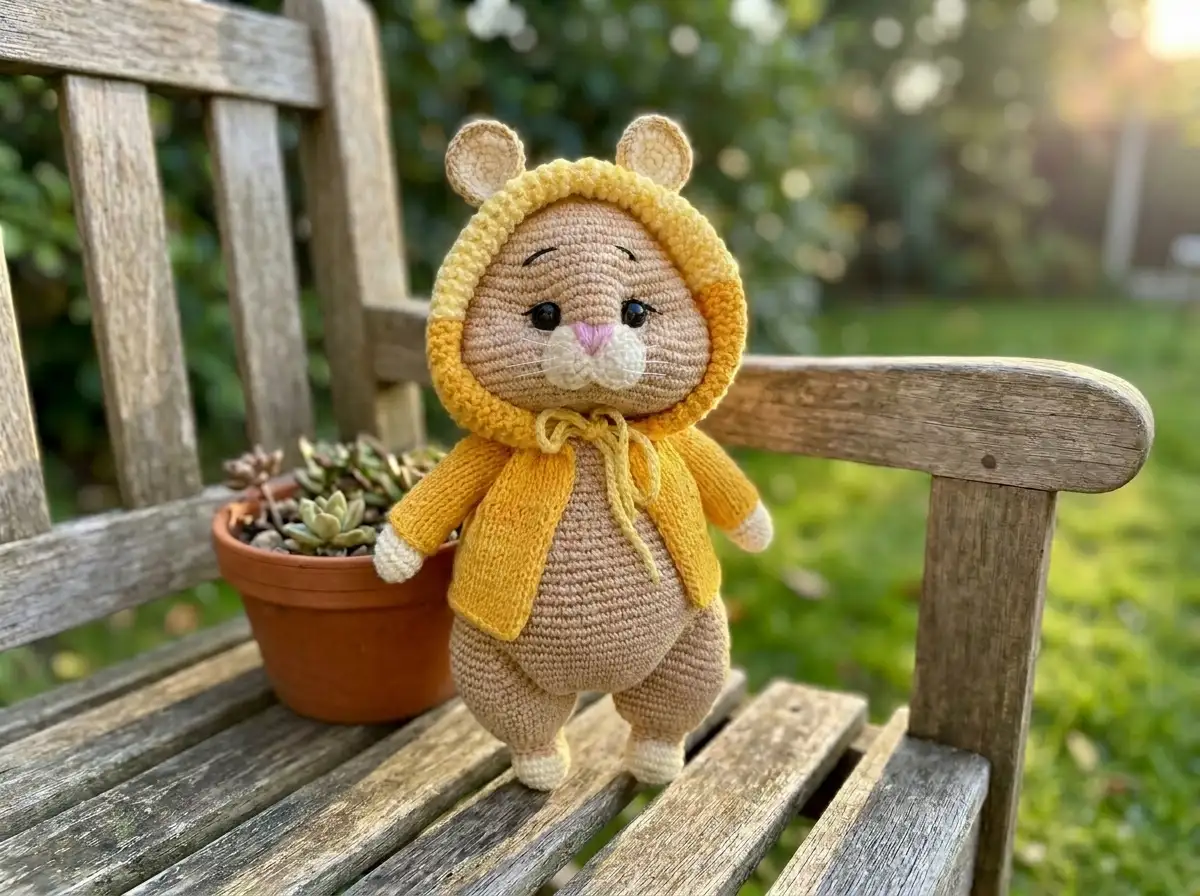
This free hamster amigurumi pattern creates the most irresistibly round, cheek-puffed little hamster you’ve ever seen — warm biscuit beige with sweet vanilla cream pouches, glossy 10mm safety eyes, and embroidered lashes that give him the most precious expression. He sits just under 10 inches tall, wonderfully squishy, with a delicate pink embroidered nose and little thread whiskers that bring the whole face together. Let’s make him.
🩷 Pattern Highlights
- Cuteness Rating: 🩷🩷🩷🩷🩷
- Finished Size: ~9.75 in (25 cm) tall
- Difficulty: Intermediate
- Hook Size: B/1 (2.25 mm)
- Yarn Palette: warm biscuit beige + sweet vanilla cream
- Key Detail: sculpted cheek pouches, embroidered lashes and brows, 10mm glossy safety eyes, pink embroidered nose
- Estimated Time: 8–12 hours
What You’ll Need for This Hamster Amigurumi
Yarn
Main Color (Beige): This is the warm biscuit beige that covers the head, body, and most of the arms and legs. The recommended yarn is YarnArt Jeans — a smooth, tightly spun cotton-acrylic blend that shows every stitch beautifully and holds the round, firm shape hamsters need. US alternatives include Drops Muskat or Paintbox Simply Cotton DK. Both are classified as DK / Light Worsted (Weight 3) — lightweight, smooth, and perfect for showing off tiny stitch details at this scale.
If you prefer a slightly larger, softer hamster, Alize Cotton Gold Hobby (US alternative: Lion Brand 24/7 Cotton, Worsted Weight 4) gives a finished size of about 8.85 in (22.5 cm). Both yarn options produce a beautiful result — the DK version just gives a slightly crisper stitch definition.
Accent Color (Cream/White): This sweet vanilla cream covers the muzzle circles, ear inner pieces, and the paw section of the arms and legs. It’s the color that makes his face look soft and kissable. Use the same yarn brand in a lighter colorway — YarnArt Jeans #03 (cream/white) or the same DK alternative in natural cream.
All Materials
- Yarn — Main Color (Beige): YarnArt Jeans #07 (beige) or US alternative: Drops Muskat / Paintbox Simply Cotton DK — DK/Light Worsted (3)
- Yarn — Accent Color (Cream/White): YarnArt Jeans #03 (cream/white), same DK alternative in cream
- Embroidery Thread: White, black, and soft pink — for embroidering the eye whites, lashes and brows, nose, and whiskers
- Sweater Yarn (optional): Any DK yarn in your favorite pastel — lavender and dusty rose both look stunning on this hamster
- Hook: B/1 (2.25 mm) for standard tight tension; 1.75–2.0 mm (no US letter equivalent) if your tension runs looser
- Safety Eyes: Two 10mm glossy black safety eyes — this size gives him that perfect round-eyed, wide-awake hamster expression
- Polyfill Stuffing: Good quality polyester fiberfill — Poly-Fil by Fairfield is widely available at Joann, Michaels, and Hobby Lobby. You’ll need a generous amount for the head and body
- Tapestry Needle: For sewing parts and weaving in ends
- Long Sculpting Needle: For cinching the muzzle pouches into shape — this is what creates those signature stuffed cheeks
- Stitch Marker: Non-negotiable for tracking rounds
- Scissors
- 2 mm knitting needles (optional): Only needed if you’d like to add the little sweater
Abbreviations Used in This Pattern
| Abbreviation | Meaning |
|---|---|
| mr | magic ring |
| sc | single crochet |
| hdc | half double crochet |
| dc | double crochet |
| inc | increase — 2 sc worked into the same stitch |
| dec | invisible decrease — insert hook through front loops only of next 2 stitches simultaneously, yarn over, pull through, yarn over, pull through 2 loops |
| hdc-inc | half double crochet increase — 2 hdc worked into the same stitch |
| ch | chain |
| sl st | slip stitch |
| BLO | back loop only |
| FO | fasten off |
| st(s) | stitch(es) |
🩷 Chloe’s Note on Decreases: Throughout this pattern, dec always means the invisible decrease — worked through the front loops only of the next two stitches. This keeps the surface of his cheeks and body smooth and gap-free. It’s the only decrease method used on this hamster, and it makes a real difference in how polished he looks.
Before You Begin — Details That Make This Hamster Amigurumi Special
Those Cheek Pouches Are Everything
The head of this hamster is designed to create the most iconic hamster feature — those impossibly full, stuffed cheek pouches. Row 18 is where the magic happens: a sudden burst of increases forms two separate rounded bulges on either side of the face. After working those rows, you’ll shape and cinch the pouches into position during assembly using your long sculpting needle. Take your time with this step — the cheeks are what make him unmistakably a hamster, and getting them symmetrical is deeply satisfying.
Safety Eyes — Place Them Before You Close the Head
Safety eyes go in between Rows 15 and 16 of the head, with 9–10 stitches of space from edge to edge. There’s a useful reference point in Row 18: count 2 stitches after the last increase of that row and you’ll find the exact eye position. If this is your first time working with safety eyes, our safety eyes tutorial walks you through how to position and press in the washers so they sit perfectly level every single time.
🩷 Chloe’s Detail Tip: Before you press those washer backs on, hold the head under a bright lamp and look at it directly from the front. Check that both eyes are at the same height and the same distance from center. Once the washers click in, there’s no undoing it — so that extra thirty seconds of checking is absolutely worth it.
The Body Is Built From the Legs Up
This pattern uses a fun construction technique where the body grows directly from the joined legs — no seam at the hip. The left and right legs are worked separately, then connected with a chain bridge, and the body continues up from there. The belly increases in the early body rows create the gorgeous rounded tummy that makes him look perfectly hamster-shaped. Stuff as you go to keep control of the shape — our guide to stuffing amigurumi has tips for building a firm, even fill that holds the roundness in all the right places.
Pattern
Head (×1)
Yarn: Main color (beige)
Start: Magic ring
Row 1: 7 sc in mr (7)
Row 2: 7 inc (14)
Row 3: (1 sc, inc) × 7 (21)
Row 4: 1 sc, inc, (2 sc, inc) × 6, 1 sc (28)
Row 5: (3 sc, inc) × 7 (35)
Row 6: 2 sc, inc, (4 sc, inc) × 6, 2 sc (42)
Row 7: (5 sc, inc) × 7 (49)
Row 8: 3 sc, inc, (6 sc, inc) × 6, 3 sc (56)
Rows 9–10: 56 sc (2 rows) (56)
Row 11: (7 sc, inc) × 7 (63)
Row 12: 4 sc, inc, (8 sc, inc) × 6, 4 sc (70)
Row 13: (9 sc, inc) × 7 (77)
Rows 14–17: 77 sc (4 rows) (77)
🩷 Eye Placement: Insert safety eyes between Rows 15 and 16, with 9–10 stitches from edge to edge. Do not press the washers in yet — just position and check. See the reference note for Row 18 below.
Row 18: 10 sc, (inc, 1 sc) × 7, 7 inc; 15 sc, 7 inc; (1 sc, inc) × 7, 10 sc (105)
🩷 Chloe’s Note: This is the row where those signature cheek pouches bloom. The two clusters of increases form the separate rounded bulges on either side of the face. It’s the most satisfying row in the whole pattern — watch the shape transform. For eye placement reference: after completing Row 18, count 2 stitches after the last increase and confirm your eye position looks right before pressing the washers in.
Rows 19–20: 105 sc (2 rows) (105)
Row 21: 43 sc, dec, 15 sc, dec, 43 sc (103)
Row 22: 42 sc, dec, 15 sc, dec, 42 sc (101)
Row 23: 41 sc, dec, 6 sc, dec, 7 sc, dec, 41 sc (98)
Row 24: (5 sc, dec) × 14 (84)
Row 25: (10 sc, dec) × 7 (77)
Row 26: (9 sc, dec) × 7 (70)
Row 27: (8 sc, dec) × 7 (63)
Row 28: (7 sc, dec) × 7 (56)
Row 29: (6 sc, dec) × 7 (49)
Row 30: (5 sc, dec) × 7 (42)
Row 31: (4 sc, dec) × 7 (35)
Row 32: (3 sc, dec) × 7 (28)
Stuff lightly — enough to hold the shape, but leave room to adjust during the muzzle cinching step. Leave a long tail for sewing.
Arms (×2)
Yarn: Start in accent color #03 (cream/white), change to main color (beige) at Row 7
Start: Magic ring
Row 1: 6 sc in mr (6)
Row 2: 6 inc (12)
Row 3: (1 sc, inc) × 6 (18)
Rows 4–5: 18 sc (2 rows) (18)
Row 6: 6 sc, 3 dec, 6 sc [continue in color #03] (15)
Row 7: (3 sc, dec) × 3 [change to main color on last stitch of Row 6] (12)
Rows 8–20: 12 sc (13 rows) (12)
Row 21: 6 dec (6)
Stuff only the cream paw section firmly; stuff the arm tube lightly. If crocheting arms on directly: fold flat and work 3 sc across to attach. If sewing on later: close through the front loops.
Right Leg (×1)
Yarn: Start in accent color #03 (cream/white), change to main color (beige) at Row 7
Start: Magic ring
Row 1: 7 sc in mr (7)
Row 2: 7 inc (14)
Row 3: (1 sc, inc) × 7 (21)
Rows 4–5: 21 sc (2 rows) (21)
Row 6: (1 sc, dec) × 7 [in color #03] (14)
Rows 7–8: 14 sc (2 rows) [main color] (14)
Row 9: (1 sc, inc) × 7 (21)
Row 10: 1 sc, inc, (2 sc, inc) × 6, 1 sc (28)
Rows 11–12: 28 sc (2 rows) (28)
Row 13: 14 sc, 4 inc, 10 sc (32)
Row 14: 32 sc (32)
FO, cut yarn. Set aside.
Left Leg (×1)
Yarn: Start in accent color #03 (cream/white), change to main color (beige) at Row 7
Start: Magic ring
Rows 1–12: Work same as Right Leg (28)
Row 13: 10 sc, 4 inc, 14 sc (32)
Row 14: 32 sc (32)
Do not cut yarn — the body continues directly from here. Ch 2 and join to the Right Leg. Work: 32 sc across Right Leg, 2 sc across the ch bridge, 32 sc across Left Leg, 2 sc across the remaining ch bridge. (68 total)
🩷 Chloe’s Note: The little chain bridge between the legs is what creates that continuous hip opening. Keep your tension even across the chains — it’ll make the body foundation row much easier to work cleanly.
Body (×1 — continued from Legs)
Yarn: Main color (beige)
Start: Continued from leg join (68 sts)
Row 1: 68 sc (68)
Row 2: inc, 21 sc, (1 sc, inc) × 10, 23 sc, inc, 2 sc (80)
Row 3: 29 sc, 19 inc, 32 sc (99)
🩷 Chloe’s Note: Row 3 is where that glorious round belly appears. All those consecutive increases in the center create the chubby tummy bulge that is pure hamster. From here, the shaping decreases taper it back in — watch the silhouette form as you go.
Row 4: 24 sc, dec, 44 sc, dec, 27 sc (97)
Row 5: 24 sc, 2 dec, 38 sc, 2 dec, 27 sc (93)
Row 6: 25 sc, dec, 36 sc, dec, 28 sc (91)
Row 7: 25 sc, dec, 34 sc, dec, 28 sc (89)
Row 8: 25 sc, dec, 32 sc, dec, 28 sc (87)
Row 9: 25 sc, dec, 30 sc, dec, 28 sc (85)
Row 10: 25 sc, dec, 28 sc, dec, 28 sc (83)
Row 11: 25 sc, dec, 26 sc, dec, 28 sc (81)
Row 12: 25 sc, dec, 24 sc, dec, 28 sc (79)
Row 13: 25 sc, dec, 22 sc, dec, 28 sc (77)
Row 14: 77 sc (77)
Row 15: (9 sc, dec) × 7 (70)
Rows 16–17: 70 sc (2 rows) (70)
Row 18: (8 sc, dec) × 7 (63)
Rows 19–20: 63 sc (2 rows) (63)
Row 21: (7 sc, dec) × 7 (56)
Rows 22–23: 56 sc (2 rows) (56)
Row 24: (6 sc, dec) × 7 (49)
Rows 25–26: 49 sc (2 rows) (49)
Row 27: (5 sc, dec) × 7 (42)
Rows 28–29: 42 sc (2 rows) (42)
Row 30: (4 sc, dec) × 7 (35)
Row 31: 35 sc (35)
Row 32: 35 sc — or, to attach arms while crocheting: 11 sc, 3 sc attaching right arm, 14 sc, 3 sc attaching left arm, 4 sc (35)
Row 33: (3 sc, dec) × 7 (28)
Stuff firmly and evenly as you go, paying special attention to the thighs and belly area. Any visible folds will disappear once stuffed — trust the process.
Ears (×4 pieces total — 2 in cream, 2 in beige)
Yarn: Make 2 pieces in accent color #03 (cream/white) and 2 pieces in main color (beige)
Start: Magic ring — work all 4 pieces identically through Row 4
Row 1: 6 sc in mr (6)
Row 2: 6 inc (12)
Row 3: (1 sc, inc) × 6 (18)
Row 4: (2 sc, inc) × 2, 2 hdc, hdc-inc, 2 hdc, inc, (2 sc, inc) × 2 (24)
Cream pieces (#03): Close with a sl st. Cut yarn and weave in ends.
Beige pieces (main color): Do not cut yarn.
To assemble ears: Hold one cream piece and one beige piece with wrong sides together. Using the live yarn from the beige piece, sc around through both layers simultaneously. Fold the assembled ear in half and work 3 sc across the folded base to secure the shape.
Muzzle (×1, made from 2 pieces)
Yarn: Accent color #03 (cream/white)
Start: Magic ring — work both pieces identically
Piece 1:
Row 1: 6 sc in mr
Row 2: 6 inc (12)
Close with sl st. Cut yarn and leave a short tail.
Piece 2:
Row 1: 6 sc in mr
Row 2: 6 inc (12)
Do not cut yarn.
Joining: Using the live yarn from Piece 2, sl st into the last sc of Piece 1. Work (1 sc, inc) × 5, sl st across Piece 1. On Piece 2: sl st, (inc, 1 sc) × 5, sl st.
🩷 Chloe’s Note: The double-circle muzzle is what gives this hamster his unmistakable face — two rounded pouches sitting side by side, like he’s already got snacks tucked away. Once joined, you’ll cinch and sculpt this piece onto the head during assembly to really bring out those cheek shapes. It looks a little unusual off the hook, but on the face it’s absolutely perfect.
Assembly
- Cinch the muzzle pouches. Using your long sculpting needle and the main yarn, thread through the head and muzzle to pull the cheek shapes into rounded position. Add small bits of stuffing into the gaps at the increase sections to fill out the pouches fully. Work slowly — this is the step that defines his whole expression.
- Confirm eye position. If you haven’t pressed the safety eye washers in yet, do it now while you can still see the full face taking shape. Our safety eyes tutorial has the exact technique for making sure they’re centered and level.
- Sew the muzzle to the face. Attach through the back loops of the muzzle edge and through the connecting bars (the spaces between stitches) on the head surface. This gives a clean, invisible join.
- Sew the ears. Attach between Rows 7 and 8 of the head, positioning them symmetrically on either side. Pin with stitch markers before sewing to check the balance.
- Sew the head to the body. Center the head onto the top of the body and sew through the connecting bars. Take your time rotating and checking alignment from the front before committing to the sew.
- Attach the arms. If you crocheted them in at Row 32, they’re already done. If sewing on: attach at the level of Rows 32–33 on the body, one on each side. For tips on getting a clean, invisible join, our guide to sewing amigurumi parts together covers exactly this kind of shoulder attachment.
Making It Extra Cute — The Finishing Details That Define This Hamster Amigurumi
Okay, this is my favorite part. The embroidery and finishing details are where this hamster goes from a lovely crocheted piece to something that makes people say “wait, is that real??” Every detail matters and none of them take long.
The Eye Whites
Using white embroidery thread, work a small curved arc at the upper edge of each safety eye to create a highlight — the white crescent that makes the eyes look glossy and dimensional. Keep it small and consistent on both sides. This tiny detail is the one that catches light and gives him that slightly startled, maximum-cute hamster look.
Lashes and Brows
Using black embroidery thread, add 3–4 short lash strokes under each eye at the level of Rows 11–12, and a soft arched brow above each eye. Don’t overwork these — a light hand gives the sweetest, most natural expression. Hold the piece at arm’s length regularly while you embroider to check the balance between both sides.
The Pink Nose
Using pink embroidery thread, work a small inverted triangle on the center of the muzzle — two or three stitches is all it needs. Position it centered between the two muzzle circles so it sits right at the point where they meet. This little pink nose is the detail that pulls the whole face together.
Whiskers
For the whiskers, use either separated white yarn (pull individual plies apart from your accent color) or fine white sewing thread. Thread your tapestry needle and pass it through the muzzle from one side to the other, leaving equal lengths on both sides. Aim for 3 whiskers per side at a slight downward angle. Trim to an even length — about 1.5–2 inches looks perfect on this scale.
The Blush Cheeks
Using pink embroidery thread, work two small clusters of soft satin stitches — oval-shaped, about 4–5 stitches each — on the upper outer edge of each cheek pouch. Keep the stitches close together and going in the same direction for a smooth, rosy finish. These little blush marks are what make him go from cute to completely irresistible. I can’t stress this enough — do not skip the cheeks.
🩷 Color Variation Ideas: The classic beige-and-cream colorway is perfect, but this hamster is also adorable in soft grey with lavender cheeks, or a warm honey brown with blush cream. If you’re making him a sweater, dusty rose, sage green, or powder blue all look dreamy against the neutral body color.
Chloe’s Final Look
I have been sitting here holding this finished hamster for an embarrassingly long amount of time and I truly cannot stop looking at his little face. Those glossy eyes catching the light, the round cream pouches, the tiny pink nose centered perfectly between them — it’s everything a hamster amigurumi should be. The embroidered lashes give him the most precious, slightly surprised expression, and once you add the blush cheeks the whole piece just clicks into place. Make him in a soft grey next, or a warm honey brown, and line them up on a shelf together. You’ll want to make a whole little family. 🩷
What yarn is best for this hamster amigurumi?
YarnArt Jeans (DK/Light Worsted, Weight 3) is the recommended yarn for its tight, smooth structure that shows every stitch clearly. US alternatives include Drops Muskat or Paintbox Simply Cotton DK in the same weight.
How long does it take to crochet this hamster amigurumi pattern?
Expect 8–12 hours total, depending on your experience level. The most time-intensive steps are the head’s cheek pouch shaping rows and the finishing embroidery.
Is this hamster amigurumi suitable for beginners?
The pattern is rated intermediate. Crocheters comfortable with magic rings, invisible decreases, and the join-as-you-go leg technique will be able to follow it; complete beginners may find the cheek pouch shaping and facial embroidery challenging.