Free Avocado Keychain Amigurumi Pattern — Scrap-Friendly
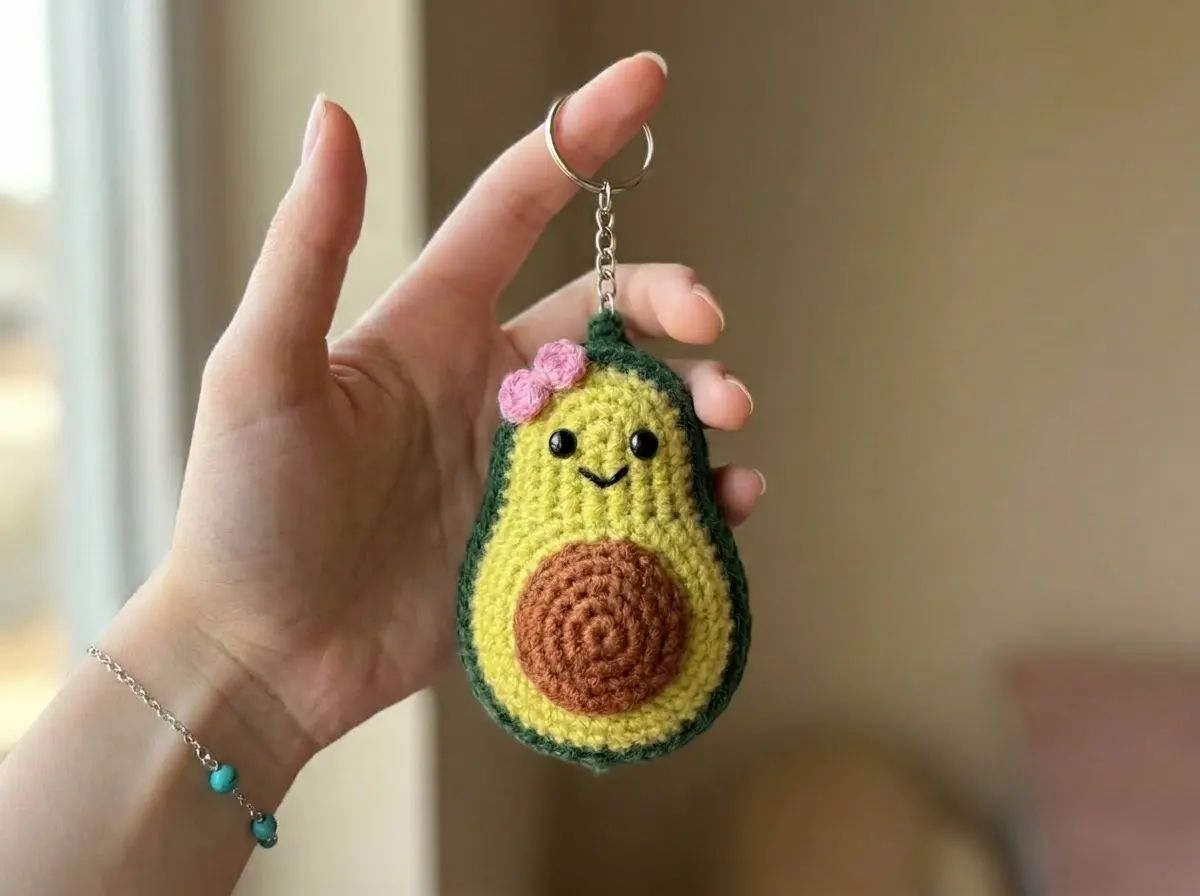
This free avocado keychain amigurumi pattern is one of those projects that was basically designed for your scrap bin — it uses about 100 yards of DK weight yarn total, works up in a couple of hours, and the finished piece is 4 inches of pure charm. I’ve made these in every shade of green I had lying around. Grab whatever you’ve got and let’s get started.
🧶 What You’ll Need From Your Stash
- 💰 Yarn Needed: ~100 yards total (dark green ~50 yds, yellow-green ~35 yds, brown ~12 yds, accent color ~3 yds)
- 🎨 Colors: dark green (skin), yellow-green (flesh), warm brown (pit), any accent (bow) — or similar scraps from your stash
- 🪝 Hook: 2.0mm (steel 4)
- ⏱️ Time: 2–3 hours
- 📏 Finished Size: approx. 4 in (10 cm)
- 💡 Difficulty: Intermediate
- 🎁 Great For: keychains, bag charms, market sets, gifts
Materials for This Avocado Keychain Amigurumi
The whole point of this keychain amigurumi is that it costs almost nothing to make if you already crochet. Here’s the breakdown:
- Dark green yarn — approximately 50 yards. Any DK/Light Worsted (weight 3) in your stash works. YarnArt Jeans is the original — Drops Muskat or Paintbox Simply DK are easy US substitutes. A leftover ball from a previous project is perfect.
- Yellow-green yarn — approximately 35 yards. That soft avocado-green or bright lime you’ve been meaning to use? This is its moment.
- Warm brown yarn — approximately 12 yards. This is the pit. A tiny scrap of any brown you have works fine.
- Accent color — approximately 3 yards for the bow. Pink, red, white — whatever accent scrap you have. The bow is optional but makes the whole thing.
- Hook: 2.0mm (steel 4)
- Polyfill stuffing — a small amount. The pit gets stuffed, and the flesh and skin sandwich around a light fill.
- Stitch marker — one is enough for tracking your rounds
- Tapestry needle — for assembly and weaving in ends
- Keychain ring — optional, for attaching once finished
🧶 Scrap Check: The bow uses roughly 3 yards of yarn — any small scrap works. That little bit left on a half-used bobbin? Don’t throw it out. That’s your bow.
Abbreviations Used in This Avocado Keychain Amigurumi Pattern
| Abbreviation | Meaning |
|---|---|
| ch | chain |
| sl st | slip stitch |
| sc | single crochet |
| dc | double crochet |
| tr | treble crochet |
| inc | increase — 2 sc worked into the same stitch |
| dec | invisible decrease — insert hook through front loops only of next 2 stitches simultaneously, yarn over, pull through, yarn over, pull through 2 loops |
| mr | magic ring |
Smart Crafter Tips
A few things worth knowing before you start this keychain amigurumi that will save you time and yarn.
Row 6 of the flesh and skin looks intimidating — it isn’t. That long row with the chain extension is how the avocado pear shape gets created. You’re essentially building a little stem bump at the top. Read it slowly once before you start, and it’ll make sense as you go. The stitch count ends at 51, and if yours does too, you’re right on track.
The flesh and skin are the same shape. Rows 1–9 of both pieces are identical. You can crochet them at the same time if you have two hooks — one right after the other while the instructions are fresh. This cuts your mental load in half.
First time making a magic ring? Our magic ring tutorial covers the whole thing in a couple of minutes — it’s simpler than it looks on paper.
This yarn weight is smaller than you’d expect. DK at a 2.0mm hook produces a tight, dense fabric with great stitch definition — which is exactly what you want for a keychain amigurumi that’s going to get handled a lot. If your tension is looser, size down to a 1.75mm hook. The Craft Yarn Council’s yarn weight guide is a good reference if you’re unsure where your yarn lands.
Unsure how much stuffing to use? Our stuffing guide walks through exactly how to get that firm-but-not-lumpy feel — especially useful for the pit, which is small enough that overstuffing is easy to do.
Pattern
Part 1: The Pit (×1) — warm brown yarn, ~12 yards
Starting Method: Magic ring
Row 1: 6 sc in mr (6)
Row 2: inc × 6 (12)
Row 3: (inc, 1 sc) × 6 (18)
Row 4: (1 sc, inc, 1 sc) × 6 (24)
Row 5: (3 sc, inc) × 6 (30)
Row 6: 30 sc (30)
Finishing: Leave a long tail for sewing. Do not fasten off completely yet — you’ll stuff the pit lightly as you sew it down onto the flesh.
🧶 Scrap Check: The pit is the smallest piece — about 12 yards of brown. Any warm brown scrap in your bin covers this easily. If your brown is slightly darker or lighter than expected, that’s fine. Real avocado pits have a lot of variation.
Part 2: The Flesh (×1) — yellow-green yarn, ~35 yards
Starting Method: Magic ring
Row 1: 6 sc in mr (6)
Row 2: inc × 6 (12)
Row 3: (inc, 1 sc) × 6 (18)
Row 4: (1 sc, inc, 1 sc) × 6 (24)
Row 5: (3 sc, inc) × 5, 4 sc (29)
Row 6: Ch 9, starting from the 2nd ch from hook work 8 sc, dec (in the sc from which you chained and in the next sc after it), (1 sc, inc, 2 sc), (2 sc, inc, 2 sc) × 4, (2 sc, inc), dec, 6 sc (along the back of the ch), inc (51)
Row 7: Working around the perimeter of the resulting shape: inc, 6 sc, dec, 5 sc, (inc, 5 sc) × 4, (inc, 3 sc), dec, 5 sc, (inc) × 2 (57)
Row 8: (1 sc, inc), 5 sc, dec, (2 sc, inc, 3 sc), (3 sc, inc, 3 sc) × 4, 4 sc, dec, 4 sc, (1 sc, inc) × 2 (63)
Row 9: (2 sc, inc), 4 sc, dec, (6 sc, inc), (7 sc, inc) × 4, 4 sc, dec, 3 sc, (2 sc, inc) × 2 (69)
Finishing: Instructions not specified in source. Fasten off and leave a long tail for assembly.
Part 3: The Skin (×1) — dark green yarn, ~50 yards
Starting Method: Magic ring
Rows 1–9 are identical to the Flesh above — same shape, different color. Crochet them back to back if you can.
Row 1: 6 sc in mr (6)
Row 2: inc × 6 (12)
Row 3: (inc, 1 sc) × 6 (18)
Row 4: (1 sc, inc, 1 sc) × 6 (24)
Row 5: (3 sc, inc) × 5, 4 sc (29)
Row 6: Ch 9, starting from the 2nd ch from hook work 8 sc, dec (in the sc from which you chained and in the next sc after it), (1 sc, inc, 2 sc), (2 sc, inc, 2 sc) × 4, (2 sc, inc), dec, 6 sc (along the back of the ch), inc (51)
Row 7: Working around the perimeter of the resulting shape: inc, 6 sc, dec, 5 sc, (inc, 5 sc) × 4, (inc, 3 sc), dec, 5 sc, (inc) × 2 (57)
Row 8: (1 sc, inc), 5 sc, dec, (2 sc, inc, 3 sc), (3 sc, inc, 3 sc) × 4, 4 sc, dec, 4 sc, (1 sc, inc) × 2 (63)
Row 9: (2 sc, inc), 4 sc, dec, (6 sc, inc), (7 sc, inc) × 4, 4 sc, dec, 3 sc, (2 sc, inc) × 2 (69)
Row 10: 7 sc, dec, 23 sc, inc, 24 sc, dec, 9 sc, inc (69)
Row 11: 69 sc (69)
Row 12: 69 sc (69)
Row 13: 69 sc (69)
Finishing: Fasten off. Leave a yarn tail for assembly.
🧶 Scrap Check: The skin is the largest piece at about 50 yards of dark green. If you’ve got two slightly different shades of dark green and not quite enough of either, you can swap colors between rows 10–13 — those are plain sc rows and the color break will look intentional, like a gradient.
Part 4: The Bow (×1) — accent color, ~3 yards
Starting Method: Magic ring
Row 1: In mr work (1 sc, 1 dc, 1 tr, 1 dc, 1 sc) × 2 (10)
Finishing: Pull the ring closed. Leave a long tail. Wrap yarn around the center of the bow to cinch it into shape, fasten off, and leave tail for sewing on.
Assembling your avocado keychain amigurumi
- Lay the flesh piece flat, right side facing up.
- Center the pit on the flesh piece and sew down, stuffing lightly with polyfill as you go to give it a rounded, 3D shape. Secure all the way around.
- Place the skin piece wrong side up and lay the flesh piece (with pit attached) on top of it, right sides together.
- Sew the flesh and skin together around the perimeter, leaving a gap to stuff. Add polyfill lightly — you want a slight puff, not a firmly stuffed body. Too much stuffing will distort the avocado shape.
- Close the gap and weave in ends.
- Sew the bow onto the upper portion of the skin side.
- Attach a keychain ring at the top stem area if using as a bag charm or keychain.
Need a refresher on sewing amigurumi pieces cleanly? Our guide to sewing amigurumi parts together covers placement, anchoring, and how to hide your joins.
💡 Stretch It Further: Make three of these in different color combos — try a traditional dark green, a bright lime green, and a teal — and bundle them on a single keychain ring for an instant gift set. Total yarn cost for all three? Under $3 if you’re working from scraps. Wrap them in a small kraft bag and you’ve got a handmade gift that looks like it came from a boutique. Add a tiny tag that says “made with scraps, made with love” and call it a day.
Mia’s Take
About 100 yards, a 2.0mm hook, and a couple of hours — that’s the whole cost of this keychain amigurumi. The shape comes together faster than the row count suggests, and once you’ve made one, you’ll have the flesh and skin rows memorized well enough to knock out a second one in half the time. Make a matching set in three greens, attach them to a bag, and you’ll get compliments every time. That’s what I’m here for: small pieces, real results, almost nothing wasted. 🧶
What yarn is best for this avocado keychain amigurumi?
DK weight (weight 3) yarn works perfectly — the pattern uses dark green, yellow-green, and warm brown. YarnArt Jeans is the original yarn; Drops Muskat or Paintbox Simply DK are great US substitutes. Scrap yarn from your stash is ideal since the total yardage is only ~100 yards.
How long does it take to crochet this avocado keychain amigurumi?
This keychain amigurumi takes approximately 2–3 hours for intermediate crocheters. Once you’ve memorized the flesh and skin rows — which are identical for rows 1–9 — a second piece goes even faster.
Can beginners make this avocado keychain amigurumi pattern?
This keychain amigurumi is rated Intermediate. Crocheters who are comfortable with single crochet, increases, invisible decreases, and the magic ring technique should be able to follow it. If the magic ring is new to you, the site’s magic ring tutorial covers it in full before you start.