The Plush Amigurumi Dog That’s Impossible to Put Down
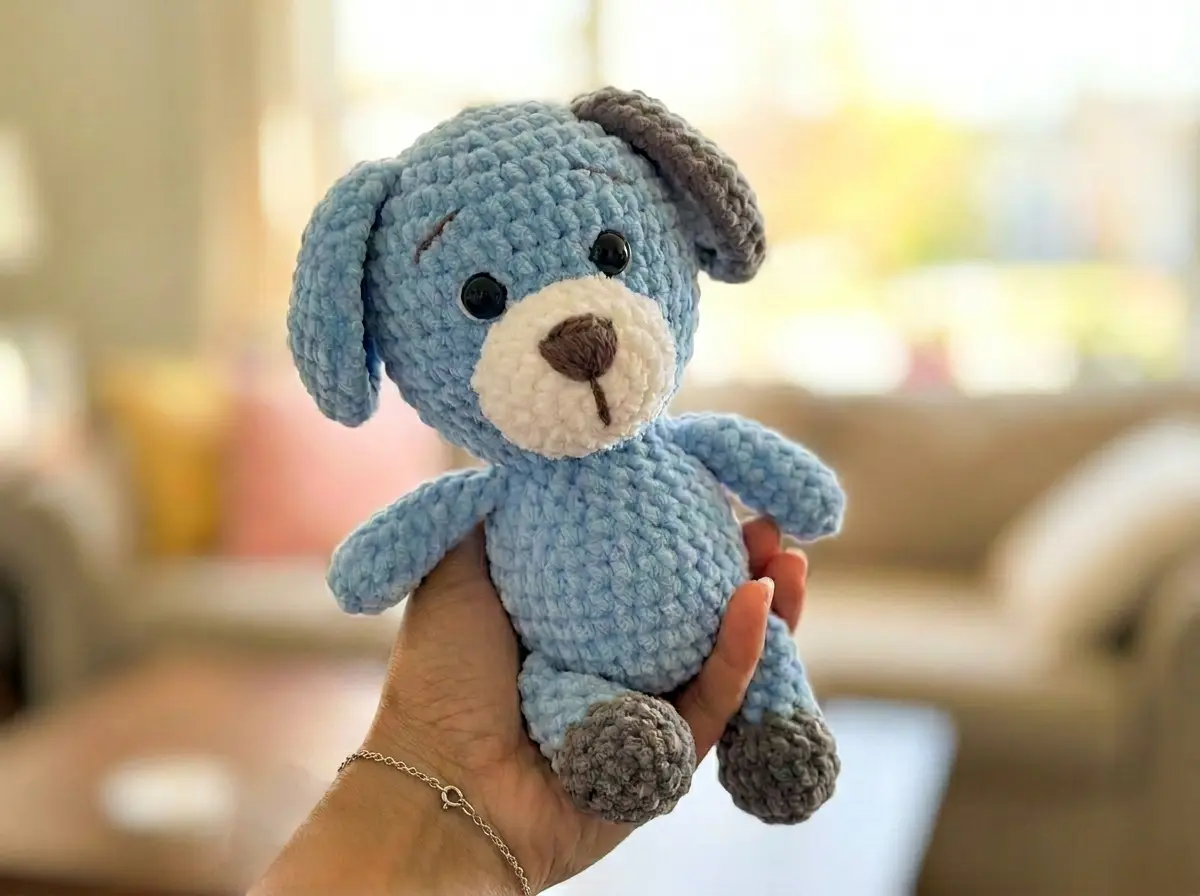
This amigurumi dog — Rex — is the kind of project I keep coming back to. The chenille plush body gives him that irresistibly soft, dense finish, while the cotton nose and ear inserts add just enough structure and contrast to make his face pop. I’ve worked through every row twice and all counts are confirmed. Every stitch is exactly where it should be. Let’s make Rex.
📋 Pattern Quick Stats
- Difficulty: Intermediate
- Finished Size: Approx. 6–7 in (15–18 cm), depending on yarn brand and tension
- Hook Sizes: E/4 (3.5 mm) for plush yarn; 1.75 mm for cotton accent yarn
- Yarn Weight: Bulky (5) chenille for body; Worsted (4) cotton for accents
- Techniques: magic ring, chain oval start, invisible decrease, continuous rounds, flat fold closure
- Estimated Time: 5–8 hours
What You Need to Make This Amigurumi Dog
Yarn
- Main color — Bulky (5) chenille/velvet: Alize Dolphin Baby (original) or US alternatives: Bernat Baby Velvet or Premier Yarns Parfait. You’ll need less than half a skein in your main color, plus a small amount in a contrasting color for the spot.
- Spot color — Bulky (5) chenille: Alize Softy (white and accent color). A small amount of each — check local availability for a similar Bulky (5) chenille. Joann, Michaels, and Hobby Lobby carry several comparable options.
- Accent color — Worsted (4) cotton: Alize Cotton Gold (original) or US alternative: Lion Brand 24/7 Cotton. You’ll need brown for the nose and white for the ear inserts. A single skein of each will be far more than enough.
The yarn weights used here follow the Craft Yarn Council yarn weight system — Bulky (5) for the plush body and Worsted (4) for the cotton details.
Tools and Notions
- E/4 (3.5 mm) crochet hook — for all plush and chenille yarn sections
- 1.75 mm crochet hook — for all cotton yarn sections (nose and ear inserts). Note: there is no standard US letter equivalent for this size.
- 12 mm safety eyes × 2
- Polyester fiberfill (Poly-Fil or similar) for stuffing
- Tapestry needle (yarn needle) for sewing and weaving in ends
- Black and white thread for embroidering face details
- Stitch markers — non-negotiable for tracking your round starts
💡 Emma’s Tip: Chenille and velvet yarns hide stitch definition beautifully, which is great for the finished look — but it makes it harder to count stitches after the fact. Move your stitch marker every single round. I’ve learned this the hard way more times than I’d like to admit.
Abbreviations Used in This Amigurumi Dog Pattern
| Abbreviation | Meaning |
|---|---|
| sc | single crochet |
| inc | increase — 2 sc worked into the same stitch |
| dec | decrease — worked as the invisible decrease (insert hook through front loops only of next 2 stitches simultaneously, yarn over, pull through, yarn over, pull through 2 loops) |
| ch | chain |
| mr | magic ring |
| FO | fasten off |
| BLO | back loop only |
| sl st | slip stitch |
💡 Note on decreases: All decreases in this pattern should be worked as the invisible decrease. This method inserts through the front loops only of two stitches at once, eliminating the visible gap that a standard sc2tog leaves behind. On chenille yarn, tight invisible decreases also prevent the stuffing from showing through. If you’d like a full walkthrough of this technique, our complete invisible decrease tutorial covers it step by step.
Special Techniques
Rex uses a few techniques worth reviewing before you start.
The magic ring is used to start most of Rex’s parts — the head and body, spot, nose, arms, and legs. It creates a tight, gap-free center that’s essential for clean amigurumi. If you’ve never worked one before, our step-by-step magic ring tutorial will walk you through it.
The chain oval start is used for the muzzle and ears. Instead of a magic ring, you begin with a foundation chain and work into both sides of it to create an oval flat base. The instructions will walk you through it row by row.
Safety eyes need to be inserted and secured before you stuff and close the head. Once the opening closes, there’s no getting them in. If you want a thorough guide on sizing and placement, see our article on how to attach safety eyes.
The flat fold closure is used for the arms and legs. After completing the final row, you fold the piece flat and single crochet through both layers to close it. This creates a flat, clean end that’s easy to sew onto the body.
Crochet Amigurumi Dog Rex — Full Pattern
Muzzle (×1)
Yarn: Softy (or similar Bulky (5) chenille) — white
Hook: E/4 (3.5 mm)
Start: Foundation chain of 5 ch
Row 1: 3 sc, 3 sc in last ch, along second side of chain — 2 sc, inc (10)
Row 2: inc, 2 sc, inc×3, 2 sc, inc×2 (16)
Row 3: 1 sc, inc, 2 sc, (1 sc, inc)×3, 2 sc, (1 sc, inc)×2 (22)
Row 4: 2 sc, inc, 2 sc, (2 sc, inc)×3, 2 sc, (2 sc, inc)×2 (28)
Rows 5–7: 28 sc (3 rows) (28)
Finishing: FO, leaving a long tail for sewing.
Spot (×1)
Yarn: Softy — contrasting accent color
Hook: E/4 (3.5 mm)
Start: Magic ring
Row 1: 6 sc in mr (6)
Row 2: (1 sc, 3 sc in 1 st)×3 (12)
Row 3: (2 sc, inc×2)×3 (18)
Row 4: 4 sc, 3 sc in 1 st, (5 sc, 3 sc in 1 st)×2, 1 sc (24)
Row 5: 5 sc, inc×2, (6 sc, inc×2)×2, 1 sc (30)
Finishing: FO, leaving a long tail for sewing.
💡 Emma’s Tip: The “3 sc in 1 st” at the corners of the spot creates sharp outward points — this is intentional. Those corner stitches are what give the spot its irregular, natural-looking shape. Don’t mistake them for an error.
Head and Body (×1)
Yarn: Main color chenille
Hook: E/4 (3.5 mm)
Start: Magic ring
The head and body are worked as one continuous piece. The dramatic decrease at Row 15 and the increase at Row 17 form the neck. Stuff the head section before you close the neck.
— Head —
Row 1: 9 sc in mr (9)
Row 2: inc×9 (18)
Row 3: (2 sc, inc)×6 (24)
Row 4: (3 sc, inc)×6 (30)
Row 5: 30 sc (30)
Row 6: (4 sc, inc)×6 (36)
Rows 7–14: 36 sc (8 rows) (36)
Row 15: (4 sc, dec)×6 (30)
📌 Stop here before Row 16. Install your 12 mm safety eyes approximately 4 sc apart across the face. Sew the muzzle and spot into position. Once you’re happy with the placement, stuff the head firmly. I prefer to stuff it a little more than feels comfortable at this stage — the chenille compresses slightly as the neck closes.
Row 16: dec×15 (15)
— Neck transition —
Row 17: inc×15 (30)
— Body —
Rows 18–27: 30 sc (10 rows) (30)
Row 28: (3 sc, dec)×6 (24)
Row 29: (2 sc, dec)×6 (18)
Row 30: (1 sc, dec)×6 (12)
Row 31: dec×6 (6)
Finishing: Stuff the body firmly and evenly. Close the opening by weaving the yarn tail through the 6 remaining stitches and pulling snug. Weave the tail through the inside of the toy.
💡 Emma’s Tip: The body’s 10-row straight section (Rows 18–27) is your best opportunity for even stuffing. I add fiberfill gradually starting around Row 22 rather than waiting until the piece is closed. Stuffing through a small opening is frustrating, and uneven stuffing always shows in the final shape.
Nose (×1)
Yarn: Lion Brand 24/7 Cotton or Alize Cotton Gold — brown
Hook: 1.75 mm
Start: Magic ring
Row 1: 6 sc in mr (6)
Row 2: (1 sc, 3 sc in 1 st)×3 (12)
Row 3: 2 sc, inc, (3 sc, inc)×2, 1 sc (15)
Finishing: FO, leaving a long tail for sewing.
💡 Emma’s Tip: Switching to a much smaller hook (1.75 mm) for the cotton yarn creates a noticeably denser, more structured fabric — which is exactly what you want for a nose that holds its shape when sewn onto the soft plush muzzle. Don’t skip the hook change here.
Ears (×2)
Yarn: Main color chenille
Hook: E/4 (3.5 mm)
Start: Foundation chain of 10 ch
Row 1: 8 sc, 3 sc in last st, along second side of chain — 7 sc, inc (20)
Row 2: inc, 7 sc, inc×3, 7 sc, inc×2 (26)
Row 3: 1 sc, inc, 7 sc, (1 sc, inc)×3, 7 sc, (1 sc, inc)×2 (32)
Finishing: FO, leaving a long tail for sewing.
Ear Inserts (×2)
Yarn: Lion Brand 24/7 Cotton or Alize Cotton Gold — white
Hook: 1.75 mm
Start: Foundation chain of 10 ch
The ear inserts are worked identically to the ears for the first 3 rows, then gain one additional row. This creates a slightly larger inner panel that folds behind the ear edge when sewn in.
Row 1: 8 sc, 3 sc in last st, along second side of chain — 7 sc, inc (20)
Row 2: inc, 7 sc, inc×3, 7 sc, inc×2 (26)
Row 3: 1 sc, inc, 7 sc, (1 sc, inc)×3, 7 sc, (1 sc, inc)×2 (32)
Row 4: 2 sc, inc, 7 sc, (2 sc, inc)×3, 7 sc, (2 sc, inc)×2 (38)
Finishing: FO, leaving a long tail for sewing.
Arms (×2)
Yarn: Main color chenille
Hook: E/4 (3.5 mm)
Start: Magic ring
Row 1: 6 sc in mr (6)
Row 2: (1 sc, inc)×3 (9)
Rows 3–7: 9 sc (5 rows) (9)
Finishing: Flatten the piece so the edges align evenly. Single crochet through both layers across — 4 sc. FO, leaving a long tail for sewing.
Legs (×2)
Yarn: Main color chenille
Hook: E/4 (3.5 mm)
Start: Magic ring
Row 1: 6 sc in mr (6)
Row 2: inc×6 (12)
Rows 3–4: 12 sc (2 rows) (12)
Row 5: (4 sc, dec)×2 (10)
Rows 6–10: 10 sc (5 rows) (10)
Finishing: Flatten the piece so the edges align evenly. Single crochet through both layers across — 5 sc. FO, leaving a long tail for sewing.
Assembly
- Prepare the ears: Lay each ear insert (cotton) on top of its matching ear (chenille), wrong sides together. Sew the insert securely onto the ear using the cotton yarn tail. The insert will be slightly larger — ease it in as you sew so the ear curves naturally.
- Attach the nose to the muzzle: Position the nose centered on the muzzle face and sew it down firmly.
- Attach the ears: Pin the completed ears to the sides of the head and sew them in place.
- Attach the arms: Sew each arm to the body between Rows 19 and 20, one on each side.
- Attach the legs: Sew each leg to the body between Rows 25 and 26, one on each side. Make sure both legs sit at the same angle and height before you knot off.
💡 Emma’s Tip: Take your time pinning the ears, arms, and legs before sewing anything permanently. I use stitch markers to hold pieces in place while I step back and check the symmetry. On a plush yarn project like this one, the soft texture makes it harder to spot uneven placement until after you’ve already knotted off. Pin first. Every time.
Finishing and Face Details
Once all parts are assembled, the final step is embroidering Rex’s face. Using a sharp tapestry needle threaded with black embroidery thread, add:
- Nostrils: Two small satin stitch dots or short vertical stitches just below the nose center.
- Mouth line: A simple inverted Y shape below the nose creates an expressive dog smile. Keep your stitches light — it’s easy to overdo this on a soft muzzle.
- Eye highlights: A single small white thread stitch in the upper corner of each safety eye adds life and dimension.
There’s no single right way to embroider a face — look at Rex from a distance as you work. The expression you want is one that looks like him, not a checklist of stitches.
Emma’s Note
Rex has been one of those patterns I genuinely enjoyed testing. The one-piece head-and-body construction is elegant — that dramatic decrease and re-increase at the neck takes a little nerve the first time, but the shape it creates is so clean. If your tension is anything like mine, the chenille fabric will come out beautifully dense and the stuffing will stay exactly where it belongs. Take your time on the face embroidery — that’s where his personality lives. Happy hooking. 🧶
New to amigurumi? Our complete beginner’s guide to amigurumi is the best place to start before tackling your first project.
What yarn is best for this amigurumi dog?
Bulky (5) chenille or velvet yarn gives Rex his signature dense, plush finish. Good US options include Bernat Baby Velvet and Premier Yarns Parfait. For the nose and ear inserts, use a Worsted (4) cotton such as Lion Brand 24/7 Cotton.
How long does it take to crochet this amigurumi dog pattern?
Most crocheters finish Rex in 5 to 8 hours. The one-piece head-and-body construction and multiple small parts add up, but each section is relatively quick to complete on its own.
Can beginners make this amigurumi dog pattern?
This pattern is rated intermediate, mainly due to the two-hook-size requirement, chenille yarn (which hides stitch definition), and the neck transition technique. Confident beginners who have already completed a few amigurumi should be able to follow it successfully.