Dragon Amigurumi Free Pattern — Wire-Posed Crochet Dragon
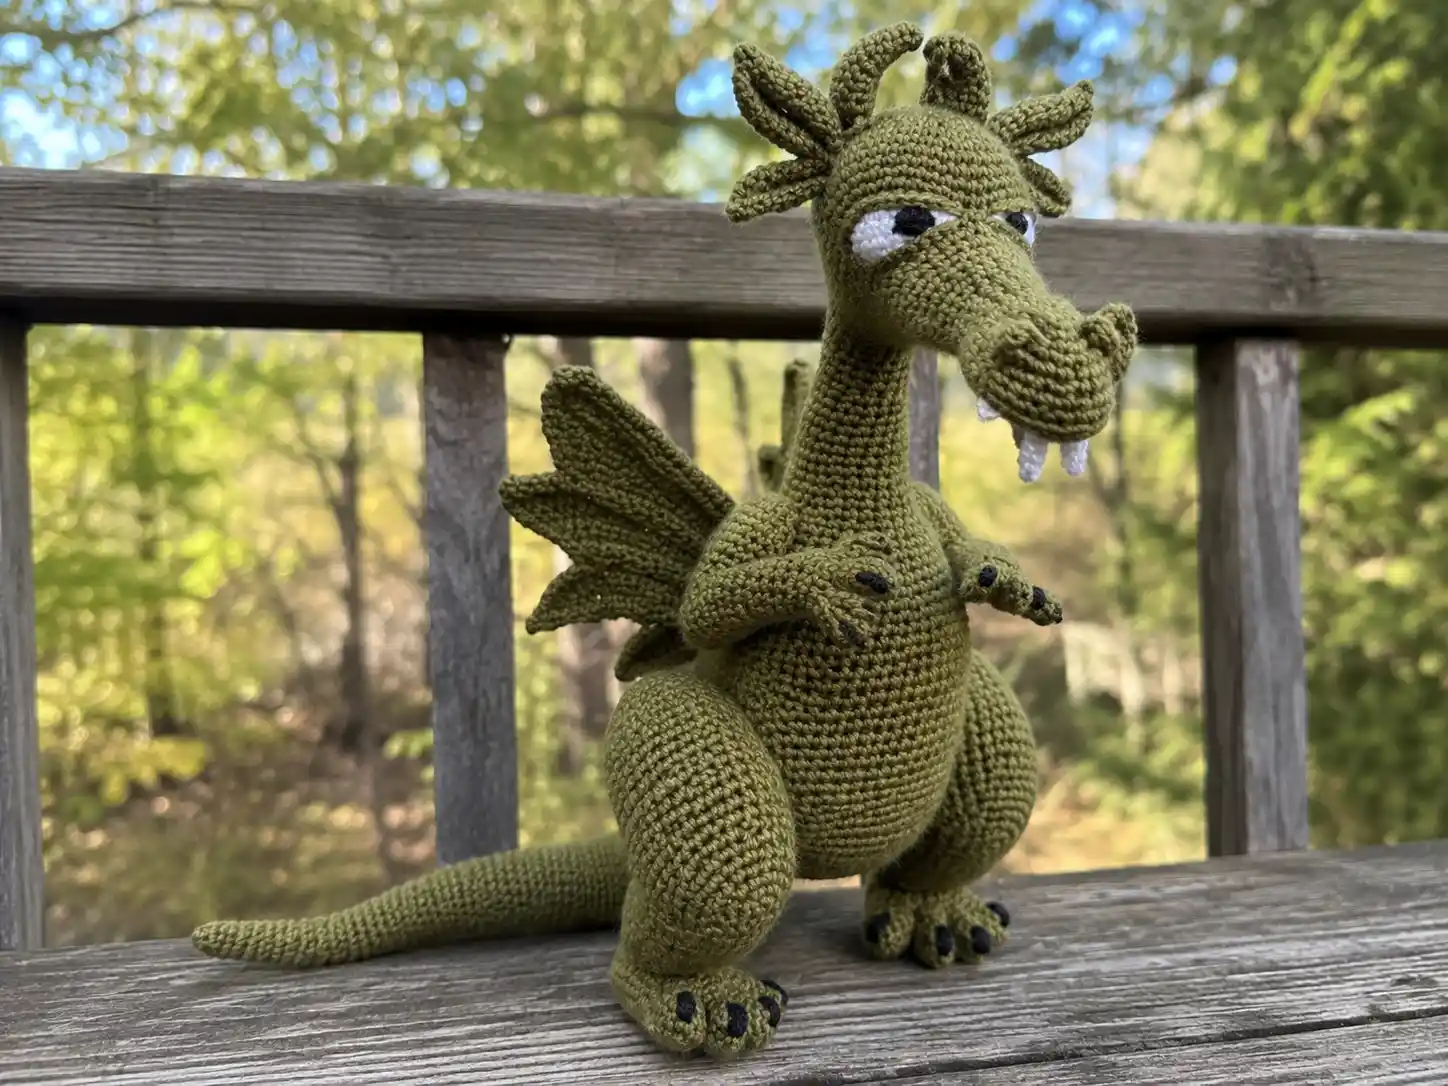
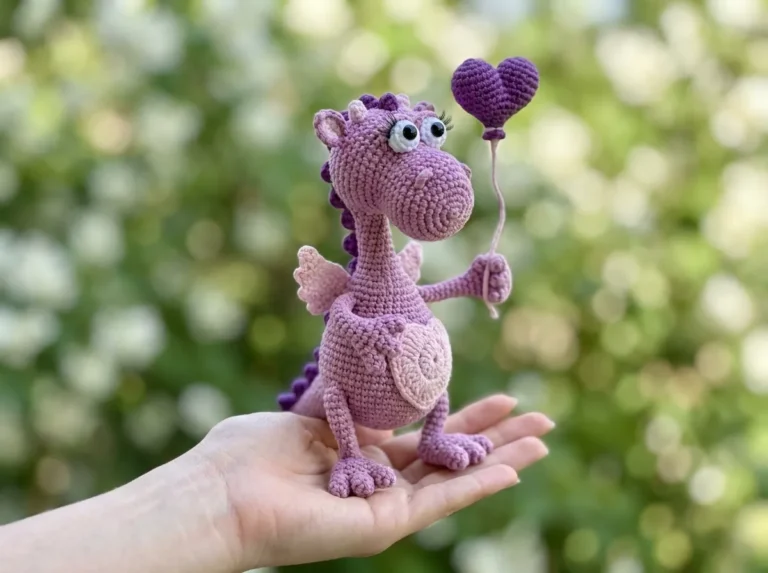
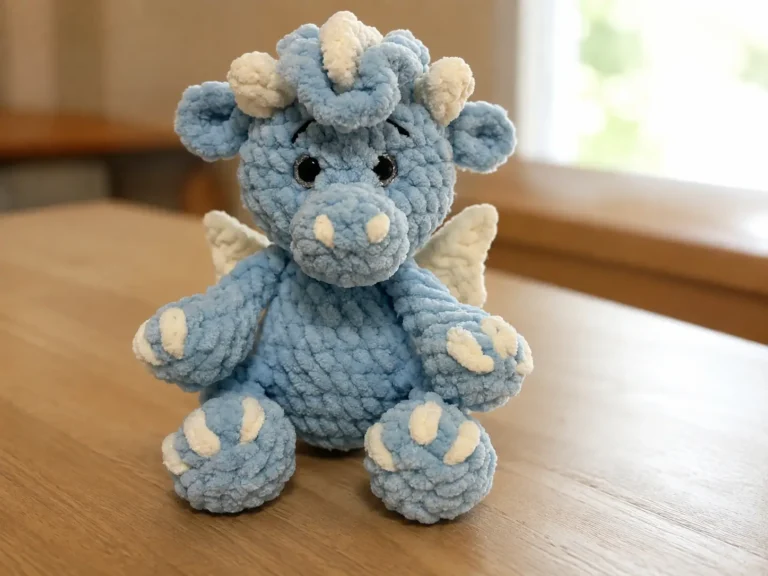
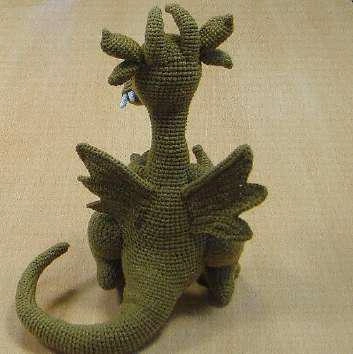
This free dragon amigurumi pattern is the biggest stash project I’ve tackled in a while, and it’s worth every leftover yard — a nearly 12-inch dragon with a full wire armature, poseable wings, and a jaw that actually opens. You don’t need anything fancy to make it: worsted or DK weight yarn from your bins, a scrap of white and black for the eyes and fangs, and some craft wire. This one takes patience, not a shopping trip.
🧶 What You’ll Need
- 💰 Yarn Needed: Not precisely specified in the original pattern — budget generously. This is a large, densely-stitched piece (head, body, tail, four legs, two wings, horns, ears), so plan on at least 2-3 full skeins of worsted or DK weight in your main dragon color, plus small amounts of white (eyes, fangs) and black (pupils, claw embroidery). I’d rather tell you to buy a little extra than have you run out mid-tail.
- 🎨 Colors: any medium worsted (4) or DK/light worsted (3) yarn for the main color (or similar from your stash), a small amount of white, a small amount of black, plus a bit of thin fingering-weight black for the pupils
- 🪝 Hook: 2.5mm (no exact US letter match — closest is US C/2 at 2.75mm, so size down slightly) or a 2.0mm steel hook, plus a 1.5mm or 1.25mm hook for the pupils and fangs (also no standard US letter equivalents — these run smaller than typical amigurumi hooks)
- ⏱️ Time: Multiple sessions — this is not a one-evening make
- 📏 Finished Size: 11.8 in tall (30 cm)
- 💡 Difficulty: Advanced
- 🎁 Great For: shelf display, dragon-lover gifts, a serious stash-clearing project that actually earns its keep
Dragon Amigurumi Free Pattern: Materials List
Here’s exactly what goes into this dragon amigurumi free pattern, kept as minimal and stash-friendly as a wire-framed project can be:
- Main color yarn: Worsted (4) weight or DK/Light Worsted (3) weight — any medium-weight cotton-acrylic blend from your stash works. This falls under the standard yarn weight categories if you need to double-check what you’re holding against the label.
- White yarn: a small amount for the eye background piece and the fangs (fangs are crocheted with the yarn split lengthwise and worked in two strands, so a little goes a long way)
- Black yarn: a small amount of thin fingering-weight cotton for the pupils, plus more black for embroidering the claws later
- Craft wire: 2.5mm diameter, about 1.8m (roughly 6 feet) total, cut into four lengths for the internal armature. This is what lets the head, tail, and wings hold a pose.
- Stuffing: polyester fiberfill
- Adhesive tape: for wrapping the cut wire ends so nothing pokes through your stitches
- Hooks: your main 2.5mm (or 2.0mm steel), plus a much finer 1.5mm or 1.25mm hook for the tiny pupil and fang pieces
If your local hook set doesn’t include anything close to 2.5mm, our hook sizing guide covers how to substitute without throwing off your gauge too badly.
Abbreviations
| Abbreviation | Meaning |
|---|---|
| ch | chain |
| sc | single crochet |
| sl st | slip stitch |
| inc | increase (2 sc in same stitch) |
| dec | invisible decrease (AmiLoops standard method) |
| 3 sc in next st | 3 single crochet worked into the same stitch |
Smart Crafter Tips for This Dragon Amigurumi
A few things that will save you time and frustration on a build this size:
This pattern leans on the invisible decrease throughout — if you’re not confident with it yet, our invisible decrease tutorial covers the technique in a couple of minutes, and it makes a real difference in how clean the head and tail shaping looks.
Every piece here starts the same way, so if magic rings still trip you up, it’s worth a quick refresh with our magic ring tutorial before you start the jaw pieces — you’ll be making a lot of them.
This dragon has more sewing than most patterns I write — ears, horns, nostrils, fangs, legs, and wings all get attached after the fact. Our guide to sewing amigurumi parts together is worth a look before you start assembly, especially the section on keeping seams tight without puckering the wire-stuffed pieces.
And because this piece is stuffed around a wire frame rather than just packed with fiberfill, stuff a little at a time as you go rather than all at once at the end — our stuffing guide has more on getting an even shape, which matters even more here since you’re stuffing around wire.
🧶 Scrap Check: The white eye piece, both sets of fangs, and the pupils together use only a small amount of yarn — this is exactly the kind of detail work that clears out those tiny leftover balls you can’t bring yourself to throw away.
How to Crochet This Dragon Amigurumi Free Pattern
Lower Jaw (make 1)
Main color, starting with a magic ring.
Row 1: 6 sc in mr (6)
Row 2: 6 inc (12)
Row 3: (inc, 1 sc) *6 (18)
Row 4: (2 sc, inc) *6 (24)
Row 5: (inc, 3 sc) *6 (30)
Row 6: 6 sc (6)
Row 7: 6 sc (6)
Row 8: inc, 4 sc, inc (8)
Row 9: 8 sc (8)
Row 10: inc, 6 sc, inc (10)
Row 11: 9 sc, sl st (total not stated in source)
Note: From Row 6 onward you’re crocheting in back-and-forth rows, not continuous rounds. Chain 1, turn, and start each row from the 2nd stitch from the hook (the loop on the hook doesn’t count as a stitch). Rows 7, 9, and 11 are wrong-side rows — for wrong-side stitches, insert the hook from behind the work and catch the yarn from the front. This keeps the fabric even on both sides.
Fasten off and cut yarn.
Upper Jaw (make 1)
Main color, starting with a magic ring.
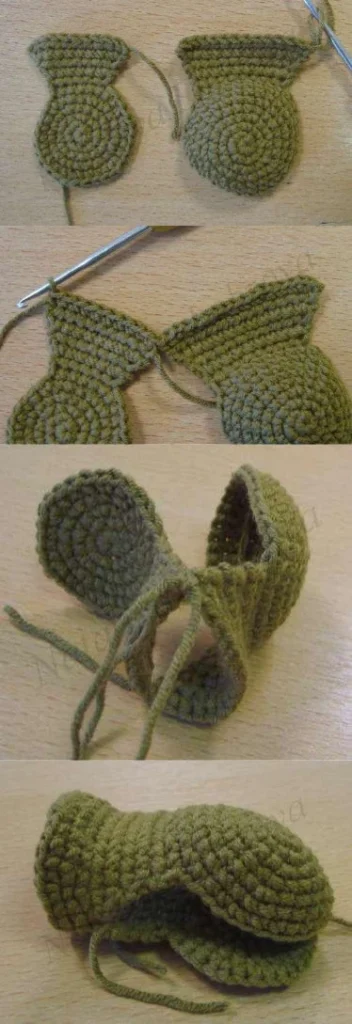
Row 1: 6 sc in mr (6)
Row 2: 6 inc (12)
Row 3: (inc, 1 sc) *6 (18)
Row 4: (inc, 5 sc) *3 (21)
Row 5: (4 sc, inc, 2 sc) *3 (24)
Row 6: (inc, 7 sc) *3 (27)
Row 7: (5 sc, inc, 3 sc) *3 (30)
Row 8: (inc, 9 sc) *3 (33)
Row 9: 9 sc (9)
Row 10: 9 sc (9)
Row 11: inc, 7 sc, inc (11)
Row 12: 11 sc (11)
Row 13: inc, 9 sc, inc (13)
Row 14: 13 sc, sl st (total not stated in source)
Row 15: along the upper edge: 1 sc, inc, 2 sc, inc, 3 sc, inc, 2 sc, inc, 1 sc; then along the lower edge: 10 sc — that’s 27 sc, crochet one more stitch to join the round (27)
Row 16: one stitch is already worked from the join; continue: 2 sc, inc, 4 sc, inc, 4 sc, inc, 13 sc (30)
Row 17: 2 sc, inc, 4 sc, inc, 4 sc, inc, 4 sc, inc, 12 sc (34)
Note: From Row 9 you’re back to back-and-forth rows (Rows 10, 12, and 14 are wrong-side rows). In Row 15 you switch back to continuous rounds — but first, join the upper and lower jaw pieces with their wrong sides facing each other before working that round.
Slip stitch to join, fasten off, cut yarn.
Eyes — white background piece (make 1)
White yarn, starting with a chain of 31.
Rows 1-7: 30 sc (7 rows) (30)
Rows 8-11: 18 sc (4 rows) (18)
Note: Crochet in right-side and wrong-side rows — chain 1, turn, and start each row from the 2nd stitch from the hook. You’ll end up with a stepped, roughly rectangular shape.
Fasten off, cut yarn.
Head-Body (make 1)
Main color, starting with a magic ring. This is the longest single piece in the pattern — take it in stages.
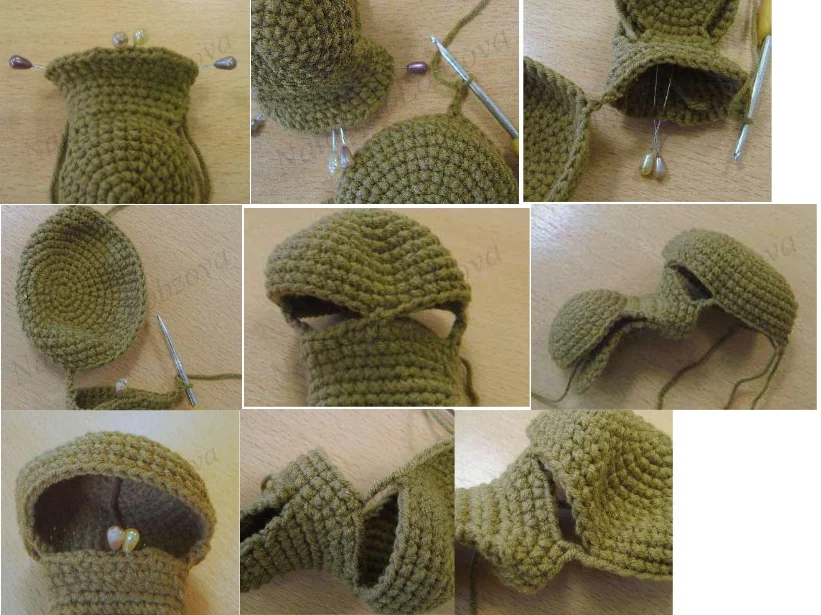
Row 1: 6 sc in mr (6)
Row 2: 6 inc (12)
Row 3: (inc, 1 sc) *6 (18)
Row 4: (2 sc, inc) *6 (24)
Row 5: (inc, 3 sc) *6 (30)
Row 6: (3 sc, inc, 1 sc) *6 (36)
Row 7: (inc, 5 sc) *6 (42)
Row 8: (4 sc, inc, 2 sc) *6 (48)
Rows 9-12: 48 sc (4 rows) (48)
Row 13: 13 sc, ch 3, 18 sc along the lower part of the jaws starting from the leftmost mark (through to the rightmost mark), ch 2, skip 22 stitches on the head, 13 sc — this joins the round (49)
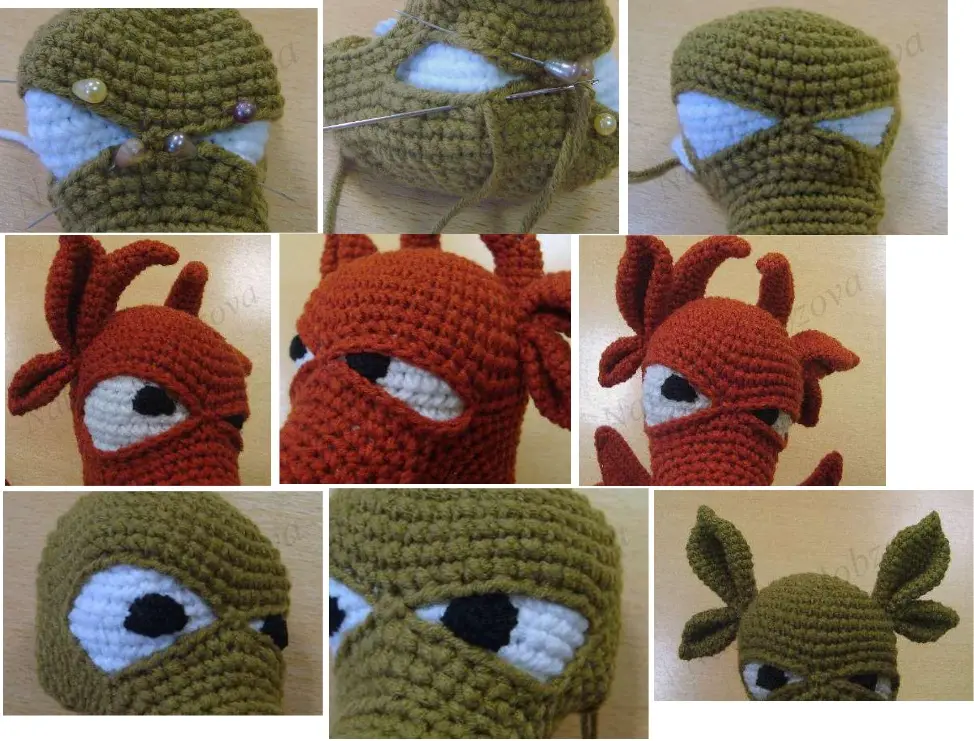
Row 14: sc around, working a dec at the junction of stitches and chain and in the lower corners of the eyes (47)
Row 15: 47 sc (47)
Row 16: sc around, dec at the level of the lower corners of the eyes (45)
Row 17: (7 sc, dec, 6 sc) *3 (42)
Row 18: (3 sc, dec, 2 sc) *6 (36)
Row 19: (dec, 4 sc) *6 (30)
Note: Pause here after Row 19. Join the jaw pieces by tying them together with sc, holding the more convex (upper) side facing you. Stuff the head. Insert the white eye piece inside the head, sew it in place, and sew or embroider the pupils onto it. Then crochet one round of sc around each eye, working into the remaining free loops.
Row 20: (dec, 8 sc) *3 (27)
Row 21: (4 sc, dec, 3 sc) *3 (24)
Row 22: (dec, 10 sc) *2 (22)
Row 23: 22 sc (22)
Row 24: (5 sc, dec, 4 sc) *2 (20)
Rows 25-28: 20 sc (4 rows) (20)
Note: After Row 28, insert the wire frame (built from four lengths of wire) into the head, then stuff the head and neck around it.
Row 29: (inc, 9 sc) *2 (22)
Rows 30-31: 22 sc (2 rows) (22)
Row 32: (6 sc, inc, 4 sc) *2 (24)
Rows 33-34: 24 sc (2 rows) (24)
Row 35: (inc, 11 sc) *2 (26)
Row 36: 26 sc (26)
Row 37: (7 sc, inc, 5 sc) *2 (28)
Row 38: 28 sc (28)
Row 39: (inc, 13 sc) *2 (30)
Row 40: (8 sc, inc, 6 sc) *2 (32)
Row 41: (inc, 15 sc) *2 (34)
Row 42: (9 sc, inc, 7 sc) *2 (36)
Note: Before Row 43, secure the wire frame together. Find the middle of the back — there should be 9 stitches between the wires. In this row you’ll bring the short wires out for the wings.
Row 43: (5 sc, inc, 3 sc) *4 (40)
Row 44: (inc, 9 sc) *4 (44)
Row 45: (6 sc, inc, 4 sc) *4 (48)
Row 46: (inc, 23 sc) *2 (50)
Row 47: 51 sc — 1 inc worked in the front (51)
Row 48: 53 sc — 1 inc in the front, 1 inc in the back (53)
Row 49: 53 sc (53)
Row 50: 55 sc — 2 inc in the front, roughly 7 stitches apart (55)
Row 51: 57 sc — 1 inc in the front, 1 inc in the back (57)
Row 52: 57 sc (57)
Row 53: 59 sc — 2 inc in the front, roughly 9 stitches apart (59)
Row 54: 60 sc — 1 inc in the back (60)
Rows 55-56: 60 sc (2 rows) (60)
Row 57: 61 sc — 1 inc in the back (61)
Row 58: 63 sc — 2 inc in the back, roughly 3 stitches apart (63)
Row 59: 65 sc — 2 inc in the back, roughly 7 stitches apart (65)
Row 60: 68 sc — 3 inc in the back, roughly 5 stitches apart (68)
Row 61: 70 sc — 2 inc in the back, roughly 4 stitches apart (70)
Row 62: 72 sc — 2 inc in the back, roughly 8 stitches apart (72)
Row 63: 74 sc — 3 inc in the back roughly 3 stitches apart, 1 dec in the front (74)
Row 64: 74 sc — 2 inc in the back roughly 4 stitches apart, 2 dec in the front roughly 9 stitches apart (74)
Row 65: 73 sc — 1 dec in the front (73)
Row 66: 73 sc — 2 inc in the back roughly 10 stitches apart, 2 dec in the front roughly 5 stitches apart (73)
Row 67: 72 sc — 1 dec in the front (72)
Row 68: 74 sc — 2 inc in the back, roughly 4 stitches apart (74)
Note: In Rows 47-68, the increases and decreases sit approximately in the middle of the front or back of the body — you don’t need to count them to the exact stitch.
Row 69: sc until you reach the first mark, ch 12, attach the chain to the second mark (skipping 26 marked stitches), finish the round (60)
Note: In Row 69 you’re separating off the tail — find the middle of the back and mark 26 stitches there. Leave the wire running through the hole you’re leaving for the tail, and crochet the chain through just one loop.
Row 70: (dec, 8 sc) *6 (54)
Row 71: (4 sc, dec, 3 sc) *6 (48)
Row 72: (dec, 6 sc) *6 (42)
Row 73: (3 sc, dec, 2 sc) *6 (36)
Row 74: (dec, 4 sc) *6 (30)
Row 75: (2 sc, dec, 1 sc) *6 (24)
Row 76: (dec, 2 sc) *6 (18)
Row 77: (1 sc, dec) *6 (12)
Row 78: 6 dec (6)
Slip stitch, fasten off, weave the tail through the remaining stitches to close the opening.
🧶 Scrap Check: The Head-Body piece is where most of your main-color yarn goes. If you’re working from multiple partial skeins of the same or similar shades, this is a good piece to blend them in — the shaping is gradual enough that subtle color shifts won’t be obvious.
Pupils (make 2)
Black yarn, thin hook, starting with a magic ring.
Row 1: 6 sc in mr (6)
Row 2: 3 sc in next st, 4 sc, sl st (8)
Fasten off, leaving a tail for sewing.
Tail (make 1)
Main color, starting by picking up stitches along the opening left on the back.
Row 1: pick up 38 sc along the opening (38)
Row 2: dec at the junction of the upper (stitch) and lower (chain) parts (36)
Row 3: dec at the junction of the upper and lower parts (34)
Row 4: 34 sc (34)
Row 5: (8 sc, dec, 7 sc) *2 (32)
Row 6: 32 sc (32)
Row 7: (dec, 14 sc) *2 (30)
Row 8: 30 sc (30)
Row 9: (7 sc, dec, 6 sc) *2 (28)
Rows 10-11: 28 sc (2 rows) (28)
Row 12: (dec, 12 sc) *2 (26)
Rows 13-15: 26 sc (3 rows) (26)
Row 16: (6 sc, dec, 5 sc) *2 (24)
Rows 17-19: 24 sc (3 rows) (24)
Row 20: (dec, 10 sc) *2 (22)
Rows 21-23: 22 sc (3 rows) (22)
Row 24: (5 sc, dec, 4 sc) *2 (20)
Rows 25-29: 20 sc (5 rows) (20)
Row 30: (dec, 8 sc) *2 (18)
Rows 31-35: 18 sc (5 rows) (18)
Row 36: (4 sc, dec, 3 sc) *2 (16)
Rows 37-43: 16 sc (7 rows) (16)
Note: Before Row 44, cut one of the two wires in the tail and wrap the cut end with adhesive tape onto the remaining wire.
Row 44: (dec, 6 sc) *2 (14)
Rows 45-51: 14 sc (7 rows) (14)
Row 52: (3 sc, dec, 2 sc) *2 (12)
Rows 53-59: 12 sc (7 rows) (12)
Row 60: (dec, 4 sc) *2 (10)
Rows 61-67: 10 sc (7 rows) (10)
Note: Before Row 68, cut the remaining wire and wrap the tip with adhesive tape.
Row 68: (2 sc, dec, 1 sc) *2 (8)
Rows 69-75: 8 sc (7 rows) (8)
Note: After Row 75, finish stuffing the tail.
Row 76: (dec, 2 sc) *2 (6)
Note: In Row 1, when picking up along the upper part, also catch a strand from the intermediate section and crochet them together so no holes are left. Stuff the body as you go, and stuff the tail gradually as you work down its length.
Slip stitch, fasten off, close the opening.
Ears — Upper Part (make 2)
Main color, starting with a magic ring. Do not stuff the ears.
Row 1: 4 sc in mr (4)
Row 2: (inc, 1 sc) *2 (6)
Row 3: (2 sc, inc) *2 (8)
Row 4: (inc, 1 sc) *4 (12)
Row 5: (2 sc, inc) *4 (16)
Row 6: (inc, 3 sc) *4 (20)
Row 7: (inc, 9 sc) *2 (22)
Row 8: 22 sc (22)
Row 9: (6 sc, inc, 4 sc) *2 (24)
Rows 10-11: 24 sc (2 rows) (24)
Row 12: (dec, 10 sc) *2 (22)
Row 13: (5 sc, dec, 4 sc) *2 (20)
Row 14: (dec, 8 sc) *2 (18)
Row 15: (4 sc, dec, 3 sc) *2 (16)
Fold the piece in half and crochet the edges together with sc = 7 sc, sl st, fasten off, cut yarn.
Ears — Lower Part (make 2)
Main color, starting with a magic ring.
Row 1: 4 sc in mr (4)
Row 2: (inc, 1 sc) *2 (6)
Row 3: (2 sc, inc) *2 (8)
Row 4: (inc, 1 sc) *4 (12)
Row 5: (2 sc, inc) *4 (16)
Row 6: (inc, 7 sc) *2 (18)
Row 7: 18 sc (18)
Row 8: (5 sc, inc, 3 sc) *2 (20)
Row 9: 20 sc (20)
Row 10: (dec, 8 sc) *2 (18)
Row 11: (4 sc, dec, 3 sc) *2 (16)
Fold in half and crochet the edges together just like the upper part. Cut yarn leaving a tail for sewing, fasten off.
Horns (make 2)
Main color, starting with a magic ring.
Row 1: 4 sc in mr (4)
Row 2: inc, 3 sc (5)
Row 3: 3 sc, inc, 1 sc (6)
Row 4: inc, 4 sc, sl st (7)
Row 5: starting from the 1st stitch from the hook: 3 sc, sl st (total not stated in source)
Row 6: 3 sc, inc, 3 sc (8)
Row 7: 6 sc, inc, 1 sc (9)
Row 8: 9 sc (9)
Row 9: 2 sc, inc, 6 sc (10)
Row 10: 10 sc (10)
Row 11: 8 sc, inc, 1 sc (11)
Row 12: 1 sc, sl st (total not stated in source)
Row 13: starting from the 1st stitch from the hook: 6 sc, sl st (total not stated in source)
Row 14: starting from the 1st stitch from the hook: 16 sc (16)
Row 15: 11 sc (11)
Row 16: 3 sc, inc, 7 sc (12)
Rows 17-20: 12 sc (4 rows) (12)
Note: The horns are worked partly in back-and-forth rows. Row 5 (wrong side): turn, yarn stays in front, inside the horn. Row 6: turn, yarn goes behind the work, inside the horn — and in this continuous round, don’t work into the side edge, only into the loops. Stuff the piece gradually as you go. Row 12: turn, yarn in front. Row 13 (wrong side): turn, yarn behind the work. Row 14 gives you 16 sc worked, but only 11 stitches in the actual round. After Row 20, work 3 more sc to shift the start of the round, then finish stuffing.
Fold in half and crochet the edges together with sc = 5 sc, sl st, cut yarn leaving a tail for sewing, fasten off.
Nostrils (make 2)
Main color, starting with a magic ring.
Row 1: 6 sc in mr (6)
Row 2: 6 inc (12)
Fold in half and crochet the edges together = 5 sc, sl st. Fasten off leaving a tail for sewing.
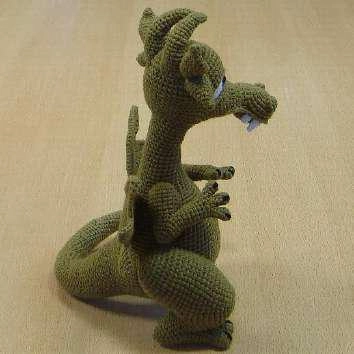
Hind Legs — Toes (make 6, three per leg)
Main color, starting with a magic ring.
Row 1: 6 sc in mr (6)
Row 2: 6 inc (12)
Rows 3-4: 12 sc (2 rows) (12)
Row 5: (dec, 4 sc) *2 (10)
Row 6: 9 sc, sl st (total not stated in source)
Note: Make three toe pieces per leg (six total). Cut the yarn short on the first toe, leave a sewing tail on the second, and on the third work an sc instead of a sl st and leave the yarn attached — you’ll continue directly into the foot.
Hind Legs — Foot (make 2, continuing from the joined toes)
Row 7: gather the three toes together, crocheting one round of sc around them, leaving 3 stitches unworked between each toe (18)
Row 8: 18 sc (18)
Row 9: dec, 16 sc (17)
Row 10: 17 sc (17)
Row 11: 8 sc, dec, 7 sc (16)
Row 12: 16 sc (16)
Note: In Row 7, bring the sewing tail left between the toes out to the outside — you’ll use it to sew the gaps between toes shut later.
Slip stitch, fasten off leaving a tail for sewing. Sew up the holes between the toes.
Hind Legs — Thigh (make 2)
Main color, starting with a magic ring.
Row 1: 6 sc in mr (6)
Row 2: 6 inc (12)
Row 3: (inc, 1 sc) *6 (18)
Row 4: (inc, 5 sc) *3 (21)
Row 5: (4 sc, inc, 2 sc) *3 (24)
Row 6: (inc, 7 sc) *3 (27)
Row 7: (5 sc, inc, 3 sc) *3 (30)
Row 8: (inc, 9 sc) *3 (33)
Row 9: (6 sc, inc, 4 sc) *3 (36)
Row 10: (inc, 11 sc) *3 (39)
Row 11: (7 sc, inc, 5 sc) *3 (42)
Rows 12-13: 42 sc (2 rows) (42)
Row 14: ch 9, skip 15 stitches, starting from the 16th stitch crochet 2 sc — incomplete round (total not stated in source)
Row 15: dec at the junction of stitches and sc (crochet the chain through one loop) (total not stated in source)
Row 16: dec at the junction of stitches and chain, and inc on the opposite side (33)
Rows 17-18: 33 sc (2 rows) (33)
Row 19: (6 sc, inc, 4 sc) *3 (36)
Rows 20-22: 36 sc (3 rows) (36)
Row 23: (dec, 10 sc) *3 (33)
Row 24: (5 sc, dec, 4 sc) *3 (30)
Row 25: (2 sc, dec, 1 sc) *6 (24)
Row 26: (dec, 2 sc) *6 (18)
Row 27: (1 sc, dec) *6 (12)
Row 28: 6 dec (6)
Note: In Row 14, the beginning of the round shifts to this new position.
Slip stitch, fasten off leaving a tail for sewing, close the opening.
Hind Legs — Lower Leg (make 2, from the opening on the thigh)
Main color, starting from the opening left in Row 14 of the thigh.
Row 1: pick up 22 sc along the opening, working a dec at the junction of stitches and chain (22)
Row 2: dec at the junction of stitches and chain (20)
Row 3: 20 sc (20)
Note: Before Row 4, stuff the lower leg and the previously crocheted foot — you’ll be connecting them. Bring the sewing tail left on the foot out through the opening.
Row 4: connect the lower leg and foot, crocheting one round of sc around both. Skip 7 stitches at the junction on the foot and leg — you’ll sew those later: 9+13=22 sc (22)
Row 5: dec at the junction of the foot and lower leg (20)
Row 6: dec at the junction of the foot and lower leg (18)
Row 7: 18 sc (18)
Row 8: (dec, 4 sc) *3 (15)
Row 9: (2 sc, dec, 1 sc) *3 (12)
Row 10: (dec, 2 sc) *3 (9)
Row 11: (1 sc, dec) *3 (6)
Note: After Row 11, stuff the piece through the opening between the foot and lower leg.
Slip stitch, fasten off, close the opening. Sew the opening and add a couple more stitches on each side to pull the lower leg and foot toward each other for a natural bend.
Front Legs — Toes and Hand (make 2)
Main color, starting with a magic ring.
Row 1: 6 sc in mr (6)
Row 2: (inc, 2 sc) *2 (8)
Row 3: 8 sc (8)
Row 4: (dec, 2 sc) *2 (6)
Row 5: 5 sc, sl st (total not stated in source)
Note: Rows 1-5 make one toe. Crochet three toe pieces for each hand, the same way as the hind leg toes — leave the yarn attached on the third toe and continue into Row 6.
Row 6: gather the toes together, crocheting one round of sc around them, leaving 1 stitch unworked between each toe (14)
Row 7: 14 sc (14)
Row 8: dec on the middle toes, on both sides (12)
Rows 9-17: 12 sc (9 rows) (12)
Note: In Row 6, bring the sewing tail for the toes out to the outside — you’ll sew the gaps between the toes later.
Slip stitch, fasten off leaving a tail for sewing.
Front Legs — Shoulder (make 2)
Main color, starting with a magic ring. In Row 1, leave the starting tail long, for sewing the arm later, and keep it on the outside.
Row 1: 6 sc in mr (6)
Row 2: 6 inc (12)
Row 3: (inc, 2 sc) *4 (16)
Rows 4-8: 16 sc (5 rows) (16)
Row 9: (dec, 6 sc) *2 (14)
Row 10: 14 sc (14)
Note: Before Row 11, stuff both the hand and shoulder pieces — you’ll be joining them. The hand should sit edge-on to the shoulder, not palm-on. Bring the sewing tail left on the hand out through the opening.
Row 11: connect the hand and shoulder, crocheting one round of sc around both. Skip 5 stitches at the junction — you’ll sew those later: 9+7=16 sc (16)
Row 12: dec at the junction of the hand and shoulder (14)
Note: In Row 12, if the dec spot happens to land right at the end of the round, just shift it one stitch forward.
Row 13: 14 sc (14)
Row 14: (dec, 5 sc) *2 (12)
Row 15: (dec, 2 sc) *3 (9)
Row 16: (1 sc, dec) *3 (6)
Slip stitch, fasten off, close the opening. Stuff the paws and sew the opening between hand and shoulder closed.
Wings (make 2)
Main color, starting with a chain of 25. Worked in back-and-forth rows.
Rows 1-3: starting from the 2nd stitch from the hook, 24 sc, ch (3 rows) (24)
Note: After Row 3, fold the piece and crochet the edges together along the long side with sc = 24 sc — you’ll end up with a hollow tube. If the wire doesn’t fit through, work one more row of 24 sc before joining. After joining the edges, chain 2.
Row 4: from the 4th stitch from the hook: dec, 9 sc, sl st — incomplete round (total not stated in source)
Row 5: from the 2nd stitch from the hook: 8 sc, dec, ch 2 (total not stated in source)
Row 6: from the 4th stitch from the hook: dec, 11 sc, sl st — incomplete round (total not stated in source)
Row 7: from the 2nd stitch from the hook: 10 sc, dec, ch 2 (total not stated in source)
Row 8: from the 4th stitch from the hook: dec, 13 sc, ch (total not stated in source)
Row 9: from the 2nd stitch from the hook: 14 sc, ch 7 (total not stated in source)
Row 10: from the 2nd stitch from the hook: 20 sc, ch (total not stated in source)
Row 11: from the 2nd stitch from the hook: 18 sc, dec, ch 2 (total not stated in source)
Row 12: from the 4th stitch from the hook: dec, 6 sc, sl st — incomplete round (total not stated in source)
Row 13: from the 2nd stitch from the hook: 5 sc, dec, ch 2 (total not stated in source)
Row 14: from the 4th stitch from the hook: dec, 7 sc, sl st — incomplete round (total not stated in source)
Row 15: from the 2nd stitch from the hook: 6 sc, dec, ch 2 (total not stated in source)
Row 16: from the 4th stitch from the hook: dec, 8 sc, ch (total not stated in source)
Row 17: from the 2nd stitch from the hook: 9 sc, ch 7 (total not stated in source)
Row 18: from the 2nd stitch from the hook: 15 sc, ch (total not stated in source)
Row 19: from the 2nd stitch from the hook: 13 sc, dec, ch 2 (total not stated in source)
Row 20: from the 4th stitch from the hook: dec, 5 sc, sl st — incomplete round (total not stated in source)
Row 21: from the 2nd stitch from the hook: 4 sc, dec, ch 2 (total not stated in source)
Row 22: from the 4th stitch from the hook: dec, 7 sc, ch (total not stated in source)
Turn the work and crochet a round of sc around the edge of the wing, skipping the upper part and the base. Work increases at the tips of each feather, and slip stitches between the feathers. Finish at the tip of the upper feather, sewing the hole for the wire shut as you go. On the second wing, work the border in the opposite direction (join yarn at the tip of the upper feather instead). Bring the yarn tail through the empty space to the base of the wing for sewing.
Large Fangs (make 2)
White yarn, split lengthwise and worked in two strands, thin hook, starting with a magic ring.
Row 1: 4 sc in mr (4)
Row 2: inc, 3 sc (5)
Row 3: 3 sc, inc, 1 sc (6)
Row 4: inc, 5 sc (7)
Row 5: 4 sc, inc, 2 sc (8)
Slip stitch, fasten off leaving a tail for sewing. Do not stuff — fold in half and sew the edges together.
Small Fangs (make 2)
White yarn, split lengthwise and worked in two strands, thin hook, starting with a magic ring.
Row 1: 4 sc in mr (4)
Row 2: inc, 3 sc (5)
Row 3: 3 sc, inc, 1 sc (6)
Slip stitch, fasten off leaving a tail for sewing. Do not stuff — fold in half and sew the edges together.
Assembling Your Dragon Amigurumi
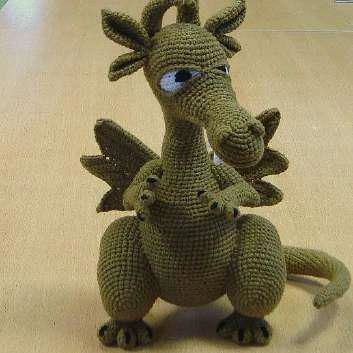
- Ears: Fold the upper and lower ear pieces in half and sew them together. Sew each ear to the head by the stitches around the seam (not the seam itself), on the sides, about 7 rows up from the starting ring.
- Horns: Sew almost right up against the ears, about 8 rows down from the top of the head. Sew along the crocheted fold edge, plus 2 rows up from it.
- Nostrils: Sew to the head using the side where you finished crocheting, placed on the muzzle set back about 2 rows from the edge.
- Hind legs: Sew on so that the closing point of the thigh (where the sewing tail is) sits level with the wire and level with the curve of the tail. Catch the thigh generously as you sew, pulling it tight against the body.
- Wings: Trim the back wires to the length you need, slide a wing onto each one, angle them slightly upward, and sew in place. Tuck the short yarn tails inside the body.
- Front legs: Sew to the sides, about 2-3 rows higher than the wings.
- Fangs: Sew closely against the seam that joins the jaws — large fangs at nostril level, small fangs further back, with no more than 1 stitch between each pair.
Finishing the Details
Embroider claws on the feet in black yarn using simple straight stitches from the starting ring — 4 stitches spanning 3 rows. On the hands, embroider 3 stitches spanning 2 rows the same way.
💡 Stretch It Further: Once you’ve built the wire technique into muscle memory, this same shaping translates well to smaller dragons — try scaling the head and body down for a mini version using leftover sock or fingering yarn and a shorter length of wire. Mixing your main color across a few close shades of green, teal, or rust from your stash also reads as natural scale variation rather than a mismatch — this is a great project for using up those “almost but not quite matching” skeins you’ve been holding onto. And if you’ve got any leftover white or black from other projects, that covers the eyes, fangs, and claw embroidery entirely.
This one took me the better part of a week, working a piece or two an evening, and I still can’t quite believe how much of it came out of yarn I already had sitting around. The wire frame is the only real investment here — everything else is stash. If you make one, I’d start with the jaw and head pieces first; once the face comes together, the rest of the build starts to feel a lot less intimidating. Make the wings, sew them on at an angle, and suddenly you’ve got a dragon that actually looks like it’s about to take off.
FAQ
What yarn weight is best for this dragon amigurumi free pattern?
You can use any medium worsted (4) or DK/light worsted (3) cotton-acrylic blend from your stash. The pattern is designed to be highly adaptable to standard yarn weights.
Do I have to use wire for this crochet dragon?
Yes, the 2.5mm craft wire armature is essential. It allows the heavy tail, head, and large wings to support themselves and makes the entire dragon poseable.
Is this dragon amigurumi pattern suitable for beginners?
This is an advanced pattern. It requires working back-and-forth rows mixed with continuous rounds, working around a wire armature, and extensive sewing and shaping techniques like invisible decreases.