A Crochet Cat Amigurumi Free Pattern That Curls Up Into an Actual Ball
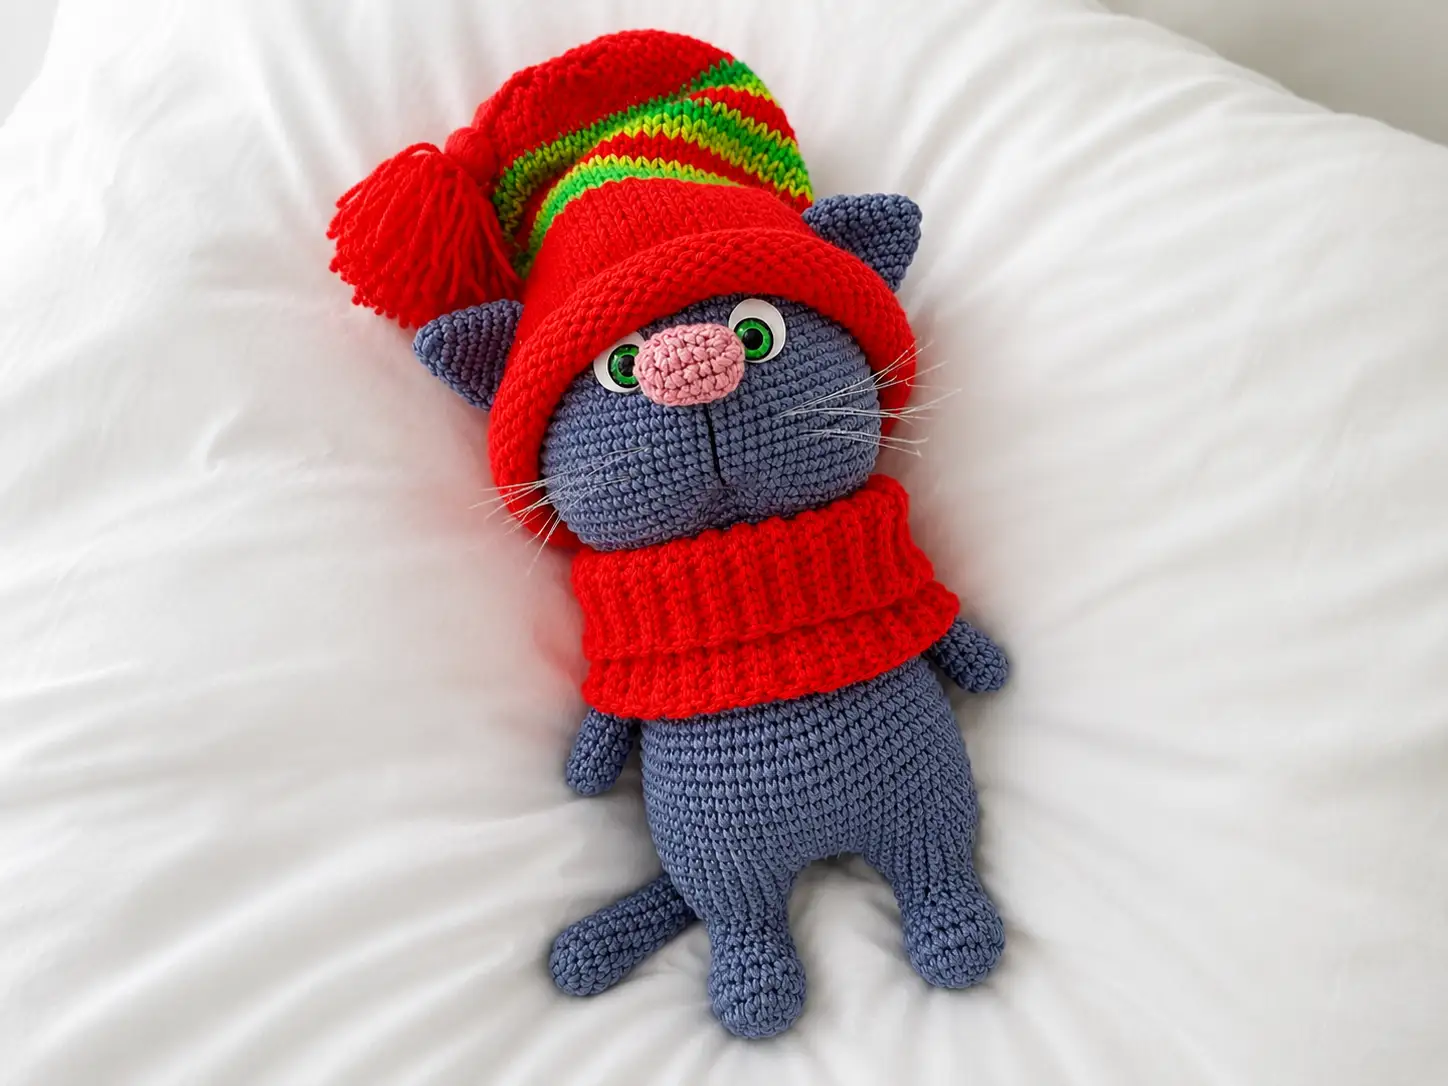
Okay, this crochet cat amigurumi free pattern is a little different from my usual quick-win projects, and I want to be upfront about that. This one takes some real time and a bit of sewing — but the payoff is a cat that literally curls into a ball, wearing its own tiny knit hat and snood. Honestly? It’s worth every stitch. Grab a comfy chair, because we’re settling in for this one.
🧶 Why You’ll Love This Pattern
- ⭐ Difficulty: INTERMEDIATE — more sewing and shaping than my usual picks, but every step is broken down for you
- ⏱️ Time: A weekend project — this isn’t a one-evening make, and that’s okay
- 🪡 Sewing: Standard — you’ll sew on the ears, join the head to the body, and do a little face sculpting
- 🧵 Yarn: DK/Light Worsted weight cotton-blend — soft, sturdy, and easy to find
- 💰 Yarn needed: A little less than 2 skeins total across your colors — grab a bit extra since exact yardage wasn’t specified by the original designer
Materials for This Crochet Cat Amigurumi Pattern
- Main color yarn: DK/Light Worsted (3) weight yarn for the body — something like Paintbox Cotton DK or a similar cotton-blend works beautifully. Look for it at Joann, Michaels, or Hobby Lobby, or order Paintbox online.
- Contrast color: a small amount in a second shade for the nose.
- Hat and snood yarn: two more small amounts of DK weight yarn in colors of your choice.
- A little black or dark brown thread (thinner than your main yarn — a lace-weight works) for embroidering the face details.
- White felt circles, about 15mm across, for the eye whites.
- Fishing line or waxed thread (optional) for whiskers.
- 10mm safety eyes (or sew-on/glue-on eyes if you prefer).
- Polyester stuffing — Poly-Fil is my go-to, easy to find at any craft store.
- Hook size: here’s the thing — the original pattern doesn’t specify an exact hook size, just “appropriate for your yarn.” For DK weight yarn worked tightly (which you want for amigurumi, so stuffing doesn’t peek through), I’d start with a 3.25mm (US D/3) hook and go down a size if your stitches look loose. Not sure? Our hook size guide will help you dial it in.
- Also grab: a tapestry needle, stitch markers, pins, and scissors.
Don’t stress about matching brands exactly — any DK/Light Worsted (3) cotton-blend yarn will work here. If you’re not sure what “DK weight” means, the Craft Yarn Council’s yarn weight chart is a great cheat sheet.
Abbreviations Used in This Cat Amigurumi Pattern
| Abbreviation | Meaning |
|---|---|
| mr | magic ring — an adjustable loop you start amigurumi with. Sounds fancy, it’s really just a loop. |
| sc | single crochet — your basic, foundational amigurumi stitch. |
| ch | chain stitch — used for starting chains and buttonholes. |
| inc | increase — 2 single crochets worked into the same stitch, adds width. |
| dec | invisible decrease — worked through the front loops of the next 2 stitches together, keeps things smooth with no visible gap. |
| sl st | slip stitch — a low, flat stitch used for joining. |
| (…)×X | repeat everything inside the parentheses X times. |
Beginner Tips for This Crochet Cat Amigurumi Free Pattern
If you’ve never made a magic ring before, don’t panic — our magic ring tutorial walks you through it in under two minutes, and every single part of this cat starts with one.
The dec stitches throughout this pattern are worked as an invisible decrease. If that term is new to you, check out our invisible decrease guide — it’s genuinely the easiest way to avoid gappy amigurumi.
This pattern has more sewing than most of my picks — sewing on ears, joining the head to the body, that kind of thing. Our guide to sewing amigurumi parts will make it way less intimidating. Pin everything in place first before you commit to a single stitch. Trust me on this one.
The Pattern
Part 1: Upper Paws (make 2)
Color: main | Start: magic ring
Row 1: 5 sc in mr (5)
Row 2: 5 inc (10)
Rows 3-16: sc around (10)
Stuff only the lower part of the paw. Fold it in half and crochet 5 sc through both sides to close it flat. Fasten off and cut yarn — these paws get crocheted directly into the body later, so don’t sew them separately.
Part 2: Tail (make 1)
Color: main | Start: magic ring
Row 1: 6 sc in mr (6)
Row 2: 6 inc (12)
Rows 3-27: sc around (12)
Stuff lightly as you go — you don’t want a firm tail. Fold in half and crochet 6 sc through both sides to close. Fasten off and cut yarn.
🎉 Look at you go! Two parts down. The tail is one of my favorite pieces to make — it’s simple, repetitive, and great for zoning out in front of a movie.
Part 3: Nose (make 1)
Color: contrast | Start: ch 5, work into 2nd ch from hook
Row 1: inc, 2 sc, 4 sc in next st, 2 sc, inc (12)
Row 2: 2 inc, 2 sc, 4 inc, 2 sc, 2 inc (20)
Rows 3-4: sc around (20)
Row 5: 10 dec (10)
Fasten off, cut yarn, and stuff lightly. The nose gets crocheted into the head in a few steps — hang onto it.
Part 4: Head (make 1)
Color: main | Start: magic ring
Row 1: 6 sc in mr (6)
Row 2: 6 inc (12)
Row 3: (1 sc, inc)×6 (18)
Row 4: (2 sc, inc)×6 (24)
Row 5: (3 sc, inc)×6 (30)
Row 6: (4 sc, inc)×6 (36)
Row 7: (5 sc, inc)×6 (42)
Row 8: (6 sc, inc)×6 (48)
Row 9: (7 sc, inc)×6 (54)
Row 10: (8 sc, inc)×6 (60)
Rows 11-12: sc around (60)
Row 13: (9 sc, inc)×6 (66)
Rows 14-18: sc around (66)
Row 19: 19 sc, (1 sc, inc)×6, 5 sc together with 5 sts of the nose, (inc, 1 sc)×6, 18 sc (78)
Row 20: 37 sc, 5 sc along the remaining stitches of the nose, 36 sc (78)
This is the trickiest moment in the whole head — you’re crocheting the cheeks and attaching the nose at the same time. Take it slow, and stuff the nose a little as you close row 20 around it. Once it’s attached, it looks so good, I promise.
Rows 21-30: sc around (78)
Eye placement: between rows 17 and 18, spaced 6-7 stitches apart, centered around the nose. Fold each white felt circle in half and snip a small cross-shaped cut in the center, then insert your safety eye through the felt before pushing it into the head — this gives you that soft white “eye white” look.
Row 31: (11 sc, dec)×6 (72)
Row 32: (7 sc, dec)×8 (64)
Row 33: (6 sc, dec)×8 (56)
Row 34: (5 sc, dec)×8 (48)
Row 35: (4 sc, dec)×8 (40)
Row 36: (3 sc, dec)×8 (32)
Row 37: (2 sc, dec)×8 (24)
Stuff the head firmly, but don’t overdo it — remember we’re sculpting the face later, so leave a little give. Fasten off and weave in your ends.
🎉 You just made a whole cat head with a nose crocheted in! That’s genuinely one of the more advanced techniques in amigurumi. If it looked a little wonky going in, don’t worry — the sculpting step evens everything out.
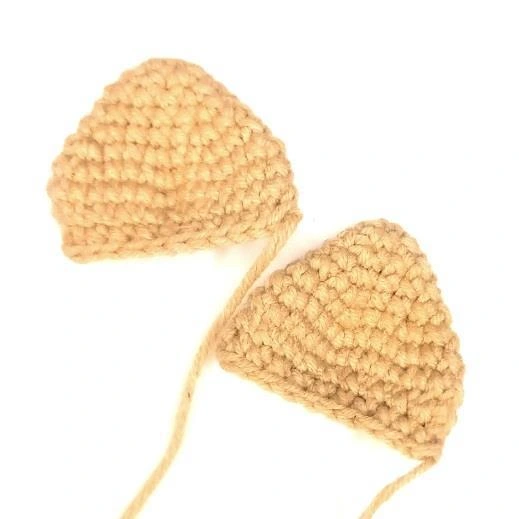
Part 5: Ears (make 2)
Color: main | Start: magic ring
Row 1: 6 sc (6)
Row 2: (1 sc, inc)×3 (9)
Row 3: (2 sc, inc)×3 (12)
Row 4: (3 sc, inc)×3 (15)
Row 5: (4 sc, inc)×3 (18)
Row 6: (2 sc, inc)×6 (24)
Row 7: (3 sc, inc)×6 (30)
Row 8: sc around (30)
Row 9: 2 sc, 8 dec, 12 sc (22)
Row 10: 3 sc, then fold in half and crochet 11 sc through both sides (11)
Fasten off, but leave a long tail — about 45-50cm — for sewing these on later.
Part 6: Lower Paws (make 2)
Color: main | Start: magic ring
Row 1: 6 sc in mr (6)
Row 2: 6 inc (12)
Row 3: (1 sc, inc)×6 (18)
Rows 4-5: sc around (18)
Row 6: 3 sc, 6 dec, 3 sc (12)
Rows 7-8: sc around (12)
Row 9: (1 sc, inc)×6 (18)
Row 10: sc around (18)
Row 11: (2 sc, inc)×6 (24)
Row 12: sc around (24)
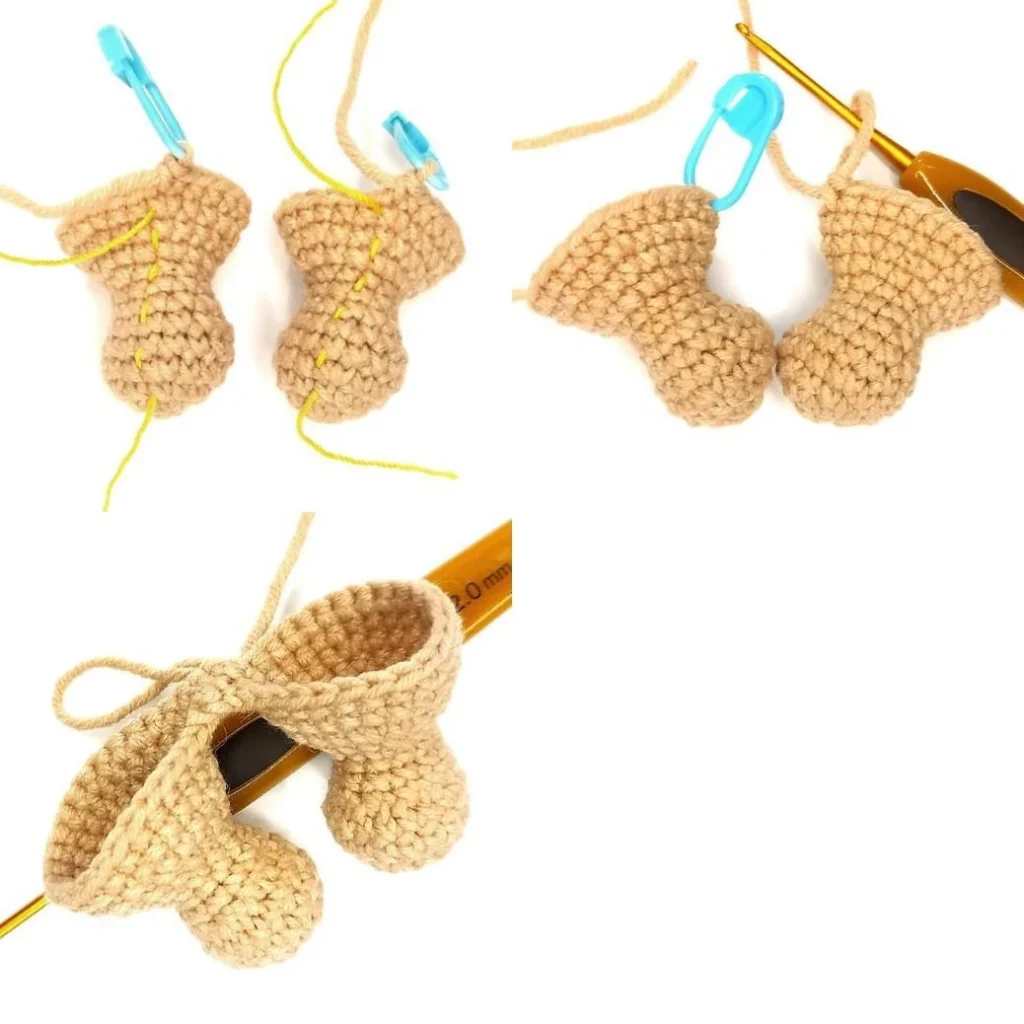
Here’s a fun little quirk of this design: crochet a few extra stitches on your second paw up to the point where it’ll join the first (the designer used 6 sc). Then go back and crochet that same number of extra stitches on the first paw. This is what gives the finished cat its cute “toes-in” clubfoot look.
Temporarily fasten off the first paw, leaving about 30cm — don’t cut yarn on the second paw yet. Fold the paws together and decide how “toes-in” you want them to look, then fasten off and trim the first paw’s yarn for good. Count back that same extra-stitch number, doubled (the designer’s version used 12), on the first paw — that’s your joining point for the body.
Part 7: Body (make 1)
Color: main | Start: chain 3 from the second paw, join to the first paw
Row 1: 24 sc along the first paw, 3 sc along the chain, 24 sc along the second paw, 3 sc along the chain (54)
Row 2: (8 sc, inc)×6 (60)
Row 3: sc around (60)
Row 4: (9 sc, inc)×6 (66)
Rows 5-9: sc around (66)
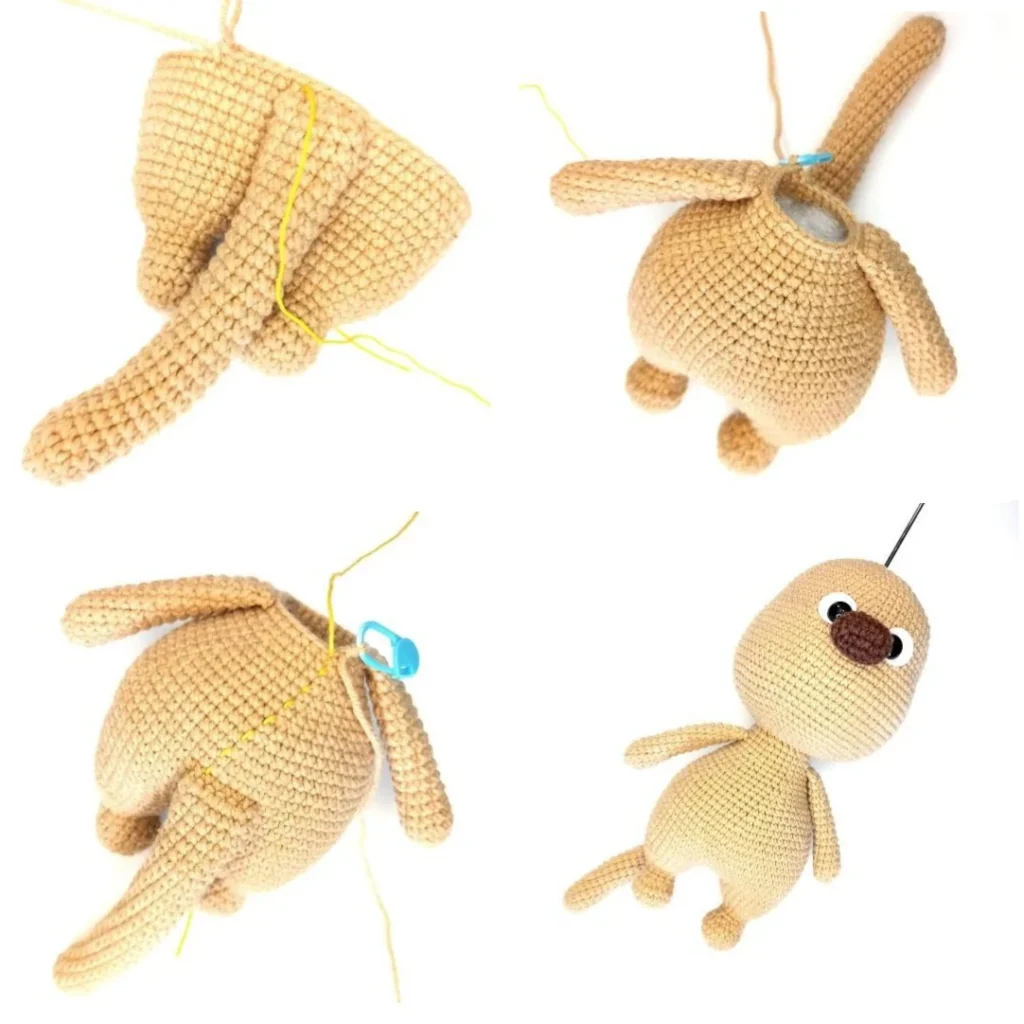
Stuff the body firmly as you go. In row 9, you’ll crochet in the tail — to keep it centered, work 62 sc, then 5 sc together with the tail, catching 1 stitch of the next row. Place a stitch marker after the 66th stitch of row 9 so you don’t lose your place.
Rows 10-11: sc around (66)
Row 12: (9 sc, dec)×6 (60)
Row 13: sc around (60)
Row 14: (8 sc, dec)×6 (54)
Row 15: sc around (54)
Row 16: (7 sc, dec)×6 (48)
Row 17: sc around (48)
Row 18: (6 sc, dec)×6 (42)
Row 19: sc around (42)
Row 20: (5 sc, dec)×6 (36)
Row 21: sc around (36)
Row 22: (4 sc, dec)×6 (30)
Row 23: sc around (30)
Row 24 is where the upper paws get crocheted in. Stuff the main body pretty firmly here, but not all the way — you still have shaping to do. Place your joining points strictly on the sides: 5 sc together with each paw, with 10 sc between them.
Row 24: 7 sc, 5 sc together with a paw, 10 sc, 5 sc together with the other paw, 3 sc (30)
Row 25: sc around (30)
Row 26: (3 sc, dec)×6 (24)
Crochet a couple more stitches to close (1 sc plus a slip stitch into the next stitch), then fasten off at the back, centered. Leave about 50cm of yarn — you’ll need it to sew on the head. Remove your marker and give the body one final firm stuffing.
🎉 The body is done, and honestly, that was the hardest part. Everything left from here is small pieces and finishing touches — you’ve got this.
Part 8: Crocheted Hat (make 1)
Color: hat color | Start: magic ring
Row 1: 6 sc in mr (6)
Row 2: 6 inc (12)
Row 3: (1 sc, inc)×6 (18)
Row 4: (2 sc, inc)×6 (24)
Row 5: (3 sc, inc)×6 (30)
Row 6: (4 sc, inc)×6 (36)
Row 7: (5 sc, inc)×6 (42)
Row 8: (6 sc, inc)×6 (48)
Row 9: (7 sc, inc)×6 (54)
Row 10: (8 sc, inc)×6 (60)
Row 11: (9 sc, inc)×6 (66)
Row 12: (10 sc, inc)×6 (72)
Row 13: (11 sc, inc)×6 (78)
Row 14: 17 sc, ch 10, skip 10 sc of the previous row, 24 sc, ch 10, skip 10 sc of the previous row, 17 sc (78)
Those chain-10 gaps are the ear holes — this is what lets the hat sit properly around your cat’s ears.
Rows 15-24: sc around (78)
Row 25: 78 sl st (78)
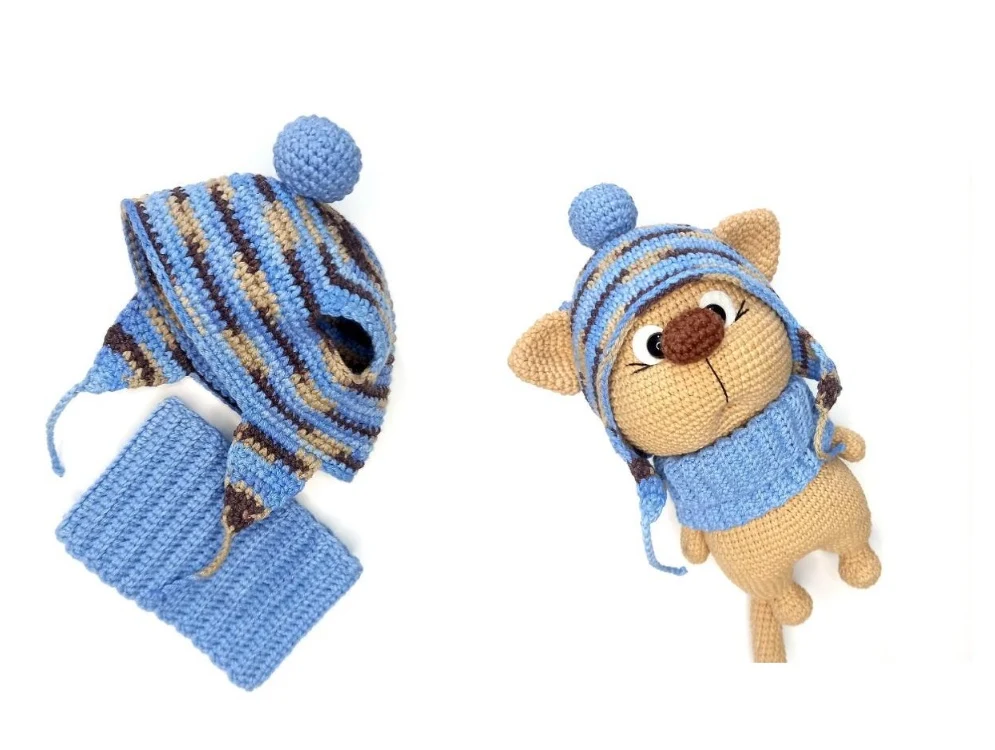
Work this hat loosely and top-down. Don’t cut yarn yet — you’ll need it for the earflap cords.
Earflaps (make 2): Try the hat on your finished cat and pick where you want the earflaps to sit (the designer used 34 sc of space between them at the front). Work these in turning rows, picking up stitches along the hat’s edge from the front side:
Rows 1-2: 10 sc (10)
Row 3: 2 dec, one at each edge (8)
Row 4: sc across (8)
Row 5: 2 dec, one at each edge (6)
Row 6: sc across (6)
Row 7: 2 dec, one at each edge (4)
Row 8: sc across (4)
Row 9: 2 dec, one at each edge (2)
Row 10: sc across (2)
Row 11: 1 dec (1)
Don’t cut the yarn — chain a cord to whatever length you like for tying the earflaps, knot the end, trim, and dab a bit of glue on the cut end to keep it from unraveling.
Part 9: Pompom (make 1)
Color: hat trim color | Start: magic ring
Row 1: 6 sc in mr (6)
Row 2: 6 inc (12)
Row 3: (1 sc, inc)×6 (18)
Row 4: (2 sc, inc)×6 (24)
Rows 5-7: sc around (24)
Row 8: (2 sc, dec)×6 (18)
Row 9: (1 sc, dec)×6 (12)
Row 10: 6 dec (6)
Pull the remaining stitches closed with your needle, fasten off, and sew the pompom onto the top of the hat. Weave in any loose yarn inside it.
Part 10: Snood (make 1)
Color: hat trim color | Start: ch 20 plus turning chain
Work in turning rows in the back loops only (BLO) until your strip reaches the length you want — the designer’s measured about 7.9in (20cm). Close it into a ring with slip stitches.
Assembly
- Sew on the ears: place them at the level between rows 10 and 11 counting down from the crown, spaced 32 stitches apart along row 11 (16 stitches out from the center of the muzzle on each side). Pin first, then sew.
- Sew on the head: using the 50cm tail you left from the body, sew the head in place — and don’t forget to tuck in a little extra stuffing at the neck as you close the gap.
- Sculpt the face: mark 6 points with pins. Points 1 and 6 sit at the bottom center, between rows 30 and 31 (3 sc apart). Points 2, 3, 4, and 5 sit between rows 18 and 19, at the outer and inner corners of the eyes. With a strong thread, go in at point 1 and out at point 2, then in at 3 and out at 6, pulling snug and tying off. Without cutting, go back in at 6 and out at 5, then in at 4 and out at 1, pull snug, and knot again. This is the step that pulls the face into that classic squished-cat expression — it looks strange until the very last pull, then suddenly it clicks into place.
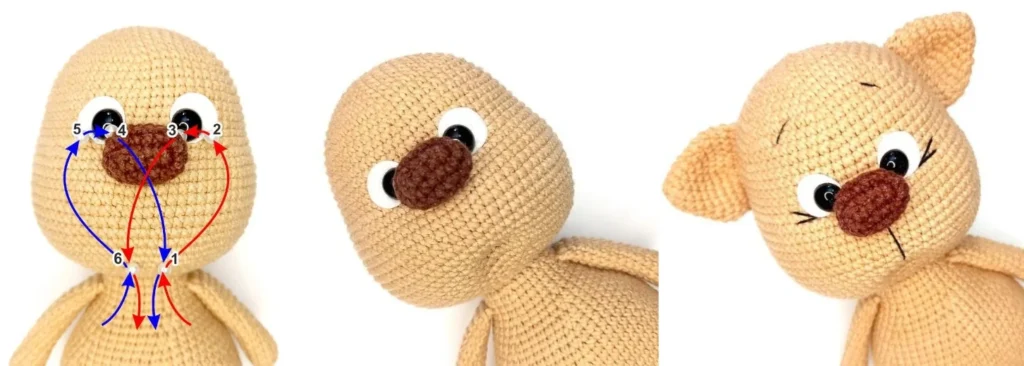
4. Embroider the details: with thin black thread, stitch in the eyebrows, the little creases above the cheeks, and the line from the nose down to the mouth.
5. Add whiskers (optional): attach lengths of fine waxed thread or fishing line using an auxiliary thread through the muzzle.
6. Dress your cat: pop the hat on, tie the earflap cords, and wrap the snood around its neck.
🎉 Look at that face! The sculpting step is genuinely the moment this project transforms from “pile of crochet parts” into an actual cat. Told you it was worth it.
You Did It!
Seriously — sit back and look at that curled-up little cat ball, hat, snood, and all. This was not a quick project, and if you pushed through the sewing and the face sculpting, you should be genuinely proud. This one tests patience more than skill, and you clearly have both. Tag AmiLoops if you share your finished cat — I want to see every single tiny sculpted face. 🧶
Feeling good about sewing now? You might enjoy our cozy gray kitty crochet cat pattern next, or if you want a break from sewing altogether, our easier free cat crochet pattern is a gentler follow-up.
FAQ
What yarn is best for this crochet cat amigurumi free pattern?
A DK/Light Worsted (3) weight cotton-blend yarn is ideal. It is soft, sturdy, and helps prevent the polyester stuffing from showing through your stitches.
Can beginners make this cat pattern?
This is an intermediate pattern because it involves complex shaping, crocheting pieces together, and face sculpting. However, an ambitious beginner can succeed by taking it one step at a time.
What size hook do I need for this amigurumi?
A 3.25mm (US D/3) crochet hook is a great starting point for DK weight yarn. You may need to go down a size if your stitches feel too loose.