Free Elf Amigurumi Pattern — Easy Crochet Friendly Elf Plush
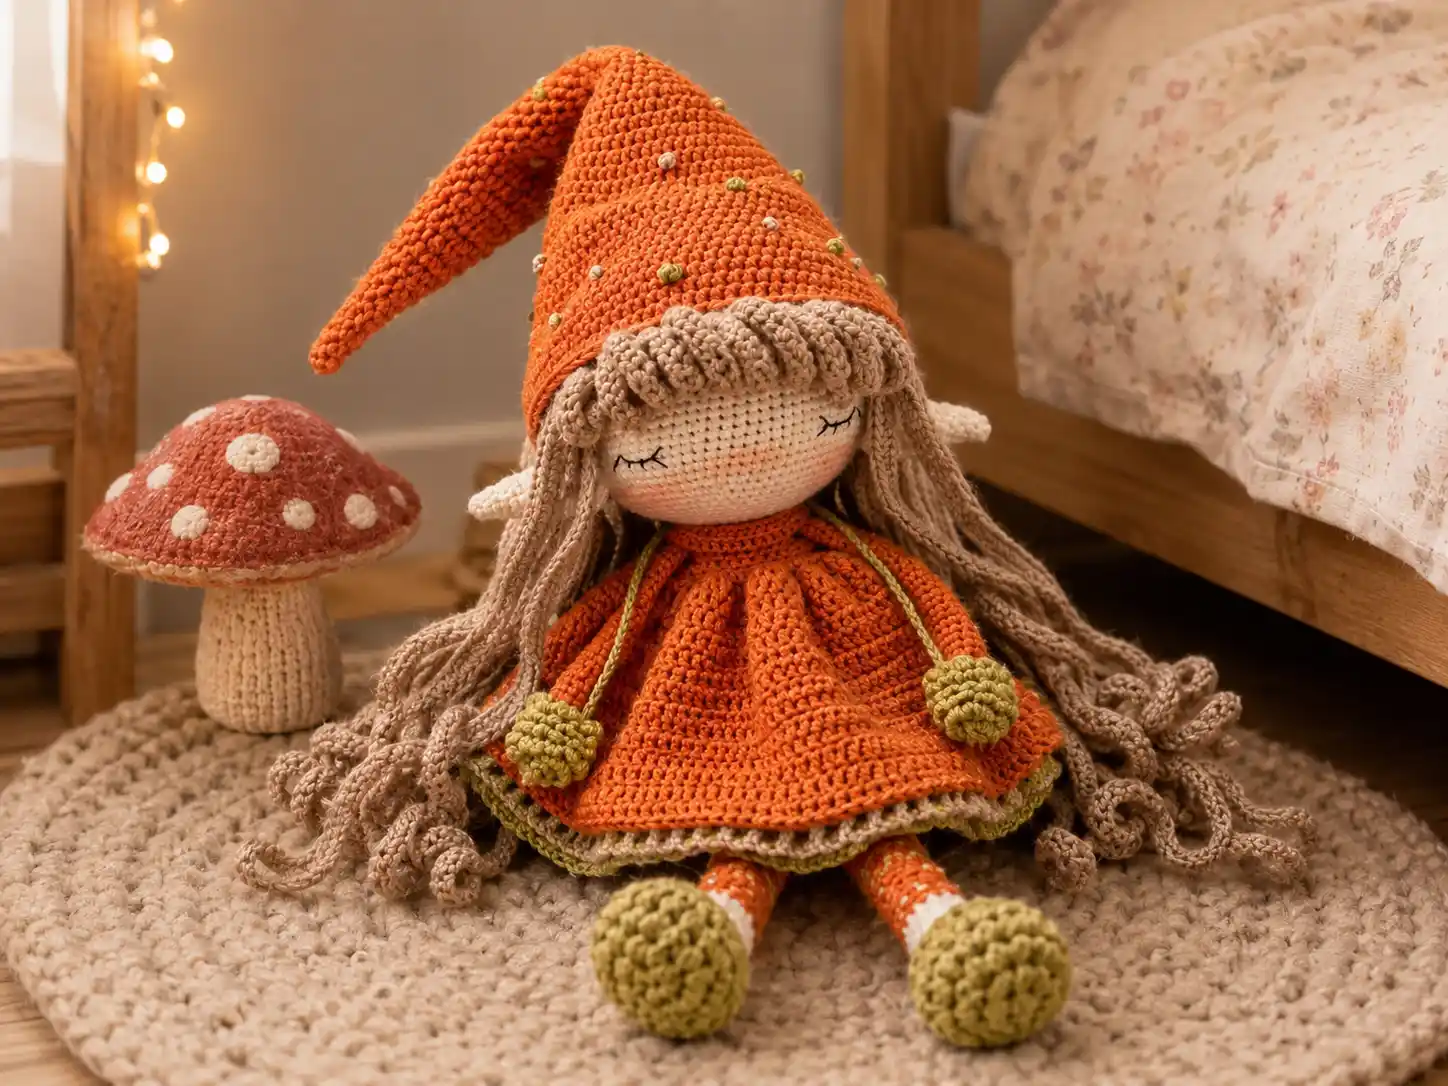
This free elf amigurumi pattern is going to make you feel like an absolute rockstar — even if you’re still figuring out how to hold your hook. Meet the Friendly Elf: a 12-inch plush with a long pointy hat, a ruffled dress, loop-trimmed shoes, and the most satisfying hair strands you’ll ever crochet. Yes, there’s some assembly. But I’m going to walk you through every single step, and I promise it’s more fun than it sounds. Ready? Let’s go.
🧶 Why You’ll Love This Pattern
- ⭐ Difficulty: Intermediate — but totally doable for a motivated beginner
- ⏱️ Time: 2–3 evenings — a weekend project
- 🪡 Sewing: Some assembly required — head, ears, and hair cap get sewn on
- 🧵 Yarn: DK/Light Worsted cotton — crisp stitch definition, gorgeous result
- 💰 Yarn needed: About 6 skeins across 4 colors
What You’ll Need for This Free Elf Amigurumi Pattern
Yarn
This pattern uses a DK/Light Worsted (Weight 3) cotton yarn in four colors. The original calls for Drops Safran — if you can’t find it at your local store, look for Paintbox Simply DK or Gazzal Baby Cotton. Both work beautifully and are available on Amazon US or through LoveCrafts.
- Color A — Milky White: 0.5 skein (approx. 80 yds) — for the head, legs (foot section), and ears
- Color B — Beige: 2 skeins (approx. 320 yds) — for the hair cap and dress trim
- Color C — Orange: 2.5 skeins (approx. 400 yds) — for the arms, legs (upper), body, hat, and dress
- Color D — Green Tea: 1 skein (approx. 160 yds) — for the shoes, mittens, and dress accent
Not sure which yarn weight is right for your project? The Craft Yarn Council’s yarn weight system is a great quick reference.
Tools & Supplies
- Hook: 1.5mm — yes, it’s small! Take your time and enjoy the detail it creates.
- Polyester fiberfill stuffing — Poly-Fil by Fairfield works great (find it at Joann, Michaels, or Hobby Lobby)
- Stitch markers — you’ll need these to track your rounds
- Tapestry needle — for sewing parts and weaving in ends
- Scissors
- Embroidery thread — for the eyes
- Dry pastel chalk (optional) — for blushed cheeks
- Pins — helpful for positioning the hair and ears before sewing
Substitution note: You can swap to any DK cotton you have on hand. Just check your gauge before starting — with a 1.5mm hook and DK yarn, your stitches should be tight enough that no stuffing shows through.
Abbreviations Used in This Free Elf Amigurumi Pattern
| Abbreviation | What It Means |
|---|---|
| mr | magic ring — an adjustable loop start that closes completely, no hole in the center |
| ch | chain — yarn over, pull through loop |
| sc | single crochet — the main building block of amigurumi |
| hdc | half double crochet — slightly taller than sc |
| hdc-inc | half double crochet increase — 2 hdc into the same stitch |
| dc | double crochet — taller still, used in the dress |
| tr | treble crochet — the tallest stitch in this pattern |
| sl st | slip stitch — insert hook, yarn over, pull through both loops at once |
| inc | increase — 2 sc into the same stitch |
| dec | decrease — used here as invisible decrease: insert hook through front loops of next 2 sts simultaneously |
| FLO | front loop only — work into only the front loop of the stitch |
| BLO | back loop only — work into only the back loop of the stitch |
| st(s) | stitch(es) |
| RS | right side — the outside of the piece |
| WS | wrong side — the inside |
Before You Start — Quick Tips for Beginners
New to amigurumi? Here are three things that’ll make this project go way smoother.
1. The magic ring is your friend. Almost every 3D part of this elf starts with one. It sounds fancy, but it’s really just an adjustable loop that you tighten at the end of round 1 so there’s no gap in the center. Our magic ring tutorial shows you exactly how to do it — takes two minutes to learn, pays off for every amigurumi you ever make.
2. Use stitch markers. Seriously. This pattern has a LOT of rounds, especially in the head (39 rows!) and hat (67 rows!). Without a marker tracking your round start, you will lose count. Place it on the first stitch of each round and move it up as you go. Non-negotiable.
3. Stuff as you go. Don’t wait until the very end to stuff closed pieces. The head gets stuffed before closing, and the legs get stuffed before row 38. Check out our guide on how to stuff amigurumi without lumps — it makes a huge difference in the final shape.
The Pattern
Head (×1) — Color A, Milky White
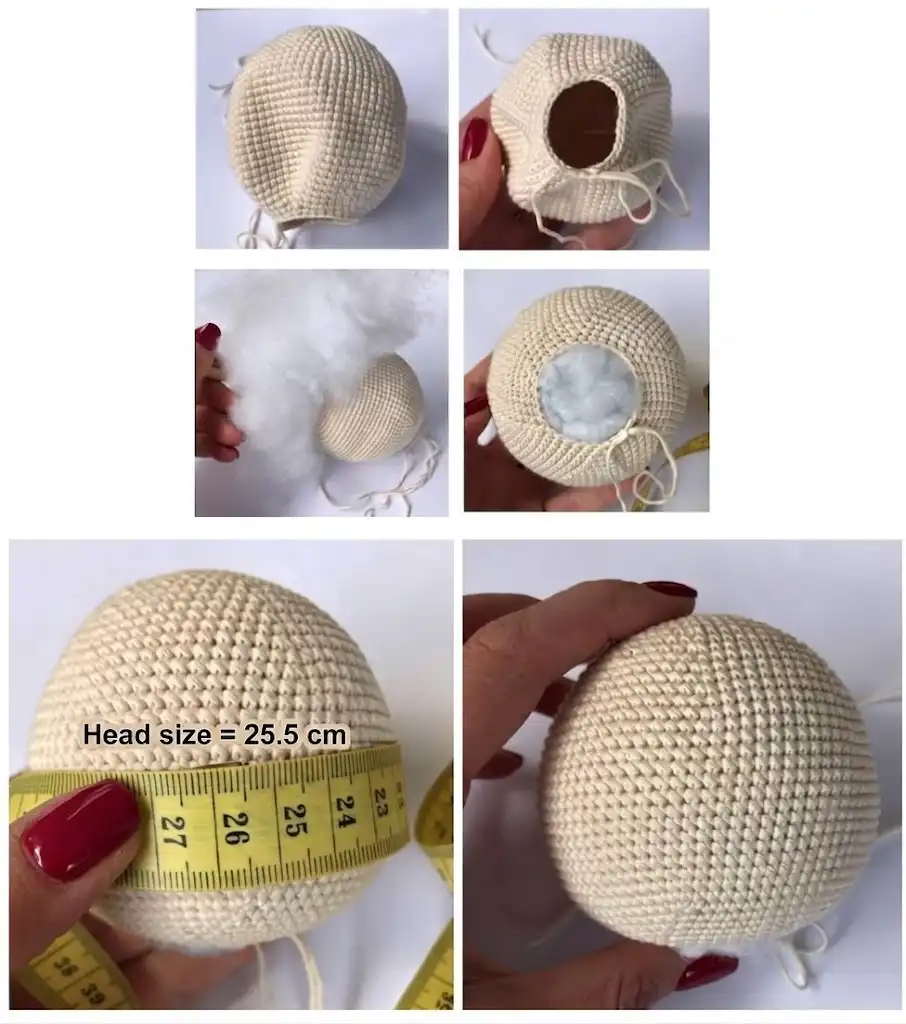
Start with your magic ring. This is the biggest part of the whole project — 39 rows of sc that build up into a beautifully round head. Work in continuous rounds.
Row 1: 6 sc in mr (6)
Row 2: 6 inc (12)
Row 3: *sc, inc*, repeat * 6 times (18)
Row 4: *2 sc, inc*, repeat * 6 times (24)
Row 5: *3 sc, inc*, repeat * 6 times (30)
Row 6: *4 sc, inc*, repeat * 6 times (36)
Row 7: *5 sc, inc*, repeat * 6 times (42)
Row 8: *6 sc, inc*, repeat * 6 times (48)
Row 9: *7 sc, inc*, repeat * 6 times (54)
Gauge check: the diameter of rows 1–9 should measure 2 in. Measure now — it’s much easier to fix tension issues here than after 30 more rows!
Row 10: 54 sc (54)
Row 11: *8 sc, inc*, repeat * 6 times (60)
Row 12: 60 sc (60)
Row 13: *9 sc, inc*, repeat * 6 times (66)
Row 14: 66 sc (66)
Row 15: *10 sc, inc*, repeat * 6 times (72)
Row 16: 72 sc (72)
Row 17: *11 sc, inc*, repeat * 6 times (78)
Rows 18–31: 78 sc (14 rows) (78)
🎉 Look at that head! You’ve just crocheted the widest part — now we shape it down. The decreases work exactly like the increases did, just in reverse. You’ve got this.
Row 32: *11 sc, dec*, repeat * 6 times (72)
Row 33: *10 sc, dec*, repeat * 6 times (66)
Row 34: *9 sc, dec*, repeat * 6 times (60)
Row 35: *8 sc, dec*, repeat * 6 times (54)
Row 36: *7 sc, dec*, repeat * 6 times (48)
Row 37: *6 sc, dec*, repeat * 6 times (42)
Row 38: *5 sc, dec*, repeat * 6 times (36)
Row 39: *4 sc, dec*, repeat * 6 times (30)
Finishing: Cut yarn and fasten off. Stuff the head very firmly before closing — really pack it in there. The finished head should measure about 10 in around.
Arms (×2) — Color C, Orange
Good news: these are tiny and super quick. No stuffing required!
Row 1: 4 ch, from the 2nd ch from hook, 2 sc, 3 sc in the last st, on the other side of the chain sc, inc (8)
Rows 2–33: 8 sc (32 rows) (8)
Finishing: Do not stuff. Cut yarn and fasten off. Make two.
Legs (×2) — Color A (foot) + Color C (upper leg), Orange
The legs are the trickiest part of this pattern — they have a color change, some shaping, and a fun fold-and-join moment at row 38. Take it one step at a time and it’ll make sense as you go.
Row 1: 6 ch, from the 2nd ch from hook 4 sc, 3 sc in the last st, on the other side of the chain 3 sc, inc [Color A] (12)
Rows 2–15: 12 sc (14 rows) [Color A] (12)
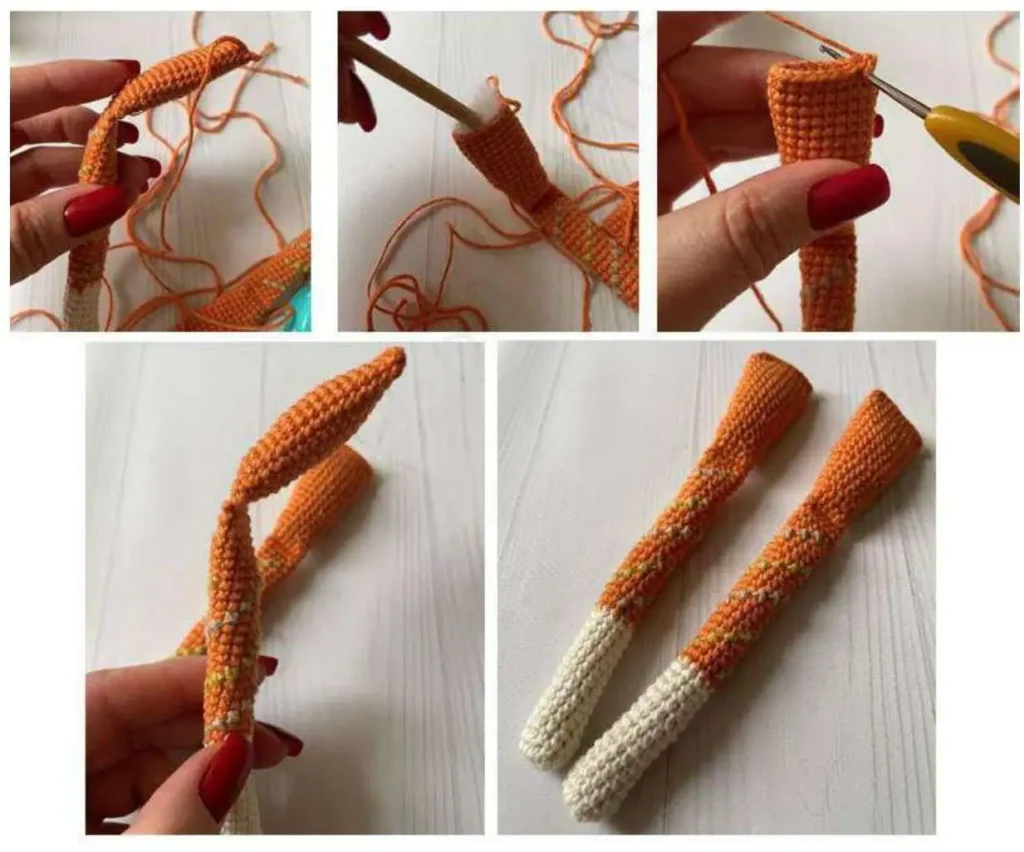
Rows 16–37: 12 sc (22 rows) [Color C] (12)
Note: Switch to Color C (orange) starting at row 16.
Stuffing note: Before row 38, stuff the leg — pack the foot tightly, and fill the rest of the leg loosely.
Row 38: Fold the piece in half, then join the two sides together by crocheting 6 sc through both sides. ch 1. Do not cut the yarn. (6)
Row 39: Insert hook in FLO of the 38th row and crochet 12 sc around (12)
Row 40: 12 sc (12)
Row 41: *(2 sc, inc)*, repeat * 4 times (16)
Rows 42–45: 16 sc (4 rows) (16)
Row 46: *(3 sc, inc)*, repeat * 4 times (20)
Rows 47–56: 20 sc (10 rows) (20)
Finishing: Stuff lightly. Fold the piece in half and join through both sides with 10 sc. Cut yarn and fasten off. Make two legs.
Optional detail: The original pattern includes a cross stitch embroidery on the legs in green and orange — bring the needle from wrong side to right side at the corner of a stitch, make a diagonal stitch to the opposite corner, then cross it. Totally optional but it looks amazing.
Body (×1) — Color C (orange) + Color A (milky white)
The body is worked flat first to create an oval base, then built up in the round — and it’s where you’ll join the legs and arms directly into the crocheting. So satisfying.
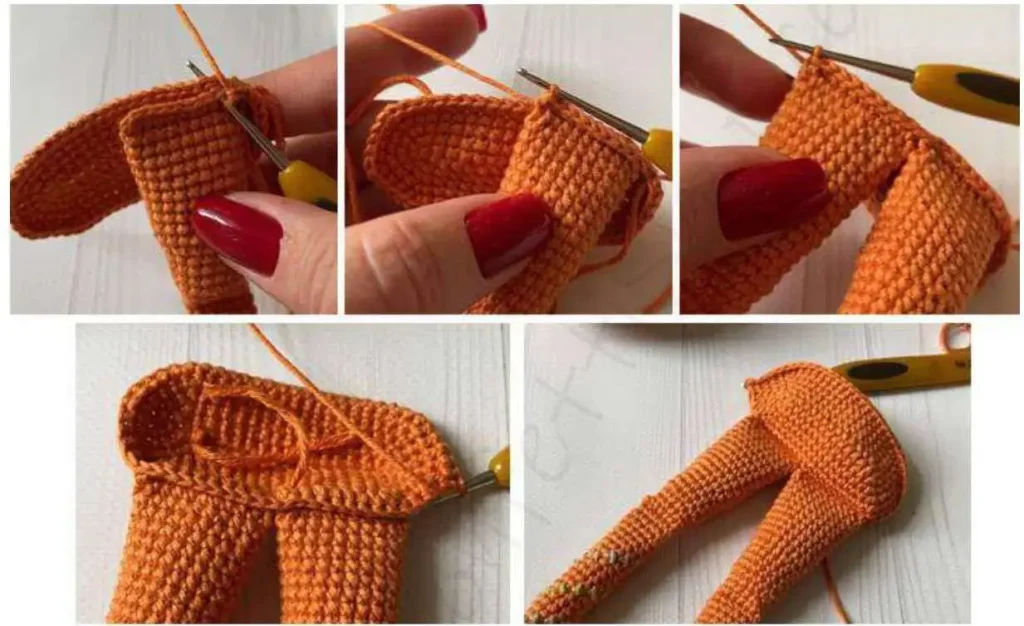
Row 1: 16 ch, from the 2nd ch from hook, 14 sc, 3 sc in the last st, on the other side of the chain 13 sc, inc (32)
Row 2: inc, 13 sc, 3 inc, 13 sc, 2 inc (38)
Row 3: sc, inc, 13 sc, *(sc, inc)*, repeat * 3 times, 13 sc,
*(sc, inc)*, repeat * 2 times (44)
Row 4: 2 sc, inc, 13 sc, *(2 sc, inc)*, repeat * 3 times, 13 sc, *(2 sc, inc)*, repeat * 2 times (50)
Row 5: 3 sc, inc, 13 sc, *(3 sc, inc)*, repeat * 3 times, 13 sc, *(3 sc, inc)*, repeat * 2 times (56)
Row 6: 2 sc, (crochet the first leg together with the body) 10 sc, (crochet the second leg together with the body) 10 sc, 34 sc (56)
This is the moment the legs get locked in — position them so the feet point forward and the thighs sit snug against the body base.
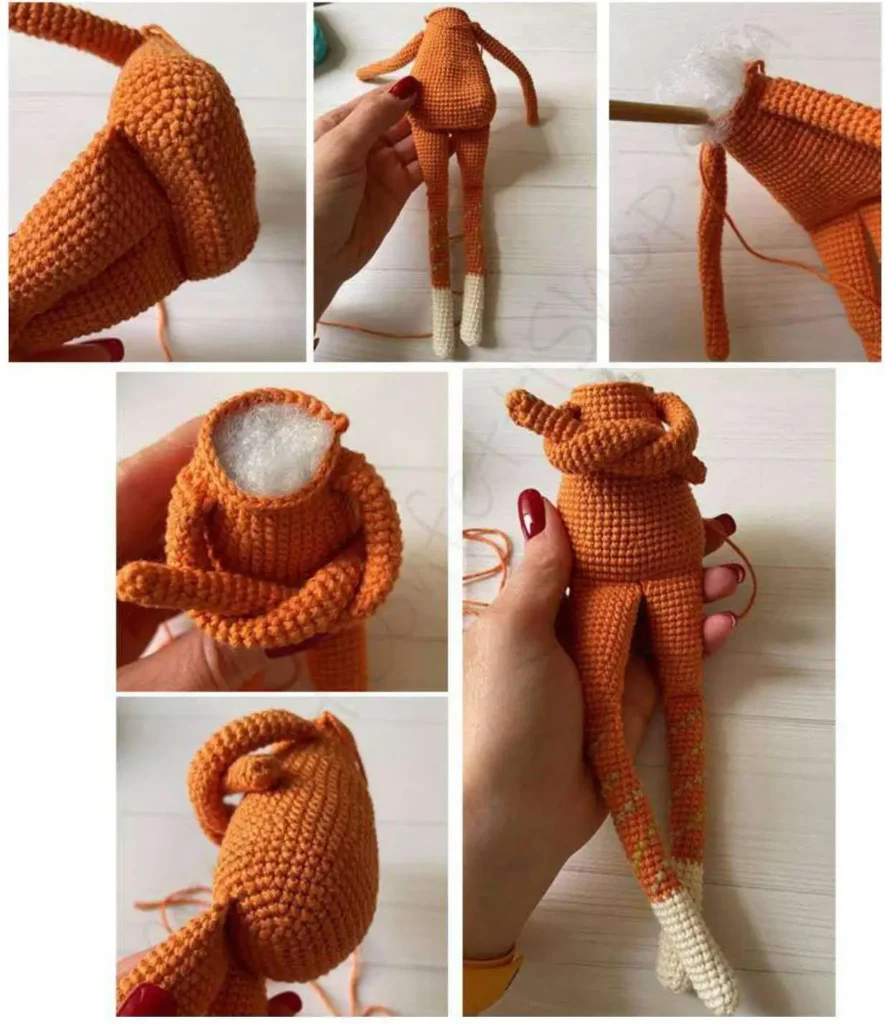
Rows 7–10: 56 sc (4 rows) (56)
Row 11: *5 sc, dec*, repeat * 8 times (48)
Rows 12–17: 48 sc (6 rows) (48)
Row 18: *4 sc, dec*, repeat * 8 times (40)
Rows 19–23: 40 sc (5 rows) [Color A] (40)
Switch to Color A (milky white) starting at row 19.
Row 24: *6 sc, dec*, repeat * 5 times [Color A] (35)
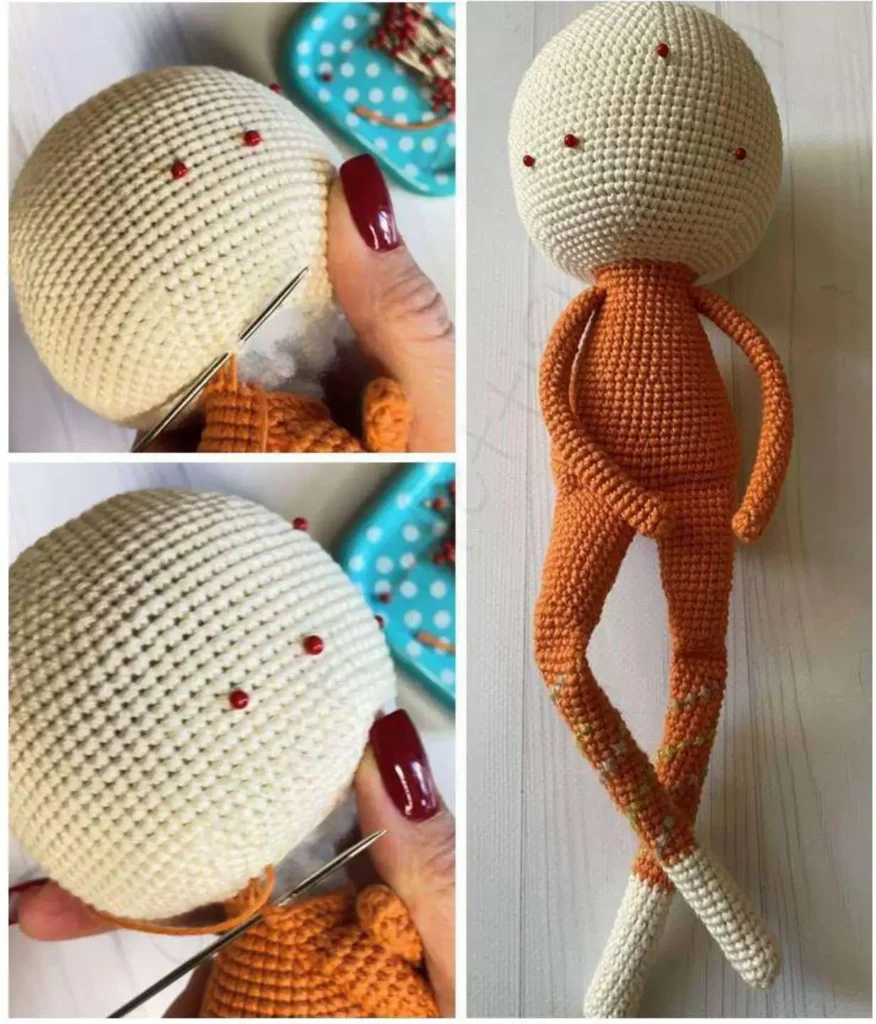
Rows 25–27: 35 sc (3 rows) [Color A] (35)
Row 28: *5 sc, dec*, repeat * 5 times [Color A] (30)
Row 29: (crochet together along the arm and body) 4 sc, 10 sc,
(crochet together along the arm and body) 4 sc, 12 sc [Color A] (30)
Rows 30–31: 30 sc (2 rows) [Color A] (30)
Finishing: Fasten off. Stuff the body very firmly — really pack it so the elf holds its shape well when standing.
🎉 The elf’s whole structure is done! Head, body, arms, and legs — you’ve crocheted all the main pieces. Everything from here is costume, hair, and accessories. The fun part is just starting.
Hair Cap (×1) — Color B, Beige
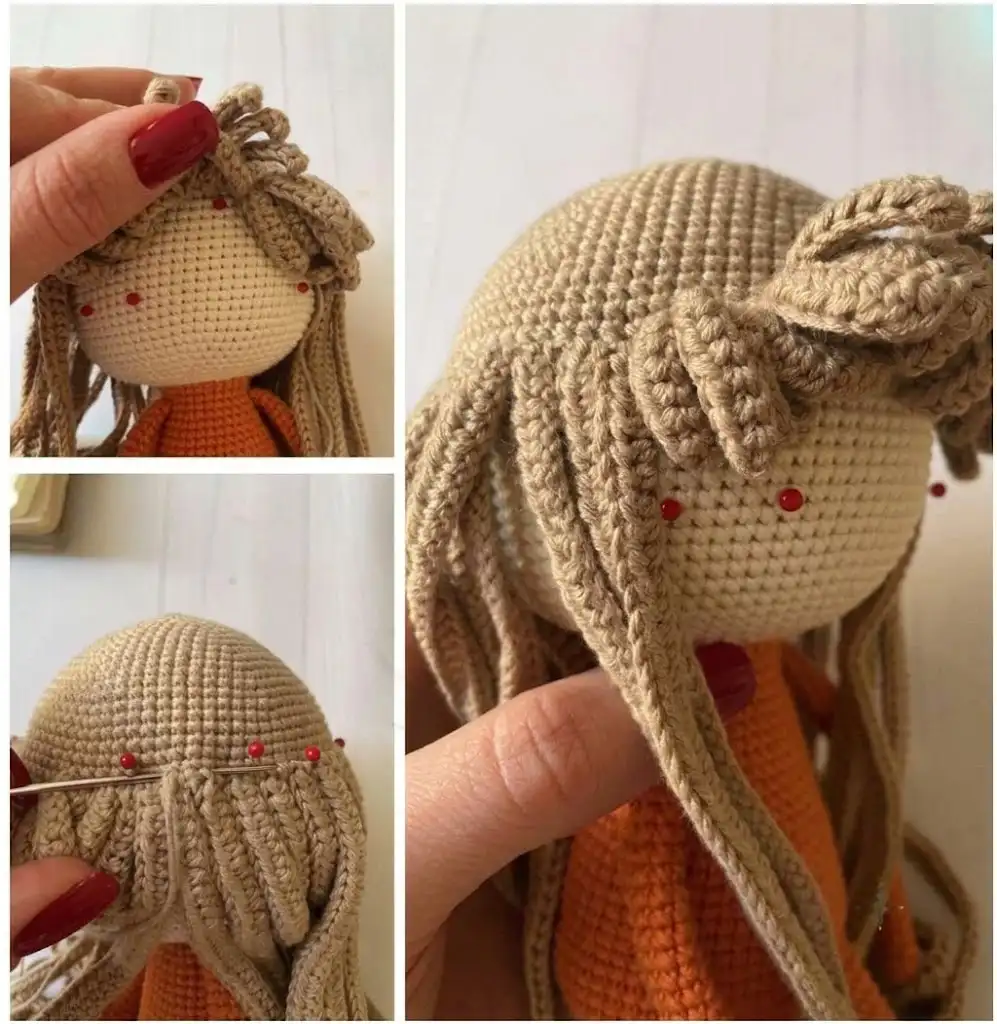
The hair cap is crocheted just like the head — expanding rounds of sc — then you keep going to add long flowing strands at the end. It fits right over the head like a wig.
Row 1: 6 sc in mr (6)
Row 2: 6 inc (12)
Row 3: *sc, inc*, repeat * 6 times (18)
Row 4: *2 sc, inc*, repeat * 6 times (24)
Row 5: *3 sc, inc*, repeat * 6 times (30)
Row 6: *4 sc, inc*, repeat * 6 times (36)
Row 7: *5 sc, inc*, repeat * 6 times (42)
Row 8: *6 sc, inc*, repeat * 6 times (48)
Row 9: *7 sc, inc*, repeat * 6 times (54)
Row 10: sc around (54)
Row 11: *8 sc, inc*, repeat * 6 times (60)
Row 12: sc around (60)
Row 13: *9 sc, inc*, repeat * 6 times (66)
Row 14: sc around (66)
Row 15: *10 sc, inc*, repeat * 6 times (72)
Row 16: sc around (72)
Row 17: *11 sc, inc*, repeat * 6 times (78)
Rows 18–22: sc around (5 rows) (78)
Hair strands: Turn the work and crochet the strands as follows:
First, crochet 25 short strands (bangs): *[10 ch, turn, from the second st from hook hdc in each st] in one st, sl st in next st*, repeat 25 times total.
Then crochet 26 long strands: *[101 ch, turn, from the second st from hook 5 sl st, 95 hdc] in one st, sl st in next 2 sts*, repeat 26 times total.
This gives you 51 strands total. Use pins to hold the long strands in place as you go — it keeps them from tangling.
Finishing: Fasten off.
Ears (×2) — Color A, Milky White
Tiny pointed elf ears — these are crocheted in the round with a few strategic increases and decreases to create that adorable pointed shape.
Row 1: 4 sc in mr (4)
Row 2: *sc, inc*, repeat * 2 times (6)
Row 3: *2 sc, inc*, repeat * 2 times (8)
Row 4: 6 sc, inc, sc (9)
Row 5: 7 sc, 2 inc (11)
Row 6: 9 sc, 2 inc (13)
Row 7: 11 sc, 2 inc (15)
Rows 8–9: sc around (2 rows) (15)
Row 10: 13 sc, inc, sc (16)
Row 11: 14 sc, inc, sc (17)
Row 12: 15 sc, inc, sc (18)
Row 13: 14 sc, dec, 2 sc (17)
Row 14: 12 sc, 2 dec, sc (15)
Finishing: Cut yarn leaving a long tail for sewing. Make two ears.
Dress (×1) — Color C (orange) + Color B (beige) + Color D (green tea)
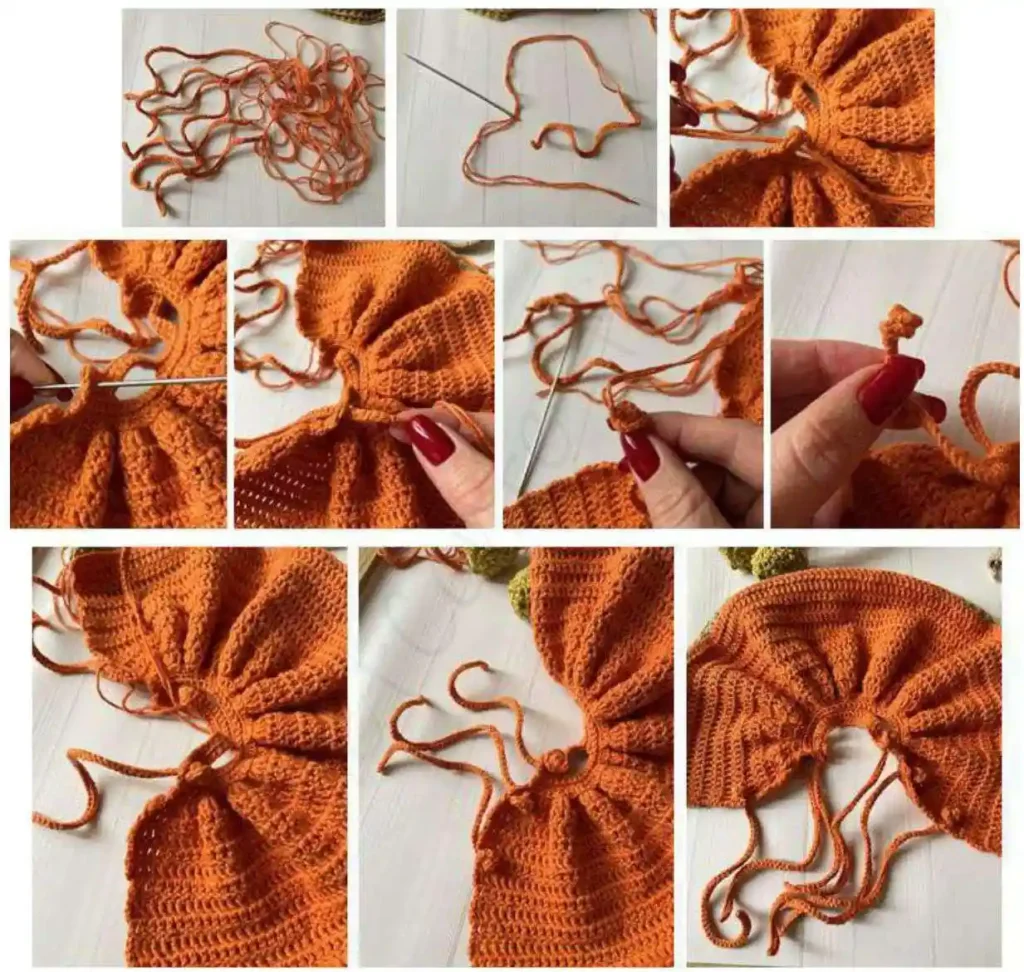
The dress is worked flat (back and forth in rows) with some really clever FLO/BLO work to create the skirt flare and the layered ruffle hem. It looks complex but it builds up row by row.
Row 1: 37 ch, turn, from the 2nd ch from hook sc in each st, turn (36)
Row 2 (WS): 1 ch, FLO 36 sc, turn (36)
Row 3 (RS): 1 ch, BLO 6 sc, 8 ch, skip 8 sts, BLO 8 sc, 8 ch, skip 8 sts, BLO 6 sc, turn
Row 4 (WS): 1 ch, FLO 36 sc, turn (36)
Row 5 (RS): 1 ch, all BLO: 2 sc, *(sc, inc)*, repeat * 8 times, *(inc, sc)*, repeat * 8 times, 2 sc, turn (52)
Row 6 (WS): 1 ch, all FLO: 4 sc, *(inc, 2 sc)*, repeat * 7 times, 2 sc, *(2 sc, inc)*, repeat * 7 times, 4 sc, turn (66)
Row 7 (RS): 3 ch, all BLO *(3 dc in one st, dc in next st)*, repeat * 33 times, turn (132)
Rows 8–18: 3 ch, 132 dc, turn (11 rows) (132)
Row 19 (RS): 3 ch, FLO 132 dc, turn (132)
Row 20 (WS): 3 ch, 132 dc, turn (132)
Row 21 (WS): Return to the BLO of the 19th row, 3 ch, 132 dc, turn [Color B] (132)
Row 22 (RS): 3 ch, FLO 132 dc, turn [Color B] (132)
Row 23 (WS): *2 ch, skip 1 st, dc in next st*, repeat * to the end of the row [Color B]
Row 24 (WS): Return to the BLO of the 22nd row, 3 ch, 132 dc, turn [Color D] (132)
Row 25 (RS): 3 ch, FLO 132 dc, turn [Color D] (132)
Row 26 (WS): *2 ch, skip 1 st, dc in next st*, repeat * to the end of the row [Color D]
Finishing: Cut yarn, fasten off, and weave in all ends.
Dress Ties (×6) — Color C, Orange
Six little twisted ties to lace up the dress. These go very fast.
Row 1: 70 ch, turn, from the 2nd ch from hook sl st in each st (69)
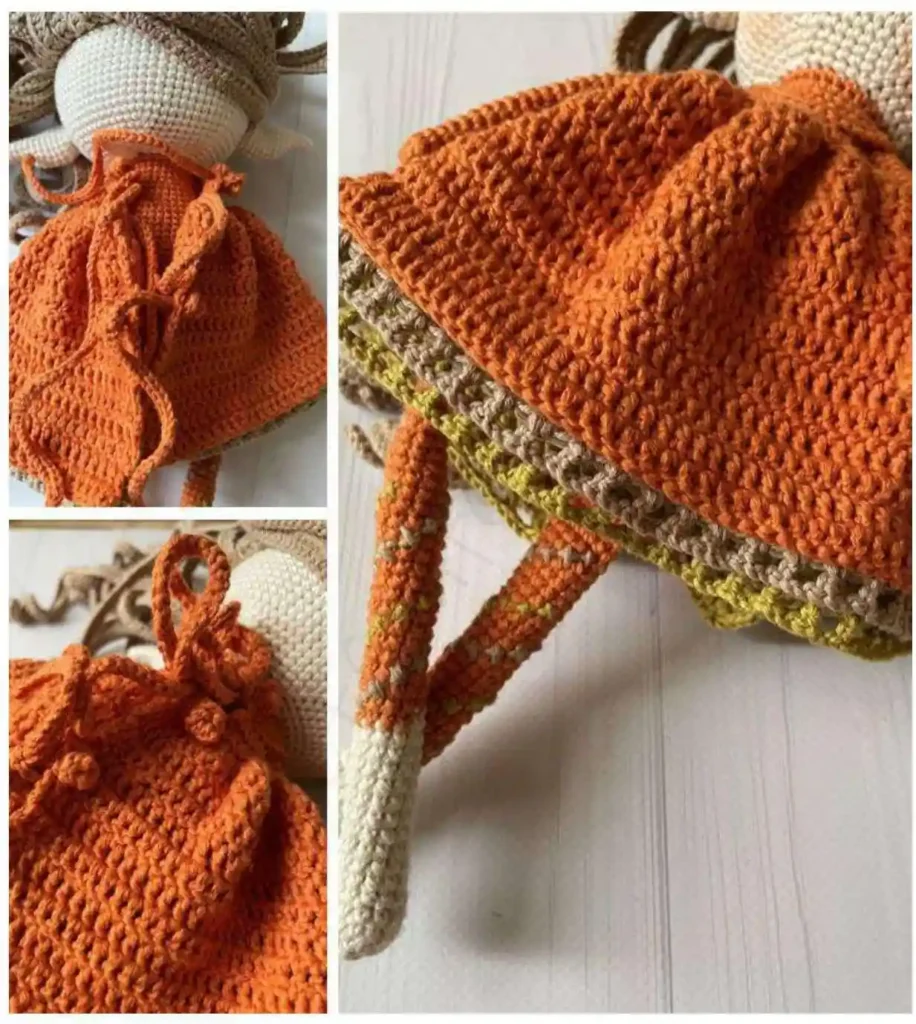
Finishing: Insert into the dress loops and tie a double knot on the right side. Make six.
Hat (×1) — Color C, Orange
The classic pointy elf hat — crocheted in hdc in the round, starting tiny at the tip and expanding gradually all the way down to the brim. 67 rows of hdc that work up surprisingly fast.
Row 1: 5 hdc in mr (5)
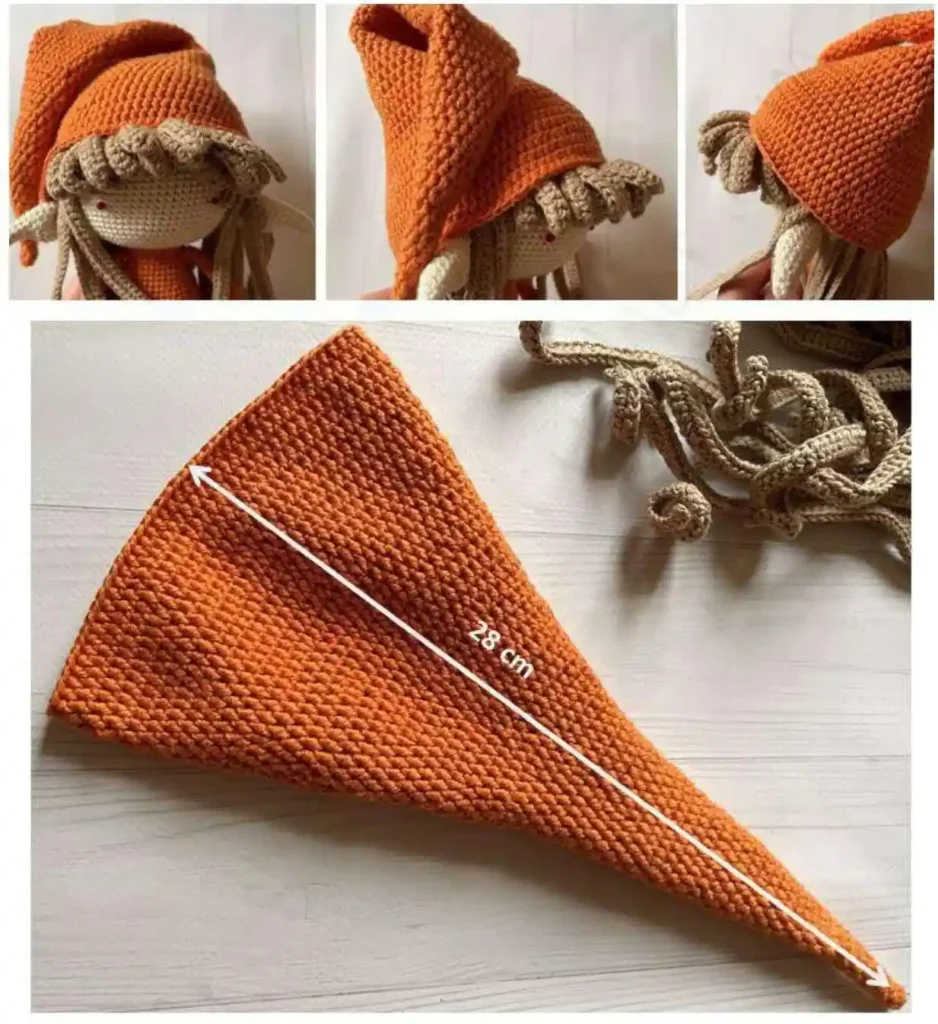
Rows 2–3: hdc around (2 rows) (5)
Row 4: 2 hdc, hdc-inc, hdc, hdc-inc (7)
Rows 5–7: hdc around (3 rows) (7)
Row 8: 3 hdc, hdc-inc, 2 hdc, hdc-inc (9)
Rows 9–11: hdc around (3 rows) (9)
Row 12: *2 hdc, hdc-inc*, repeat * 3 times (12)
Rows 13–15: hdc around (3 rows) (12)
Row 16: *3 hdc, hdc-inc*, repeat * 3 times (15)
Rows 17–19: hdc around (3 rows) (15)
Row 20: *4 hdc, hdc-inc*, repeat * 3 times (18)
Rows 21–23: hdc around (3 rows) (18)
Row 24: *5 hdc, hdc-inc*, repeat * 3 times (21)
Rows 25–27: hdc around (3 rows) (21)
Row 28: *6 hdc, hdc-inc*, repeat * 3 times (24)
Rows 29–31: hdc around (3 rows) (24)
Row 32: *5 hdc, hdc-inc*, repeat * 4 times (28)
Rows 33–35: hdc around (3 rows) (28)
Row 36: *6 hdc, hdc-inc*, repeat * 4 times (32)
Rows 37–39: hdc around (3 rows) (32)
Row 40: *3 hdc, hdc-inc*, repeat * 8 times (40)
Rows 41–43: hdc around (3 rows) (40)
Row 44: *4 hdc, hdc-inc*, repeat * 8 times (48)
Rows 45–47: hdc around (3 rows) (48)
Row 48: *5 hdc, hdc-inc*, repeat * 8 times (56)
Rows 49–51: hdc around (3 rows) (56)
Row 52: *6 hdc, hdc-inc*, repeat * 8 times (64)
Rows 53–55: hdc around (3 rows) (64)
Row 56: *7 hdc, hdc-inc*, repeat * 8 times (72)
Rows 57–59: hdc around (3 rows) (72)
Row 60: *8 hdc, hdc-inc*, repeat * 8 times (80)
Rows 61–63: hdc around (3 rows) (80)
Row 64: *15 hdc, hdc-inc*, repeat * 5 times (85)
Rows 65–67: hdc around (3 rows) (85)
Fit tip: Try the hat on over the hair cap before finishing. If it’s too tight at the brim, add a few extra increases in row 64. Too short? Just repeat row 65 until it sits at the right height.
Finishing: Fasten off and weave in ends.
Shoes (×2) — Color D, Green Tea
These little shoes have loop ruffles worked across multiple rows — the effect is incredible and way easier than it looks. You crochet the base, then go back and add loops to each row from the outside in.
Row 1: 9 ch, from the 2nd ch from hook, 7 sc, 3 sc in the last ch, continue on the other side of the chain 6 sc, inc (18)
Rows 2–9: BLO 18 sc (8 rows) (18)
Then, without cutting the yarn, add the ruffles by returning to previous rows:
Ruffle Row 1: Turn the work, *4 ch, BLO sc in the next st*, repeat * 18 times
Ruffle Row 2: Return to the 8th row of the shoe. *4 ch, sc in the next st*, repeat 18 times
Ruffle Row 3: Return to the 7th row. *4 ch, sc in the next st*, repeat * 18 times
Ruffle Row 4: Return to the 6th row. *4 ch, sc in the next st*, repeat * 18 times
Ruffle Row 5: Return to the 5th row. *4 ch, sc in the next st*, repeat * 18 times
Ruffle Row 6: Return to the 4th row. *4 ch, sc in the next st*, repeat * 18 times
Ruffle Row 7: Return to the 3rd row. *4 ch, sc in the next st*, repeat * 18 times
Ruffle Row 8: Return to the 2nd row. *4 ch, sc in the next st*, repeat * 18 times
Finishing: Cut yarn, fasten off, and weave in ends. Make two shoes.
Mittens (×2) — Color D, Green Tea
Same ruffle technique as the shoes, just smaller. These also get connected to each other with a long chain so they can hang around the elf’s neck.
Row 1: 7 ch, from the 2nd ch from hook 5 sc, in the last ch 3 sc, continue on the other side of the chain 4 sc, inc (14)
Rows 2–5: BLO 14 sc (4 rows) (14)
Then add the ruffles:
Ruffle Row 1: Turn the work, *3 ch, BLO sc in the next st*, repeat * 14 times
Ruffle Row 2: Return to the 4th row. *3 ch, sc in the next st*, repeat * 14 times
Ruffle Row 3: Return to the 3rd row. *3 ch, sc in the next st*, repeat * 14 times
Ruffle Row 4: Return to the 2nd row. *3 ch, sc in the next st*, repeat * 14 times
Finishing: Make two mittens. On the second mitten, don’t cut the yarn — chain 73 and attach it to the first mitten to connect them.
Assembly — Putting Your Free Elf Amigurumi Together
Okay, here’s where all those separate pieces become a real elf. Take it one step at a time and use pins to position everything before you commit to sewing.
- Sew the body and head together. Position the head centered on top of the body opening and sew around with your tapestry needle and a long yarn tail. The body should feel rock-solid at this point.
- Place the hair cap on the head. The cap sits so that there are 18 rows visible between the crown and the edge of the hair — position it carefully. Use pins to hold the long strands in place (leave the bangs free). Sew the cap down at the base, all the way around.
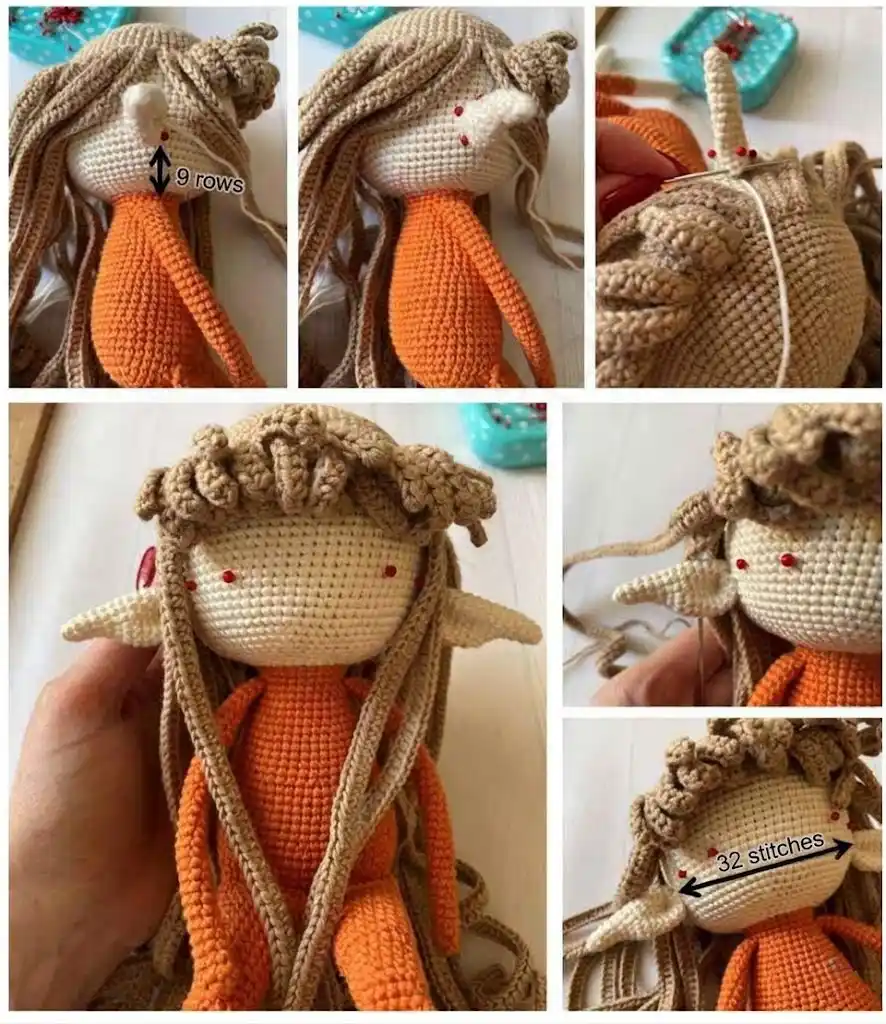
- Sew on the ears. Fold each ear in half lengthwise and hold it in that folded position as you sew it to the head. The ears sit 9 rows down from the edge of the hair cap, with 32 stitches between them across the face.
- Embroider the eyes. Use embroidery thread to stitch closed eyes between rows 12 and 13 of the head, with 14 stitches between the eyes.
- Add the blush. Use a wide brush and dry pastel chalk to dust the cheeks with a soft rosy color. Build it up gradually — you can always add more but can’t take it off.
- Embroider French knots on the hat. Thread your tapestry needle with Colors B and D and scatter French knots randomly across the hat. To make a French knot: bring the needle from the wrong side to the right side, wrap the working yarn around the needle 7 times, then push the needle back down right next to where it came up. Pull through slowly. Repeat in random spots.
- Dress the elf. Slip the dress over the body, then insert and tie the dress ties through the loops at the sides.
- Add shoes and mittens. Slip the shoes onto the feet and drape the mittens around the neck.
- Place the hat. The hat sits over the hair cap. Try it both on and off — honestly, the elf looks incredible either way.
You Did It!
Seriously — you just crocheted an entire elf. A whole elf, with a dress and a hat and ruffled shoes and flowing hair strands and tiny mittens. That is not a small thing. If this was your first big amigurumi project, you should feel completely proud of yourself right now. If you’ve made others before, I hope this one felt like a real adventure.
Share your finished elf and tag AmiLoops — I want to see every single one. 🧶
FAQ
What yarn is best for this free elf amigurumi pattern?
A DK/Light Worsted (Weight 3) cotton yarn is ideal for crisp stitch definition. Drops Safran, Paintbox Simply DK, and Gazzal Baby Cotton are all great choices.
How long does it take to crochet this elf?
This is a weekend project that generally takes about 2 to 3 evenings to complete, depending on your crochet speed.
Can a beginner make this elf amigurumi?
Yes! While it is rated as an intermediate pattern due to the assembly and detailed shaping, a motivated beginner can successfully complete it by following the step-by-step instructions.