Free Crochet Crocus Pattern — Stuffed Amigurumi with Pot, Petals & Stamens
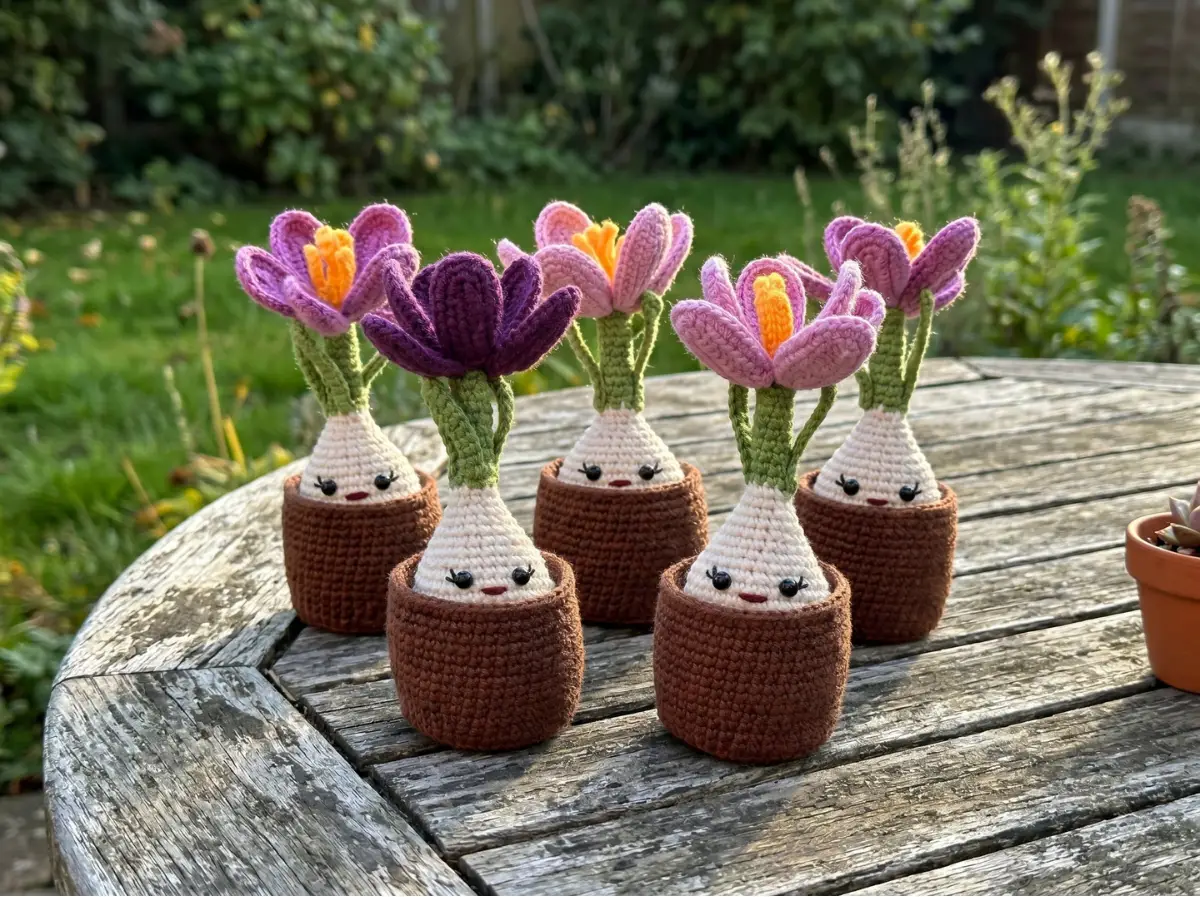
This crochet crocus pattern is a stash-buster hiding in plain sight — three yarn colors, a handful of scraps in yellow and green, and you end up with a fully assembled blooming flower in a pot that looks like it belongs on a shelf in a boutique. The bulb and pot take a little time, but the petals and leaves are the fastest parts: six petals at two rows each, three leaves that are one row apiece. That’s basically nothing. If you’ve got DK weight leftovers in any shade of purple, lavender, or lilac sitting around, this is exactly where they go.
🧶 What You’ll Need From Your Stash
- 💰 Yarn Needed: ~120 yards total (milk/white ~55 yds, lilac ~25 yds, green ~20 yds, brown ~20 yds, yellow ~5 yds)
- 🎨 Colors: milk/white, lilac (or any purple shade), green, brown, yellow — all DK weight except brown (worsted)
- 🪝 Hook: 2.0mm (steel/no US letter equivalent) for stamens; 2.5mm (approx. US C/2) for bulb, petals, leaves; 3.5mm (approx. US E/4) for pot
- ⏱️ Time: 4–6 hours total
- 📏 Finished Size: Approximately 5–6 in (12–15 cm) tall assembled
- 💡 Difficulty: Intermediate
- 🎁 Great For: shelf display, spring gifts, home décor, Easter baskets, market tables
Materials for This Crochet Crocus Amigurumi
- DK/Light Worsted (weight 3) yarn in milk/white — approximately 55 yards. Any cotton or cotton-blend DK in cream or white works fine. US alternatives: Drops Muskat, Paintbox Cotton DK, Lion Brand 24/7 Cotton in Ecru.
- DK/Light Worsted (weight 3) yarn in lilac — approximately 25 yards. Any lavender, purple, or lilac DK. This is the perfect spot for a leftover skein. US alternatives: Paintbox Cotton DK, Drops Safran, Cascade 220 Superwash in any purple tone.
- DK/Light Worsted (weight 3) yarn in green — approximately 20 yards. Any medium green DK. US alternatives: Drops Safran, Paintbox Cotton DK in grass or leaf green.
- Worsted (weight 4) yarn in brown — approximately 20 yards. For the pot. US alternatives: Lion Brand 24/7 Cotton, Red Heart Soft, any worsted in terracotta or brown.
- DK/Light Worsted (weight 3) yarn in yellow — approximately 5 yards. This is a true scrap amount — the end of almost any yellow skein will do. US alternative: any DK yellow.
- Hooks: 2.0mm (for stamens), 2.5mm approx. US C/2 (for bulb, petals, leaves), 3.5mm approx. US E/4 (for pot)
- Polyester fiberfill stuffing — small amount for the bulb (Poly-Fil by Fairfield, available at Joann, Michaels, Hobby Lobby)
- 3mm safety bead eyes — 1 pair
- Embroidery floss — black (eyelashes) and dark red (mouth)
- Tapestry needle for assembly and weaving in ends
- Stitch marker — to track round beginnings
- Pins — for positioning petals and leaves before sewing
🧶 Scrap Check: The yellow stamens use about 5 yards — that’s the last little bit on a bobbin most people wouldn’t bother saving. Save it. The three green leaves together use roughly 20 yards total. If you’ve got green leftovers from any recent animal pattern, you’re already set.
Abbreviations Used in This Crochet Crocus Pattern
| Abbreviation | Meaning |
|---|---|
| ch | chain |
| sc | single crochet |
| hdc | half double crochet |
| sl st | slip stitch |
| inc | increase (2 sc in same stitch) |
| dec | decrease (invisible decrease — front loops only) |
| mr | magic ring |
| BLO | back loop only |
| st(s) | stitch(es) |
Smart Crafter Tips for Your Crochet Crocus
The bulb and stem are worked as one continuous piece — you start in white and switch to green partway through. Lay in your green yarn early so you’re not hunting for it mid-project. First time making a magic ring? Our magic ring tutorial walks through it step by step — it closes completely and leaves no hole in the center, which matters for a piece that gets stuffed.
The invisible decrease is called out throughout this pattern. It’s the method that keeps your work looking clean instead of leaving little gaps where the stitches pull. Our invisible decrease tutorial explains exactly how to work through both front loops at once — once you try it, you won’t go back to the standard method.
For the petals, you’re making six identical pieces. Chain up all six foundation chains before you start crocheting — it sounds small but it keeps your rhythm and saves you from picking up and putting down your hook constantly. Each petal only takes a few minutes once you have the motion down.
💡 Hook Swap Note: This pattern uses three different hook sizes across its pieces. The 2.0mm is only for the stamens — it gives those tiny yellow chains the tight definition they need. The bulb, petals, and leaves all work at 2.5mm, and the pot goes up to 3.5mm because it’s in worsted weight. Label your hooks with a bit of washi tape if you’re switching back and forth.
Crochet Crocus Pattern Instructions
Bulb + Stem (×1)
Yarn: milk/white, then green from Row 26
Hook: 2.5mm (approx. US C/2)
Start: magic ring
Row 1: 6 sc in mr (6)
Row 2: 6 inc (12)
Row 3: (1 sc, inc) x 6 (18)
Row 4: (2 sc, inc) x 6 (24)
Row 5: (3 sc, inc) x 6 (30)
Row 6: (4 sc, inc) x 6 (36)
Row 7: (5 sc, inc) x 6 (42)
Rows 8–14: 42 sc for 7 rows (42)
Row 15: (5 sc, dec) x 6 (36)
Row 16: 36 sc (36)
Row 17: (4 sc, dec) x 6 (30)
Row 18: 30 sc (30)
Row 19: (3 sc, dec) x 6 (24)
Row 20: 24 sc (24)
Row 21: (2 sc, dec) x 6 (18)
Row 22: 18 sc (18)
Row 23: (1 sc, dec) x 6 (12)
Row 24: 12 sc (12)
Row 25: (2 sc, dec) x 3 (9)
🧶 Stuffing Note: Stuff as you go during Rows 8–14 while the opening is still wide enough to work easily. After Row 25, switch yarn to green and begin the stem.
Row 26: 9 sc [green] (9)
Row 27: 9 sc [green] (9)
Row 28: 9 sc [green] (9)
Row 29: dec, 7 sc [green] (8)
Row 30: 8 sc [green] (8)
Row 31: 8 sc [green] (8)
Row 32: 8 sc [green] (8)
Row 33: dec, 6 sc [green] (7)
Row 34: 7 sc, sl st [green] (7)
Row 35: 7 sc, sl st [green] (7)
Cut yarn and stuff the bulb fully before closing.
Petals (×6)
Yarn: lilac
Hook: 2.5mm (approx. US C/2)
Start: ch 10
Make 6 identical petals.
Row 1: Starting from the 2nd ch from hook: 2 sc, 6 hdc, 5 hdc in one st, 6 hdc, 2 sc, sl st into the turning chain (22)
Row 2: sl st, 3 sc, 4 hdc, (inc) x 5, 4 hdc, 3 sc, 2 sl st (27)
Cut yarn, leaving a tail of approximately 3.5 in (9 cm) for sewing.
🧶 Scrap Check: Six petals at two rows each use roughly 25 yards of lilac total — less than half a typical small skein. That lavender leftover from a baby blanket project? Perfect.
Stamens — Part 1 (×1)
Yarn: yellow
Hook: 2.0mm
Start: ch 8
Row 1: Starting from the 2nd ch from hook: 7 sl st, ch 8, 7 sl st, ch 8, 7 sl st
Cut yarn, leaving a tail of approximately 6 in (15 cm) for sewing.
Stamens — Part 2 (×1)
Yarn: yellow
Hook: 2.0mm
Start: mr
Row 1: ch 2 turning chains, 5 hdc in mr, sl st
Row 2: (ch 2, sl st) x 5
💡 Assembly Note for Stamens Part 2: After Row 2, cut yarn and weave in the end. With the remaining tail (approximately 8 in / 20 cm), thread the yarn through the magic ring and ch 6. Starting from the 2nd ch from hook, crochet 5 sl st. Cut yarn and secure this chain by threading the tail between stitches on both sides of the stamen to hold it in place.
Leaves
Yarn: green
Hook: 2.5mm (approx. US C/2)
Make all three leaves separately. Cut yarn after each, leaving a tail for sewing.
Leaf 1 (×1) — Start: ch 16
Row 1: Starting from the 2nd ch from hook: sl st, 14 sc
Leaf 2 (×1) — Start: ch 14
Row 1: Starting from the 2nd ch from hook: sl st, 12 sc
Leaf 3 (×1) — Start: ch 12
Row 1: Starting from the 2nd ch from hook: sl st, 10 sc
🧶 Scrap Check: Three leaves total, each only one row worked from a foundation chain. The longest uses about 7 yards. Any green DK scraps at all and you’re covered for all three.
Pot (×1)
Yarn: brown worsted
Hook: 3.5mm (approx. US E/4)
Start: magic ring
Row 1: 6 sc in mr (6)
Row 2: 6 inc (12)
Row 3: (1 sc, inc) x 6 (18)
Row 4: (2 sc, inc) x 6 (24)
Row 5: (3 sc, inc) x 6 (30)
Row 6: (4 sc, inc) x 6 (36)
Row 7: (5 sc, inc) x 6 (42)
Row 8: BLO 42 sc (42)
Rows 9–10: 42 sc (42)
Row 11: (6 sc, inc) x 6 (48)
Rows 12–21: 48 sc, sl st (48)
Cut yarn and weave in the end. The BLO in Row 8 creates a clean ridge that marks the base of the pot’s walls — a small detail that makes the finished pot look intentional and shaped.
Assembly
- Sew the two stamen pieces together, placing Part 2 in the center of Part 1.
- Sew the middle stamen sections first, then the outer ones, to keep everything centered.
- Sew the assembled stamens to the top of the stem, grabbing only the inner loops of the stem so the attachment doesn’t show from the outside.
- Arrange 3 petals in a triangle formation around the stem top. Pin them in position before sewing.
- Sew those 3 petals in place. Then position and sew the remaining 3 petals in the gaps between the first set. Petals should face upward — not curling down.
- Position the three leaves against the stem using pins. Vary the heights slightly for a natural look — the tallest leaf at the back, shortest in front.
- Sew each leaf with stitches at the base and a stitch slightly higher up the stem so the leaves hold their position and don’t flop down.
- Place the finished bulb + stem + flower assembly into the pot. Sew or secure it in position at the base.
Face Decoration
- Sew the 3mm safety bead eyes between Rows 15 and 16, spaced 8 stitches apart.
- Embroider eyelashes using black embroidery floss.
- Embroider the mouth on Row 13 using dark red embroidery floss.
- Optional: add a small amount of blush to the cheeks with a dry brush or cosmetic chalk.
For guidance on positioning and securing safety eyes before stuffing closes up, our safety eyes tutorial covers the right order of operations — install eyes before the opening gets too small to reach through comfortably.
💡 Stretch It Further: The petal pattern works just as well in deep violet, soft pink, pale yellow, or white — one base pattern, four completely different flowers. Make a full set in spring colors and arrange them together in a row of small pots. Each one costs almost nothing in yarn, and as a set they look like something you’d actually buy at a market. The pot pattern also works as a standalone mini planter — stuff it with a bit of filler and a wire-stemmed silk flower if you want a faster finish. Three different colored crocuses bundled in kraft paper with twine: instant handmade gift that uses up your DK stash.
Mia’s Take
About 120 yards across five colors — most of which you probably already have in some form — and you end up with a complete little spring scene that looks way more involved than it actually is. The petals are the fastest part of the whole thing, and the three leaves take maybe ten minutes total. This is a great project to start in the evening and finish over a weekend without feeling like you’ve committed to a marathon. Make a second one in white or deep purple from the same leftovers and you’ve got a matching pair. That’s two shelf decorations from scraps most people wouldn’t think twice about saving. 🧶
What yarn is best for this crochet crocus?
DK weight cotton or cotton-blend yarn is best for the flower parts to keep the petals and leaves structured, while worsted weight yarn gives the pot a sturdy base.
Can beginners make this crochet crocus pattern?
Yes, it is perfect for confident beginners or intermediate crocheters. The pattern includes straightforward shapes and uses basic techniques like the magic ring and invisible decrease.
How long does it take to crochet this amigurumi crocus?
It typically takes about 4 to 6 hours to crochet all the separate pieces and assemble the finished flower in its pot.