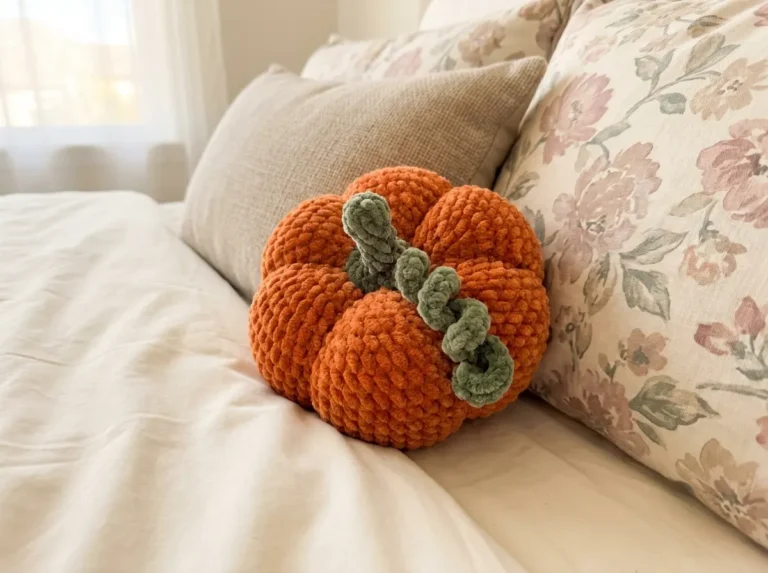
Free Crochet Pumpkin Amigurumi — Squishy Velvet Plush
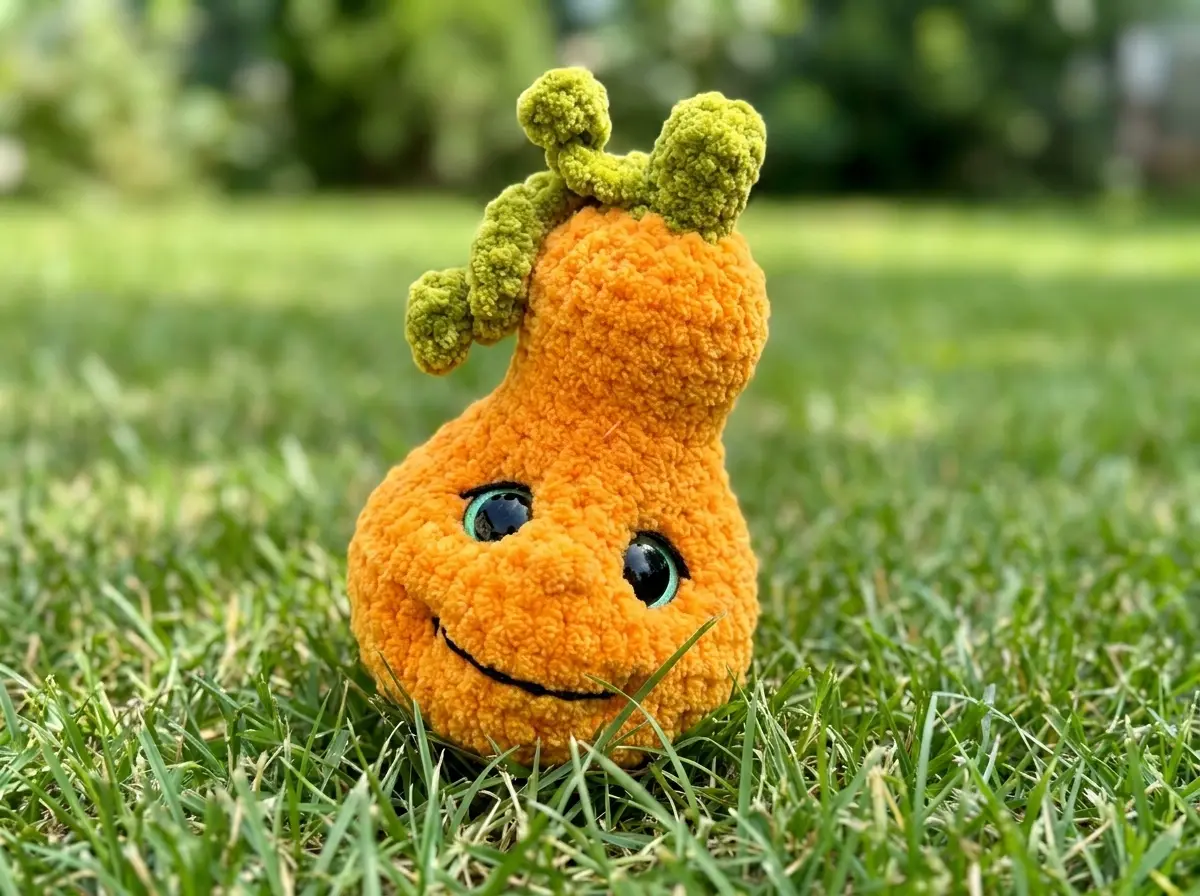
This free Crochet pumpkin amigurumi pattern is one of those projects that uses up exactly the right amount of leftover chenille — about 40 yards of orange and 13 yards of green, and you’re done. Works up in 2–3 hours, finishes at a squishy 6–7 inches, and looks genuinely impressive on a shelf, a gift bag, or a fall market table. Halloween or Thanksgiving, this one earns its spot every single season. Grab your scraps and get started.
🧶 What You’ll Need From Your Stash
- 💰 Yarn Needed: ~53 yards total (orange ~40 yds, yellow-green ~13 yds, black ~2 yds)
- 🎨 Colors: orange, yellow-green, black (or any fall colors you have on hand)
- 🪝 Hook: G/6 (4.0 mm)
- ⏱️ Time: 2–3 hours
- 📏 Finished Size: 6–6.7 in (15–17 cm)
- 💡 Difficulty: Beginner–Intermediate
- 🎁 Great For: fall decor, Halloween gifts, seasonal market items, desk display
Materials for This Pumpkin Amigurumi
- Bulky (5) chenille yarn — orange, approximately 40 yards. Bernat Baby Velvet or Premier Parfait both work perfectly. Any squishy bulky chenille you have on hand will do the job.
- Bulky (5) chenille yarn — yellow-green, approximately 13 yards. Same brand as your orange if possible — though honestly, chenille blends well even across brands.
- DK/Light Worsted (3) cotton yarn — black, approximately 2 yards. This is for embroidered eyelashes and the mouth. A tiny leftover scrap is more than enough.
- Hook: G/6 (4.0 mm)
- Safety eyes: 16 mm trapezoid with slanted pupils (the kind that give your pumpkin that classic jack-o-lantern personality)
- Polyester fiberfill — a small amount for firm stuffing
- Strong thread for eye and mouth sculpting
- Stitch marker — non-negotiable for continuous rounds
- Tapestry needle for embroidery and weaving in ends
This yarn falls under Bulky (5) weight on the CYCA standard scale — the thick, squishy kind that works up fast and gives this pumpkin its signature plush look. If you’ve got a partial skein from a previous chenille project, check the yardage. Forty yards of orange is about a third of a standard 120-yard skein. You almost certainly have this already.
Abbreviations Used in This Crochet Pumpkin Pattern
| Abbreviation | Meaning |
|---|---|
| mr | Magic ring — adjustable loop start |
| ch | Chain |
| sc | Single crochet |
| inc | Increase — 2 sc in the same stitch |
| dec | Invisible decrease — insert hook through front loops only of next 2 stitches simultaneously, yarn over, pull through, yarn over, pull through 2 loops |
| puff st | Puff stitch — 3 unfinished double crochets worked into the same stitch, then closed together in one motion |
| sl st | Slip stitch |
| FO | Fasten off |
| (…) x N | Repeat the instructions in parentheses N times |
| (NUMBER) | Total stitch count at end of row |
Smart Crafter Tips Before You Start
Use the invisible decrease every time. The pattern abbreviation is simply “dec,” but always work it as an invisible decrease — insert your hook through the front loops only of the next two stitches simultaneously. It keeps the surface of your chenille clean and gap-free. Our guide to the invisible decrease has a quick visual walkthrough if you want to double-check your technique before starting.
Your stitch marker is doing real work here. This pumpkin is worked in continuous rounds, and the marker should run in a straight line down the back. Chenille is notorious for hiding stitches — if your marker starts drifting sideways, work one or two extra “shift” stitches at the end of a row to realign it. These shift stitches don’t count toward the total. Depending on your tension, you may need to do this every 3–5 rows. It sounds fiddly, but it takes seconds and keeps the whole shape symmetrical.
Install your safety eyes before stuffing — not after. This is one of those mistakes that costs you 20 minutes of work if you get the order wrong. The eyes go in between Rows 12 and 13 with 7 stitches between them, before you close up and add fiberfill. Not sure how to secure trapezoid eyes? Our safety eye tutorial covers the locking washer technique step by step.
🧶 Scrap Check: The stem (Rows 26–30) uses about 4 yards of yellow-green yarn. Got a tiny leftover ball from any previous project in a green or olive tone? That’s your stem right there. The leaves use another 8–9 yards of the same color — still well within scrap territory for most people.
Pumpkin Amigurumi Pattern
Pumpkin Body (×1)
Yarn: Orange (main), switching to yellow-green at Row 26
Start: Magic ring or ch 2
The toy is worked in a continuous spiral. Keep your stitch marker running in a straight line down the back of the pumpkin. If it starts to shift, work one or two extra sc at the end of a row to realign — these do not count toward your stitch total. Reposition the marker and continue. You may need to do this every 3–5 rows depending on your tension.
Row 1: 8 sc in mr [orange] (8)
Row 2: 8 inc (16)
Row 3: (1 sc, inc) x 8 (24)
Row 4: (2 sc, inc) x 8 (32)
Row 5: (3 sc, inc) x 8 (40)
Rows 6–10: 40 sc (work 5 rows even) (40)
🧶 Scrap Check: Rows 1–10 use the bulk of your orange — roughly 25 yards. If you’ve got a partial skein with at least 40 yards left on it, you’re covered from start to finish with room to spare.
Row 11: 19 sc, 1 puff st (this is the nose), 20 sc (40)
The puff stitch nose sits center-front. Work 3 unfinished double crochets into the same stitch and close them together. It should pop outward slightly — that little bump is exactly the point.
Row 12: (3 sc, dec) x 8 (32)
⚠️ Safety Eye Placement: Install your safety eyes now, between Rows 12 and 13. Count 7 stitches between the two eye posts (measured along Row 12). Lock the washers on firmly from the inside. Once you’ve done that, add your fiberfill and stuff firmly — you want a solid, round shape. Don’t skimp here; chenille is forgiving but underfilling shows.
Row 13: 32 sc (32)
Row 14: (2 sc, dec) x 8 (24)
Row 15: (2 sc, dec) x 6 (18)
Rows 16–18: 18 sc (work 3 rows even) (18)
Row 19: (2 sc, inc) x 6 (24)
Rows 20–23: 24 sc (work 4 rows even) (24)
Row 24: (1 sc, dec) x 8 (16)
Row 25: 8 dec (8)
⚠️ Color Change — Row 26: Before starting Row 26, stuff the top section firmly. Switch to yellow-green yarn and secure your orange. Cut the orange yarn and hide the tail inside the piece.
Rows 26–30: 8 sc (work 5 rows even) [yellow-green] (8)
Finishing the stem: Stuff the stem lightly. Close the ring, FO, and cut the yarn. Weave the tail inside the piece — no sewing required.
Leaves (×1)
Yarn: Yellow-green
Start: Join yarn to the side of Row 26 on the right
The leaves are crocheted directly from the stem — no separate piece to sew on. Work into one side of each chain loop only to get that natural spiral curl. If you want tighter curls, work 2–3 sc into each stitch along the chain.
Row 1: ch 11. Starting in the 2nd ch from hook, 10 sc along the chain (10)
Row 2: sl st into a stitch of Row 26, ch 21. Starting in the 2nd ch from hook, 20 sc along the chain (20)
Finishing: sl st, FO and cut the yarn. Weave all yarn tails inside the body of the pumpkin.
Assembly and Finishing
- The pumpkin body and stem are crocheted as one continuous piece — no seaming required there.
- The leaves are joined directly to Row 26 of the stem during crocheting — again, no sewing.
- Safety eyes are locked in between Rows 12 and 13 during the crochet process.
- Using your strong thread, sculpt the eyes and mouth. Pull the thread through the interior of the piece to create gentle indentations around each eye — this gives the pumpkin its dimensional, slightly sunken eye look.
- Sculpt the mouth 3 rows below the puff stitch nose.
- Using your black DK cotton yarn and tapestry needle, embroider short eyelashes along the outer edges of each eye.
- Using the same black yarn, embroider the mouth in chain stitch — a curved line of small linked loops creates a clean, expressive smile.
The embroidery takes patience but uses almost no yarn — that 2-yard black scrap really is enough. Take your time with the sculpting thread; a well-shaped eye makes a huge difference in the final personality of this pumpkin amigurumi.
Need a quick refresher on closing and finishing neatly? Our guide to fastening off and weaving in ends has everything you need to get clean results on chenille specifically.
💡 Stretch It Further: Make three — swap the orange for deep burgundy, creamy ivory, and classic orange. Same pattern, three completely different seasonal vibes. Bundle them in a small kraft box with tissue paper and you’ve got a handmade fall gift set that costs under $6 total in yarn. They also sell well as a trio at fall markets. Total yarn per pumpkin is under 55 yards, so two medium skeins of chenille can produce a whole set with yarn left over. That’s the kind of math I can get behind.
Mia’s Take
About 53 yards of chenille, a couple hours, and one tiny scrap of black yarn — that’s the full material cost of this pumpkin amigurumi. It’s the kind of project where you look at your scrap bin in October, pull out whatever orange chenille is left from last year, and end up with something genuinely display-worthy. Make a few in different fall colorways and you’ve got a ready-made gift set before the season even starts. Small pieces. Big personality. No wasted yarn. That’s exactly what this pattern was made for. 🧶
Want to keep the fall vibes going? Check out our tiny beret mushroom amigurumi — another scrap-friendly chenille project that works great alongside this one as a seasonal set.
What yarn is best for this pumpkin amigurumi?
Bulky (5) chenille yarn, such as Bernat Baby Velvet or Premier Parfait, is perfect for giving the pumpkin a plush, squishy texture and works up very quickly.
How long does it take to crochet this pumpkin?
This project works up in just 2 to 3 hours, making it an excellent last-minute project for fall gifts or seasonal market tables.
Can beginners make this pumpkin amigurumi pattern?
Yes, this pattern is suitable for beginners to intermediate crocheters. It uses basic stitches and continuous rounds, though working with chenille yarn requires careful stitch counting.