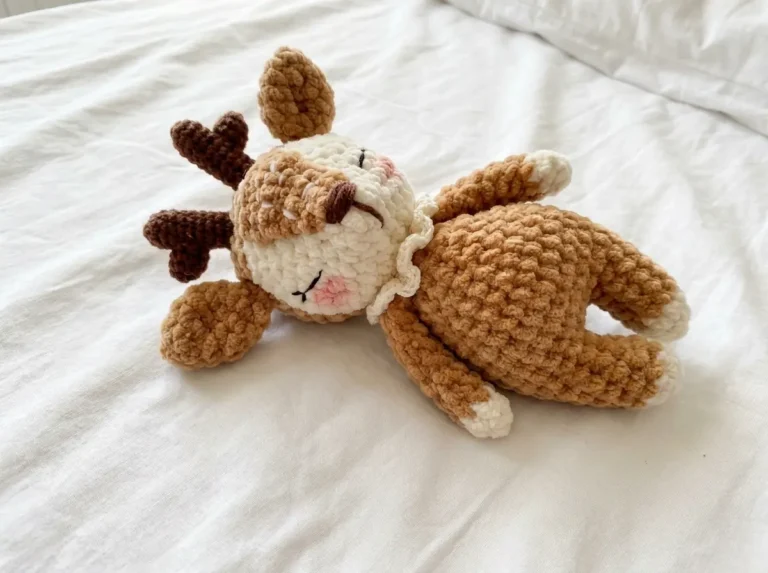
Deer Amigurumi — Free Crochet Christmas Reindeer Pattern
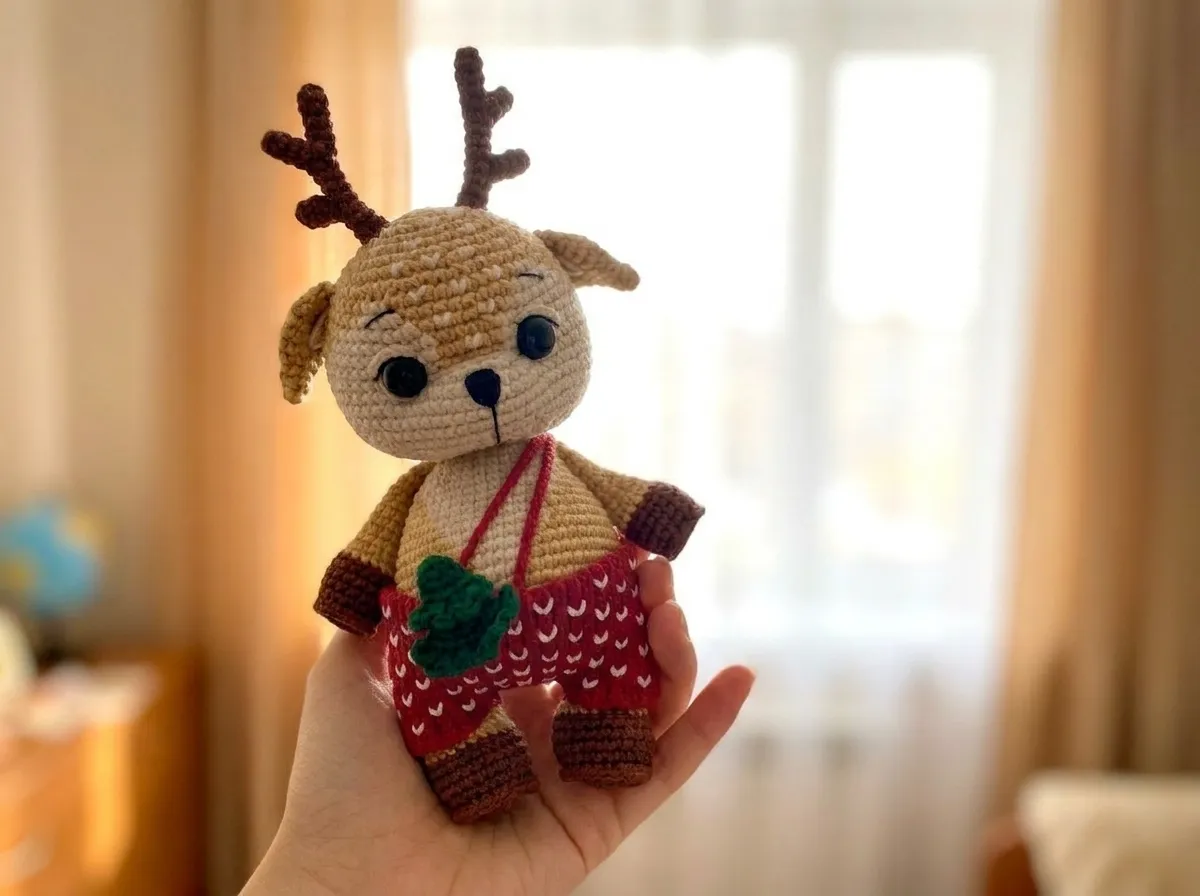
This deer amigurumi stopped me the moment I saw those two-toned color transitions on the muzzle and belly. The caramel-to-light beige shading takes real patience — we’re talking precise color placement across 54 rounds of head and body combined. The result is a reindeer with genuine character and dimension. I verified every stitch count in this pattern. If you’re ready for something that will challenge and reward you in equal measure, let’s get into it.
📋 Pattern Quick Stats
- Difficulty: Advanced
- Finished Size: Approx. 7–8 in (18–20 cm) tall
- Hook Size: 1.75mm (no US letter equivalent — nearest steel hook: size 6/7)
- Yarn Weight: DK / Light Worsted (3)
- Techniques: magic ring, invisible decrease, color changes, BLO, FLO, multi-part assembly, hoof edging
- Estimated Time: 10–15 hours
What You’ll Need for This Deer Amigurumi
Yarn
This pattern was written for YarnArt Jeans (DK / Light Worsted weight, #3). If you can’t find it locally, Drops Muskat or Paintbox Simply DK are reliable US-friendly alternatives at the same weight. You’ll need the following colors:
- Caramel (YarnArt Jeans 07) — main body color
- Light Beige / Milk (YarnArt Jeans 05) — muzzle, belly, and ear details
- Brown (YarnArt Jeans 70) — hooves and antlers
- Burgundy (YarnArt Jeans 51) — shorts
- Green (YarnArt Jeans 52) — little tree button
- White (YarnArt Jeans 62) — shorts embroidery and eye whites
These yarn weights fall under CYCA category 3 on the Craft Yarn Council yarn weight system.
💡 Emma’s Note on Yarn: I always use mercerized cotton or a tight-spun DK at this hook size. The 1.75mm hook is even finer than my usual 2.5mm, so expect very dense, tightly woven fabric — which is exactly what you want for a piece this detailed. If your hands cramp up, put it down and stretch. This one is worth taking your time over.
Additional Materials
- 1.75mm crochet hook (nearest steel hook: size 6/7)
- 12mm safety eyes (×2)
- Polyfill stuffing
- Tapestry needle for sewing parts and weaving in ends
- Scissors
- Craft glue (fabric-safe adhesive)
- Black embroidery thread (for eyelashes, eyebrows, and nose)
- Stitch markers
Abbreviations Used in This Deer Amigurumi Pattern
| Abbreviation | Meaning |
|---|---|
| mr | magic ring — an adjustable loop that closes completely to eliminate the center hole |
| ch | chain |
| sc | single crochet |
| sl st | slip stitch |
| inc | increase — 2 sc worked into the same stitch |
| dec | invisible decrease — insert hook through front loops only of the next 2 stitches simultaneously, yarn over, pull through, yarn over, pull through 2 loops. This is the only decrease method used at AmiLoops. |
| BLO | back loop only — work into only the back loop of the stitch |
| FLO | front loop only — work into only the front loop of the stitch |
| st(s) | stitch(es) |
| FO | fasten off |
Techniques in This Deer Amigurumi You’ll Want to Know
This is not a beginner-level pattern. Before you start, I’d strongly recommend being comfortable with the following:
Magic ring: Almost every part of this deer starts with a magic ring. If yours tends to pop open or leave a hole, now is the time to nail that technique. Our step-by-step magic ring tutorial walks you through it with close-up detail.
Invisible decrease: The head and body close over 54 rounds — that’s a lot of decreases. The invisible method keeps the fabric clean and gap-free. If you’ve been using sc2tog, switching to inv dec will genuinely change the finish of your work. Read through our invisible decrease tutorial before you start the body closure.
Color changes: The head and body involve active color switching between caramel and light beige throughout Rows 10–43. The transitions form the muzzle, cheeks, and belly. Take your time reading the row instructions for those sections before you begin. Our seamless color change guide covers exactly how to carry yarn and manage your tails cleanly.
BLO hoof edging: Both the arms and legs use a back-loop-only row to create a ridge, then you return to the front loops later to crochet the hoof edge. Read the notes carefully for those parts — the order matters.
Multi-part assembly: This deer has 9 separate pieces to sew on. I always pin everything before I commit to a single stitch. Check our guide to sewing amigurumi parts together for tips on placement and invisible seams.
Free Deer Amigurumi Pattern
All parts are worked in continuous rounds unless stated otherwise. Use a stitch marker to track the beginning of each round.
Head and Body (×1)
Color: Caramel (07), Light Beige (05) — color changes begin at Row 10
Start: Magic ring
Row 1: 6 sc in mr (6)
Row 2: 6 inc (12)
Row 3: (1 sc, inc) × 6 (18)
Row 4: (2 sc, inc) × 6 (24)
Row 5: (3 sc, inc) × 6 (30)
Row 6: (4 sc, inc) × 6 (36)
Row 7: (5 sc, inc) × 6 (42)
Row 8: (6 sc, inc) × 6 (48)
Row 9: (7 sc, inc) × 6 (54)
Row 10: 18 sc [caramel]; 3 sc [light beige]; 10 sc [caramel]; 3 sc [light beige]; 20 sc [caramel] (54)
Row 11: 17 sc [caramel]; 5 sc [light beige]; 8 sc [caramel]; 5 sc [light beige]; 19 sc [caramel] (54)
Row 12: 16 sc [caramel]; (1 sc, inc, 5 sc) [light beige]; 6 sc [caramel]; (6 sc, inc) [light beige]; 17 sc, inc [caramel] (57)
Row 13: 9 sc, inc, 5 sc [caramel]; 10 sc [light beige]; 3 sc, inc [caramel]; 10 sc [light beige]; 8 sc, inc, 9 sc [caramel] (60)
Row 14: 15 sc [caramel]; 11 sc [light beige]; 5 sc [caramel]; 11 sc [light beige]; 18 sc [caramel] (60)
Row 15: 14 sc [caramel]; 12 sc [light beige]; 5 sc [caramel]; 12 sc [light beige]; 17 sc [caramel] (60)
Row 16: 14 sc [caramel]; (12 sc, 6 inc, 11 sc) [light beige]; 17 sc [caramel] (66)
📌 Safety Eyes: Insert your 12mm safety eyes between Rows 15 and 16, with 11 stitches between the inner posts of the eyes. Do this before Row 16 is complete. Once the washer is on, there’s no going back.
Rows 17–21: 14 sc [caramel]; 35 sc [light beige]; 17 sc [caramel] (66)
Row 22: 9 sc, dec, 3 sc [caramel]; (6 sc, dec, (9 sc, dec) × 2, 5 sc) [light beige]; 4 sc, dec, 9 sc, dec [caramel] (60)
Row 23: 4 sc, dec, 7 sc [caramel]; (1 sc, dec, (8 sc, dec) × 3) [light beige]; 8 sc, dec, 4 sc [caramel] (54)
Row 24: 7 sc, dec, 3 sc [caramel]; (4 sc, dec, (7 sc, dec) × 2, 5 sc) [light beige]; 2 sc, dec, 7 sc, dec [caramel] (48)
Row 25: 3 sc, dec, 6 sc [caramel]; (dec, (6 sc, dec) × 3) [light beige]; 6 sc, dec, 3 sc [caramel] (42)
Row 26: 5 sc, dec, 3 sc [caramel]; (2 sc, dec, (5 sc, dec) × 2, 4 sc) [light beige]; 1 sc, dec, 5 sc, dec [caramel] (36)
Row 27: 2 sc, dec, 4 sc, dec [caramel]; (4 sc, dec) × 3 [light beige]; 4 sc, dec, 2 sc [caramel] (30)
Row 28: 3 sc, dec, 3 sc [caramel]; (dec, (3 sc, dec) × 2, 3 sc) [light beige]; dec, 3 sc, dec [caramel] (24)
💡 Emma’s Tip: Stuff the head firmly now, after Row 28, before the opening gets any smaller. I always underestimate how much stuffing the head needs — go firmer than you think. The muzzle area especially needs good support to hold its shape.
Row 29: (3 sc, inc) × 2 [caramel]; ((3 sc, inc) × 2, 3 sc) [light beige]; inc, 3 sc, inc [caramel] (30)
Row 30: 10 sc [caramel]; 12 sc [light beige]; 8 sc [caramel] (30)
Row 31: 2 sc, inc, 4 sc, inc, 2 sc [caramel]; (2 sc, inc, 4 sc, inc, 4 sc) [light beige]; inc, 4 sc, inc, 2 sc [caramel] (36)
Row 32: 12 sc [caramel]; 14 sc [light beige]; 10 sc [caramel] (36)
Row 33: 13 sc [caramel]; 12 sc [light beige]; 11 sc [caramel] (36)
💡 Emma’s Tip: Stuff the lower head and neck firmly after Row 33 as well. This transition point between head and body is where most people end up with a wobbly neck — pack it in tighter than feels comfortable. You want a solid, confident silhouette.
Row 34: (5 sc, inc) × 2, 1 sc [caramel]; (4 sc, inc, 5 sc, inc, 1 sc) [light beige]; 4 sc, inc, 5 sc, inc [caramel] (42)
Row 35: 16 sc [caramel]; 12 sc [light beige]; 14 sc [caramel] (42)
Row 36: 3 sc, inc, 6 sc, inc, 6 sc [caramel]; (inc, 6 sc, inc, 2 sc) [light beige]; 4 sc, inc, 6 sc, inc, 3 sc [caramel] (48)
Row 37: 20 sc [caramel]; 10 sc [light beige]; 18 sc [caramel] (48)
Row 38: 19 sc, inc, 1 sc [caramel]; (1 sc, inc, (2 sc, inc) × 2) [light beige]; (2 sc, inc) × 2, 13 sc [caramel] (54)
📌 Important: Make sure the increases in Row 38 are positioned at the front of the belly. This shapes the tummy correctly for assembly.
Row 39: 23 sc [caramel]; 10 sc [light beige]; 21 sc [caramel] (54)
Row 40: 4 sc, inc, (8 sc, inc) × 2, 1 sc [caramel]; 7 sc, inc [light beige]; (8 sc, inc) × 2, 4 sc [caramel] (60)
Row 41: 28 sc [caramel]; 7 sc [light beige]; 25 sc [caramel] (60)
Row 42: 29 sc [caramel]; 5 sc [light beige]; 26 sc [caramel] (60)
Row 43: 30 sc [caramel]; 3 sc [light beige]; 27 sc [caramel] (60)
Rows 44–45: 60 sc (60)
Row 46: (8 sc, dec) × 6 (54)
Row 47: (7 sc, dec) × 6 (48)
Row 48: (6 sc, dec) × 6 (42)
Row 49: (5 sc, dec) × 6 (36)
Row 50: (4 sc, dec) × 6 (30)
Row 51: (3 sc, dec) × 6 (24)
Row 52: (2 sc, dec) × 6 (18)
Row 53: (1 sc, dec) × 6 (12)
Row 54: 6 dec (6)
💡 Emma’s Tip: Continue stuffing the body as you close — add a little at a time through Rows 46 through 51 so the shape stays even and the belly sits forward correctly. Fasten off and close the opening.
On the wrong side, tie off and trim yarn tails when changing colors throughout.
Ears (Make 2)
Color: Caramel (07)
Start: Magic ring
Row 1: 6 sc in mr (6)
Row 2: 6 inc (12)
Row 3: (2 sc, dec) × 3 (9)
Row 4: 9 sc (9)
Row 5: (2 sc, inc) × 3 (12)
Row 6: 6 inc (12)
Rows 7–9: 18 sc (18)
Row 10: (1 sc, dec) × 6 (12)
Row 11: 12 sc (12)
Do not stuff. Fold in half and sc through both layers for 6 stitches. Embroider a few stitches in light beige (05) on the inner face of the ear. Leave a yarn tail for sewing.
Eyelids (Make 2)
Color: Light Beige (05)
Start: Foundation chain
Row 1: ch 6 (6)
Leave yarn tails of approximately 2–2.75 in at both the beginning and end for sewing.
Antlers (Make 2)
Color: Brown (70)
Start: Magic ring
Each antler is made from three small pieces joined together.
Pieces 1 and 2 — make two identical pieces:
Row 1: 6 sc in mr (6)
Rows 2–4: 6 sc (6)
Cut yarn and set aside. Do not fasten off in a way that closes the piece — leave the loop live for joining.
Piece 3 — the base:
Row 1: 6 sc in mr (6)
Rows 2–5: 6 sc (6)
Row 6: 3 sc together with Piece 1, 3 sc along base (6)
Row 7: 3 sc along remaining sts of Piece 1, 3 sc along base (6)
Rows 8–9: 6 sc (6)
Row 10: 3 sc together with Piece 2, 3 sc along base (6)
Row 11: 3 sc along remaining sts of Piece 2, 3 sc along base (6)
Rows 12–13: 6 sc (6)
Do not stuff. Leave a yarn tail for sewing.
💡 Emma’s Tip: The antler construction is the most technically involved part of this pattern. Work slowly through Rows 6–7 and 10–11 — you’re essentially bridging two separate tubes. Use a stitch marker to keep track of where each piece connects.
Arms (Make 2)
Color: Brown (70) for the hoof, Caramel (07) for the arm
Start: Magic ring
Row 1: 6 sc in mr (6)
Row 2: 6 inc (12)
Row 3: (1 sc, inc) × 6 (18)
Row 4: 18 sc in BLO (18)
Rows 5–7: 18 sc (18)
Row 8: 18 sc in BLO [switch to caramel] (18)
Row 9: (1 sc, dec) × 6 (12)
Rows 10–17: 12 sc (12)
Stuff the hoof section through Row 10. Fold in half and sc through both layers for 6 stitches to close.
Hoof edging: Return to the front loops of Row 4, join brown yarn with the hook pointing downward, and work 18 sc around.
Leave a yarn tail for sewing.
Legs (Make 2)
Color: Brown (70) for the hoof, Caramel (07) for the leg
Start: Magic ring
Row 1: 6 sc in mr (6)
Row 2: 6 inc (12)
Row 3: (1 sc, inc) × 6 (18)
Row 4: (2 sc, inc) × 6 (24)
Row 5: 24 sc in BLO (24)
Rows 6–8: 24 sc (24)
Row 9: 24 sc in BLO [switch to caramel] (24)
Row 10: (2 sc, dec) × 6 (18)
Rows 11–19: 18 sc (18)
Stuff the hoof section through Row 11. Fold in half and sc through both layers for 9 stitches to close.
Hoof edging: Return to the front loops of Row 5, join brown yarn with the hook pointing downward, and work 24 sc around.
Leave a yarn tail for sewing.
Tail (×1)
Color: Caramel (07)
Start: Magic ring
Row 1: 6 sc in mr (6)
Row 2: (1 sc, inc) × 3 (9)
Row 3: 9 sc (9)
Do not stuff. Fold in half and sc through both layers for 4 stitches. Leave a yarn tail for sewing.
Shorts (×1)
Color: Burgundy (51), White (62) for embroidery
Start: Foundation chain
Row 1: ch 21 (21)
Rows 2 onward: Work turning rows in BLO with sl st (21). Make one turning chain at the end of each row. Continue until the fabric fits around the deer’s waist — the exact number of rows will vary based on your tension.
Before sewing up, embroider hearts across the right side of the fabric in white yarn. Fold with right sides together and join with a slip stitch. Sew the center seam between the legs while fitting the shorts on the deer to get the fit right.
Little Tree Button (×1)
Color: Green (52)
Start: Magic ring
Row 1: 6 sc in mr (6)
Row 2: 6 sc (6)
Row 3: 6 inc (12)
Row 4: 12 sc (12)
Row 5: 6 dec in BLO (6)
Row 6: 6 inc (6)
Row 7: (1 sc, inc) × 6 (18)
Row 8: 18 sc (18)
💡 Emma’s Tip: Work Rows 5–7 slowly and check your stitch count after each one. This little section shapes the waist of the tree and can catch you off guard if you’re moving fast.
Fold in half and sew through the back loops. For the edging along the remaining front loops on the front side only, work (3 ch, sc) across. Crochet a short chain loop onto the shorts to serve as the buttonhole that wraps around the tree button.
Deer Amigurumi Assembly
Take your time here. Pin every piece before sewing a single stitch. Getting the proportions right before you commit is what separates a finished piece that looks like the photo from one that doesn’t.
- Eye socket shaping: Sculpt from below the eye and along its inner edge. Press the safety eyes in firmly so the backing washer is fully seated.
- Muzzle shaping: Thread a tapestry needle with a double strand of light beige yarn. Insert from the back of the head and bring the needle out at the lower inner corner of the right eye. Insert into the lower inner corner of the left eye and bring back out at the same entry point on the back of the head. Pull taut and tie off. This pulls the muzzle up and gives the face its characteristic sweetness.
- Eyelids: Sew the light beige chain strips in a gentle arc above the safety eyes. A small amount of craft glue can help hold them in place and prevent the yarn from shifting over time.
- Ears: Sew on at a slight angle between Rows 9 and 11 of the head. The angle makes all the difference — pin them first and hold the head at arm’s length before you sew.
- Antlers: Sew on between Rows 3 and 5 of the head, positioned symmetrically.
- Arms: Sew on between Rows 30 and 32 of the body.
- Legs: Sew on between Rows 39 and 40 of the body, evenly spaced on the lower front.
- Tail: Sew on between Rows 39 and 40 at the back.
- Shorts: Dress the deer, sew the leg seam to fit, attach the tree button, and secure the chain loop around it.
Finishing and Decoration
Eye whites: Using white yarn, embroider a small curved highlight above and to the side of each safety eye. A tiny dot of craft glue on the back of the embroidered thread will keep it from shifting after the piece is handled repeatedly.
Eyelashes and eyebrows: Using black embroidery thread, embroider 3–4 short lash strokes below each eye and a small curved brow above. The brows make a dramatic difference to the deer’s expression — take your time placing them symmetrically.
Nose: Using the same black thread, embroider a small oval or V-shaped nose at the center of the light beige muzzle area.
Forehead hearts: Using light beige yarn, embroider 2–3 small heart shapes across the caramel forehead area. These are the finishing touch that makes this deer unmistakably festive.
Shorts embroidery reminder: If you haven’t already, embroider the white hearts across the shorts fabric before sewing it up. It’s essentially impossible to do neatly once the piece is assembled.
💡 Emma’s Tip: I always do the embroidery last and in good light. Black thread on caramel yarn can look very different under warm lamp light than it does in natural light. If you can, do the facial embroidery near a window.
Emma’s Note
This is one of the more involved patterns I’ve worked through in a while, and I mean that as a compliment to you for attempting it. The color transitions on the muzzle and belly are genuinely satisfying to execute — when those caramel and light beige sections start revealing themselves round by round, the character of the deer comes to life in a way that simpler patterns just don’t give you. If your count ever goes off in the head and body section, don’t push through — frog back to the last correct round. It’s worth it every time. I’ve checked every row in this pattern twice, and every count adds up. Happy hooking. 🧶
What is the best yarn for this deer amigurumi?
The pattern is designed for YarnArt Jeans (DK weight cotton blend). You can substitute with Drops Muskat or Paintbox Simply DK if needed.
Is this deer pattern suitable for beginners?
No, this is an advanced pattern due to frequent color changes, a very small hook size (1.75mm), and multi-part assembly.
How tall is the finished deer?
When using the recommended 1.75mm hook and DK yarn, the finished deer amigurumi stands approximately 7–8 inches (18–20 cm) tall.