Free Giraffe Amigurumi Pattern — Adorable Crochet Plushie with Honey Spots and Rosy Cheeks
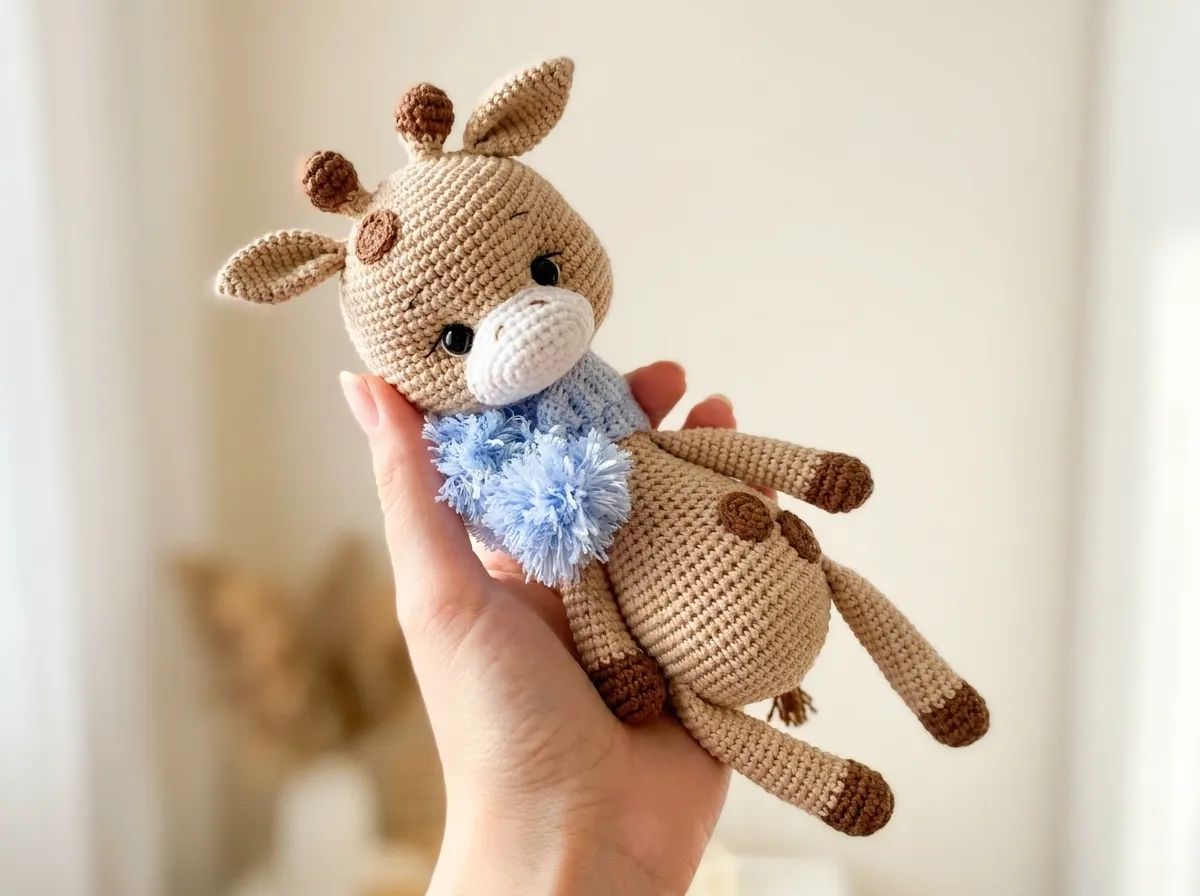
This free giraffe amigurumi pattern makes the sweetest little long-necked plushie you’ll ever hold — warm honey-beige all over, rich chestnut brown spots dotted like tiny kisses, and the most precious two-tone horns you’ve ever seen on something this small. He has a soft oval cream muzzle, a fluffy brown-tasseled tail, and once those 12mm glossy eyes catch the light… I may have squealed a little. Let me show you how every single detail comes together. 🩷
🩷 Pattern Highlights
- Cuteness Rating: 🩷🩷🩷🩷🩷
- Finished Size: Estimated 8–10 in tall (varies with tension)
- Difficulty: Intermediate
- Hook Size: 2.0mm (approx. US B/1)
- Yarn Palette: warm honey beige, rich chestnut brown, soft off-white cream
- Key Detail: Two-tone brown-to-beige horns, brown spot cheeks on the face, 12mm glossy safety eyes, and embroidered lashes
- Estimated Time: 8–12 hours
Materials for Your Giraffe Amigurumi Free Pattern
This little giraffe is worked in DK / Light Worsted weight (CYCA #3) yarn on a 2.0mm hook — that snug tension is what gives him that perfectly solid, smooth surface and keeps all the polyfill hidden safely inside where it belongs. His color palette is classic and warm: honey beige, chestnut brown, and a whisper of off-white cream for the muzzle.
- Yarn A — Warm Honey Beige: YarnArt Jeans, color 87. US alternatives: Drops Muskat or Paintbox Simply DK in a warm natural beige. This is the main color — head, body, ears, and the upper portion of all four limbs.
- Yarn B — Rich Chestnut Brown: YarnArt Jeans, color 71. US alternatives: Drops Muskat or Paintbox Simply DK in a medium warm brown. Used for hooves, horn tips, spots, and the tail tassel.
- Yarn C — Soft Off-White Cream: YarnArt Jeans, color 01. US alternatives: the same line in natural white or warm cream. Used only for the muzzle — that delicate creamy oval against the honey beige is everything.
- Hook: 2.0mm (approx. US B/1)
- Safety Eyes: 12mm black safety eyes × 2 — the size that gives him that big, soulful giraffe expression
- Stuffing: Polyester polyfill (Poly-Fil by Fairfield, available at Joann, Michaels, or Hobby Lobby)
- Tapestry needle for sewing parts together and weaving in ends
- Stitch marker — non-negotiable for tracking your continuous rounds
- Scissors
- Black embroidery floss for the eye whites, eyelashes, and eyebrows
- Pink embroidery floss or thin pink yarn for optional blush embroidery
Abbreviations Used in This Giraffe Amigurumi Pattern
| Abbreviation | Meaning |
|---|---|
| mr | magic ring |
| sc | single crochet |
| sl st | slip stitch |
| inc | increase — 2 sc worked into the same stitch |
| inv dec | invisible decrease — insert hook through front loops only of next 2 stitches simultaneously, yarn over, pull through, yarn over, pull through 2 loops |
| ch | chain |
🩷 Chloe’s Detail Tip: Throughout this pattern, all decreases are worked as invisible decreases (inv dec) — inserting through the front loops only of both stitches. This is the technique that keeps your finished surface smooth and gap-free, which makes the whole piece look cleaner and more polished. It takes a tiny bit more focus than a standard decrease, but the difference in the final look is genuinely worth it.
Before You Begin
All the 3D parts of this giraffe amigurumi free pattern are worked in continuous rounds — no joining, no turning, just a smooth spiral all the way through. The only exceptions are the muzzle and tail, which begin with a foundation chain. Place a stitch marker at the first stitch of each new round and move it up as you go. If you’re new to the magic ring, our magic ring tutorial walks you through the technique step by step so you can start every part with confidence.
The safety eyes are installed in the head between Rows 14–16, spaced 8 sc apart. They go in before you close the head — please don’t skip past this step in the excitement of finishing. Once the stuffing is in and the opening is sewn closed, those eyes live exactly where you put them forever. If this is your first time placing safety eyes, our safety eyes tutorial has a full guide on how to position and press them in so they’re perfectly symmetrical every single time.
All four limb pieces — arms and legs — are worked identically. Make 4, and then where you sew them onto the body determines which become arms and which become legs. It’s a clever design and it means a lot less counting. Keep them together until assembly so you don’t accidentally sew a leg where an arm should go.
🩷 Chloe’s Detail Tip: Before you start, wind off two small separate butterflies of Yarn B (chestnut brown) — one for the horns and one for the limbs. The color changes in this pattern are clean and simple (a few brown rows, then a switch to beige), and having pre-wound yarn right there makes those transitions smooth and tidy with no tangling.
Free Giraffe Amigurumi Pattern — All Parts
Part 1: Head (×1) — Warm Honey Beige
The head is the biggest piece and the one that takes the most rounds of love to build — but watching it grow from that tiny 6-stitch ring into a full, round, squishy sphere is one of the most satisfying things in amigurumi. Have your safety eyes within reach because you’ll need them toward the end.
Yarn: Warm Honey Beige (Yarn A)
Start: Magic ring
Row 1: 6 sc in mr (6)
Row 2: 6 inc (12)
Row 3: (1 sc, inc) × 6 (18)
Row 4: (1 sc, inc, 1 sc) × 6 (24)
Row 5: (3 sc, inc) × 6 (30)
Row 6: (2 sc, inc, 2 sc) × 6 (36)
Row 7: (5 sc, inc) × 6 (42)
Row 8: (5 sc, inc, 1 sc) × 6 (48)
Row 9: (7 sc, inc) × 6 (54)
Row 10: (8 sc, inc) × 6 (60)
Rows 11–13: 60 sc (3 rows) (60)
Row 14: (9 sc, inc) × 6 (66)
Rows 15–17: 66 sc (3 rows) (66)
Row 18: (10 sc, inc) × 6 (72)
Rows 19–23: 72 sc (5 rows) (72)
🩷 After Row 23 — pause here. The head is at its fullest and most beautiful right now, and this is exactly when to place your safety eyes between Rows 14–16, spaced 8 sc apart. Check them from directly in front before you press the washers in. Once they click, they’re staying. Take thirty extra seconds. It’s always worth it.
Row 24: (10 sc, inv dec) × 6 (66)
Row 25: (9 sc, inv dec) × 6 (60)
Row 26: (8 sc, inv dec) × 6 (54)
Row 27: (7 sc, inv dec) × 6 (48)
Row 28: (6 sc, inv dec) × 6 (42)
Row 29: (5 sc, inv dec) × 6 (36)
Row 30: (4 sc, inv dec) × 6 (30)
Row 31: (3 sc, inv dec) × 6 (24)
Work 1 sl st, then cut yarn, leaving a long tail. Stuff the head firmly before the opening gets too small to work with comfortably.
Part 2: Body (×1) — Warm Honey Beige
The body starts wide and beautiful, then tapers all the way down to 24 stitches — and Rows 28–41 are the long neck section that gives this giraffe his characteristic elegance. That cylindrical neck is going to look so good once it connects to the head.
Yarn: Warm Honey Beige (Yarn A)
Start: Magic ring
Row 1: 6 sc in mr (6)
Row 2: 6 inc (12)
Row 3: (1 sc, inc) × 6 (18)
Row 4: (2 sc, inc) × 6 (24)
Row 5: (3 sc, inc) × 6 (30)
Row 6: (4 sc, inc) × 6 (36)
Row 7: (5 sc, inc) × 6 (42)
Row 8: (6 sc, inc) × 6 (48)
Row 9: (7 sc, inc) × 6 (54)
Row 10: (8 sc, inc) × 6 (60)
Rows 11–16: 60 sc (6 rows) (60)
Row 17: (8 sc, inv dec) × 6 (54)
Row 18: 54 sc (54)
Row 19: (7 sc, inv dec) × 6 (48)
Row 20: 48 sc (48)
Row 21: (6 sc, inv dec) × 6 (42)
Row 22: 42 sc (42)
Row 23: (5 sc, inv dec) × 6 (36)
Row 24: 36 sc (36)
Row 25: (4 sc, inv dec) × 6 (30)
Row 26: 30 sc (30)
Row 27: (3 sc, inv dec) × 6 (24)
Rows 28–41: 24 sc (14 rows) (24)
Leave a long tail for sewing the body to the head. Stuff the body firmly before closing.
Part 3: Horns (×2) — Chestnut Brown to Honey Beige
Okay, these horns. They start in rich chestnut brown — a small round base — and then transition to honey beige for the tall stem. That color change creates the classic two-tone ossicone look that makes this little giraffe so instantly recognizable. They’re tiny and I am completely obsessed with them.
Yarn: Chestnut Brown (Yarn B), switching to Honey Beige (Yarn A)
Start: Magic ring
Row 1: 6 sc in mr [Yarn B — brown] (6)
Row 2: 6 inc [Yarn B — brown] (12)
Row 3: (1 sc, inc) × 6 [Yarn B — brown] (18)
Row 4: 18 sc [Yarn B — brown] (18)
Row 5: (1 sc, inv dec) × 6 [Yarn B — brown; switch to Yarn A at the end of this row] (12)
Row 6: (1 sc, inv dec) × 4 [Yarn A — beige] (8)
Rows 7–9: 8 sc (3 rows) [Yarn A — beige] (8)
Work 1 sl st, leave a long tail for sewing. Make 2 identical horns. Optionally stuff each one lightly with a tiny pinch of polyfill before closing to help them hold their upright shape.
Part 4: Ears (×2) — Warm Honey Beige
These little oval ears have the most satisfying shape — they widen gently and then taper back in, and the fold-and-close finish at the end gives them that sweet, natural curve. Like he’s really listening to every word you say.
Yarn: Warm Honey Beige (Yarn A)
Start: Magic ring
Row 1: 4 sc in mr (4)
Row 2: (1 sc, inc) × 2 (6)
Row 3: (2 sc, inc) × 2 (8)
Row 4: (3 sc, inc) × 2 (10)
Row 5: (4 sc, inc) × 2 (12)
Row 6: (5 sc, inc) × 2 (14)
Row 7: (6 sc, inc) × 2 (16)
Row 8: 16 sc (16)
Row 9: (7 sc, inc) × 2 (18)
Row 10: 18 sc (18)
Row 11: (7 sc, inv dec) × 2 (16)
Row 12: (6 sc, inv dec) × 2 (14)
Row 13: (5 sc, inv dec) × 2 (12)
Fold the ear flat in half and work 6 sc through both layers to close the base. Do not stuff. Leave a tail for sewing. Make 2 identical ears.
Part 5: Muzzle (×1) — Soft Off-White Cream
The muzzle is worked differently from everything else in this pattern — it starts with a foundation chain instead of a magic ring and grows into a soft, rounded oval. This creamy white against the honey beige of the face is one of the details that makes this piece feel so intentionally designed. Take your time with this one.
Yarn: Soft Off-White Cream (Yarn C)
Start: Foundation chain
Row 1: Ch 7 (7)
Row 2: Starting from the 2nd ch from hook: 5 sc, 3 sc in the last ch, 4 sc, inc in the last ch (14)
Row 3: inc, 4 sc, 3 inc, 4 sc, 2 inc (20)
Row 4: 1 sc, inc, 4 sc, (1 sc, inc) × 3, 4 sc, (1 sc, inc) × 2 (26)
Row 5: 2 sc, inc, 4 sc, (2 sc, inc) × 3, 4 sc, (2 sc, inc) × 2 (32)
Row 6: 32 sc, sl st (32)
Leave a long tail for sewing. You’ll stuff the muzzle lightly before fully closing it to the face — just a small, soft pinch to give it gentle projection without looking overstuffed.
Part 6: Spots (×6) — Chestnut Brown
Six perfect little brown circles that scatter across your giraffe like patches of warm sunshine. Two go on the face as cheek accents — which is honestly the cutest design choice in this whole pattern — and the remaining four dot across the body and near the horns.
Yarn: Chestnut Brown (Yarn B)
Start: Magic ring
Row 1: 6 sc in mr (6)
Work 1 sl st, leave a tail for sewing. Make 6 identical spots.
Part 7: Arms and Legs (×4) — Chestnut Brown to Honey Beige
All four limb pieces are worked completely identically — rich chestnut brown hooves on the rounded bottom, honey beige all the way up the long tube. That warm brown-to-beige transition ties the whole color palette together so beautifully. Placement during assembly is what makes each piece an arm or a leg.
Yarn: Chestnut Brown (Yarn B), switching to Honey Beige (Yarn A)
Start: Magic ring
Row 1: 6 sc in mr [Yarn B — brown] (6)
Row 2: 6 inc [Yarn B — brown] (12)
Row 3: (1 sc, inc) × 6 [Yarn B — brown] (18)
Row 4: 18 sc [Yarn B — brown] (18)
Row 5: (1 sc, inv dec) × 6 [Yarn B — brown; switch to Yarn A at the end of this row] (12)
Rows 6–17: 12 sc (12 rows) [Yarn A — beige] (12)
Stuff each piece lightly. Fold flat in half and work 6 sc through both layers to close, leaving a long tail for sewing. Make 4 identical pieces — 2 will be sewn as arms, 2 as legs.
Part 8: Tail (×1) — Honey Beige with Brown Tassel
The tiniest, most perfect little tail. A short beige tube with a fluffy brown fringe on the end — it’s the kind of finishing detail that you might almost skip, and then you add it and you absolutely cannot imagine the piece without it.
Yarn: Honey Beige (Yarn A) for the tail tube; Chestnut Brown (Yarn B) for the tassel
Start: Foundation chain
Row 1: Ch 7, starting from the 2nd ch from hook work 6 sc to end of row (6)
Leave a sewing tail. For the tassel: cut 8 lengths of chestnut brown yarn approximately 4 in (10 cm) each. Fold each length in half and attach to the tip of the tail. Trim the ends evenly with scissors for a neat, fluffy finish.
Assembly — Bringing Your Giraffe Together
This is the part where all those separate little pieces become one actual giraffe. Take your time with placement — especially the horns, ears, and limbs. Symmetry here is everything, and it’s so much easier to check before you sew than to undo later.
- Stuff the head and body firmly but not hard — you want soft, even, rounded shaping throughout. Sew the head to the top of the body (the narrow neck end), aligning them carefully so the giraffe sits or stands naturally upright.
- Create the facial indentation using your preferred sculpting method — running a length of yarn through the head with a tapestry needle and applying gentle tension can help define the face shape before you attach the muzzle.
- Sew the horns at Rows 3–5 of the head, centered on top and spaced evenly side by side. Optionally stuff each horn with a tiny pinch of polyfill before closing them down to help them stand upright.
- Sew the ears 2 rows below the horns, one on each side. Angle them ever so slightly outward for that sweet, bright-eyed, alert expression.
- Sew on the muzzle centered on the lower portion of the face, stuffing it lightly with polyfill before fully closing for gentle, rounded projection. Our stuffing guide has tips for getting the perfect amount of fill in small sewn-on pieces like this.
- Sew the spots: place 2 on the face in the cheek position on either side of the muzzle (those brown circles against the honey beige are precious), then scatter the remaining 4 across the body near the horns and wherever they look most natural.
- Sew the arms at Rows 9–10 from the base of the head, one on each side of the upper body.
- Sew the legs between Rows 9–10 at the bottom of the body, spaced evenly so he balances well.
- Sew the tail between Rows 12 and 13 at the back of the body.
🩷 Chloe’s Detail Tip: Before you sew any limb permanently, hold the piece in position and look at the whole giraffe from directly in front, then from each side. Step back a full arm’s length. The arms especially — getting them at the same height on both sides is the difference between a finished piece that looks intentional and one that looks like he’s had a very long day. Pin them in place first if you can.
Making It Extra Cute — Finishing Details for Your Giraffe Amigurumi
This is the part I look forward to the entire time I’m crocheting. The giraffe amigurumi free pattern gives you a beautiful foundation — but these are the details that give him a face, a personality, and that irresistible quality that makes people pick him up and not put him down.
The Safety Eyes — Getting Them Perfect
Your 12mm safety eyes are placed between Rows 14–16, spaced 8 sc apart. Before you press those washers in, hold the stuffed head under a bright lamp and look at it from directly in front. Ask yourself: are the eyes the same height? Are they the same distance from the centerline? Are they the same distance from the muzzle position? They need to clear all three of those checks before those washers click. That moment of checking takes thirty seconds and it saves you from staring at a slightly-off face for the rest of the piece’s life. I cannot stress this enough. I check mine at least four times before I commit.
The Eye Embroidery — Where He Really Comes to Life
This is the part where the magic happens. Using black embroidery floss, add 3–4 tiny straight stitches radiating upward from the top of each eye for lashes — soft and curved, not dramatic. For eyebrows, two short gently arched stitches above each eye, set slightly wide for that sweet, curious expression. Finally, for the whites: a few tiny straight stitches of white floss at the inner corner of each eye. That tiny highlight is what makes him look alive and glossy, and it catches the light in the most perfect way. You’re going for warm and sweet here — baby giraffe energy, not editorial fashion.
The Cheek Spots — This Design Is Genius
Okay but those cheeks though. The two brown spot circles sewn to either side of the muzzle double as the blush cheeks in this design, and it’s such a clever, cohesive decision. The chestnut brown against the honey beige creates a naturally rosy, warm-toned flush that feels completely organic to the color palette. If you want to deepen the effect slightly, a very light dusting of blush-pink eyeshadow or chalk applied over the spot area with a dry brush adds a soft, warm glow. Go subtle — you want it to look like the softest natural blush, not like he’s been running.
The Nose Embroidery
A few small straight stitches of chestnut brown or black floss centered on the muzzle create a simple, sweet nose. Keep it small — just a tiny inverted triangle or a single horizontal stitch is enough. The muzzle is the focal point of the face and you don’t want to clutter it.
Color Variation Ideas
This pattern is gorgeous in the classic warm palette, but the color logic works beautifully with substitutions. Imagine him in soft lavender with dusty mauve spots for a dreamy pastel nursery version, or pale mint green with warm caramel brown spots for something fresh and spring-like. Blush pink as the main color with cream spots would be maximum kawaii energy and I would personally make four of them immediately. The color change placement stays exactly the same — just swap your main yarn and coordinate the spot/hoof color accordingly.
Chloe’s Final Look 🩷
I’ve been sitting here holding this finished little giraffe for way too long and I regret absolutely nothing. The way those 12mm eyes catch the light, the soft curve of the honey-beige neck flowing into the body, the chestnut brown spots scattered just so, that fluffy little tasseled tail — he’s everything. Make the classic warm palette first, then make him in lavender with dusty rose spots and tell me your heart didn’t do something completely unacceptable when you finished. You’re going to love this one. 🩷
What difficulty level is this giraffe amigurumi?
This pattern is rated as Intermediate due to the color changes, small parts like horns, and the assembly required for the long neck.
Can I change the colors of the giraffe?
Yes! While classic honey beige and brown are used here, it looks adorable in pastels like lavender or mint green.
What size safety eyes are best for this giraffe amigurumi free pattern?
We recommend 12mm glossy safety eyes to give the giraffe its signature soulful and “sweet” expression.