Free Koala Amigurumi Pattern — Tiny Plush with Rosy Cheeks
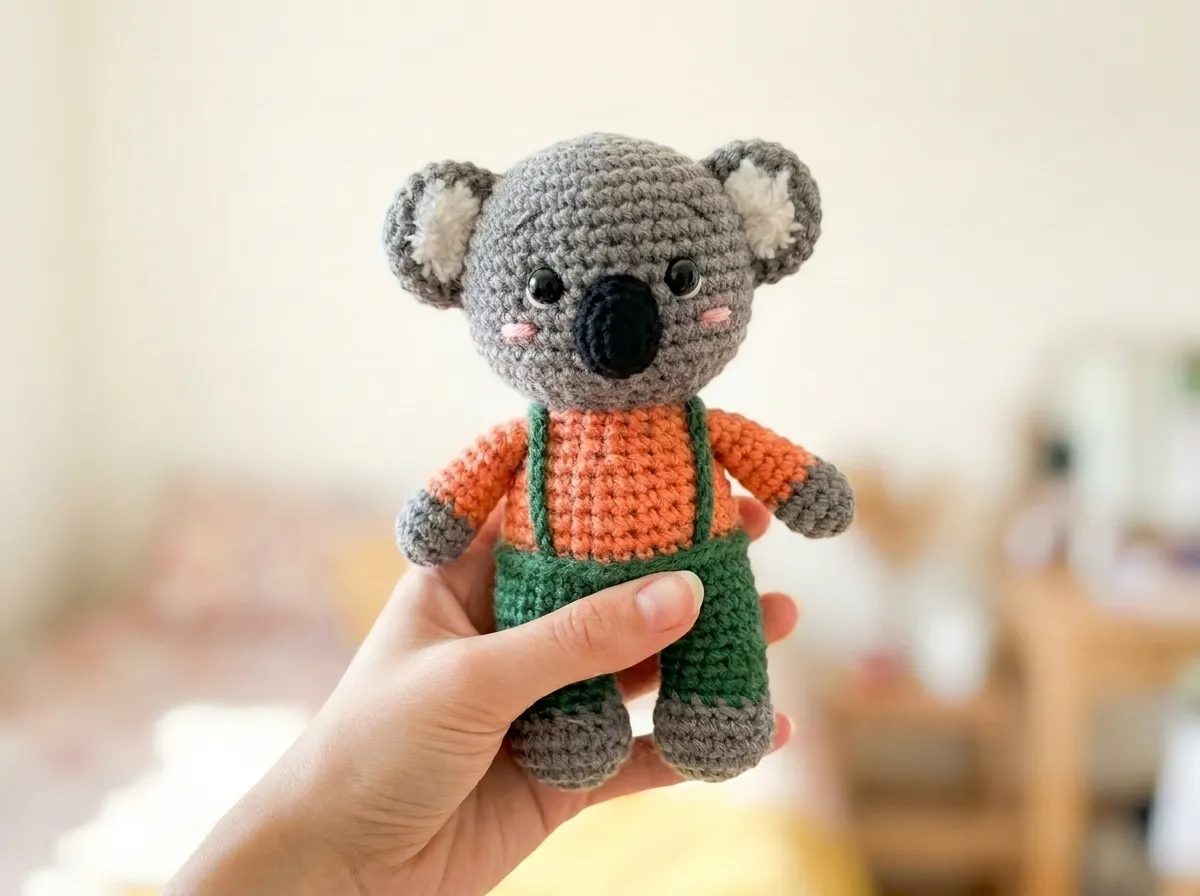
This free koala amigurumi pattern creates the most precious little eucalyptus baby you’ve ever seen — soft dove gray from nose to paw, with fluffy two-tone ears, glossy safety eyes, and a round face that just begs for a pair of embroidered pink cheeks. Dressed in a tiny color-blocked outfit, this little koala fits right in your palm and that squishy roundness makes you want to make one in every pastel colorway. The details are everything.
🩷 Pattern Highlights
- Cuteness Rating: 🩷🩷🩷🩷🩷
- Finished Size: Approx. 5–6 in (12–15 cm) tall
- Difficulty: Beginner–Intermediate
- Hook Size: E/4 (3.5 mm)
- Yarn Palette: dove gray, soft white, plus your choice of pastel outfit colors — dusty rose and mint green are a dream together
- Key Detail: fluffy white-center ears, color-blocked outfit, 9mm glossy safety eyes, and embroidered blush cheeks
- Estimated Time: 4–6 hours
Materials for Your Koala Amigurumi
- Dove gray yarn — worsted weight (CYCA 4), approx. 80–100 yards. This is the main color for the head, body, legs, and arms. Look for a soft, slightly warm gray — something that reads cozy rather than cool.
- Soft white yarn — worsted weight (CYCA 4), small amount (approx. 10–15 yards). Used for the inner ear detail only. A clean, bright white gives the sweetest contrast against the gray and makes those ears instantly recognizable.
- Outfit color yarn (A) — worsted weight (CYCA 4), approx. 20–30 yards. For the pants or overalls. Dusty rose, soft lavender, and powder blue all look absolutely dreamy on a gray koala — pick whatever makes your heart happy.
- Outfit color yarn (B) — worsted weight (CYCA 4), approx. 20–25 yards. For the sweater top, if using a different color from the pants. A soft mint paired with lavender pants? I can’t even handle how cute that combination is.
- 2 × 9mm black safety eyes — glossy black. The 9mm size gives this koala the most expressive, round little face. I’ve tried 12mm and they feel slightly too grown-up for this scale — 9mm hits that perfect sweet spot.
- Polyester fiberfill (polyfill) — a generous handful. Poly-Fil by Fairfield is widely available at Joann, Michaels, or Hobby Lobby.
- Hook: 3.5 mm (US E/4)
- Tapestry needle — for sewing parts and weaving in ends
- Stitch markers — at least 2, to mark the beginning of each leg before joining
- Scissors
- Soft pink embroidery floss — for the blush cheeks, which are, in my completely unbiased opinion, the single most important finishing step in this entire pattern
This yarn falls under the Worsted Weight (4) standard — smooth, widely available, and wonderful for showing off that rounded stitch definition that gives amigurumi its signature squishy look.
Abbreviations Used in This Koala Amigurumi Pattern
| Abbreviation | Meaning |
|---|---|
| mr | magic ring |
| sc | single crochet |
| inc | increase (2 sc worked into the same stitch) |
| dec | decrease |
| ch | chain |
| sl st | slip stitch |
| BLO | back loop only |
Before You Begin — Tips for the Cutest Koala Amigurumi
A few small things before we start that will make the difference between a cute koala and an impossibly cute koala.
Every round piece starts with a magic ring. The head, both arms, both ears, and both legs all begin from a magic ring — that adjustable loop that closes completely and leaves zero hole at the center. It’s the reason amigurumi tops look so clean and polished. If it’s new to you, our magic ring tutorial walks you through it step by step and makes the whole thing far less intimidating than it sounds.
Use the invisible decrease for the smoothest surface. The pattern notes “dec” throughout the shaping rows. For the cleanest, most gap-free finish on the outside of the koala, use the invisible decrease technique — it works through the front loops only of two stitches simultaneously, leaving almost no visible seam on the right side of the piece. The difference in the finished surface is genuinely noticeable and so worth the tiny extra attention.
🩷 Chloe’s Detail Tip: Before you place the safety eyes, pin or hold the nose in position first. The nose is your anchor point — once you know where it sits, you can place the eyes symmetrically on either side at the right row height. Getting the nose placed first makes the whole face come together so much more naturally.
Install the safety eyes before stuffing and closing the head. This is the one step you truly cannot skip or reverse. Once the head is stuffed and the opening closes up, getting the backing washer onto a safety eye stem is nearly impossible. Our safety eyes tutorial covers exactly how to position, check symmetry, and press the washers in so every single piece comes out with that perfect glossy, level expression.
Koala Amigurumi Pattern
Head (× 1)
Yarn color: dove gray
This is where the whole personality starts. The head builds outward from a magic ring into a wide, satisfying sphere — generous enough to hold those big fluffy ears and give the face plenty of room to be expressive. Watch it come together from Row 6 onward and try not to squeal a little. I dare you.
Row 1: 6 sc in mr (6)
Row 2: 6 inc (12)
Row 3: (1 sc, inc) ×6 (18)
Row 4: (2 sc, inc) ×6 (24)
Row 5: (3 sc, inc) ×6 (30)
Row 6: (4 sc, inc) ×6 (36)
Rows 7–12: 36 sc (36)
By Row 12, the head has that perfect round bowl shape and you can already start imagining exactly where the eyes are going to land. This is the part where I always stop for a moment just to appreciate it. So round. So gray. So squishy.
Row 13: (4 sc, dec) ×6 (30)
Row 14: (3 sc, dec) ×6 (24)
Row 15: (2 sc, dec) ×6 (18)
Row 16: (4 sc, dec) ×3 (15)
Before closing: attach safety eyes between Rows 9–10, on either side of the nose. Stuff firmly, then sew the head onto the body.
Nose (× 1)
Yarn color: gray, or one shade deeper for definition
The nose is the centerpiece of this little face — it gives the koala that wide, flattened snout that makes the whole expression so immediately recognizable. It’s worked flat from a starting chain rather than a magic ring.
Row 1: Chain 5. Starting from the 2nd ch from hook: 3 sc, 3 sc in the last ch, then continue along the other side: 2 sc, 2 sc in the last ch. (10)
Fasten off and leave a long yarn tail for sewing. Position the nose in the center of the face before you place the safety eyes — it’s your anchor point for getting the whole expression perfectly balanced.
Arms (× 2)
Yarn color: gray, then outfit color (A) at Row 10
The arms are sweet little rounded paddles — paw-shaped and plump at the bottom, narrowing slightly toward the top where they attach to the body. The color change at Row 10 gives them that adorable little sleeve detail that makes the outfit come to life.
Row 1: 6 sc in mr (6)
Row 2: 6 inc (12)
Row 3: 12 sc (12)
Row 4: (2 sc, dec) ×3 (9)
Rows 5–8: 9 sc (9)
Row 9: dec, 7 sc (8)
Change to outfit color (A).
Rows 10–11: 8 sc (8)
Stuff only the lower paw section — lightly, just enough to give it gentle roundness. The upper portion stays flat so the arm hangs naturally against the body instead of sticking out sideways. Fold in half and sc 4 stitches across to close. Leave a tail for sewing, or crochet the arms directly into Row 23 of the body.
Ears (× 2)
Yarn color: gray and white, worked simultaneously
Okay, the ears. These are genuinely my favorite part of this whole pattern. That soft white center peeking out from the gray ring — it’s precisely what makes this koala look like a koala. The color placement in Rows 2 through 4 is quite specific, so follow the notes carefully and you’ll end up with the most perfectly fluffy little ears.
Row 1: 6 sc in mr (6)
Row 2: 6 inc — first 2 inc in gray, 3rd inc in white, last 3 inc in gray (12)
Row 3: 1 sc, inc, 1 sc in gray. inc, 1 sc, inc, 1 sc in white. inc, 1 sc, inc, 1 sc, inc in gray. (18)
Row 4: 4 sc in gray, 6 sc in white, 8 sc in gray, then work 2 extra sc + sl st to reposition (not counted). (18)
Fasten off with a long tail for sewing. Don’t place a single ear until both are finished — set them both against the top of the head at the same time and check the balance from directly in front before you commit.
Legs and Body (× 1)
Yarn color: gray, then outfit color(s)
This is the clever heart of the whole pattern. The two legs are crocheted separately, then joined with a bridge chain and worked up into a complete body in one continuous piece. Watching the little torso take shape after the legs come together is one of the most satisfying moments in all of amigurumi construction — this is where the magic happens.
Make the First Leg:
Row 1: 6 sc in mr (6)
Row 2: 6 inc (12)
Row 3: (1 sc, inc) ×6 (18)
Row 4: 18 sc (18)
Change to outfit color (A).
Row 5: 18 sc (18)
Row 6: (1 sc, dec) ×6 (12)
Rows 7–10: 12 sc (12)
Fasten off the first leg and set aside with a stitch marker to hold your place. Make the second leg but do not fasten off.
Joining the Legs:
From the second leg, chain 3 and join to the first leg to connect them.
Row 11: 12 sc around the second leg, 3 sc across the ch, 12 sc around the first leg, 3 sc across the ch. (30)
Rows 12–15: 30 sc (30)
Row 16: (3 sc, dec) ×6 — for the pants version, work this row in BLO and switch to outfit color (B) for the sweater top (24)
Rows 17–20: 24 sc (24)
Row 21: (2 sc, dec) ×6 (18)
Row 22: 18 sc (18)
Row 23: Attach the arms in this row: 3 sc, 4 sc together with arm, 5 sc, 4 sc together with arm, 2 sc. (18)
Row 24: (4 sc, dec) ×3 (15)
Stuff the legs and body as you work, adding fiberfill gradually as you decrease. The body should feel nicely rounded and hold its shape without being stiff.
Assembling Your Koala Amigurumi
- Attach the safety eyes and close the head. Pin the nose in position on the center-front of the head first — approximately Rows 10–13, depending on how you want the face proportioned. Place the safety eyes between Rows 9–10, on either side of the nose. Hold the head up and look at the face from directly in front at a slight distance. When the symmetry feels right, press the washers in firmly. Stuff the head and fasten off.
- Sew the head to the body. Align the 15 open stitches at the base of the head with the 15 stitches at Row 24 of the body. Our full guide on sewing amigurumi parts together has tips for getting a clean, secure join that sits flush and doesn’t gap. Sew all the way around before fastening off.
- Sew on the nose. Center the nose on the front of the face and stitch securely around the edges using the yarn tail. The nose gives the face its koala character — take your time with the placement and step back to check it looks centered before you tie off the tail.
- Attach the ears. Set both finished ears against the top of the head simultaneously before sewing a single stitch. The white inner section should face forward, and both ears should sit at the same height on either side. Check from directly in front, then sew each one down securely around the full base.
- Weave in all ends. Take your time here — a securely woven end is the difference between a piece that lasts and one that slowly unravels with handling.
Making Your Koala Amigurumi Extra Cute — Finishing Details
This is the section. This is where a nice koala becomes an irresistible koala. Every tiny detail here counts and none of them take more than a few minutes.
The blush cheeks — do not skip these. Thread two strands of soft pink embroidery floss onto your tapestry needle. Using small, gentle satin stitches, embroider a soft oval blush mark on each cheek, just below and slightly to the outside of each eye. Soft edges look more natural than perfectly crisp ones — work a few stitches slightly outside the main oval to let the color fade gently. The pink against the dove gray is one of the most precious color pairings in all of amigurumi and it completely transforms the expression of the face.
🩷 Chloe’s Detail Tip: I work the blush cheeks in 4–5 small satin stitches in a soft oval, then add 1–2 lighter stitches just outside the edge to blur the boundary. Two minutes total, and it makes the whole face look ten times more alive. Pink embroidery floss against dove gray yarn — it never gets old.
The eyes — symmetry is everything. Before pressing those washers in, hold the piece under a bright lamp and look at it straight-on from about arm’s length. Both eyes should sit at exactly the same row height and be equidistant from the nose on either side. If one looks even slightly higher, reposition it. You will notice the asymmetry in every photo you take of the finished piece, every single time. The extra thirty seconds of checking are always, always worth it.
Outfit color combinations to try:
- Dusty rose pants + mint green sweater — the sweetest color story, completely irresistible
- Soft lavender pants + baby yellow sweater — unexpected and absolutely precious together
- Powder blue pants + soft cream sweater — clean, classic, and so delicate-looking
- All-matching pastel gray outfit — elegant and minimalist, but still add the pink cheeks. Always add the pink cheeks.
A tiny finishing accessory. A small ribbon bow tucked between the ears, or a tiny crocheted leaf worked in chain stitches, can take this koala from adorable to completely unforgettable. Completely optional — but I always go there. The tiniest details make the biggest difference, and this little koala amigurumi deserves every single one of them.
Chloe’s Final Look
I’ve been sitting here holding this finished koala for far too long and I have absolutely zero regrets. The soft dove gray, those fluffy two-tone ears, the way the glossy eyes catch the light right next to those rosy embroidered cheeks — this koala amigurumi is everything it was supposed to be. Try making a coordinating set in three different pastel outfits and lining them up together on a shelf. One gray koala is precious. Three gray koalas in dusty rose, lavender, and mint green is genuinely a reason to rearrange your entire desk. 🩷
What is the best yarn for this koala amigurumi?
Worsted weight (CYCA 4) yarn is best for this pattern. It provides smooth stitch definition and makes the finished toy durable and extra squishy.
Can beginners make this koala amigurumi?
Yes! This koala amigurumi pattern is perfect for advanced beginners. It uses basic stitches and requires some simple color-changing skills, but the step-by-step assembly is very straightforward.
How long does it take to crochet this koala?
On average, this koala amigurumi takes about 4 to 6 hours to complete, depending on your crocheting speed and familiarity with color changes and assembly.