Crochet Strawberry Amigurumi — Squishy Chenille Berry
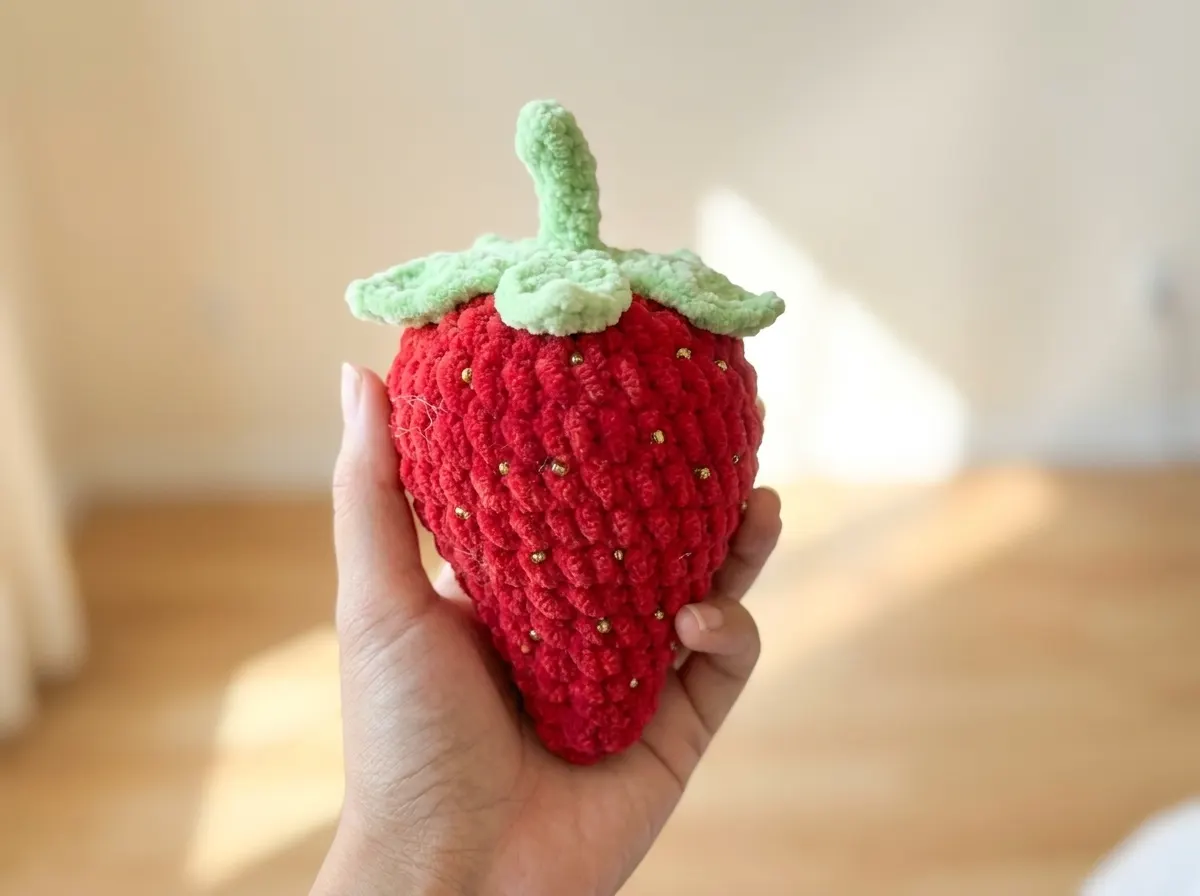
This free crochet strawberry amigurumi might be the squishiest thing I’ve ever held in my palm, and I genuinely need you to have one. It’s worked in soft chenille yarn, so the finished berry is deep and velvety and rich in a way that makes people reach out and touch it before they even say a word. The stem fans into five perfect little leaves like a tiny crown, and the scattered seed bead seeds are the detail that makes everyone stop and stare. Come make one.
🩷 Pattern Highlights
- Cuteness Rating: 🩷🩷🩷🩷🩷
- Finished Size: 5.5 × 2.75 in
- Difficulty: Beginner–Intermediate
- Hook Size: 3.75mm (US F/5) for the berry · 3.25mm (US D/3) for the stem
- Yarn Palette: deep berry red chenille · soft leafy green chenille
- Key Detail: five-leaf chenille crown and scattered green seed bead seeds
- Estimated Time: 2–3 hours
What Makes This Strawberry Amigurumi So Special
Before anything else, I need to talk about the yarn — because it really does change everything here. This strawberry is made entirely in chenille, that thick, plush, almost-velvety yarn that makes amigurumi look like they were cut from the softest fabric you’ve ever touched. The finished piece doesn’t look like a typical crocheted project. It looks dimensional and rich, with a color depth that photographs beautifully and a texture that’s genuinely hard to put down.
The shape is perfectly strawberry-like — wide and rounded at the fullest point, tapering into a gentle soft tip at the bottom. And then there’s the stem piece, which is honestly one of my favorite things in this whole pattern. You build it up as a narrow little tube, then fan out into five separate pointed leaves all in a single round. When you hold the finished stem up and look down at it from above, it looks like a perfect green star. The second you press it onto the top of the berry and it settles there like a little crown — okay, I may have squealed.
The seed beads are what tip this from sweet into completely irresistible. Tiny green beads, scattered across the surface like real strawberry seeds. The detail is so small and so precisely placed and so unexpectedly realistic that people genuinely do a double take. This is a project where the finishing details are the whole point, and that’s very much my kind of project.
Materials
- Chenille yarn, Bulky (5) — deep berry red: Approximately 1/5 of a skein. Recommended brands: Himalaya Dolphin Baby in red, or US alternatives Bernat Baby Velvet or Premier Parfait in a rich red shade
- Chenille yarn, Bulky (5) — soft leafy green: A small amount is all you need for the stem and leaves. Look for a plush velvet-style chenille yarn in green at Joann, Michaels, or Hobby Lobby
- Hooks: 3.75mm (US F/5) for the berry · 3.25mm (US D/3) for the stem and leaves
- Green seed beads: A small handful — these become the seeds scattered across the berry’s surface
- Tapestry needle and sewing thread for attaching the beads and assembling the parts
- Polyfill stuffing: 100% polyester fiberfill. Poly-Fil by Fairfield is widely available at US craft stores and works perfectly here
- Stitch marker: One clip-style marker to track the beginning of each round
A note on yarn weight: Both yarns used here fall into the Bulky (5) weight category per the Craft Yarn Council’s yarn weight system, though the yarn used for the stem is slightly thinner. If you’re shopping for US alternatives, the most important thing is the texture — aim for a soft chenille or velvet-style yarn in both cases. That plushness is what gives the finished berry its gorgeous, almost edible look.
Abbreviations
| Abbreviation | Meaning |
|---|---|
| ch | chain |
| sc | single crochet |
| dc | double crochet |
| tr | treble crochet |
| inc | increase — 2 sc worked into the same stitch |
| dec | decrease (see tip below — inv dec recommended) |
| sl st | slip stitch |
🩷 Chloe’s Detail Tip — On Decreases: The decrease rounds are where the berry gets its beautiful rounded taper, and how you work them really shows in chenille. For the cleanest, most invisible result, use the invisible decrease (inv dec): insert your hook through the front loops only of the next two stitches at the same time, yarn over, pull through, yarn over, pull through both loops. It closes so much more neatly than the standard method, and the surface stays smooth rather than puckered. Our invisible decrease tutorial walks you through every step if you’d like to see it up close before you start.
Before You Begin — Details That Make This Berry Extra Sweet
On Working in Continuous Rounds
The berry is worked entirely in continuous rounds — a spiral without any joining slip stitches between rounds. This is the standard method for amigurumi because it leaves no visible seam line on the finished piece, which matters even more in chenille where texture makes every detail pop. Place your stitch marker at the first stitch of every round and move it up as you go. It sounds small but it keeps your stitch count accurate all the way through the shaping rounds, where getting off by even one stitch changes the whole silhouette.
On Stuffing
The pattern calls for stuffing after Round 13, and that timing is exactly right — the opening is still open enough to get even polyfill distribution without bunching or lumping. Add the stuffing gradually and shape the berry with your hands as you go. You want it to feel firm and hold its rounded strawberry shape, but with a gentle give when squeezed — not hard like a ball. Our guide to stuffing amigurumi goes into detail on how much is too much, how to push filling into narrower areas evenly, and how to avoid that lumpy texture that ruins the silhouette.
On the Stem and Leaf Assembly
The stem piece sits on top of the berry and is sewn in place, and how you position it before you start sewing makes a real difference. You want the five leaves fanning out evenly all the way around — not grouped on one side or tilted. Before picking up your needle, rotate the stem piece slowly across the top of the berry and find the placement where the leaves look most symmetrical from directly above. Our tutorial on sewing amigurumi parts together covers exactly how to get a clean, invisible attachment that won’t shift or gap over time.
On the Seed Beads
Before sewing a single bead, loosely scatter a handful across the berry’s surface and take a step back. Real strawberries have seeds concentrated most heavily across the widest middle section, tapering toward the tip and sparser near the top under the leaves. Arrange yours to echo that natural distribution before committing to sewing anything down. That extra five minutes of planning is what makes the finished piece look genuinely botanical rather than decorated.
Free Strawberry Amigurumi Pattern
Part 1: The Berry
Yarn: Deep berry red chenille
Hook: 3.75mm (US F/5)
Starting Method: Chain 4 and join into a ring
Work all rounds in continuous rounds. Place a stitch marker at the first stitch of each round and move it up as you go.
Round 1: inc × 4 (8)
Round 2: 8 sc (8)
Round 3: (inc, 1 sc) × 4 (12)
Round 4: (inc, 2 sc) × 4 (16)
Round 5: 16 sc (16)
Round 6: (inc, 3 sc) × 4 (20)
Round 7: (inc, 4 sc) × 4 (24)
Round 8: 24 sc (24)
Round 9: (inc, 3 sc) × 6 (30)
Round 10: 30 sc (30)
🩷 After Round 10, your berry is at its widest and fullest. Hold it up for a second and look at that shape — that gorgeous, plump roundness. This is the moment it starts looking like a real little strawberry. So satisfying to watch it get there.
Round 11: (dec, 2 sc) × 7, dec (22)
Round 12: (dec, 1 sc) × 7, 1 sc (15)
Round 13: (dec, 1 sc) × 5 (10)
🩷 Stuff the berry now, before Round 14. Add polyfill gradually and shape it as you work — you want a firm, rounded berry that holds its shape beautifully. The opening after Round 13 is the perfect size for getting the stuffing exactly right.
Round 14: dec × 5 (5)
Finishing: Fasten off. Cut yarn and weave the end through to the inside of the piece to close.
Part 2: The Stem and Leaves
Yarn: Soft leafy green chenille
Hook: 3.25mm (US D/3)
Starting Method: Chain 4 and join into a ring
Round 1: 1 sc, inc, 2 sc (5)
Rounds 2–5: 5 sc (5)
Round 6: inc × 5 (10)
Round 7: (1 sc, inc) × 5 (15)
🩷 Chloe’s Detail Tip: Rounds 1–5 build the narrow little stem tube — it’s the sweetest thing, perfectly proportioned for a berry this size. After Round 7, you’ll have a wider, flat disc with 15 stitches all the way around, ready to bloom. This is where the magic happens.
Round 8 — The Leaves: (1 sl st, 1 dc, 1 tr, ch 3 and sl st back into the top of the tr, 1 dc, 1 sl st, 1 sc) × 5 (15 base stitches used — 3 per leaf × 5 leaves)
Round 8 note: Each bracketed repeat creates one complete pointed leaf and uses 3 stitches from Round 7. Work the full sequence five times all the way around the piece. The chain-3 loop at the tip of each leaf gives it that lovely pointed shape. When you hold the finished stem piece up and look down at it from directly above, it fans out into a perfect five-pointed star. I genuinely could stare at it for too long.
Finishing: Fasten off. Cut and secure the yarn on the bottom (wrong side) of the stem piece.
Assembly
- Set the finished berry on a flat surface and place the stem piece on top, centered at the natural top of the berry — the area that was the widest before the shaping rounds began.
- Before picking up your needle, look down at the stem from directly above and rotate it slowly until all five leaves fan out as evenly as possible around the full circumference. Take your time here. Symmetry at this stage is everything.
- Using a tapestry needle and a length of matching green yarn, sew the base of the stem piece to the top of the berry with small, neat stitches all the way around the edge. Keep the stitches tight and close together so the join is secure and invisible.
- Weave in and secure all yarn ends on the inside.
- Using a sewing needle and thread, sew the green seed beads across the surface of the berry one at a time. Pass through each bead twice before moving to the next so each one sits flat and firm against the chenille. See the finishing section below for bead placement guidance.
Making It Extra Cute — Finishing Details
Okay — this is the part I live for. The berry is technically complete after assembly, but these details are what take it from nice to completely irresistible. Don’t skip this section. This is where it goes from a crochet project to something people pick up and refuse to put back down.
The Seed Bead Seeds
Green seed beads are what make this strawberry look convincingly real, and placement matters more than you’d think. Before sewing anything down, loosely scatter the beads across the berry’s surface and study the pattern. Real strawberries have seeds most densely concentrated across the widest, fullest middle section — gradually sparser toward the tip and nearly absent right under the stem at the top. Mimic that natural distribution rather than spacing the beads in a uniform grid. A little variation in spacing looks more organic and more adorable than anything too perfectly even.
Use a fine sewing needle and clear or matching thread. Pass through each bead twice before moving on so they sit flat and pressed neatly into the chenille. Work slowly — there’s no rush, and precise placement here is what separates a good strawberry from a truly precious one.
Embroidered Blush Cheeks
This isn’t part of the original pattern, but I put pink embroidered cheeks on almost everything I make, and a little strawberry with rosy cheeks is one of the most heart-melting things in existence. If you want to give yours some kawaii personality, take a short length of soft pink embroidery floss and work two small circular satin stitch rounds — one on each side of the berry, positioned roughly halfway down the widest section. Keep the edges soft and slightly diffused rather than sharply outlined, so they read as a delicate blush rather than two flat circles. That softness is what makes them look sweet instead of cartoonish.
A Tiny Embroidered Face
If you’ve already added cheeks, you’re halfway to a full kawaii strawberry face. Two small stitched eyes and a tiny curved smile take about two minutes total and completely transform the personality of the piece. Use black embroidery floss for the eyes — two short straight stitches worked close together to create a small filled oval — and a slightly deeper pink or red for the mouth. After each element, hold the berry at arm’s length and check the placement before adding the next detail. The tiniest details make the biggest difference, and getting the face centered and balanced is what makes it look truly intentional.
Color Variations Worth Making
The pattern is written in classic red and green, but this shape translates into other colorways so beautifully. A soft blush pink berry with a sage green stem and pearl-white seed beads would be dreamy. A dusty rose with mint green leaves leans more cottagecore and less kawaii — also completely stunning. A pale lavender berry with ivory beads would look like it came from a fairy garden. The strawberry silhouette is so recognizable that even unexpected color combinations read immediately — which means your pastel experiments almost always work out.
Chloe’s Final Look
I’ve been holding this little berry in my palm since I finished it and I regret absolutely nothing about that. The chenille gives it this softness that photographs honestly don’t capture — you have to hold it to understand. The five-leaf crown sits perfectly, the seed beads catch the light in the most delicate way, and if you added the embroidered cheeks, you now have a strawberry with feelings and a face and I love her completely.
Make a little collection of three in different colorways — a deep classic red, a soft blush, and maybe a pale butter yellow for a little pineberry — and arrange them together in a tiny ceramic bowl on a shelf. It’s the kind of display that makes people walk into your space and immediately ask who made those. 🩷
What yarn is best for this strawberry amigurumi?
This pattern is specifically designed for chenille or velvet-style yarn in the Bulky (5) weight category. The plush texture is what gives the finished berry its deep, velvety look — standard acrylic yarn will work structurally but won’t achieve the same rich visual effect.
How long does it take to crochet this strawberry amigurumi?
Most crocheters finish this strawberry amigurumi in 2–3 hours, including both the berry and the stem-and-leaf piece. The seed bead finishing adds an extra 20–30 minutes depending on how many beads you sew on.
Can beginners make this strawberry amigurumi pattern?
This pattern is rated Beginner–Intermediate. If you’re comfortable working single crochet in continuous rounds and using a stitch marker, you can absolutely make this. The leaf round in the stem uses double crochet and treble crochet, which beginners can learn quickly with a short warm-up swatch.