The Sweetest Little Doll Amigurumi You’ll Ever Make
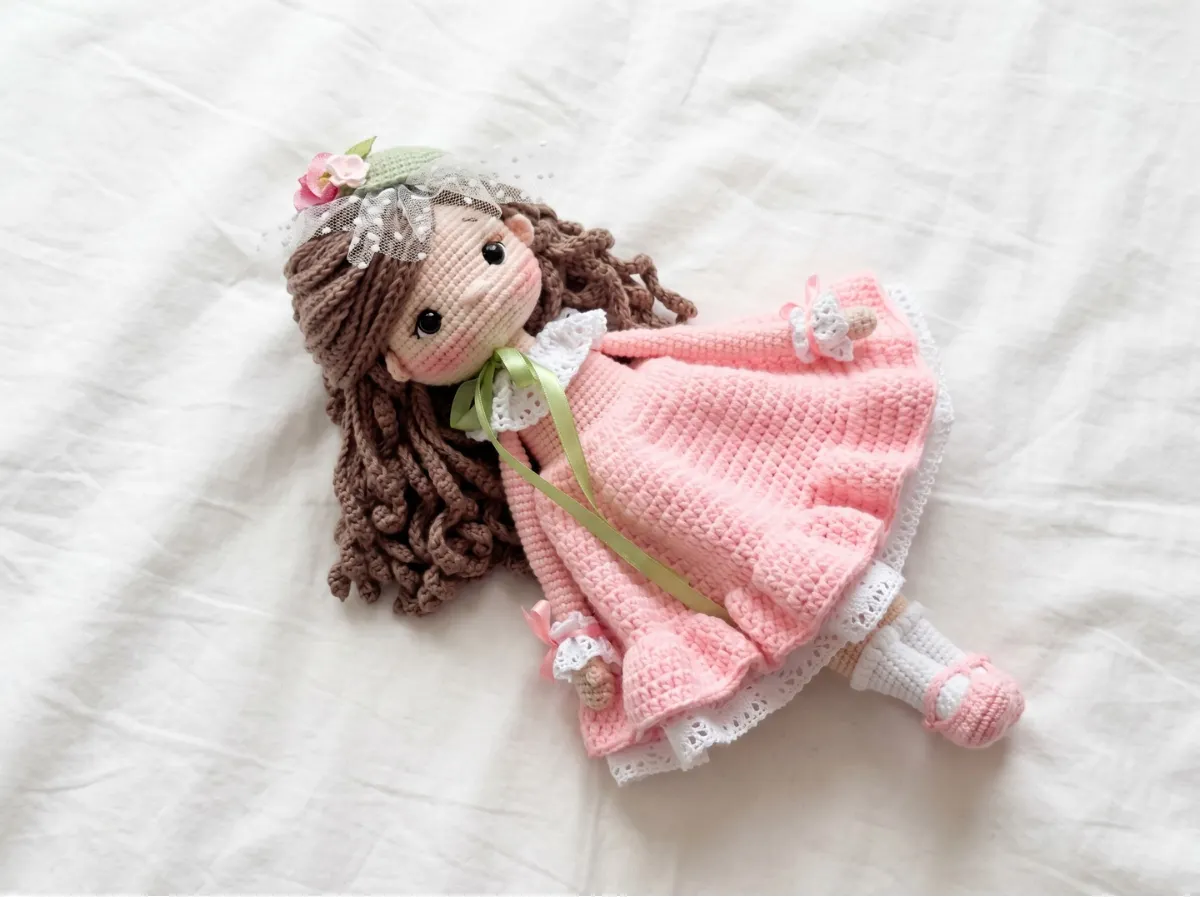
This doll amigurumi free pattern creates the most darling little Jane you’ve ever seen — soft blush pink dress, a dainty green hat trimmed with tiny flowers, and the most expressive embroidered face with rosy tinted cheeks. She stands 11.4 in tall, which means she’s substantial enough to really admire every detail but still that perfect cozy size you want to hold in both hands. Every little thing about her — the lace cuffs, the curly cocoa hair, the glossy 8mm safety eyes — just makes you want to start crocheting immediately.
🩷 Pattern Highlights
- Cuteness Rating: 🩷🩷🩷🩷🩷
- Finished Size: 11.4 in (29 cm)
- Difficulty: Intermediate
- Hook Size: 1.75mm (no direct US letter equivalent) for body; 2.5mm (approx. US C/2) for hair
- Yarn Palette: warm beige, soft blush pink, crisp white, sage/light green, rich cocoa brown
- Key Detail: embroidered face with rosy tinted cheeks, lace cuffs and collar, curly cocoa wig, flower-trimmed hat
- Estimated Time: 15–20 hours
Materials for Your Doll Amigurumi Free Pattern
Part of what makes Jane so special is how much care goes into choosing her palette. The warm beige of her skin, the delicate blush of her dress, that sage green hat — it all works together like a pastel storybook illustration come to life.
- Worsted weight yarn (CYCA 4) — Alize Cotton Gold or similar (e.g. Lion Brand 24/7 Cotton), 100g/330 yds per skein:
- Warm beige (color 401) — for the head, ears, arms, and body skin
- Crisp white (color 55) — for the panties and little socks
- Soft sage green (color 103) — for the hat
- DK / Light Worsted weight yarn (CYCA 3) — YarnArt Jeans or similar (e.g. Drops Muskat, Paintbox Cotton DK), 50g/160 yds per skein:
- Soft blush pink — for the dress, skirt, ruffle, and shoes
- Fine / Sport weight yarn (CYCA 2) — similar to YarnArt Baby Cotton, 50g/165 yds per skein:
- Warm cocoa brown — for the curly wig (first hair option)
- Alternative hair option: DK / Light Worsted boucle yarn (e.g. similar to Drops Alpaca Boucle), 50g/140 yds — warm brown, for a textured wig look
- Hook sizes: 1.75mm (main hook for body and parts); 2.5mm (approx. US C/2) for hair
- 8mm black safety eyes × 2 — that glossy black finish is everything for a doll’s expression
- Polyester fiberfill stuffing (e.g. Poly-Fil by Fairfield, available at Joann, Michaels, or Hobby Lobby)
- Tapestry / yarn needle and scissors
- Stitch markers
- Sewing pins (for placement before stitching)
- Floral wire, 1.6mm diameter, 9.8 in (25 cm) long — for neck reinforcement
- Adhesive plaster or medical tape — to insulate wire ends
- Black, white, and light brown embroidery thread — for facial features
- Dry pastel or blush powder — pink and brown shades for tinting cheeks and eyelids
- Cotton lace trim, 0.8 in (2 cm) wide × 49.2 in (1.25 m) long — for skirt, cuffs, and collar
- Satin ribbons, 0.2 in (6 mm) wide — for hair and hat ties
- A small piece of tulle, 2.2 in (5.5 cm) wide × 15.7 in (40 cm) long — for hat decoration
- Miniature artificial flowers and leaves for hat (optional but highly recommended — they make it irresistible)
- Two small decorative buttons, 6mm — for the shoes
- Clear craft glue (e.g. “Moment Crystal” or any strong clear adhesive)
Abbreviations Used in This Doll Amigurumi Pattern
| Abbreviation | Meaning |
|---|---|
| mr | magic ring |
| ch | chain |
| sc | single crochet |
| hdc | half double crochet |
| dc | double crochet |
| inc | increase (2 sc in same stitch) |
| dec | invisible decrease (through front loops only) |
| sl st | slip stitch |
| BLO | back loop only |
| FLO | front loop only |
| hdc-inc | half double crochet increase (2 hdc in same stitch) |
| dc-inc | double crochet increase (2 dc in same stitch) |
| FO | fasten off |
Before You Begin — Making Jane Extra Special
Jane is an intermediate project, and what separates a lovely Jane from a truly magical Jane is all in the finishing details. Here are a few things to keep in mind before your first stitch.
Tip 1: Continuous rounds are your best friend here. This entire pattern is worked in continuous rounds — no slip stitch joins except where specifically noted. Keep a stitch marker in place at all times, especially through the long leg and body section. A lost marker means a lost round count, and with 91 rows in the legs and body, you really don’t want that. If you’re new to working in rounds, our guide to continuous vs. joined rounds explains exactly how this works.
Tip 2: The face is where the magic lives. Jane’s expression is entirely embroidered — her nose, eyebrows, eyelashes, and that beautiful upper eyelid line. This takes patience and feels a little intimidating, but it’s also the most rewarding part. Work in good lighting. Do the pastel tinting (blush on cheeks, brown on the eyelid area) after all thread embroidery is complete and before the wig goes on.
🩷 Chloe’s Detail Tip: Before you press those 8mm safety eye washers in, hold the head under a bright lamp and look at it directly from the front. The eye holes in row 20 guide your placement, but take an extra moment to check that both eyes feel balanced and alive. Once those washers click in, they’re in for good — so take your time. A perfectly centered gaze is the difference between “cute” and “I can’t put her down.”
Tip 3: Wire reinforcement matters. The neck wire isn’t optional — it’s what lets Jane hold her head upright gracefully instead of drooping. Prepare your 9.8 in (25 cm) piece of 1.6mm floral wire by folding it in half before inserting it after row 86 of the body, as directed. Wrap the exposed ends in adhesive plaster before finishing the neck. It makes the whole doll feel beautifully posable.
If this is your first time working with safety eyes, our safety eyes tutorial walks you through exactly how to position and secure them for a perfectly symmetrical look.
Pattern Instructions
Head (×1) — Warm Beige
Start with a magic ring. The head is worked in continuous rounds in warm beige yarn.
Row 1: 6 sc in mr (6)
Row 2: inc in each st (12)
Row 3: (1 sc, inc)*6 (18)
Row 4: 1 sc, inc, (2 sc, inc)*5, 1 sc (24)
Row 5: (3 sc, inc)*6 (30)
Row 6: 2 sc, inc, (4 sc, inc)*5, 2 sc (36)
Row 7: (5 sc, inc)*6 (42)
Row 8: 3 sc, inc, (6 sc, inc)*5, 3 sc (48)
Row 9: (7 sc, inc)*6 (54)
Row 10: 4 sc, inc, (8 sc, inc)*5, 4 sc (60)
Row 11: (19 sc, inc)*3 (63)
Rows 12–19: 63 sc (8 rows) (63)
This is where you’ll pause to make the eye holes. Stuff the head firmly as you go — don’t wait until the end.
Row 20: 25 sc, ch 1, skip 1 st of the previous row, 11 sc, ch 1, skip 1 st of the previous row, 25 sc (63)
Insert the 8mm safety eyes into the ch-1 spaces before continuing. This is the moment — take your time with placement.
Row 21: 21 sc, (inc, 1 sc)*4, 5 sc, (1 sc, inc)*4, 21 sc (71)
Rows 22–24: 71 sc (3 rows) (71)
Row 25: 21 sc, (dec, 1 sc)*4, 5 sc, (1 sc, dec)*4, 21 sc (63)
Row 26: (19 sc, dec)*3 (60)
Row 27: 4 sc, dec, (8 sc, dec)*5, 4 sc (54)
Row 28: (7 sc, dec)*6 (48)
Row 29: 2 sc, dec, (4 sc, dec)*7, 2 sc (40)
Row 30: (3 sc, dec)*8 (32)
Row 31: 1 sc, dec, (2 sc, dec)*7, 1 sc (24)
Row 32: (1 sc, dec)*8 (16)
Row 33: BLO 16 sc (16)
FO, cut yarn, and hide the tail inside the piece.
🩷 Chloe’s Detail Tip: The bump created by rows 21–25 forms the cheek and brow structure — this is what gives Jane her sweet, rounded face. Keep your tension consistent here and it’ll shape beautifully.
Ears (×2) — Warm Beige
Row 1: in mr: 1 sc, 4 hdc, 1 sc (6)
Don’t pull the magic ring closed completely — leave it slightly open so the ear forms a pretty semicircle shape. FO, leaving a long tail for sewing.
First Arm (×1) — Warm Beige, then Blush Pink
Row 1: 6 sc in mr (6)
Row 2: inc in each st (12)
Row 3: 12 sc (12)
Row 4: (inc, 5 sc)*2 (14)
Row 5: finger (from one stitch crochet 3 dc, leaving the last loop of each on the hook — 4 loops on hook total — then crochet all loops together with the working loop), 13 sc (14)
Row 6: 14 sc (14)
Row 7: (dec, 5 sc)*2 (12)
Row 8: (dec, 4 sc)*2 (10)
After row 8, change to blush pink yarn. Cut the beige yarn.
Rows 9–13: 10 sc (5 rows) (10)
Row 14: 3 sc, inc, 6 sc (11) — increase should be on the inside of the arm, approximately in the middle
Rows 15–19: 11 sc (5 rows) (11)
Row 20: 5 sc, inc, 5 sc (12) — increase on the inside of the arm, above the previous increase
Rows 21–37: 12 sc (17 rows) (12)
Row 38: Crochet 1–2 additional sc as needed so the finger sits on the side when you fold the piece in half. Fold edges together, crochet 6 sc through both layers. (6)
Lightly stuff as you go — keep the palm flat. FO, hide tail inside.
Second Arm (×1) — Warm Beige, then Blush Pink
Row 1: 6 sc in mr (6)
Row 2: inc in each st (12)
Row 3: 12 sc (12)
Row 4: (inc, 5 sc)*2 (14)
Row 5: 7 sc, finger (same technique as first arm), 6 sc (14)
Row 6: 14 sc (14)
Row 7: (dec, 5 sc)*2 (12)
Row 8: (dec, 4 sc)*2 (10)
After row 8, change to blush pink yarn. Cut the beige yarn.
Rows 9–13: 10 sc (5 rows) (10)
Row 14: 3 sc, inc, 6 sc (11)
Rows 15–19: 11 sc (5 rows) (11)
Row 20: 5 sc, inc, 5 sc (12)
Rows 21–37: 12 sc (17 rows) (12)
Row 38: Crochet 1–2 additional sc as needed so the finger sits on the side when folded in half. Fold edges together, crochet 6 sc. (6)
FO, hide tail inside.
Legs + Body (×1) — White, Beige, then Pink
This is the big section — it forms both legs, connects them, builds the full body, and even joins the arms. Keep your stitch marker tracking carefully throughout. Start each leg with a chain of 8.
Begin with white yarn. Chain 8.
Row 1: Starting from the 2nd ch from hook: 6 sc, 3 sc in the last ch. Continue along the other side of the chain: 5 sc, inc (16)
Row 2: 16 sc (16)
Row 3: (inc, 7 sc)*2 (18)
Row 4: 2 sc, dec, 1 sc, dec, 5 sc, inc, 1 sc, inc, 3 sc (18)
Row 5: 18 sc (18)
Row 6: 10 sc, dec, 1 sc, dec, 3 sc (16)
Rows 7–8: 16 sc (2 rows) (16)
After row 8, fold in half and mark the central 4 stitches — the heel sits here. Mark the outermost of the four stitches with your stitch marker, then unravel the extra stitches.
Row 9: ch 1, without turning: 4 sc (4)
Rows 10–11: ch 1, turn, 4 sc (2 rows) (4)
After row 11, turn again, reposition marker, and continue crocheting in rounds.
Row 12: 4 sc, then 3 sc along the side, 1 sc in the corner space, 12 sc, 1 sc in the corner space, 3 sc along the side (24)
Row 13: 5 sc, 2 dec, 10 sc, 2 dec, 1 sc (20)
Row 14: 4 sc, 2 dec, 8 sc, 2 dec (16)
Row 15: 4 sc, dec, 8 sc, dec (14)
Rows 16–18: 14 sc (3 rows) (14)
Row 19: 1 sc, inc, 3 sc, inc, 8 sc (16)
Row 20: 16 sc (16)
Row 21: inc, 15 sc (17)
Before row 22, change to beige yarn. Leave white yarn outside (in front of the work) — you’ll use it again for the sock trim.
Row 22: BLO inc, 16 sc (18)
Row 23: 18 sc (18)
Row 24: inc, 17 sc (19)
Row 25: 19 sc (19)
Row 26: inc, 18 sc (20)
Rows 27–33: 20 sc (7 rows) (20)
Row 34: inc, 19 sc (21)
Rows 35–41: 21 sc (7 rows) (21)
Row 42: inc, 20 sc (22)
Rows 43–52: 22 sc (10 rows) (22)
After row 52, FO the first leg. With the white yarn left outside, make the sock trim FLO: ch 3, 17 dc, sl st. Crochet the second leg the same way as the first, following rows 1–52, then do NOT cut the yarn — continue directly to row 53.
Row 53: Fold edges of second leg together and crochet 11 sc. Chain 3. Fold edges of first leg together and crochet 11 sc. (This connects the two legs.)
Before row 54, change to white yarn. Cut the beige yarn.
Row 54: FLO along the first leg (inc, 10 sc), along the ch (1 sc, inc, 1 sc), FLO along the second leg (10 sc, inc). Then along the other side: FLO along second leg (12 sc), along ch (inc, 1 sc), FLO along first leg 11 sc (54)
Rows 55–63: 54 sc (9 rows) (54)
Row 64: (25 sc, dec)*2 (52)
Rows 65–66: 52 sc (2 rows) (52)
Row 67: (24 sc, dec)*2 (50)
Row 68: 50 sc (50)
Row 69: (23 sc, dec)*2 (48)
Row 70: 48 sc (48)
Row 71: 5 sc, dec, (10 sc, dec)*3, 5 sc (44)
Row 72: 44 sc (44)
Before row 73, change to blush pink yarn. Cut the white yarn.
Row 73: BLO (9 sc, dec)*4 (40)
Rows 74–81: 40 sc (8 rows) (40)
Before row 82, move your stitch marker to the exact middle back of the body, crocheting any additional sc needed to align it.
Row 82: 7 sc, then crochet 6 sc simultaneously through loops of the arm AND body, 14 sc, crochet 6 sc simultaneously through loops of the other arm AND body, 7 sc (40)
Row 83: 5 sc, dec, 6 sc, dec, 10 sc, dec, 6 sc, dec, 5 sc (36)
Row 84: 2 sc, dec, (4 sc, dec)*5, 2 sc (30)
Before row 85, change to beige yarn. Cut the pink yarn.
Row 85: BLO 30 sl st (30)
Row 86: BLO (3 sc, dec)*6 (24)
After row 86, fold your prepared floral wire in half and insert it into the body so it runs through the entire body, up through the neck, and out the top.
Row 87: (1 sc, dec)*8 (16)
Rows 88–91: 16 sc (4 rows) (16)
FO, leaving a long tail for sewing. Trim the wire as needed, leaving 1.4–1.6 in (3.5–4 cm) exposed. Wrap exposed wire ends in adhesive plaster.
🩷 Chloe’s Detail Tip: Stuff the legs firmly up to the middle, then stuff more lightly above that — the top 5 or so rows of each leg don’t need stuffing at all. The body itself gets firm stuffing throughout. This gives Jane a beautiful, natural posture and those lovely soft upper thighs.
Skirt (×1) — Blush Pink, then White
Attach blush pink yarn to row 72 of the body (the row worked just before the BLO row). The skirt is worked outward from the body.
Row 1: FLO (1 hdc, hdc-inc)*22 (66)
Rows 2–3: 66 hdc (2 rows) (66)
Row 4: (2 hdc, hdc-inc)*22 (88)
Rows 5–6: 88 hdc (2 rows) (88)
Row 7: (3 hdc, hdc-inc)*22 (110)
Rows 8–15: 110 hdc (8 rows) (110)
Begin each row (rows 1–15) with ch 1 and end with sl st. Before row 16, change to white yarn. Leave pink yarn outside — it will become the ruffle.
Row 16: BLO (4 dc, dc-inc)*22 (132)
Row 17: (5 dc, dc-inc)*22 (154)
Row 18: (6 dc, dc-inc)*22 (176)
Rows 16–18 begin with ch 3 and end with sl st.
FO, cut yarn, hide tail.
Skirt Ruffle (×1) — Blush Pink
With the blush pink yarn left at the outside of the skirt, crochet the ruffle into the front loops of the row left behind when working the white section.
Row 1: FLO hdc-inc in each st (220)
Rows 2–5: 220 hdc (4 rows) (220)
Begin each row with ch 1 and end with sl st.
FO, cut yarn, hide tail. Look at that skirt. I can’t even.
Hair — Curly Wig (×1) — Warm Cocoa Brown
Use the 2.5mm hook for the wig. Keep tension loose throughout.
Row 1: 6 sc in mr (6)
Row 2: BLO 6 inc (12)
Row 3: (1 sc, inc)*6 (18)
Row 4: BLO 1 sc, inc, (2 sc, inc)*5, 1 sc (24)
Row 5: (3 sc, inc)*6 (30)
Row 6: BLO 2 sc, inc, (4 sc, inc)*5, 2 sc (36)
Row 7: (5 sc, inc)*6 (42)
Row 8: BLO 3 sc, inc, (6 sc, inc)*5, 3 sc (48)
Row 9: (7 sc, inc)*6 (54)
After row 9, finish with a sl st. Without cutting yarn, begin the first row of curls.
Row 10 (first curl row): *ch 50, starting from the 2nd ch from hook crochet 49 sc along the chain, make 1 sl st into the next st of the round, 1 sl st into the following st. Repeat from * to end of round. (27 curls)
For rows 11–14, move to the next row using 2 sl st each time. All curl rows are worked FLO of the base.
Rows 11–14: *ch 50, 49 sc along the chain, 2 sl st. Repeat from * to end of round.
You’ll end up with 5 rows of curls: 27, 21, 15, 9, and 3 curls respectively. FO, bring yarn to the wrong side, cut and hide the tail.
Hat (×1) — Soft Sage Green
Row 1: 8 sc in mr (8)
Row 2: inc in each st (16)
Row 3: (1 sc, inc)*8 (24)
Row 4: (3 sc, inc)*6 (30)
Row 5: 2 sc, inc, (4 sc, inc)*5, 2 sc (36)
Row 6: (5 sc, inc)*6 (42)
Row 7: (5 sc, inc)*7 (49)
Row 8: 3 sc, inc, (6 sc, inc)*6, 3 sc (56)
Rows 9–10: 56 sc (2 rows) (56)
Row 11: BLO 13 sc, dec, 26 sc, dec, 13 sc (54)
Row 12: (7 sc, dec)*6 (48)
Row 13: 5 sc, dec, (10 sc, dec)*3, 5 sc (44)
Row 14: (9 sc, dec)*4 (40)
Row 15: 4 sc, dec, (8 sc, dec)*3, 4 sc (36)
Row 16: 2 sc, dec, (4 sc, dec)*5, 2 sc (30)
Row 17: (3 sc, dec)*6 (24)
Row 18: 1 sc, dec, (2 sc, dec)*5, 1 sc (18)
Row 19: (1 sc, dec)*6 (12)
FO, leaving a long tail. Use it to pull the remaining hole closed, then hide inside. Fold the brim of the hat and let it sit.
Shoes (×2) — Blush Pink
The two shoes are nearly identical — the only difference is which side the strap loop falls on. Start each with a chain of 11.
Row 1: Starting from the 2nd ch from hook: 9 sc, 3 sc in the last ch. Continue along the other side: 8 sc, inc (22)
Row 2: inc, 8 sc, 3 inc, 8 sc, 2 inc (28)
Row 3: 1 sc, inc, 8 sc, (1 sc, inc)*3, 8 sc, (1 sc, inc)*2 (34)
Row 4: BLO 34 sc (34)
Row 5: 34 sc (34)
After row 5, align the stitch marker to the exact middle back.
Row 6: 8 sc, 18 hdc, 8 sc (34)
Row 7 (First shoe): 6 sc, ch 9, starting from the 2nd ch from hook crochet 8 sl st along the chain, 1 sl st into the same st from which the chain was started, 3 sc, 8 dec, 9 sc.
Row 7 (Second shoe): 9 sc, 8 dec, 3 sc, ch 9, starting from the 2nd ch from hook crochet 8 sl st along the chain, 1 sl st into the same st from which the chain was started, 6 sc.
Before finishing, try the shoe on the foot. If the strap feels snug, add 1–2 more ch before crocheting the sl st return.
FO with sl st, cut yarn, hide tail.
Assembly
- Attach head to body: Insert the exposed wire from the neck into the head through the open bottom. Pin the head to the neck and sew firmly in a circle, catching stitches from row 32 of the head so the join tucks inward neatly.
- Attach ears: Pin the ears at approximately rows 20–22 of the head — one on each side. Sew firmly in place.
- Sew on the wig: Try the wig on, aligning the center of the wig with the center of the head’s crown. Lift the curls and pin the base in a circle, then sew it down. Pin the bottom curl row from ear to ear at the back (leave 9–11 curls free at the front), and sew each curl at the level of the ear’s lower edge. The remaining curl rows can drape freely.
- Style the hair: Pull the front curls back, join together, and tie with a satin ribbon bow. Trim any uneven ends.
- Place the hat: Part the curls to separate strands in front. Place the hat on the head, pass satin ribbons behind the ears and tie loosely under the chin. Pull the front strands back and tie with another ribbon.
- Put on the shoes: Slip each blush pink shoe onto the corresponding foot.
Making It Extra Cute — The Finishing Details
Okay, this is my favorite part. This is where Jane goes from a beautiful doll to something you genuinely can’t stop looking at. Don’t rush any of this.
The Face — Embroidering the Expression
Jane’s expression is entirely hand-embroidered, and it’s the heart of this whole project.
- Eye indentations: Using a long needle with matching beige thread, mark points between rows 19–20 (for eyes) and 32–33 (for tension anchors). Pass the needle from the lower anchor point, out at one eye point, then back in and out to create gentle eye sockets. Pull carefully to create the slight inward pull that makes realistic doll eyes. Repeat for the other eye, then knot securely.
- Eye highlights: Make two or three tiny stitches with white thread just at the outer edge of each safety eye — this is what creates that gorgeous glossy, alive look.
- Upper eyelids and lashes: With black thread, embroider a soft curved line above each eye for the upper eyelid. Add two or three tiny lash strokes radiating outward. Keep them delicate.
- Nose: Between rows 21–22, embroider a small nose with horizontal stitches (about 3–4 sc wide), then carefully wrap with vertical stitches from bottom to top. Going over it twice creates a beautifully defined little nose.
- Eyebrows: Embroider soft, slightly arched brows with light brown thread. Keep them gentle — Jane has a sweet expression, not a stern one.
🩷 Chloe’s Detail Tip: The pastel tinting step is transformative. Use bright pink dry pastel on the cheeks (soft circular motions with a small brush or cotton swab), light pink just above the nose, and soft brown across the eyelid area. This is what takes a flat crocheted face and makes it warm and dimensional. Do the tinting after all thread embroidery is done, and before the wig goes on.
Dress Decorations — The Lace Details
- Skirt lace: Sew the cotton lace trim along the bottom edge of the skirt with small running stitches, overlapping the edge by 1–2 mm. Slightly stretch the final skirt row as you sew — this keeps it from puckering. Join the ends in the back with an overcast stitch.
- Cuffs: Cut a 3.9 in (10 cm) piece of lace, sew the short ends together to form a circle. Place running stitches about 1/3 in from one edge, slip over the arm, gather, and stitch down to secure. Tie a tiny satin ribbon bow over the top of each cuff. I may have squealed a little the first time I saw these finished.
- Collar: Cut a 9.8 in (25 cm) piece of lace. Sew running stitches 1–2 mm from the top edge, then try it on the doll at the neckline. Gather, pin in place, join the ends at center back, and stitch down. A small bow at center front is optional but absolutely adorable.
Hat Decoration — The Prettiest Little Green Hat
- Thread a satin ribbon through a large-eye needle and pass it entirely through the hat between rows 10 and 11 — this creates the brim definition.
- Gather your piece of tulle by sewing running stitches 2–3 mm from one edge, then stitch the gathered tulle to the inside center of the hat so it fans out only at the front half.
- Glue miniature artificial flowers to the outside. Paper cherry blossoms at about 1 in (2.5 cm) diameter surrounded by smaller 0.6 in (1.5 cm) blooms look absolutely dreamy against the sage green.
Shoe Detail
- Sew the strap on the opposite side of the shoe from the loop. Stitch a tiny 6mm decorative button beside the strap attachment — it adds the most charming little finishing touch.
For more guidance on sewing pieces together neatly, our guide to sewing amigurumi parts has all the tips you need for clean, invisible joins.
If you’re newer to the invisible decrease technique used throughout this pattern, our invisible decrease tutorial shows you exactly how to work it so your fabric stays smooth and tight with no gaps — which is especially important in beige yarn where any holes would be noticeable.
For reference on yarn weight classifications used in this pattern, the Craft Yarn Council’s yarn weight system is always a reliable resource for understanding the difference between DK, worsted, and other weights.
Chloe’s Final Look
I’ve been sitting here looking at finished Jane for way too long and I have absolutely no regrets. The way the blush on her cheeks catches the light, the tiny lace cuffs peeking out from her pink dress, those cocoa curls framing her embroidered face — she’s just everything. Try making her in different yarn colorways: imagine a lavender dress with a white hat, or a soft mint dress with cream lace. She’d look incredible lined up on a shelf with her little floral hat tipped just so. You made this. Look at her little face. 🩷
What yarn is best for this doll amigurumi?
This pattern uses Worsted weight cotton yarn for the main body for structure, and DK/Sport weight yarn for the clothing and hair to ensure the details remain delicate.
How long does it take to crochet this doll?
This is an intermediate project that typically takes between 15 to 20 hours to complete, depending on your crochet speed and experience with facial embroidery.
Can beginners make this doll pattern?
This pattern is rated Intermediate. While confident advanced beginners can attempt it, you should be comfortable with continuous rounds, wire insertion, and intricate parts assembly.