Tiger Amigurumi — Free Crochet Tiger Pattern
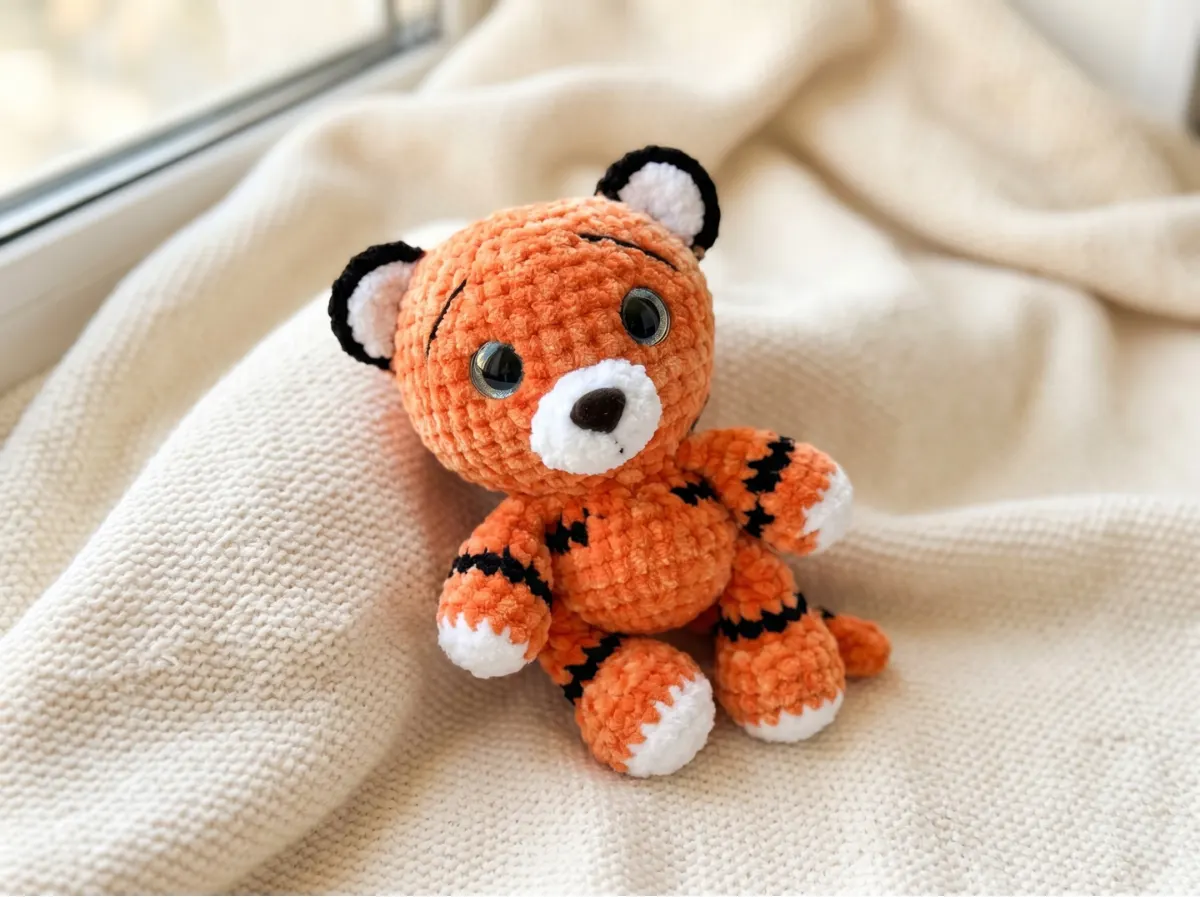
This crochet tiger pattern has been on my list for longer than I’d like to admit — and the orange velvet with its black stripe details is exactly as satisfying as I hoped it would be. The construction is what drew me in: body and head worked in one continuous piece, limbs joined directly as you go, no loose pieces flapping around waiting to be sewn. I checked every stitch count, and every round adds up. Grab your hook.
📋 Pattern Quick Stats
- Difficulty: Intermediate
- Finished Size: Approximately 5 in (13 cm)
- Hook Size: 3.0mm (between US C/2 at 2.75mm and US D/3 at 3.25mm)
- Yarn Weight: Bulky (5) — velvet/chenille
- Techniques: magic ring, invisible decrease, mid-row color changes, BLO, joined limbs, flat tube closure
- Estimated Time: 5–8 hours
Materials for This Crochet Tiger Pattern
Yarn
- Orange (main color): Himalaya Velvet or Bernat Velvet — Bulky (5), orange — less than half a skein (approximately 50–60 yds). This covers the entire body, head, and most of the limbs.
- Black (contrast): Same yarn, black — small amount (approximately 15–20 yds). Used for the stripe rows on the arms, legs, and tail, and for the mid-row striping on the body.
- White (contrast): Same yarn, white — small amount (approximately 10–15 yds). Used for the paw tips on the arms and legs, and the inner ear pieces.
- Black accent yarn for embroidery: A thin DK / Light Worsted (3) weight black yarn — such as Drops Muskat or Paintbox Simply Cotton DK — for the eyebrows and face detailing. A few yards is all you need.
Velvet yarn is listed as Bulky (5) on the Craft Yarn Council yarn weight system. It produces a beautifully dense, plush finish at this hook size, and the texture does a lot of the visual work — those black stripes read cleanly even on a small piece. The one trade-off is that velvet makes it harder to see individual stitches, so use your stitch marker on every single round without exception.
Hook
- 3.0mm — there is no standard US letter equivalent for this size. The closest options are US C/2 at 2.75mm or US D/3 at 3.25mm. I’d lean toward the 2.75mm if you don’t have a 3.0mm on hand — a tighter fabric is always better with velvet.
Other Supplies
- Polyester fiberfill — Poly-Fil works well and is widely available at Joann, Michaels, or Hobby Lobby
- Safety eyes: 16–18mm
- Safety nose: 15×12mm oval
- Tapestry needle with a large eye (velvet yarn is thick and needs room)
- Stitch marker
- Scissors
⚠️ Safety Note: The safety eyes in this pattern are large (16–18mm) with locking washers. Always press the washers completely flat before closing up any piece. If this crochet tiger is intended for a child under 3, review current toy safety standards at the U.S. Consumer Product Safety Commission before gifting.
Abbreviations Used in This Crochet Tiger Pattern
| Abbreviation | Meaning |
|---|---|
| mr | magic ring |
| sc | single crochet |
| inc | increase — 2 sc worked into the same stitch |
| dec | decrease — see Special Techniques note below for the method I use |
| ch | chain |
| BLO | back loop only — insert hook into the back loop of the stitch only |
| FO | fasten off |
| st(s) | stitch(es) |
Special Techniques for This Crochet Tiger
Magic Ring: Every single part in this pattern starts with a magic ring. If you’ve never worked one before — or if yours tends to leave a small gap in the center — our step-by-step magic ring tutorial walks through the whole process. Pull it closed firmly before you start round 1.
Invisible Decrease: Wherever this crochet tiger pattern calls for a dec, I always use the invisible decrease — insert the hook through the front loops only of the next two stitches simultaneously, yarn over, pull through both front loops, yarn over, pull through remaining two loops. It eliminates the small gap you get with a standard sc2tog, which is especially important in velvet since the texture can’t hide it the way cotton does. If you want to practice before starting, our invisible decrease tutorial has a full walkthrough.
Mid-Row Color Changes: Body row 9 is the most technically demanding row in this pattern — there are four separate color sections within a single round. I prep all three yarn colors before I start that row and let the unused strands hang at the back. When switching colors, make the change on the very last yarn-over of the previous stitch, not after completing it. Our guide to seamless color changes in amigurumi covers this in detail if you’re new to it.
BLO (Back Loop Only): The first orange row on both the arms and legs is worked in BLO. This creates a subtle fold ridge at the wrist and ankle — the little visual detail that separates the white paw from the orange limb. Work carefully through the back loop only or you’ll lose that definition entirely.
Flat Tube Closure: The arms, legs, and tail are all closed using a fold-and-join method rather than being sewn shut. After the final round, work the specified number of sc to position yourself, then fold the tube flat so the two sides align, and single crochet through both walls simultaneously for the remaining stitches. This seals the end cleanly and gives you a flat edge that integrates neatly into the body during the joining rows.
Joining Limbs Into the Body: In rows 6 and 12 of the body, you’ll attach the legs, tail, and arms directly while crocheting — no sewing required for the limbs. Have all four limbs and the tail completely finished and closed before you begin the body. For stuffing timing and technique, our guide to stuffing amigurumi properly is worth a read before you start.
If you enjoy this kind of integrated body construction, our free lion amigurumi pattern uses a similar build and is a natural companion project.
Crochet Tiger Pattern — Full Step-by-Step Instructions
💡 Order of work: Make the arms (×2), legs (×2), and tail first — all closed using the flat closure method. Then begin the body, joining those pieces in at rows 6 and 12. Continue from the body directly into the head without cutting yarn. Make the ears and muzzle last while the head is assembled.
Arms (Make 2)
Start in white yarn.
Row 1: 6 sc in mr [white] (6)
Row 2: 6 inc (12)
Row 3: 12 sc in BLO [change to orange on this row] (12)
Rows 4–5: 12 sc (12)
Row 6: 12 sc [change to black on this row] (12)
Row 7: 12 sc [change to orange on this row] (12)
Row 8: (2 sc, dec) × 3 (9)
Rows 9–10: 9 sc (9)
Work 1 sc, fold piece in half and sc through both walls for 4 sc to close.
Cut yarn and FO. Do not stuff the arms.
💡 Emma’s Tip: The BLO row (Row 3) is what gives the paw its distinct look — that subtle ridge where white meets orange. It’s easy to accidentally slip into both loops here, especially with velvet. Slow down, feel for the back loop with your hook, and take your time. It’s worth it.
Legs (Make 2)
Start in white yarn.
Row 1: 6 sc in mr [white] (6)
Row 2: 6 inc (12)
Row 3: (1 sc, inc) × 6 (18)
Row 4: 18 sc in BLO [change to orange on this row] (18)
Rows 5–6: 18 sc (18)
Row 7: 3 sc, 6 dec, 3 sc (12)
Row 8: 12 sc (12)
Row 9: 12 sc [change to black on this row] (12)
Row 10: 12 sc [change to orange on this row] (12)
Row 11: (2 sc, dec) × 3 (9)
Row 12: 9 sc (9)
Work 1 sc, fold piece in half and sc through both walls for 4 sc to close.
Cut yarn and FO. Do not stuff the legs.
💡 Emma’s Tip: Row 7 is where the foot shaping happens — the 6 consecutive decreases draw in the front of the foot and create the rounded toe shape. Work them evenly and count as you go. If your count after row 7 isn’t exactly 12, frog back and redo it before moving on.
Tail (Make 1)
Start in orange yarn.
Row 1: 8 sc in mr [orange] (8)
Rows 2–4: 8 sc (8)
Row 5: 8 sc [change to black on this row] (8)
Rows 6–8: 8 sc [change to orange on this row] (8)
Row 9: 8 sc [change to black on this row] (8)
Rows 10–12: 8 sc [change to orange on this row] (8)
Row 13: 8 sc [change to black on this row] (8)
Rows 14–16: 8 sc [change to orange on this row] (8)
Work 3 sc, fold piece in half and sc through both walls for 3 sc to close.
Cut yarn and FO. Do not stuff the tail.
💡 Emma’s Tip: Three black stripes alternating with orange — it’s a quick piece but a satisfying one. I pre-wind all three yarn colors and clip them to the outside of the tube before I start. Stopping to re-cut yarn between stripe changes is where mistakes creep in. Have everything ready.
Body
Start in orange yarn. Have both legs and the tail finished and set aside before you begin row 6.
Row 1: 6 sc in mr (6)
Row 2: 6 inc (12)
Row 3: (1 sc, inc) × 6 (18)
Row 4: (2 sc, inc) × 6 (24)
Row 5: (3 sc, inc) × 6 (30)
Row 6: 4 sc together with left leg, 11 sc, 4 sc together with right leg, 4 sc, 3 sc together with tail, 4 sc (30)
Rows 7–8: 30 sc (30)
Row 9: 3 sc, dec, 2 sc [black], 1 sc, dec, 2 sc [orange], 1 sc, dec, 3 sc, dec [black], (3 sc, dec) × 2 [orange] (24)
Row 10: (2 sc, dec) × 6 (18)
Row 11: 18 sc (18)
Row 12: 1 sc, 4 sc together with left arm, 4 sc, 4 sc together with right arm, 5 sc (18)
⚠️ Row 6 — Joining the Legs and Tail: Position one leg on each side of the body opening before you start this row. To join, insert your hook through the current body stitch and through the corresponding edge of the folded leg simultaneously, then work the sc through both at once. Four sc attaches each leg. Then join the tail at the back of the body using 3 sc the same way. The total stitch count stays at 30 — you are attaching pieces, not adding new stitches.
⚠️ Row 9 — The Color Change Row: This is the most complex row in the entire crochet tiger pattern. Four color sections in a single round, with the black sections creating the stripe definition across the lower body and waist. Count carefully as you go — the round should total exactly 24 stitches. If your count is off at the end, don’t try to fix it by adding or skipping stitches. Frog back to row 8 and work it again. This is one of those rows that’s worth the extra time to get right.
⚠️ Row 12 — Joining the Arms: Same technique as row 6. Hold one arm flat against each side of the body at approximately the shoulder position, and join with 4 sc through both layers. The arms end up pointing outward and slightly downward — that’s exactly how they should sit.
Head (Continued Directly From Body — Do Not Cut Yarn)
After completing row 12 of the body, do not fasten off. Continue crocheting directly into the head in orange yarn. The body and head are one continuous piece.
Row 13: 18 inc (36)
Row 14: (5 sc, inc) × 6 (42)
Rows 15–21: 42 sc (7 rows) (42)
Row 22: (5 sc, dec) × 6 (36)
Row 23: 36 sc (36)
Row 24: (4 sc, dec) × 6 (30)
Row 25: 30 sc (30)
Row 26: (3 sc, dec) × 6 (24)
Row 27: (2 sc, dec) × 6 (18)
Row 28: 9 dec (9)
Row 29: (1 sc, dec) × 3 (6)
💡 Stuffing the Body — Timing Matters: After you complete row 13 (the first increase row of the head), stuff the body firmly through the opening before it gets any narrower. Row 13 brings you to 36 stitches — wide enough to get your hand in, narrow enough that you’re not adding many more rows before access becomes difficult. This is your window. For technique and tips on getting an even fill without lumps, our guide to stuffing amigurumi is worth a quick read before you start this section.
💡 Safety Eyes — Insert Before Row 22: Position the safety eyes between rows 19 and 20, with 7–8 stitches of spacing between the posts. Do this before you pass the widest point of the head and start your decrease rows — once you’re past row 21, the opening closes quickly and access becomes awkward. Lock the washers completely flat on the inside before continuing. If you’d like more guidance on placement and locking technique, our safety eyes tutorial covers it step by step.
💡 Stuffing the Head: Add stuffing in small handfuls as you work through rows 22–29. I add a little every two or three decrease rounds rather than waiting until the very end — it gives you much better control over the final shape. Close the remaining 6 stitches by weaving your yarn through the front loops and pulling tight, then weave the tail end inside the head.
Fasten off, cut yarn, and weave the end inside.
Ears (Make 4 Flat Pieces — 2 in Orange, 2 in White)
The ears are worked flat, not in rounds. You will make 4 identical pieces: 2 in orange and 2 in white. Each ear uses one orange piece and one white piece layered together.
Row 1: 6 sc in mr, ch, turn (6)
Row 2: (1 sc, inc) × 3, ch, turn (9)
Fasten off, cut yarn.
💡 Emma’s Tip: The chain and turn at the end of each row keeps these flat rather than curving into a tube. Don’t skip the chain — it acts as your turning chain and keeps the edge neat. You’ll end up with four small triangular pieces that pair together (one orange + one white each) to form the finished ear with a white inner face.
Muzzle (Make 1)
White yarn.
Row 1: 6 sc in mr (6)
Row 2: [3 sc in next st] × 2, 1 sc, [3 sc in next st] × 2, 1 sc (14)
Fasten off, cut yarn. Leave a long tail for sewing.
Assembly
- Limbs (already attached): The legs, tail, and arms were joined directly into the body during crocheting — rows 6 and 12 respectively. No additional sewing is needed for any of the limbs.
- Safety nose: If you’re using a safety nose, insert it into the center of the muzzle piece and lock the washer on the back before you sew the muzzle to the face. It’s much easier to secure it now than after the muzzle is already attached.
- Muzzle: Pin the muzzle to the lower front of the head, centered horizontally. The upper edge should sit at approximately row 21–22 of the head. Sew it on securely through both layers using the long yarn tail and your tapestry needle.
- Ears: Layer one orange piece and one white piece together with the white side facing inward. Sew each ear as a unit through both layers using a semicircular sewing line. Position the finished ears centered between rows 22 and 27 of the head, spaced symmetrically on either side of the top seam. Pin them in place and step back before committing to the first stitch — ear placement is one of those details that makes or breaks the finished look.
💡 Emma’s Tip: With velvet yarn, repositioning a sewn ear after the fact is difficult — the yarn leaves marks. Pin everything first. I use at least three pins per ear and hold the whole thing up at arm’s length before I sew a single stitch. It takes an extra two minutes and saves a lot of heartache.
Finishing Details for Your Crochet Tiger
Eyebrows
Thread a tapestry needle with a short length of thin black DK yarn. Embroider two short diagonal brow marks above and slightly inside each eye — angled inward toward the center gives this tiger that focused, alert expression. Keep each brow to 2–3 firm stitches. The thinner DK yarn is what makes this work — trying to embroider with the bulky velvet would just result in a lumpy mess.
Final Shaping
Once everything is assembled, give the body and head a gentle but firm squeeze to redistribute the stuffing evenly. Check that no white fiberfill is visible through the velvet fabric anywhere — particularly around the arm join points and the base of the neck. If any area looks thin, you can ease a small amount of additional stuffing in through the ear attachment points using a narrow blunt tool before you sew the ears fully closed.
If you loved making this crochet tiger, our free crochet cat amigurumi pattern uses similar construction principles and looks wonderful sitting next to this one on a shelf.
I’ve made this little tiger a few times now, and row 9 of the body still makes me slow down every single time — that instinct is correct, follow it. Once you’re past that row, the rest of the pattern moves quickly and the finished piece is so satisfying. Take your time with the ear placement, pin before you sew, and don’t rush the stuffing. Every detail in this one is worth the extra minute. Happy hooking! 🧶
What yarn is best for this crochet tiger amigurumi?
Bulky (5) velvet or chenille yarn is highly recommended for a plush, dense finish. The pattern specifically uses orange, black, and white velvet yarn.
Can beginners make this crochet tiger pattern?
This pattern is rated as intermediate due to mid-row color changes and integrated limb joining techniques. However, an adventurous beginner can tackle it by following the detailed step-by-step instructions.
How long does it take to crochet this tiger?
It generally takes between 5 to 8 hours to complete, depending on your crochet speed and familiarity with velvet yarn.