Free Skunk Crochet Amigurumi Pattern — Poseable Velvet Plush
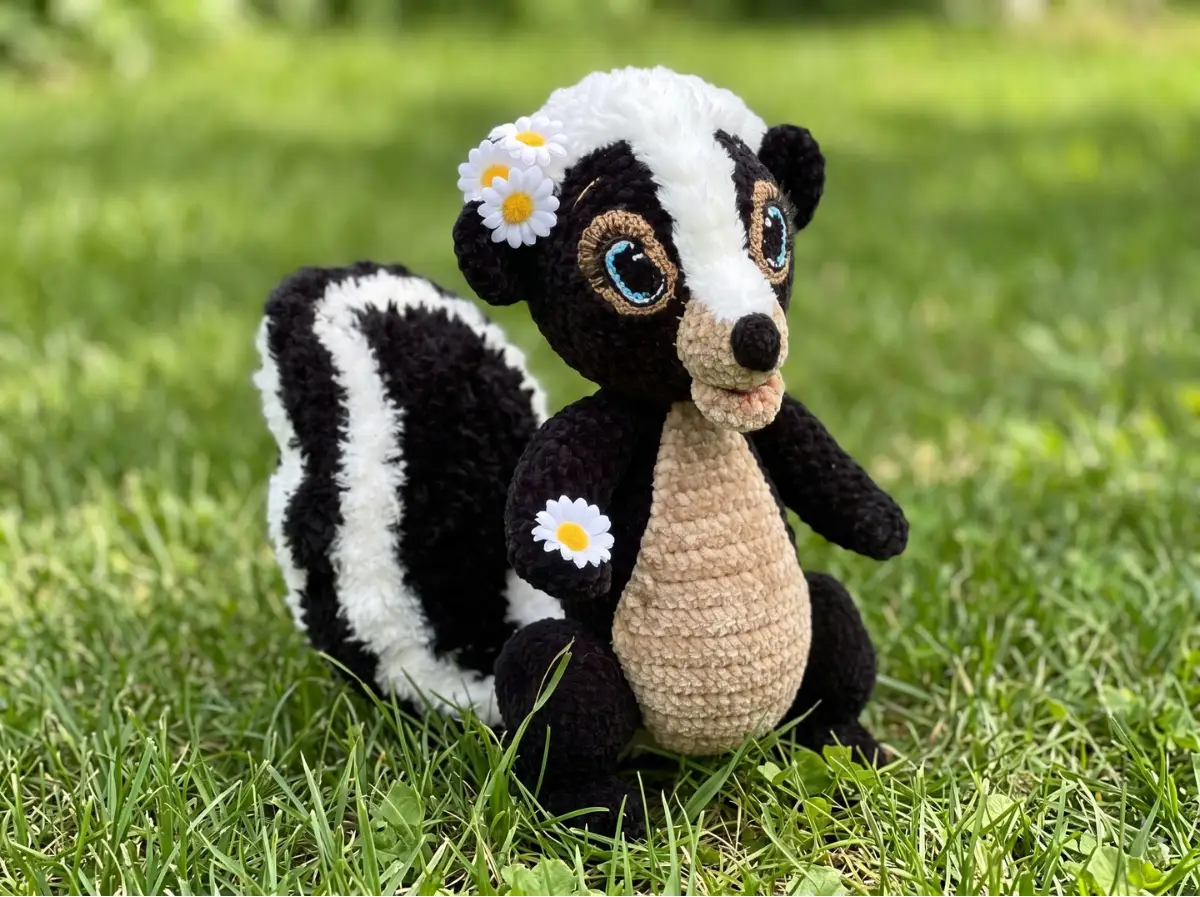
This free skunk crochet pattern builds Skunnie — a 12-inch poseable plush worked in velvet chenille with fluffy layered overlays that nail that classic black-and-cream coloring. Two specialty yarn types carry the whole project, a bit of wire makes the arms and tail genuinely bendable, and those detailed crocheted eyes take her from cute to genuinely impressive. This is a weekend-sized commitment. Worth every hour of it.
🧶 What You’ll Need for This Skunk Crochet Pattern
- 💰 Yarn Needed: ~575 yards total — black velvet/chenille ~242 yds, beige velvet/chenille ~93 yds, black fluffy/fur ~98 yds, cream fluffy/fur ~82 yds, black DK ~44 yds, fingering scraps ~15 yds total across 4 colors
- 🎨 Colors: black, beige/cream (velvet); black, cream (fluffy); plus small amounts of black, light blue, white, beige fingering for crocheted eyes
- 🪝 Hook: 2.5mm for main body; 1.0mm steel hook for eyes
- ⏱️ Time: 10–15 hours
- 📏 Finished Size: ~12.2 in (31 cm) tall
- 💡 Difficulty: Intermediate–Advanced
- 🎁 Great For: display pieces, impressive gifts, craft fair standouts, character collections
Materials for This Skunk Crochet Pattern
This skunk crochet project uses two types of specialty yarn working together — a velvet chenille for the body structure, and a fluffy fur-style yarn for the layered overlays. The combination is what gives Skunnie her texture and character. Here’s exactly what you need:
- Black velvet/chenille yarn (Bulky 5 weight) — approximately 242 yards. US alternatives: Bernat Velvet, Premier Parfait. This is the main structural yarn for the body, head, arms, legs, ears, and tail base.
- Beige velvet/chenille yarn (Bulky 5 weight) — approximately 93 yards. Same yarn family as above in beige/tan. Used for the muzzle section of the head and the belly overlay.
- Black fluffy/fur yarn (Bulky 5 weight) — approximately 98 yards. Look for a faux fur or bouclé-style novelty yarn in this weight. Used for the tail and back overlay.
- Cream fluffy/fur yarn (Bulky 5 weight) — approximately 82 yards. Same novelty yarn family in cream/off-white. Used for the head overlay and tail border — this is what creates the signature white stripe.
- Black DK/Light Worsted yarn (Weight 3) — approximately 10g (around 44 yards). Used only for the nose. A small leftover ball works perfectly here.
- Fingering/lace microfiber yarn (Weight 0–1) — small amounts in black, light blue, white, and beige. These are the crocheted eye colors. Each requires only a few yards — check your scrap bin before buying anything new.
- Hook: 2.5mm for all main parts; 1.0mm steel hook for the fingering-weight eyes
- Polyester fiberfill stuffing — enough for the head, body, arms, and legs
- Wire armature: 1.2mm diameter wire for arms; 1.6mm diameter wire for legs and tail. Available at craft stores, usually sold as floral or jewelry wire. Inexpensive — a small roll covers this entire project.
- Stick-on or false eyelashes — attached to the finished crocheted eyes
- Tapestry needle and matching sewing thread for assembling pieces
- Stitch markers — non-negotiable for velvet yarn (more on that in the tips)
- Stiff cardboard or thin plastic — cut to shape for inner foot insoles
The velvet chenille and fluffy novelty yarns both fall under Bulky (5) weight — the thick, squishy category that works up fast and gives every stitch real presence. The two textures together are what make this skunk crochet design stand out.
🧶 Scrap Check: The fingering-weight eye colors need only 3–5 yards each. If you’ve crocheted anything with fine mercerized cotton or microfiber recently, those tiny leftover bits are more than enough. Same goes for the DK black yarn for the nose — 10 grams is almost nothing. Check your scrap basket before buying a new skein of either.
Abbreviations for This Skunk Crochet Pattern
| Abbreviation | Meaning |
|---|---|
| mr | magic ring (adjustable loop start — used only for the nose in this pattern) |
| ch | chain; at the start of flat/turning rows, ch = chain 1 to turn |
| sl st | slip stitch |
| sc | single crochet |
| hdc | half double crochet |
| dc | double crochet |
| tr | treble crochet |
| dtr | double treble crochet |
| inc | increase — work 2 sc in the same stitch |
| dec | invisible decrease — insert hook through front loops only of next 2 stitches simultaneously, yarn over, pull through, yarn over, pull through 2 loops. See Smart Crafter Tips below. |
| hdc-inc | half double crochet increase — work 2 hdc in the same stitch |
| hdc-dec | half double crochet decrease — work 2 hdc together |
| dc-inc | double crochet increase — work 2 dc in the same stitch |
| dc-dec | double crochet decrease — work 2 dc together |
| tr-inc | treble crochet increase — work 2 tr in the same stitch |
| tr-dec | treble crochet decrease — work 2 tr together |
| sc-inc | single crochet increase (same as inc) — used in flat row pieces |
| sc-dec | single crochet decrease (same as dec) — used in flat row pieces |
| BLO | back loop only — work into the back loop of each stitch only |
| 2-dc cluster | 2 double crochets joined at the top (shared top loop) |
| 3 sc in 1 | work 3 single crochets into the same stitch |
| 3 tr in 1 | work 3 treble crochets into the same stitch |
| (X) | stitch count at the end of the row or round |
Smart Crafter Tips for This Skunk Crochet Pattern
Skip the magic ring for velvet yarn. This skunk crochet pattern intentionally starts most parts with a short chain (2–3 ch) worked into the second chain from the hook — not a magic ring. That’s not a typo. Velvet chenille fibers can catch and resist tightening, meaning your MR either won’t close cleanly or the yarn breaks under the tension. The chain start solves this completely. The nose (worked in DK yarn) is the one exception — that one does use a magic ring.
Decreases = front loops only. Velvet yarn is prone to gaps when you decrease the standard way. Throughout this pattern, all single crochet decreases should be worked as invisible decreases — insert your hook through the front loops only of the next two stitches before completing. The result is a tight, clean decrease with no visible hole. Our invisible decrease tutorial shows exactly how to work it if you need a refresher — it takes about 30 seconds to learn.
Use stitch markers. Non-negotiable. Velvet yarn is notoriously hard to frog — the fibers catch on the stitches, and unraveling even a few rows can distort the yarn permanently. Mark the beginning of every round without fail. If something goes wrong, it’s far easier to fix two rows than twelve.
Sew with thread, not yarn. Velvet doesn’t behave well as a sewing strand — it’s too thick and the fibers make clean joins difficult. Use a strong thread in a matching color when attaching all pieces together. Our guide on sewing amigurumi parts covers joining techniques that work well with bulkier yarns.
Wire armature is cheaper than you think. A single roll of floral or jewelry wire at any craft store covers all the armature needs for this pattern — arms, legs, and tail. It costs a few dollars and makes the finished toy genuinely interactive. Bend the arms into a natural resting position, curve the tail upward — the wire holds any shape you give it.
Need a refresher on stuffing technique before you start? Our guide on how to stuff amigurumi properly covers the head and body shaping approaches that work best for larger pieces like this one.
Free Skunk Crochet Pattern — Step by Step
This skunk crochet pattern is worked in continuous spiral rounds unless otherwise noted. Flat pieces (overlays, tail) are worked in turning rows. Read all notes within each section before starting that part.
Head (×1)
Yarn: Beige velvet for Rows 1–8, then black velvet from Row 9.
Start: 3 ch. Work into 2nd ch from hook.
Row 1: 6 sc in 2nd ch from hook (6)
Row 2: inc, 3 sc, 2 inc (9)
Row 3: 2 hdc, 3 sc, 4 hdc (9)
Row 4: 1 hdc, 1 hdc-inc, 1 sc, sc inc, 1 sc, (1 hdc, 1 hdc-inc)×2 (13)
Row 5: 3 hdc, 4 sc, 6 hdc (14)
Row 6: 2 hdc, hdc-inc, 2 sc, sc inc, 1 sc, (2 hdc, hdc-inc)×2 (17)
Row 7: hdc-inc, 3 hdc, 2 sc, sc inc, 2 sc, (hdc-inc, 3 hdc)×2 (22)
Row 8: 5 sc, 6 sl st, 10 sc, work 5 more sc (26)
📌 Note: After the final 5 sc in Row 8, place a stitch marker here — this marks the new beginning of round going forward.
Row 9: Change to black velvet: (6 sc, inc)×3 (24) [color change here]
Row 10: (3 sc, inc)×6 (30)
Row 11: 10 sl st, 20 hdc (30)
Row 12: 12 hdc-inc, 18 sc (42)
Row 13: (1 sc, inc)×12, 18 sc (54)
Row 14: (8 sc, inc)×6 (60)
Rows 15–24: 60 sc (60)
Row 25: (8 sc, dec)×6 (54)
Row 26: 54 sc (54)
📌 Note: After Row 26, stuff the head firmly with fiberfill.
Row 27: (7 sc, dec)×6 (48)
Row 28: 48 sc (48)
Row 29: (6 sc, dec)×6 (42)
Row 30: (5 sc, dec)×6 (36)
Row 31: (4 sc, dec)×6 (30)
Row 32: (3 sc, dec)×6 (24)
📌 Note: After Row 32, add more fiberfill as needed to maintain shape before continuing.
Row 33: (2 sc, dec)×6 (18)
Row 34: (1 sc, dec)×6 (12)
Row 35: 6 dec (6)
Close the opening. Fasten off, cut yarn, and weave in ends.
Eyes — First Eye (×1)
Yarn: Alize Forever or similar fingering/lace yarn in black, light blue, white, and beige.
Hook: 1.0mm steel hook.
Start: 4 ch.
Row 1: With black: in 2nd ch from hook: inc, 1 sc, 3 sc in 1st ch, along the other side 2 sc (8)
Row 2: 2 inc, 1 sc, 3 inc, 1 sc, inc (14)
Row 3: Change to light blue: (inc, 1 sc)×2, 1 sc, (inc, 1 sc); change to black: (inc, 1 sc)×2, 1 sc, inc (19)
Row 4: Change to white: (inc, 2 sc)×2, 1 sc, (2 sc, inc)×2, sl st; join beige: 4 sc, inc (24) [two color changes in this row]
Row 5: (inc, 1 sc)×3, 5 sc, (inc, 2 dc)×2, inc, 6 sc (30)
Row 6: 1 sc, hdc-inc, 7 dc-inc, 2 hdc, 2 sc, sl st (30)
Fasten off, leaving a long tail for sewing.
Eyes — Second Eye, Mirror Image (×1)
Yarn: Same as first eye.
Start: 4 ch.
Row 1: With black: in 2nd ch from hook: inc, 1 sc, 3 sc in 1 st, 2 sc (8)
Row 2: 2 inc, 1 sc, 3 inc, 1 sc, inc (14)
Row 3: Change to light blue: inc, 1 sc, inc, 2 sc, inc, 1 sc; change to black: (inc, 1 sc)×2, 1 sc, inc (19)
Row 4: With white: (inc, 2 sc)×2, 1 sc, (2 sc, inc)×2, sl st; join beige: 4 sc, inc (24)
Row 5: (inc, 1 sc)×3, 5 sc, (inc, 2 dc)×2, inc, 6 sc (30)
Row 6: 7 sl st, 3 sc, 2 hdc, 1 dc, 7 dc-inc, hdc-inc, 1 sc, sl st (30)
Fasten off, leaving a long tail for sewing. Once both eyes are complete: embroider white highlight dots on the pupils, embroider black outlines around the pupils with black yarn, then attach eyelashes.
🧶 Scrap Check: Each eye color uses 3–5 yards of fingering-weight yarn. Four colors, roughly 15 yards total. If you have any fine cotton or microfiber scraps in black, white, light blue, and beige sitting in your bin — that’s everything you need for both eyes without buying a single new skein.
Nose (×1)
Yarn: Black DK yarn.
Start: Magic ring.
Row 1: 6 sc in mr (6)
Row 2: 6 inc (12)
Rows 3–4: 12 sc (12)
Row 5: 1 sc, 2-dc cluster, 1 sc, sl st (12)
Fasten off, leaving a long tail for sewing.
Ears (×2)
Yarn: Black velvet.
Start: 3 ch. Work into 2nd ch from hook.
Row 1: 6 sc in 2nd ch from hook (6)
Row 2: 6 inc (12)
Row 3: (1 sc, inc)×6 (18)
Row 4: (2 sc, inc)×6 (24)
Rows 5–6: 24 sc (24)
Row 7: (2 sc, dec)×6 (18)
Row 8: 18 sc (18)
Row 9: Fold the ear flat and join the edges, working through both sides: 9 sc (9)
Row 10: Join edges with sl st (9)
Make the second ear identically. Fasten off, leaving a tail for sewing.
Mouth (×1)
Yarn: Beige velvet.
Start: 3 ch. Work into 2nd ch from hook.
Row 1: 6 sc in 2nd ch from hook (6)
Row 2: 6 inc (12)
Row 3: (1 sc, inc)×6 (18)
Rows 4–5: 18 sc (18)
Row 6: 3 sc, sl st (18)
Before sewing on, tint the inside of the mouth red — fabric paint or a red marker both work well.
Head Overlay (×1)
Yarn: Cream fluffy/fur yarn.
Start: 4 ch. Worked in turning rows. At the start of each row, ch = chain 1 to turn unless the row is labeled differently.
Row 1: In 2nd ch from hook: 3 sc (3)
Rows 2–5: 3 sc (3)
Row 6: 1 sc, inc, 1 sc (4)
Rows 7–16: 4 sc (4)
Row 17: 1 sc, inc, 2 sc (5)
Rows 18–22: 5 sc (5)
Row 23: inc, 1 sc, inc, 1 sc, inc (8)
Row 24: inc, 2 sc, 2 inc, 2 sc, inc (12)
Row 25: inc, 10 sc, inc (14)
Row 26: hdc-inc, 12 sc, hdc-inc (16)
Row 27: hdc-inc, 14 sc, hdc-inc (18)
Row 28: hdc-inc, 16 hdc, hdc-inc (20)
Row 29: hdc-inc, 18 hdc, hdc-inc (22)
Row 30: hdc-inc, 20 hdc, hdc-inc (24)
Row 31: hdc-inc, 22 hdc, hdc-inc (26)
Rows 32–36: 26 hdc (26)
Row 37: hdc-dec, 24 hdc, hdc-dec (24)
Row 38: hdc-dec, 22 hdc, hdc-dec (22)
Rows 39–40: 22 hdc (22)
Row 41: 10 hdc, 2 hdc-inc, 10 hdc (24)
Row 42: 11 hdc, 2 hdc-inc, 11 hdc (26)
Row 43: 12 hdc, 2 hdc-inc, 12 hdc (28)
Row 44: 12 hdc, 2 hdc-dec, 12 hdc (26)
Row 45: 11 hdc, 2 hdc-dec, 11 hdc (24)
Row 46: (2 hdc, hdc-dec)×6 (18)
Row 47: (1 hdc, hdc-dec)×6 (12)
Row 48: 12 hdc (12)
Row 49: hdc-dec, 18 hdc, hdc-dec (20)
Row 50: hdc-dec, 6 hdc, hdc-dec (8)
Rows 51–52: 8 hdc (8)
Row 53: dec, 4 sc, dec (6)
Rows 54–62: 6 sc (6)
Fasten off, cut yarn, and weave in ends. Fit the overlay onto the head, adjust until the placement is right, then sew it down.
Body (×1)
Yarn: Black velvet.
Start: 3 ch. Work into 2nd ch from hook.
Row 1: 6 sc in 2nd ch from hook (6)
Row 2: 6 inc (12)
Row 3: (1 sc, inc)×6 (18)
Row 4: (2 sc, inc)×6 (24)
Row 5: (3 sc, inc)×6 (30)
Row 6: (4 sc, inc)×6 (36)
Row 7: (5 sc, inc)×6 (42)
Row 8: (6 sc, inc)×6 (48)
Row 9: (7 sc, inc)×6 (54)
Row 10: 54 sc (54)
Row 11: (8 sc, inc)×6 (60)
Row 12: (9 sc, inc)×6 (66)
Rows 13–20: 66 sc (66)
Row 21: (9 sc, dec)×6 (60)
Row 22: (8 sc, dec)×6 (54)
Row 23: (7 sc, dec)×6 (48)
Row 24: (6 sc, dec)×6 (42)
Rows 25–26: 42 sc (42)
Row 27: (5 sc, dec)×6 (36)
Row 28: 36 sc (36)
📌 Note: After Row 28, stuff the body with fiberfill before continuing. Distribute the stuffing evenly to keep the silhouette round.
Row 29: (4 sc, dec)×6 (30)
Row 30: 30 sc (30)
Row 31: (3 sc, dec)×6 (24)
Row 32: (2 sc, dec)×6 (18)
Rows 33–34: 18 sc (18)
Fasten off, cut yarn, and weave in ends.
Belly Overlay (×1)
Yarn: Beige velvet.
Start: 11 ch. Worked in turning rows. Each row begins with ch (chain 1 to turn).
Row 1: In 2nd ch from hook: 10 sc (10)
Row 2: ch, inc, 8 sc, inc (12)
Row 3: ch, inc, 10 sc, inc (14)
Row 4: ch, inc, 12 sc, inc (16)
Row 5: ch, inc, 14 sc, inc (18)
Row 6: ch, inc, 16 sc, inc (20)
Rows 7–10: ch, 20 sc (20)
Row 11: ch, dec, 16 sc, dec (18)
Row 12: ch, 18 sc (18)
Row 13: ch, dec, 14 sc, dec (16)
Row 14: ch, 16 sc (16)
Row 15: ch, dec, 12 sc, dec (14)
Row 16: ch, 14 sc (14)
Row 17: ch, dec, 10 sc, dec (12)
Row 18: ch, 12 sc (12)
Row 19: ch, dec, 8 sc, dec (10)
Row 20: ch, 10 sc (10)
Row 21: ch, dec, 6 sc, dec (8)
Row 22: ch, 8 sc (8)
Row 23: ch, dec, 4 sc, dec (6)
Row 24: ch, 6 sc (6)
Row 25: ch, dec, 2 sc, dec (4)
Row 26: ch, 4 sc (4)
Row 27: ch, 4 sc (4)
Work a sc border all the way around the piece. Fasten off, cut yarn, and weave in ends.
Arms / Front Legs (×2)
Yarn: Black velvet.
Start: 3 ch. Work into 2nd ch from hook.
Row 1: 6 sc in 2nd ch from hook (6)
Row 2: (1 sc, inc)×3 (9)
Rows 3–4: 9 sc (9)
Row 5: (1 sc, dec)×3 (6)
Row 6: 3 inc, 3 sc (9)
Row 7: 9 sc (9)
Row 8: (2 sc, inc)×3 (12)
Row 9: 6 inc, 6 sc (18)
Rows 10–12: 18 sc (18)
Row 13: (2 sc, dec)×3, (1 sc, inc)×3 (18)
Rows 14–20: 18 sc (18)
Row 21: (1 sc, dec)×6 (12)
📌 Note: At the end of Row 21, insert the 1.2mm wire armature and stuff with fiberfill before closing. Make the second arm identically. Once complete, bend each arm into a natural, slightly curved position.
Row 22: 6 dec (6)
Close the opening. Fasten off, cut yarn, and weave in ends.
Legs / Back Legs (×2)
Yarn: Black velvet.
Start: 6 ch.
Row 1: In 2nd ch from hook: inc, 3 sc, 3 sc in last ch, 4 sc (12)
Row 2: 2 inc, 3 sc, 3 inc, 3 sc, inc (18)
Row 3: (1 sc, inc)×2, 3 sc, (1 sc, inc)×3, 3 sc, (1 sc, inc)×1 (24)
Row 4: (2 sc, inc)×2, 3 sc, 2 sc, hdc-inc, (2 hdc, 2 hdc-inc)×2, 3 sc, (2 sc, inc)×1 (30)
Row 5: 30 sc in BLO (30)
📌 Note: After Row 5, cut your cardboard or plastic insoles to fit the foot shape. Insert the insole flat inside the foot before working Row 6. This keeps the base flat and sturdy.
Row 6: 30 sc (30)
Row 7: (2 sc, dec)×2, 3 sc, 6 dec, 3 sc, (2 sc, dec)×1 (21)
Row 8: (1 sc, dec)×2, 3 sc, 3 dec, 3 sc, (1 sc, dec)×1 (15)
Row 9: (3 sc, dec)×3 (12)
Row 10: 12 sc (12)
📌 Note: After Row 10, stuff the foot firmly with fiberfill.
Row 11: (1 sc, inc)×6 (18)
Row 12: (2 sc, inc)×6 (24)
Row 13: 24 sc (24)
Row 14: (3 sc, inc)×6 (30)
Row 15: (4 sc, inc)×6 (36)
Row 16: (5 sc, inc)×6 (42)
Row 17: (6 sc, inc)×6 (48)
Rows 18–20: 48 sc (48)
Row 21: (6 sc, dec)×6 (42)
Row 22: (5 sc, dec)×6 (36)
Row 23: (4 sc, dec)×6 (30)
Row 24: (3 sc, dec)×6 (24)
Row 25: (2 sc, dec)×6 (18)
📌 Note: After Row 25, cut and shape your 1.6mm wire armature, insert it through the length of the leg, then stuff the remaining space with fiberfill. The wire should run from foot to top.
Row 26: (1 sc, dec)×6 (12)
Row 27: 6 dec (6)
Close the opening. Fasten off, cut yarn, and weave in ends. Make the second leg identically.
Back Overlay (×1)
Yarn: Black fluffy/fur yarn for main piece; cream fluffy/fur yarn for the borders.
Start: 9 ch. Worked in turning rows. Each row begins with ch (chain 1 to turn).
Row 1: From 2nd ch from hook: 8 sc — black (8)
Row 2: ch, sc-inc, 6 sc, sc-inc (10)
Row 3: ch, sc-inc, 8 sc, sc-inc (12)
Row 4: ch, sc-inc, 10 sc, sc-inc (14)
Row 5: ch, sc-inc, 12 sc, sc-inc (16)
Row 6: ch, 16 sc (16)
Row 7: ch, sc-inc, 14 sc, sc-inc (18)
Rows 8–12: ch, 18 sc (18)
Row 13: ch, sc-dec, 14 sc, sc-dec (16)
Row 14: ch, 16 sc (16)
Row 15: ch, sc-dec, 12 sc, sc-dec (14)
Row 16: ch, 14 sc (14)
Row 17: ch, sc-dec, 10 sc, sc-dec (12)
Row 18: ch, 12 sc (12)
Row 19: ch, sc-dec, 8 sc, sc-dec (10)
Row 20: ch, 10 sc (10)
Row 21: ch, sc-dec, 6 sc, sc-dec (8)
Row 22: ch, 8 sc (8)
Row 23: ch, sc-dec, 4 sc, sc-dec (6)
Row 24: ch, 6 sc (6)
Row 25: ch, sc-dec, 2 sc, sc-dec (4)
Row 26: ch, 4 sc (4)
Rows 27–32: ch, 4 sc (4)
Row 33: ch, 2 dec (2)
Border 1: Join cream fluffy yarn: 2 ch (turning), (6 dc, dc-inc)×2, (4 dc, dc-inc)×3, 8 dc, (dc-inc, 4 dc)×3, (dc-inc, 6 dc)×2 (76)
Border 2: ch, 10 sc, 16 dc, dc-inc, 6 dc, 10 hdc, dc-inc, 6 dc, 16 dc, 10 sc, sl st (78)
Fasten off, cut yarn, and weave in ends.
Tail (×2 pieces)
Yarn: Black fluffy/fur yarn for main piece; cream then black fluffy yarn for borders.
Start: 3 ch. Worked in turning rows. Rows begin with 2 ch.
Row 1: 3 dc in 1st ch — black (3)
Row 2: 2 ch, dc-inc, 1 dc, dc-inc (5)
Row 3: 2 ch, dc-inc, 3 dc, dc-inc (7)
Row 4: 2 ch, dc-inc, 5 dc, dc-inc (9)
Row 5: 2 ch, dc-inc, 7 dc, dc-inc (11)
Row 6: 2 ch, dc-inc, 9 dc, dc-inc (13)
Row 7: 2 ch, dc-inc, 11 dc, dc-inc (15)
Row 8: 2 ch, dc-inc, 13 dc, dc-inc (17)
Row 9: 2 ch, dc-inc, 15 dc, dc-inc (19)
Row 10: 2 ch, dc-inc, 17 dc, dc-inc (21)
Rows 11–22: 2 ch, 21 dc (21)
Row 23: 2 ch, dc-dec, 17 dc, dc-dec (19)
Row 24: 2 ch, dc-dec, 15 dc, dc-dec (17)
Row 25: 2 ch, dc-dec, 13 dc, dc-dec (15)
Row 26: 2 ch, dc-dec, 11 dc, dc-dec (13)
Row 27: 2 ch, dc-dec, 9 dc, dc-dec (11)
Row 28: 2 ch, dc-dec, 7 dc, dc-dec (9)
Row 29: 2 ch, dc-dec, 5 dc, dc-dec (7)
Row 30: 2 ch, dc-dec, 3 dc, dc-dec (5)
Row 31: 2 ch, dc-dec, 1 dc, dc-dec (3)
Row 32: 2 ch, dc3tog (1)
Border 1: Change to cream fluffy yarn. Border all sides: 2 ch, dc-inc, 16 dc, 2 dc-inc, 16 dc, 2 dc-inc, 20 dc, 3 dc in 1 st, 20 dc, 2 dc-inc, 16 dc, 2 dc-inc, 16 dc, dc-inc (148)
Border 2: 2 ch, 16 dc, 1 tr, (2 tr, tr-inc)×7, 1 tr, 10 dc, 14 sc, 3 sc in 1 st, 14 sc, 10 dc, 1 tr, (2 tr, tr-inc)×7, 1 tr, 16 dc (145)
Border 3: Change to black fluffy yarn: 2 ch, 2 dc-inc, (3 dc, dc-inc)×8, (3 tr, tr-inc)×8, 5 tr, 3 tr in 1 st, (3 tr, tr-inc)×8, 5 tr, (3 tr, tr-inc)×8, 2 dc-inc (181)
Make the second tail piece identically. Fasten off, cut yarn, and weave in ends.
Assembling Your Skunk Crochet Amigurumi
- Mark the body centerlines. Measure the circumference of the body at its widest point (~13.4 in). Mark the front center with a pin, then measure ~6.7 in along the circumference to mark the back center. These two pins guide overlay placement.
- Attach the belly overlay. Fold the piece in half to find its center. Align that center point with your front pin, distribute the overlay evenly across the belly, and sew it on.
- Attach the back overlay. Fold to find center, align with the back pin, distribute evenly, pin in place, and sew down. The cream-bordered tail of this overlay runs toward the top of the back.
- Attach the head. Pin the head to the neck opening. When the angle looks right, sew halfway around, add a bit of fiberfill to fill the neck connection, then finish sewing closed.
- Attach the arms. Use a yarn joint to attach each arm, 3–4 rows down from the neck edge. The wire armature means you can adjust the angle after attaching.
- Attach the legs. Use a yarn joint at Row 15 from the beginning of the body on each side.
- Assemble the tail. Bend your 1.6mm wire into a supporting armature shape. Secure the armature to one tail piece with several stitches so it won’t shift. Join the two tail pieces together (sew along the edges), leaving an opening at the base. Stuff lightly with fiberfill for volume — distribute evenly. Sew the tail to the body and curve it upward into position.
Decoration
- Eyes: Sew the finished crocheted eyes onto the face in a symmetrical position, using the long tails you left when finishing each eye.
- Nose: Sew the nose onto the beige section of the muzzle.
- Mouth: Sew the mouth below the nose, centering it on the muzzle.
- Ears: Attach between Rows 20 and 24 of the head. The gap between ears, measured from one inner edge to the other, is 30 stitches. Sew each ear base along 3 rows, then tack the inside center of the ear to the head with a single stitch so it sits naturally rather than sticking straight out.
- Eyebrows: Embroider eyebrows between Rows 16 and 17 of the head using black yarn. Each eyebrow is 4 stitches long. Leave 10 stitches between the inner edges of the two brows.
💡 Stretch It Further — Make This Skunk Crochet Pattern Work Harder
The poseable wire feature is the real selling point here. If you make this skunk crochet design for a craft fair, display it with the tail arched and arms out — it photographs beautifully and stands out in any booth. Pair it with our free fox amigurumi or free bat pattern for a woodland creature set that sells as a trio.
Want a faster version? Skip the legs and make just the head, body, arms, and tail as a shelf sitter — it cuts the build time by roughly a third and still delivers all the character. Use the same pattern with a grey velvet instead of black and a white overlay instead of cream for a raccoon look. The structure works for any black-and-white or dark-base character you want to adapt it toward. The wire cost for the whole armature runs under $3 — total yarn investment for this skunk crochet pattern is well under $20, and the finished piece looks far more expensive than that.
Mia’s Take
Two specialty yarn types, some wire, and one very long but genuinely satisfying weekend — that’s what this skunk crochet pattern costs you. The velvet and fluffy yarns together do something that regular acrylic can’t touch, and the poseable arms make every finished piece feel interactive rather than static. I’d make a few and sell them as a woodland set — this one and the fox side by side would move at any market. That’s the kind of value I’m here for. 🧶
What yarn is best for this skunk crochet pattern?
This pattern works best using a combination of Bulky (5) weight velvet chenille yarn for the body structure and a fluffy faux-fur or novelty yarn for the white stripe overlays to capture the realistic skunk texture.
How do you make the skunk amigurumi poseable?
The poseability comes from inserting a hidden wire armature (1.2mm wire for arms and 1.6mm wire for legs and tail) inside the limbs before adding the final fiberfill stuffing and sealing the pieces.
Can beginners try this skunk crochet design?
This pattern is rated Intermediate to Advanced due to working with specialty yarns (velvet and fur) which makes tracking stitches tricky, alongside using a 1.0mm steel hook for the micro-crocheted eyes.