Free Crochet Kitty Pattern — Adorable Gray & White Amigurumi
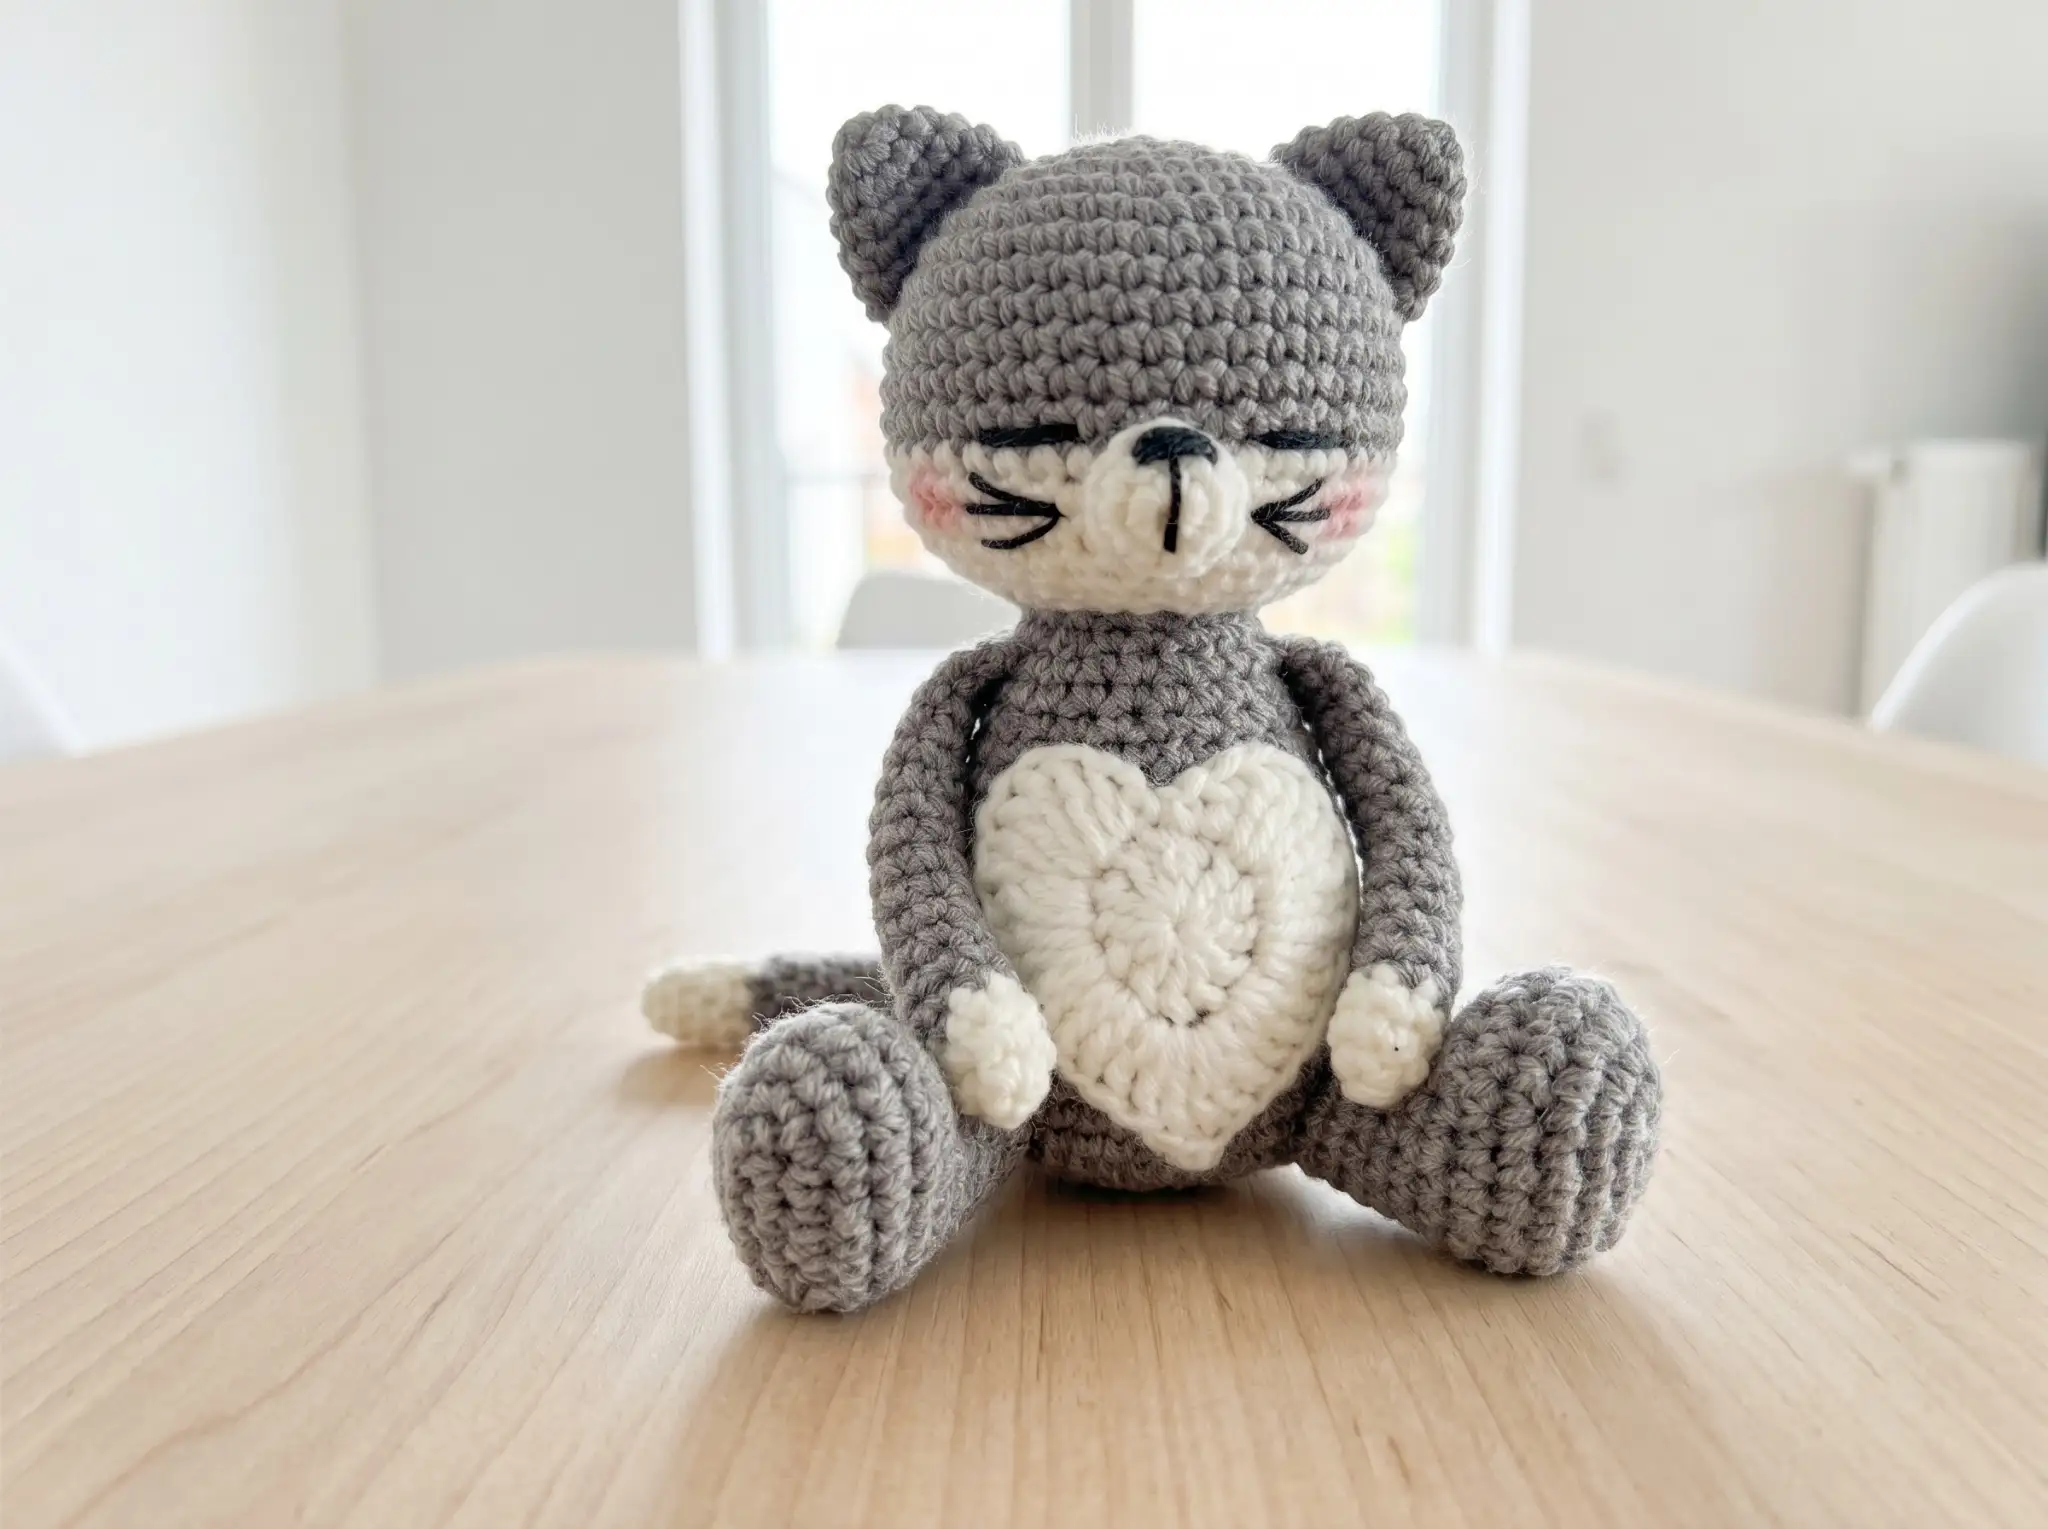
This free crochet kitty pattern creates the most heart-meltingly sweet little cat — soft cool gray all over, with a dreamy white face, delicate white paw tips, and a tiny white heart stitched right onto her tummy. Her embroidered whiskers, rosy cheeks, and soft expression give her a quiet, irresistible kawaii charm. She’s palm-sized, perfectly round, and the kind of thing you make once and immediately want to make again in a different color. Let’s make her together.
🩷 Pattern Highlights
- Cuteness Rating: 🩷🩷🩷🩷🩷
- Finished Size: approx. 5.5 in (14 cm) tall
- Difficulty: Beginner–Intermediate
- Hook Size: 2.5mm (approx. US C/2)
- Yarn Palette: cool silver-gray, soft cloud white
- Key Detail: embroidered whiskers, eyebrows, and pink blush cheeks — all the tiny things that make her face come alive
- Estimated Time: 4–6 hours
Materials for Your Crochet Kitty
The two-color palette here — a cool, silvery gray against a soft, clean white — is what makes this kitty so visually sweet. The gray gives her that classic cat feel, and the white details (her face, her paw tips, her little heart belly) make her look like she’s been dusted with something gentle and lovely.
- Gray fingering weight yarn — approx. 90 yds. Choose a smooth, tightly spun yarn so your stitches stay defined and the stuffing doesn’t peek through. A cool medium gray reads beautifully.
- White fingering weight yarn — approx. 40 yds. You want a clean, bright white (not cream) for the best contrast against the gray.
- Black embroidery floss — a few yards for the eyes, nose, whiskers, and eyebrows. Floss gives you beautiful control over fine details.
- Pink embroidery floss or yarn — for the cheek blush (Chloe’s personal addition — details below).
- 2.5mm (approx. US C/2) crochet hook — this hook size keeps your stitches tight and your fabric smooth. See the Craft Yarn Council’s crochet hook size guide if you need help converting to your preferred format.
- Polyfill stuffing — Poly-Fil by Fairfield is widely available at Joann, Michaels, and Hobby Lobby. Go in gradually to control the shape as you close up each piece.
- Tapestry needle — for sewing parts together and weaving in ends.
- Stitch markers — at least two. Non-negotiable for tracking your continuous rounds.
🩷 Chloe’s Color Note: If you want to try color variations, this pattern works beautifully in warm beige + cream for a sandy tabby look, or soft lavender + white for something a little dreamier. The two-tone structure stays the same — just swap the gray for your chosen base color.
Abbreviations
| Abbreviation | Meaning |
|---|---|
| sc | single crochet |
| ch | chain |
| mr | magic ring |
| inc | increase — 2 sc worked into the same stitch |
| inv dec | invisible decrease — insert hook through the front loops only of the next 2 stitches simultaneously, yarn over, pull through, yarn over, pull through 2 loops |
| sl st | slip stitch — used here for closing the arms and tail only |
| FO | fasten off |
Before You Begin Your Crochet Kitty
This pattern involves two color changes — one in the head (gray to white) and one in each arm and tail (white to gray). The transitions are what create all those sweet two-tone details, so it’s worth reading through the color notes before you start. If color changing is new to you, our guide to changing colors seamlessly in amigurumi will walk you through it so the transitions stay invisible.
For all decrease rows in this pattern, we always use the invisible decrease (inv dec). This is the AmiLoops standard — it eliminates the little gap that a standard decrease leaves behind, keeping the fabric smooth and your kitty’s shape clean. If you’d like a refresher before diving in, our invisible decrease tutorial covers exactly how it’s done and why it makes such a visible difference.
All parts are worked in continuous rounds (a spiral — no slip stitch joins between rounds). Place a stitch marker in the first stitch of each new round and move it up as you go. This is the standard method for amigurumi and keeps the fabric seamless.
If you’ve never worked a magic ring before, pause here and check out our magic ring tutorial — it’s the foundation of every round piece in this pattern, and it’s worth getting comfortable with before you start.
🩷 Chloe’s Detail Tip: The embroidery on this kitty is where all the personality lives — the eyes, the whiskers, the tiny arched eyebrows. Before you stuff and close anything, do a quick test of your embroidery placement on the flat fabric. Once the stuffing is in, it’s harder to maneuver. Take your time here. It makes every difference.
Free Crochet Kitty Pattern — Step by Step
Work each part as listed below. Keep your tension consistent and tight throughout — fingering yarn at 2.5mm should give you a firm, smooth fabric where the polyfill doesn’t peek through.
Head (×1)
Yarn Color: Begin in gray; change to white after Row 11.
Starting Method: Magic ring
Row 1: 6 sc in mr (6)
Row 2: (inc) × 6 (12)
Row 3: (sc, inc) × 6 (18)
Row 4: (2 sc, inc) × 6 (24)
Row 5: (3 sc, inc) × 6 (30)
Row 6: (4 sc, inc) × 6 (36)
Row 7: (5 sc, inc) × 6 (42)
Rows 8–11: 42 sc (4 rows) (42)
🩷 By Row 11 the head is a lovely, full round — this is the moment to switch to your white yarn. The color change happens here, so the top half of the face is white and the lower half is gray, just like the reference photo shows.
Rows 12–14: 42 sc (3 rows) — white yarn (42)
Row 15: (5 sc, inv dec) × 6 (36)
Row 16: (4 sc, inv dec) × 6 (30)
Row 17: (3 sc, inv dec) × 6 (24)
Row 18: (2 sc, inv dec) × 6 (18)
Finishing: Stuff firmly before the opening gets too small. FO, cut yarn, and weave in ends.
Nose (×1)
Yarn Color: Soft white
Starting Method: Magic ring
Row 1: 6 sc in mr (6)
Row 2: (sc, inc) × 3 (9)
Row 3: 9 sc (9)
Finishing: FO, cut yarn, and weave in ends. This small flat oval is the muzzle piece — it’ll be positioned in the center of the white section of the head before you embroider the nose and whiskers.
Ears (×2)
Yarn Color: Gray
Starting Method: Magic ring
Row 1: 6 sc in mr (6)
Row 2: (sc, inc) × 3 (9)
Row 3: (2 sc, inc) × 3 (12)
Row 4: 12 sc (12)
Row 5: (3 sc, inc) × 3 (15)
Row 6: 15 sc (15)
Finishing: FO, cut yarn, and weave in ends. Do not stuff — the ears are flat. Make two.
Arms (×2)
Yarn Color: Begin in white (paw); change to gray after Row 3.
Starting Method: Magic ring
Row 1: 6 sc in mr (6)
Row 2: (inc, 2 sc) × 2 (8)
Row 3: 8 sc (8) — switch to gray yarn here
Rows 4–17: 8 sc (14 rows) — gray yarn (8)
Row 18: Fold the arm in half lengthwise and work 4 sc through both edges to close. (4)
Finishing: FO, cut yarn. Do not stuff. The white at the tip becomes the little paw — such a sweet detail. Make two.
🩷 Chloe’s Detail Tip: When you fold the arm to close it on Row 18, take a second to make sure the color transition (the white paw tip) is centered at the bottom before you work those closing stitches. It’s a tiny thing, but it keeps the paws looking intentional and tidy.
Legs (×2)
Yarn Color: Gray
Starting Method: Chain 6
Row 1: 4 sc in 2nd ch from hook, 3 sc in 1 ch, 3 sc, inc (12)
Row 2: inc, 3 sc, (inc) × 3, 4 sc, inc (17)
Row 3: 6 sc, inc, (sc, inc) × 2, 6 sc (20)
Row 4: 7 sc, inc, (2 sc, inc) × 2, 6 sc (23)
Row 5: 23 sc (23)
Row 6: 7 sc, inv dec, (2 sc, inv dec) × 2, 6 sc (20)
Row 7: 5 sc, (inv dec) × 4, 7 sc (16)
Row 8: 4 sc, (inv dec) × 4, 4 sc (12)
Rows 9–11: 12 sc (3 rows) (12)
Finishing: Stuff lightly and firmly. FO, cut yarn, and weave in ends. Make two.
Body (×1)
Yarn Color: Gray
Starting Method: Magic ring
This is the heart of the project — watch how beautifully round it grows from the magic ring outward. The gradual decrease from Row 13 onward gives that gorgeous squishy tummy shape.
Row 1: 6 sc in mr (6)
Row 2: (inc) × 6 (12)
Row 3: (sc, inc) × 6 (18)
Row 4: (2 sc, inc) × 6 (24)
Row 5: (3 sc, inc) × 6 (30)
Row 6: (4 sc, inc) × 6 (36)
Row 7: (5 sc, inc) × 6 (42)
Row 8: (6 sc, inc) × 6 (48)
Rows 9–12: 48 sc (4 rows) (48)
Row 13: (6 sc, inv dec) × 6 (42)
Rows 14–15: 42 sc (2 rows) (42)
Row 16: (5 sc, inv dec) × 6 (36)
Row 17: 36 sc (36)
Row 18: (4 sc, inv dec) × 6 (30)
Rows 19–20: 30 sc (2 rows) (30)
Row 21: (3 sc, inv dec) × 6 (24)
Rows 22–23: 24 sc (2 rows) (24)
Row 24: (2 sc, inv dec) × 6 (18)
Row 25: 18 sc (18)
Finishing: FO, leaving a long tail for sewing. Stuff before the opening closes completely.
Tummy Heart (×1)
Yarn Color: Soft white
Starting Method: Chain foundation
Using white yarn and your 2.5mm hook, crochet a small flat heart shape approximately 1 in (2.5 cm) wide. The original pattern uses a charted heart diagram — any small, flat crochet heart pattern will work beautifully here. FO and leave a long tail for sewing. This little detail is genuinely one of the most precious things about this kitty. That little white heart right on her tummy? I cannot.
Tail (×1)
Yarn Color: Begin in white (tail tip); change to gray after Row 4.
Starting Method: Magic ring
Row 1: 6 sc in mr (6)
Row 2: (inc, 2 sc) × 2 (8)
Row 3: inc, 7 sc (9)
Row 4: 9 sc (9) — switch to gray yarn here
Rows 5–20: 9 sc (16 rows) — gray yarn (9)
Row 21: Lightly stuff the tip, fold in half, and work sc through both edges to close.
Finishing: FO, leaving a long tail for sewing.
Assembly
Take your time here — the positioning of each part shapes how your kitty carries herself. Our guide to sewing amigurumi parts together has all the tips you need if you want to feel confident before picking up the needle.
- Sew the head to the body. Center it at the top of the body opening and pin in place before you sew. Check from the front to make sure the white face section is angled forward — that’s what gives her that sweet, forward-gazing expression.
- Sew the nose piece to the face. Position the white oval muzzle in the center of the white section of the head, slightly below the midpoint. Sew around the edges securely. This is where you’ll later add the embroidered nose and whiskers.
- Sew the ears to the top of the head. Flatten each ear slightly and position them evenly on either side of the top of the head. Pin before sewing and step back to check symmetry from directly in front — this matters more than you’d think.
- Sew the arms to the body between Rows 22 and 23 on either side. The white paw tips should face forward and sit at a natural, slightly outward angle. Pin both arms before sewing either one, so you can confirm they’re level.
- Sew the legs to the lower body. Position them toward the bottom front of the body so the kitty can “sit” with her feet forward. Check that both feet point in the same direction.
- Sew the tail to the lower back of the body. A slightly off-center placement (angling gently to one side) gives her a more natural, mid-swish look.
- Sew the heart tummy piece to the front of the body, centered in the gray section. The contrast of the white heart against the gray belly is the whole moment. Take your time positioning it.
Making Your Crochet Kitty Extra Cute — Embroidery and Finishing Details
This is the section I get most excited about. The crochet is beautiful, but it’s the embroidery that makes this kitty hers. Every stitch you add to her face is a little more personality. Take a breath, get a good light source, and enjoy this part.
Eyes
Using black embroidery floss, embroider two eyes in the white section of the face, positioned above the nose piece. A small oval filled with satin stitch, or a cluster of French knots, both give gorgeous results. Whatever method you use, hold the piece at arm’s length after each eye and check that they’re level before adding the second. Symmetrical eyes make the expression. Off-center eyes make the personality — in a charming way, if that’s what you’re going for, but usually you’ll want them even.
Nose
Embroider a small, soft inverted triangle with black floss, centered on the white muzzle piece. Keep it small — about 3–4 threads wide. A tiny nose reads as delicate and kitten-like, which is exactly right for this little face.
Whiskers
Work 2–3 long straight stitches radiating out from each side of the nose. Pull the floss gently so the whiskers lie flat against the muzzle. Six whiskers total (three per side) is the classic cat look. For extra charm, angle the outer whisker slightly upward.
Eyebrows
Two small, gently curved stitches just above the eyes. Keep them delicate — they add expression without being heavy. A slightly curved brow reads as curious and sweet. A straighter brow reads as sleepy and calm. You choose her mood.
Rosy Cheeks (Chloe’s Personal Touch)
The pattern doesn’t specify cheeks — but I always add them, because a kitty without a little blush just isn’t finished in my book. Using a length of soft pink embroidery floss or a thin strand of blush pink yarn, work a small cluster of satin stitches in a rounded oval shape on each side of the face, between the eyes and the outer whiskers. Keep them soft and subtle — you want a gentle suggestion of blush, not a painted-on circle. Step back and look. Yes. That’s the moment.
🩷 Chloe’s Final Embroidery Tip: Do all your embroidery before you make any final knots or finishing cuts on the head — it’s easier to adjust while there’s still a little give in the fabric. Once every feature looks right from a distance of about two feet, then secure your floss and trim. That distance check is everything.
Color Variations
This kitty is so lovely in her classic gray and white, but if you want to try other color stories: a warm cream base with soft peach accents is incredibly sweet; an all-white version with the palest pink blush reads almost like a snow cat; and a smoky charcoal gray with ice-blue undertones would be stunning for a more grown-up aesthetic. The two-tone structure of the pattern stays exactly the same — just swap the colors.
If you loved making this one, our free koala amigurumi pattern has that same round, palm-sized charm with rosy cheeks, and our tiny hamster amigurumi is another pocket-sized animal with the most irresistible little face. Both follow a similar structure so you’ll feel right at home.
Chloe’s Final Look
I have been staring at this finished little kitty for an embarrassing amount of time and I have zero regrets. The white face peeking out from the gray, the whiskers fanning out over the muzzle piece, the tiny heart right there on her tummy — it all comes together into something genuinely precious. She sits so perfectly in your palm.
Line up three in different colors on a shelf — gray, cream, and lavender — and I promise you won’t be able to stop smiling. 🩷
What yarn is best for this crochet kitty?
A smooth, tightly spun fingering weight yarn works best to keep your stitches defined and prevent the stuffing from peeking through. The pattern uses cool gray and soft white.
How long does it take to crochet this amigurumi cat?
It generally takes about 4 to 6 hours to complete, depending on your crochet speed and experience with color changes and facial embroidery.
Do I need to be advanced to crochet this kitty?
No, this pattern is suitable for beginner to intermediate crocheters. It uses basic continuous rounds and invisible decreases, though the color changes and fine embroidery require a bit of patience.