Free Cow Crochet Pattern Amigurumi — Clover the Plush Calf
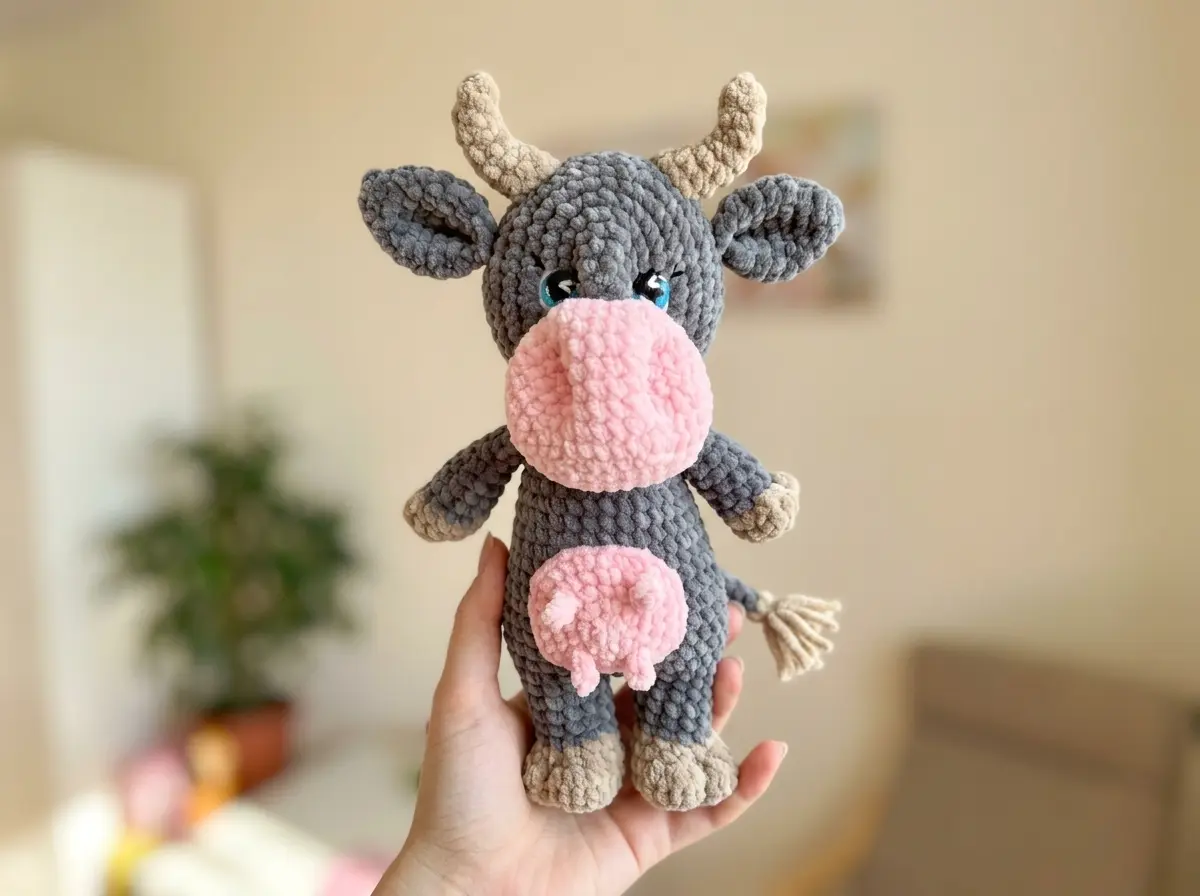
This free cow crochet pattern amigurumi has been on my hook for weeks, and the little dent in my finger is proof of how much I loved working on her. Meet Clover — a plush calf with tiny curved horns, a soft pink udder, and the kind of dense, squishy body that only tight tension and bulky chenille give you. Every stitch counted twice. Grab your hook and let’s start.
📋 Pattern Quick Stats
- Difficulty: Intermediate
- Finished Size: Approximately 6-7 in (15-18 cm) standing, depending on yarn weight and tension
- Hook Size: G/6 (4.0 mm) for the body — sizes 7 (4.5 mm) or H/8 (5.0 mm) also work depending on your tension. B/1 (2.0 mm) or 2.5 mm (no US letter equivalent) for the crocheted eyes
- Yarn Weight: Bulky (5) chenille/velvet for the body, DK/Light Worsted (3) for the eyes and tail tassel
- Techniques: magic ring, invisible decrease, hdc, joined-leg construction, in-round tail, color changes, surface sculpting
- Estimated Time: 5-8 hours
About Clover — A Free Cow Crochet Pattern Amigurumi with Real Character
I’ll admit it — when I first sketched out the construction for this little cow, I was nervous about the body. The legs are crocheted separately and then joined together to form a single torso, with the tail formed mid-round and the upper arms crocheted directly into the body’s final round. That kind of integrated construction takes patience, but it produces a much sturdier, more sculptural finish than sewing limbs on after the fact.
If you’ve made a few amigurumi already and you’re ready to try something with a little more structure and assembly logic, this is a perfect next project. The shaping is precise, the color blocking between beige hooves and gray body is satisfying, and the finished cow has real weight to her thanks to the bulky chenille body.
One note before you start: I tested this free cow crochet pattern amigurumi in soft gray chenille with beige hooves and a pale pink muzzle, but the silhouette works just as well in cream, warm brown, or even a soft caramel. The bones of the pattern are what matter — the rest is your color story.
Materials for This Free Cow Crochet Pattern Amigurumi
- Main color (body, ears, head): Bulky (5) chenille or velvet yarn — Bernat Baby Velvet, Premier Parfait Chenille, or similar plush yarn. Soft gray is my go-to for a classic dairy cow look.
- Contrast color (horns, upper hooves, lower hooves): A small amount of bulky chenille in beige, cream, or warm tan.
- Pink: A small amount of bulky chenille in soft pink for the muzzle and udder.
- DK weight cotton (for crocheted eyes): DK/Light Worsted (3) in black, white, and a single iris color (blue, brown, or amber all look great). Look for Drops Muskat or Paintbox Cotton DK at LoveCrafts, or any cotton DK from your local Joann or Michaels.
- DK weight cotton (for tail tassel): A few yards in a coordinating or contrasting color.
- Hooks: G/6 (4.0 mm) for the main body and head — sizes 7 (4.5 mm) or H/8 (5.0 mm) also work depending on your tension. A 2.0 mm steel hook (or 2.5 mm with no US letter equivalent) for the tiny crocheted eyes.
- Polyfill stuffing (Poly-Fil by Fairfield works perfectly).
- Sewing thread in matching colors for attaching eyes and sculpting the muzzle and hooves.
- Tapestry needle, sewing needle, pins, scissors, stitch marker.
If you’re not sure which chenille category your yarn falls into, the Craft Yarn Council yarn weight system is the most reliable reference for yarn weight standards in the US.
Abbreviations
| Abbreviation | Meaning |
|---|---|
| sc | single crochet |
| inc | increase (2 sc in the same stitch) |
| dec | invisible decrease (worked as 2 stitches together) |
| mr | magic ring |
| ch | chain |
| hdc | half double crochet |
| sl st | slip stitch |
| hdc-inc | half double crochet increase (2 hdc in the same stitch) |
| hdc-dec | half double crochet decrease (2 hdc worked together) |
Techniques to Know Before You Start
This pattern uses a few core amigurumi techniques throughout. If any of these are new to you, take a quick detour and read through these tutorials first — you’ll save yourself a lot of frogging later:
- Magic ring: Every piece except the muzzle starts with a magic ring. If you’re new to this technique, our step-by-step magic ring tutorial walks you through it slowly.
- Invisible decrease: I use invisible decreases (not standard sc2tog) throughout this pattern. The shaping on the head and body really benefits from clean, gap-free decreases. If you’re not familiar with the technique, our complete invisible decrease tutorial shows the exact hook motion.
- Color changes: Clover’s hooves transition from beige to gray within the leg and arm pieces. If you need a refresher on changing colors cleanly mid-piece, check our seamless color change tutorial.
- Stuffing properly: Bulky chenille forgives a lot of mistakes, but uneven stuffing can still ruin the silhouette. Read our guide on stuffing amigurumi without lumps before you start filling.
💡 Emma’s Tip: A quick warning about chenille yarn — it does NOT love being frogged. The fibers shed and the yarn loses some of its softness with each rip-back. I strongly recommend checking your stitch count at the end of every single round on this project. If your count is off, fix it on the spot. Trust me — it’s much easier than unraveling and reworking 5 rounds of chenille later.
Free Cow Crochet Pattern Amigurumi — Step-by-Step Instructions
The pattern is worked in continuous rounds unless otherwise noted. Use a stitch marker in the first stitch of each round and move it up as you go. All stitch counts are listed in parentheses at the end of each row — verify your count before moving on.
Head (×1)
Yarn color: Main color (gray)
Row 1: 6 sc in mr (6)
Row 2: 6 inc (12)
Row 3: (1 sc, inc) × 6 (18)
Row 4: (2 sc, inc) × 6 (24)
Row 5: (3 sc, inc) × 6 (30)
Row 6: (4 sc, inc) × 6 (36)
Row 7: (5 sc, inc) × 6 (42)
Row 8: (6 sc, inc) × 6 (48)
Rows 9-13: 48 sc (5 rows) (48)
Row 14: (3 sc, dec, 3 sc) × 6 (42)
Row 15: (5 sc, dec) × 6 (36)
Row 16: (2 sc, dec, 2 sc) × 6 (30)
Row 17: (3 sc, dec) × 6 (24)
Row 18: (1 sc, dec, 1 sc) × 6 (18)
Row 19: (1 sc, dec) × 6 (12)
Row 20: 6 dec (6)
💡 Eye placement note: If you’re using plastic safety eyes, insert them now before closing. The eyes sit across Rows 4, 5, and 6 of the head (counting from the magic ring at the top). The distance between the eyes along the top of Row 6 is 13-14 stitches, and along the top of Row 4 is 8 stitches. Pin them in place first and look at the head from the front before locking the washers — you can’t undo this once it’s done.
Stuff the head firmly before closing Row 20. Pull the opening closed, fasten off, and weave in the ends.
Ears (×2)
Yarn color: Main color
Row 1: 6 sc in mr (6)
Row 2: (1 sc, inc) × 3 (9)
Row 3: (2 sc, inc) × 3 (12)
Row 4: (3 sc, inc) × 3 (15)
Row 5: (4 sc, inc) × 3 (18)
Row 6: 5 sc, inc, 8 sc, inc, 3 sc (20)
Row 7: 20 sc (20)
Row 8: 20 sc (20)
Row 9: Fold in half, 10 sc (10)
Row 10: Fold in half, 5 sc (5)
Do not stuff the ears. Fasten off and leave a long tail for sewing.
Horns (×2)
Yarn color: Beige (horn/hoof color)
Row 1: 6 sc in mr (6)
Row 2: 6 sc (6)
Row 3: inc, 2 dec, inc (6)
Row 4: inc, dec, 2 sc, inc (7)
Row 5: inc, 2 dec, sc, inc (7)
Row 6: inc, 2 sc, dec, sc, inc (8)
Row 7: inc, sc, 2 dec, sc, inc (8)
Row 8: 8 sc (8)
The increases and decreases on alternating sides give the horns their curved shape. Don’t stuff — just fasten off and leave a tail for sewing.
Upper Arms (×2)
Yarn colors: Beige (hoof) for Rows 1-4, switch to gray (main color) starting Row 5
Row 1: sc, 4 hdc, sc in mr (6)
Row 2: sc inc, 4 hdc-inc, sc inc (12)
Row 3: 3 sc, 2 hdc-inc, sc, 2 hdc-inc, 4 sc (16)
Row 4: 3 sc, 2 hdc-dec, sc, 2 hdc-dec, 4 sc (12)
Change to main color (gray):
Rows 5-6: 12 sc (2 rows) (12)
Row 7: 5 sc, dec, 5 sc (11)
Row 8: 5 sc, dec, 4 sc (10)
Row 9: 4 sc, dec, 4 sc (9)
Row 10: 4 sc, dec, 3 sc (8)
Row 11: 8 sc (8)
Row 12: 3 sc, fold in half, crochet 4 sc through both layers (4)
Fold the arm flat at Row 12 and crochet through both layers to close the top, which leaves you with a flat tab to join into the body later. Fasten off and leave a long tail. Don’t stuff the arms — they sit better against the body when soft.
💡 Emma’s Tip: The hdc-inc and hdc-dec at Rows 2-4 create the rounded shape of the hoof. The taller hdc stitches give the hoof more height and a more sculptural curve than plain sc would. Don’t try to substitute sc here — the shaping really depends on the height of those hdc stitches.
Muzzle (×1)
Yarn color: Pink or pale beige (muzzle color)
The muzzle starts with a chain and is worked as an oval. Begin by chaining 7.
Row 1: Working into the chain — inc, 4 sc, 3 sc in 1 stitch (at the tip to turn around), 5 sc back along the opposite side of the chain (14)
Row 2: 2 inc, 4 sc, 3 inc, 4 sc, inc (20)
Row 3: (1 sc, inc) × 2, 4 sc, (1 sc, inc) × 3, 5 sc, inc (26)
Row 4: 2 sc, inc, 3 sc, inc, 4 sc, inc, 3 sc, inc, 3 sc, inc, 4 sc, inc, 1 sc (32)
Row 5: 2 sc, inc, 3 sc, inc, 7 sc, inc, 3 sc, inc, 3 sc, inc, 7 sc, inc, 1 sc (38)
Rows 6-9: 54 sc (4 rows) (54)
Row 10: 2 sc, dec, 3 sc, dec, 7 sc, dec, 3 sc, dec, 3 sc, dec, 7 sc, dec, 1 sc (42)
Row 11: 3 sc, dec, 4 sc, dec, 4 sc, dec, 5 sc, dec, 4 sc, dec, 4 sc, dec, 2 sc (36)
💡 Editorial note from Emma: The transition between Row 5 (38 stitches) and Row 6 (54 stitches) in the source pattern shows a jump in count that’s worth flagging. I’ve preserved the counts exactly as written, but if your count comes out to 38 at the end of Row 5, you’ll want to verify how your muzzle is shaping up before committing to the 54 sc rounds. Some crocheters add an interim row of evenly distributed increases between Rows 5 and 6 to bridge the count. Compare your work against the photo of your finished muzzle and trust your eye on this one — the goal is a flat oval roughly 2 in (5 cm) wide that will sit smoothly on the front of the head.
Fasten off and leave a long tail for sewing.
Udder (×1)
Yarn color: Pink
The udder is small but mighty — four little teats are formed in Row 3 using a chain-and-slip-stitch technique that creates a tiny bump on the surface of the round.
Row 1: 6 sc in mr (6)
Row 2: 6 inc (12)
Row 3: 1 sc, 1 sc, 3 ch, 2 sl st along ch, sc in the same stitch (forms a teat plus an increase), sc, inc, sc, 3 ch, 2 sl st along ch, inc, sc, inc, 3 ch, 2 sl st along ch, sc, inc, 2 sc, 3 ch, 2 sl st along ch, sc in the same stitch (inc) (18)
Row 4: (2 sc, inc) × 3 (12)
Row 5: (3 sc, inc) × 3 (15)
Fasten off and leave a tail for sewing to the body.
💡 Emma’s Tip: The teat construction can feel awkward the first time through. Here’s what’s happening at each teat — you stop in a stitch, chain 3, slip stitch back down 2 of those chains to form a tiny bobble, then place your next sc in the SAME stitch where the teat started. That last sc in the same stitch is what creates the increase that builds the round count. Take it slow at this round and check that your teats are pointing outward, not tucked behind the round, before moving on.
Lower Hooves and Body (Joined Leg Construction)
This is the most technical part of the pattern. You’ll make two separate legs (Rows 1-11 each), then join them with a small chain bridge to form a single body that’s worked continuously to the top, with the tail formed mid-round and the arms crocheted into the final round.
Yarn colors: Beige (hoof) for Rows 1-4 of each leg, then switch to gray (main color) from Row 5 onward
First leg (Rows 1-11)
Row 1: 6 sc in mr (6)
Row 2: 6 sc inc (12)
Row 3: (1 sc, sc inc) × 5, 2 sc (17)
Row 4: 5 sc, 3 hdc-inc, sc, 3 hdc-inc, 5 sc (23)
Change to main color (gray):
Row 5: 5 sc, 3 hdc-dec, sc, 3 hdc-dec, 5 sc (17)
Row 6: 7 sc, 3 in 1 sc dec, 7 sc (15)
Row 7: (3 sc, dec) × 3 (12)
Row 8: sc inc, 11 sc (13)
Rows 9-11: 13 sc (3 rows) (13)
Fasten off and cut the yarn at the end of Row 11.
Second leg (Rows 1-11 plus joining bridge)
Work Rows 1-11 of the second leg exactly the same as the first leg. At the end of Row 11, do not fasten off. Instead, crochet an additional 3-4 sc to position your hook on the inner side of the leg, then chain 3 to create a bridge over to the first leg. This 3-chain bridge will connect the two legs at the inner thigh.
Body — continuing from the second leg
Row 12: 13 sc around the second leg, 3 sc along the chain bridge, 13 sc around the first leg, 3 sc along the other side of the chain bridge (32)
Row 13: (7 sc, sc inc) × 4 (36)
Row 14: (5 sc, sc inc) × 6 (42)
Row 15: 42 sc (42)
Row 16: 40 sc, 11 ch, 10 sl st along ch (back toward the body), return to the body, 2 sc (42)
Row 17: 42 sc (42)
Row 18: (6 sc, dec, 6 sc) × 3 (39)
Row 19: 39 sc (39)
Row 20: (11 sc, dec) × 3 (36)
Row 21: 36 sc (36)
Row 22: (5 sc, dec, 5 sc) × 3 (33)
Row 23: 33 sc (33)
Row 24: (9 sc, dec) × 3 (30)
Row 25: 30 sc (30)
Row 26: (4 sc, dec, 4 sc) × 3 (27)
Row 27: 27 sc (27)
Row 28: (7 sc, dec) × 3 (24)
Row 29: 5 sc, 4 sc joining the first arm (work through both arm tab and body together), 8 sc, 4 sc joining the second arm (work through both arm tab and body together), 3 sc (24)
💡 Emma’s Tip on tail formation: Row 16 is where the tail magically appears mid-round. After 40 sc on the body, chain 11, then slip stitch back along 10 of those chains (this leaves one chain at the very tip — that’s where you’ll later attach the tail tassel). Once the tail is formed, you return to the body and continue with 2 sc to complete the round. The tail will be standing out from the body like a little pencil. Don’t worry — the tassel you’ll add later softens the look and gives it that classic cow silhouette.
💡 Emma’s Tip on joining the arms: The arms are joined into the body at Row 29 — this is where the flat tab you crocheted at Row 12 of each arm gets sandwiched into the body round. Position the first arm against the inside of the body so that the hoof end points downward and the open tab faces inward. Then crochet through both the body’s working stitch AND the arm’s flat tab simultaneously for 4 stitches. Repeat for the second arm. This creates a strong, seamless attachment without any sewing afterward.
Stuff the body firmly before closing the top of Row 29. The neck opening at Row 29 is where you’ll attach the head during assembly.
Assembly
- Attach the head to the body. Position the head over the neck opening of the body so that it sits naturally on top. The head attaches at the level of Rows 9-13 of the head (the widest, fullest rounds). Pin it in place first, look at the cow from all angles, and adjust before sewing. Use the long tail of the body or a fresh length of main color yarn to sew the head down through both pieces.
- Sew on the horns. Position the horns on the top of the head, spacing them 9 stitches apart. They should curve slightly outward from the centerline. Sew them down using the beige tail.
- Sew on the ears. Position the ears 4 stitches below the horns, on either side of the head. They should sit out to the sides, not flat against the head. Sew along the folded edge.
- Sew on the muzzle. Position the muzzle on the front of the head, centered between the eye placements. Pin first — getting the muzzle slightly off-center is one of the easiest ways to ruin the look of a cow. Sew it down, stuffing lightly as you close the seam.
- (Optional) Sew on the udder. If you’d like to include the udder, attach it to the lower belly between the back legs. This step is optional — some prefer the look of the cow without it, especially for keychains or kid-friendly gifts.
If you’ve made amigurumi animals before but haven’t perfected the assembly stage, our guide on sewing amigurumi parts together perfectly is worth a read before you start pinning.
Finishing Touches and Surface Details
This is where Clover really comes to life. The surface sculpting on the muzzle and the hoof definition lines are what take her from “cute little crochet cow” to a finished plush with real personality.
Eyes
If you’re using crocheted eyes, sew them to the head following the placement guide from the Head section: across Rows 4-6 of the head, with 13-14 stitches between them at the top of Row 6 and 8 stitches between them at Row 4. Use sewing thread (not yarn) for a clean, invisible attachment. If you’re using plastic safety eyes, they should already be in place from before you closed the head.
Muzzle sculpting
The muzzle gets two little nostril indents that give it real dimension. Mark the four nostril points with pins first — two upper, two lower — and use sewing thread or a single strand of cotton yarn in the muzzle color.
- Insert the needle from below into the chin (under the muzzle).
- Bring it out at the lower left nostril point.
- Insert it into the upper left nostril point.
- Bring it out at the upper right point, then insert it into the lower right point.
- Repeat this “circle” path one more time for security.
- Finally, bring the needle back out through the original hole in the chin.
- Pull the thread firmly to create the nostril indents, tie off with several strong knots, and hide the ends inside the muzzle.
Hoof sculpting
Each hoof gets a single vertical line down the middle to give it that split-hoof look. Use sewing thread or a single strand of DK cotton in a slightly darker shade of beige. Insert the needle from inside the hoof, bring it out at the bottom edge of the hoof, and sew a single straight stitch up to about halfway up the beige section. Pull firmly to indent the line, then tie off inside. Repeat on all four hooves — upper arms and lower legs.
Tail tassel
To make the tail tassel, cut several short lengths (about 2 in each) of DK cotton in your tassel color. Thread them through the tip of the tail using a tapestry needle, fold them in half so they hang from the tip, and tie a small knot at the base to secure. Trim the ends evenly with scissors to your preferred length — usually about half an inch is right for this size cow.
Emma’s Note
Clover is one of those projects that looks intimidating on paper but becomes incredibly satisfying once you understand the construction logic. The joined-leg body, the in-round tail, the arms crocheted directly into the final round — every one of these techniques produces a more polished, sculptural finished plush than the traditional sew-everything-on-after method. I’ve made her three times now in different colors, and each one has gone faster than the last as the construction starts to feel intuitive.
If you loved the integrated assembly on this project, you might enjoy our free crochet bunny pattern next — it uses a similar joined-leg construction that I think you’ll really enjoy. And if you’re craving another animal with that same cuddly bulky-chenille body, check out our free crochet teddy bear pattern for your next project.
Take your time with this one. Frog if you need to — even if it’s chenille. A perfectly stitched cow is worth one extra hour of patience. Happy hooking! 🧶
What yarn is best for this free cow crochet pattern amigurumi?
Bulky (5) chenille or velvet yarn like Bernat Baby Velvet or Premier Parfait Chenille works best for the body to give it a plush, squishy finish, while DK weight cotton is ideal for the detailed eyes and tail tassel.
Can beginners make this amigurumi cow pattern?
This pattern is rated as Intermediate. While it uses basic stitches, it requires experience with advanced amigurumi techniques such as joined-leg construction, in-round tail formation, and seamless arm integration.
What size hook do I need for this crochet cow?
You will need a G/6 (4.0 mm) crochet hook for the main body and head (or 4.5 mm / 5.0 mm depending on your tension), and a smaller 2.0 mm or 2.5 mm needle for the detailed crocheted eyes.