Free Crochet Duck Pattern — Squishy Chenille Duck Amigurumi
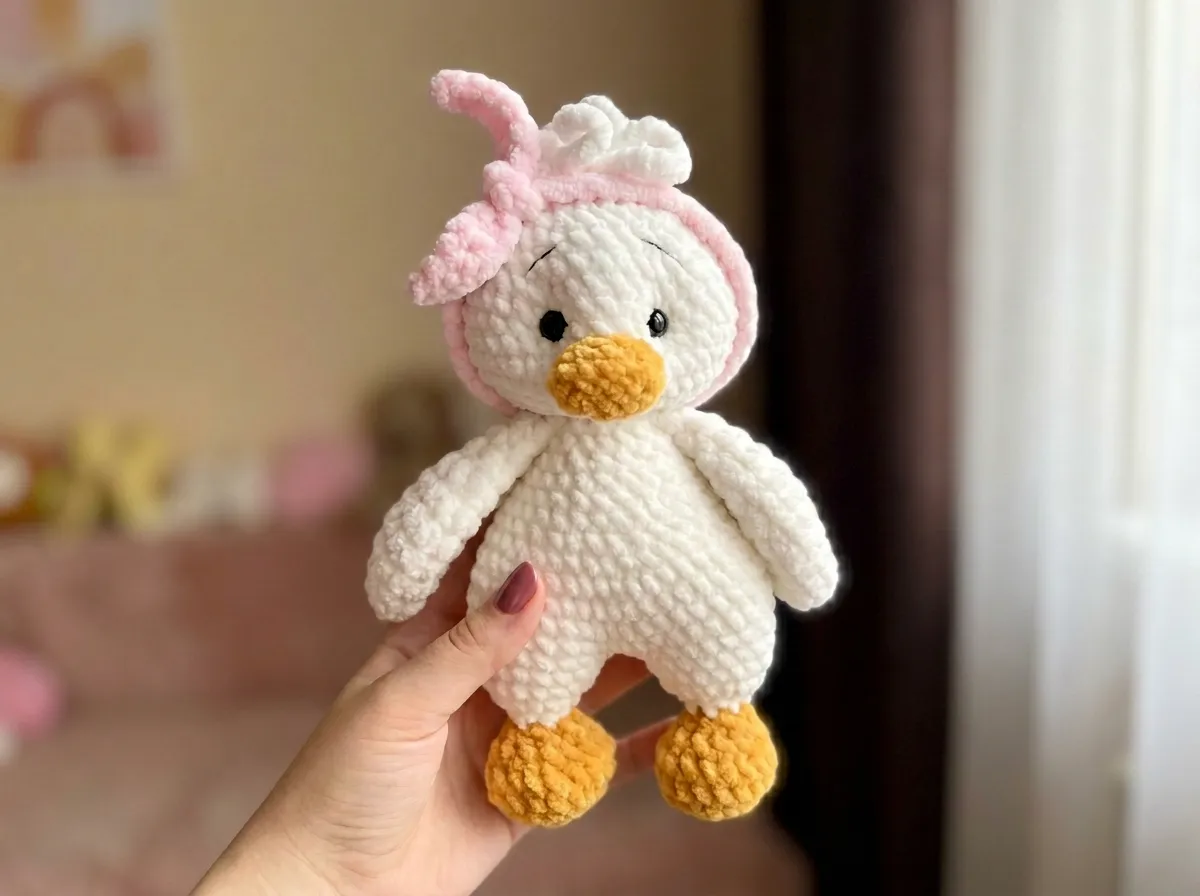
Looking for a crochet duck pattern free of charge and easy to follow? This pattern creates the squishiest, most palm-sized little duckling you’ve ever seen — soft chenille from head to tail, with a tiny oval beak, glossy 12mm safety eyes, and the most adorable loopy hair tufts on top of her head. She even comes with her own little headband. I may have squealed a little when I finished this one. Let me show you how she comes together.
🩷 Pattern Highlights
- Cuteness Rating: 🩷🩷🩷🩷🩷
- Finished Size: approx. 7 in (18 cm) tall
- Difficulty: Intermediate
- Hook Size: US 7 (4.5 mm)
- Yarn Palette: pure white chenille (main body), warm golden yellow chenille (beak and feet)
- Key Detail: ultra-soft chenille texture, fluffy hair tufts, 12mm glossy safety eyes, embroidered eyebrows, and her very own little headband
- Estimated Time: 4–6 hours
Materials Needed for This Crochet Duck Pattern Free
Yarn
- Main Color — body, wings, tail, head, hair tufts: Himalaya Dolphin Baby in Color 80363 (pure white). US alternatives: Bernat Baby Velvet or Premier Parfait in white. This is a Bulky (5) chenille yarn — that impossibly soft, cloud-like texture that makes you want to pet your finished amigurumi. Repeatedly.
- Contrast Color — beak and feet: Wolans Bunny Baby in Color 37 (golden yellow). US alternatives: Premier Parfait or Bernat Baby Velvet in yellow. Same weight and fiber type as the main color — the two yarns will look beautifully cohesive together.
Tools and Notions
- 4.5 mm hook (US 7)
- 12 mm black safety eyes × 2
- Polyfill stuffing (Poly-Fil by Fairfield — available at Joann, Michaels, or Hobby Lobby)
- Tapestry needle
- Stitch markers
- Scissors
- Thin yarn or embroidery thread in a dark color (for eyebrows)
🩷 Chloe’s Color Note: The original colorway — pure white body with golden yellow beak and feet — is an absolute classic and I love it completely. But if you want to take her somewhere dreamier, try a soft blush pink body with pale peach accents, or a baby lavender duck with warm cream. Chenille in pastel shades is something else entirely. Every color combination ends up equally precious.
Abbreviations Used in This Pattern
| Abbreviation | Meaning |
|---|---|
| sc | single crochet |
| hdc | half double crochet |
| dc | double crochet |
| inc | increase — 2 sc worked into the same stitch |
| dec | invisible decrease (inv dec) — insert hook through the front loops only of the next 2 stitches simultaneously, yarn over, pull through both, yarn over, pull through remaining 2 loops. Used for sc-based sections. See note below for wings. |
| hdc dec | half double crochet decrease (hdc2tog) — used in the Wings section. All “dec” in the Wings rows are hdc dec. |
| ch | chain |
| mr | magic ring |
| sl st | slip stitch |
Note on decreases: In all sc-based sections (Legs, Body, Head, Tail), use the invisible decrease — it closes the seam cleanly with no visible gap. In the Wings, which are worked entirely in hdc, use hdc2tog instead. The wings are folded and joined, so any slight gap is hidden entirely.
Before You Begin Your Crochet Duck Pattern
Before you cast on a single stitch, take a few minutes to read through the Legs-Body section in full. This duck has the most beautifully clever construction: the legs are worked first, then joined together with a short chain bridge and worked upward as the body — and then, without cutting yarn, the body continues directly into the head as one seamless piece. The tail is attached during construction in Rows 17–18, and the wings are incorporated in Row 25. Knowing those attachment moments are coming makes the whole process feel intentional and smooth rather than surprising.
If you haven’t worked with magic rings before, our magic ring tutorial walks you through the technique step by step — it’s the foundation for every part of this duck except the beak and headband, so it’s worth getting comfortable with.
🩷 Chloe’s Chenille Tip: Chenille yarn hides individual stitches beautifully — which is exactly what makes it so soft and lush to look at, and also what makes stitch counting a little trickier than usual. Move your stitch marker faithfully at the start of every single round. Count your stitches before you continue to the next row. It takes an extra few seconds each time and will save you from frogging later. Trust the stitch marker.
For safety eye placement, our guide to attaching safety eyes covers everything from choosing the right size to pressing washers in correctly. The eyes on this duck go in between Rows 34 and 35, spaced 6 stitches apart — place them before the head starts to close, while you can still reach inside to adjust positioning. More detail on this in the assembly section.
Free Crochet Duck Pattern Instructions
Work all parts in continuous rounds unless otherwise specified. Use a stitch marker to track the beginning of each round.
Wings (Make 2)
Yarn: Main color (white)
Start: Magic ring
Note: All decreases in this section are hdc dec (hdc2tog). Do not stuff.
Row 1: 6 sc in mr (6)
Row 2: (1 hdc, inc) × 3 (9)
Row 3: (2 hdc, inc) × 3 (12)
Row 4: (1 hdc, inc) × 6 (18)
Row 5: (8 hdc, inc) × 2 (20)
Row 6: 20 hdc (20)
Row 7: 20 hdc (20)
Row 8: (8 hdc, dec) × 2 (18)
Row 9: (1 hdc, dec) × 6 (12)
Row 10: 12 hdc (12)
Row 11: 6 hdc dec (6)
After Row 11, work 2 additional hdc as a position shift.
Finishing: Fold the wing flat in half and join through both layers with 3 sc to close the open edge. Do not stuff. Fasten off, leaving a short tail to weave in. Make a second wing to match.
🩷 When both wings are finished, hold them side by side before moving on. They should be the same size and shape — same gentle oval, same softness. The tiniest details make the biggest difference, and these wings are going to tuck right up against the body in the most precious way.
Tail (Make 1)
Yarn: Main color (white)
Start: Magic ring
Note: Do not stuff.
Row 1: 4 sc in mr (4)
Row 2: 4 inc (8)
Row 3: (3 sc, inc) × 2 (10)
Row 4: (4 sc, inc) × 2 (12)
Row 5: (2 sc, inc) × 4 (16)
Row 6: (inc, 7 sc) × 2 (18)
Finishing: Fold in half and join through both layers with 9 sc. Do not stuff. Fasten off, leaving a short tail. Set aside.
Legs and Body (Make as One Connected Piece)
Read this entire section before you begin. The legs are each worked separately through Row 12, then joined together and worked upward as the body. The tail and wings are both integrated during construction — not sewn on afterward.
Yarn: Contrast color (golden yellow) for Rows 1–6; change to main color (white) at the end of Row 7
Start: Magic ring
Work Rows 1–12 in full to make the first leg. Fasten off yarn. Work Rows 1–12 again to make the second leg — do not fasten off after the second leg. Continue immediately to Row 13.
Row 1: 6 sc in mr [contrast color] (6)
Row 2: 6 inc (12)
Row 3: (1 sc, inc) × 6 (18)
Row 4: 18 sc (18)
Row 5: 18 sc (18)
Row 6: (1 sc, dec) × 6 (12)
Stuff the leg lightly at this point, before it closes further. You want it firm enough to hold its round shape, but not so full that the seam pulls.
Row 7: 6 dec, changing to main color on the final pull-through of the last dec (6)
Row 8: 6 sc [main color] (6)
Row 9: 6 inc (12)
Row 10: (1 sc, inc) × 6 (18)
Row 11: 18 sc (18)
Row 12: 18 sc (18)
First leg: fasten off at Row 12. Second leg: do not fasten off — continue to Row 13.
Row 13 — Joining the legs: From the second leg, chain 2 and crochet across to the first leg. 18 sc along first leg, 2 sc along ch, 18 sc along second leg, 2 sc along ch (40)
🩷 This is the moment! When the two little yellow legs join together and the body starts to take shape, she suddenly looks like an actual duck. So satisfying to see it all come together.
Row 14: 8 sc, inc, 19 sc, inc, 11 sc (42)
The two increases fall on the sides of the body — this is what gives her that lovely round, plump silhouette.
Row 15: 42 sc (42)
Row 16: 42 sc (42)
Row 17 — Begin attaching tail: 37 sc, 5 sc attaching tail (42)
When you reach the tail position at the back of the body, hold the tail piece against the body with its folded edge facing out. Work 5 sc through both the body stitches and the open edge of the tail simultaneously to anchor it in place.
Row 18 — Finish attaching tail: 4 sc attaching tail, 1 sc, dec, (5 sc, dec) × 5 (36)
Continue working through both the body and the tail edge for the first 4 sc of this row to fully secure it, then decrease as indicated.
Row 19: (4 sc, dec) × 6 (30)
Row 20: 30 sc (30)
Row 21: (3 sc, dec) × 6 (24)
Row 22: 24 sc (24)
Row 23: (2 sc, dec) × 6 (18)
Row 24: 18 sc (18)
Row 25 — Attaching wings: along body — 1 sc, dec, 1 sc, dec with wing, 1 sc, dec, along body — 1 sc, dec, 1 sc, dec with wing, 1 sc, dec (12)
At each “dec with wing” position, hold one wing flat against the side of the body. Work the invisible decrease through the body stitch AND the folded edge of the wing at the same time. This locks the wing in place without any sewing — and it will look perfect.
Row 26: 12 sc (12)
Do not cut yarn. Continue directly into the head.
Head (Continuation of Body — no cutting yarn)
Yarn: Main color (white), continuous from Row 26
Start: Continuation
Row 27: 12 inc (24)
Row 28: (3 sc, inc) × 6 (30)
Row 29: (4 sc, inc) × 6 (36)
Row 30: (5 sc, inc) × 6 (42)
Row 31: (6 sc, inc) × 6 (48)
After Row 31, move your stitch marker to the center-front of the head. This reference point is going to help you position the safety eyes symmetrically — which matters so much with this design.
Row 32: 48 sc (48)
Row 33: 48 sc (48)
Row 34: 48 sc (48)
Row 35: 48 sc (48)
Safety eye placement: Insert the 12mm safety eyes between Rows 34 and 35, spaced 6 stitches apart from each other. Do this before the head closes further — you need to be able to reach inside to press the washers on. Hold the head up and look at it from directly in front before you commit. More detail in the assembly section and the finishing tips.
Row 36: (6 sc, dec) × 6 (42)
Row 37: (5 sc, dec) × 6 (36)
Row 38: (4 sc, dec) × 6 (30)
Row 39: (3 sc, dec) × 6 (24)
Row 40: (2 sc, dec) × 6 (18)
Before continuing to Row 41, stuff the body and head firmly through the remaining opening. Use your polyfill generously — you want her to feel solid and hold that beautiful round shape. Push stuffing down into the body and legs first, then fill the head, checking the silhouette from the front as you go.
Row 41: (1 sc, dec) × 6 (12)
Row 42: 6 dec (6)
Finishing: Thread yarn tail onto tapestry needle. Weave through the front loops of the remaining 6 stitches and pull snug to close the opening completely. Weave in end securely.
Hair Tufts
Yarn: Main color (white)
Start: Join yarn at the top center of the head at Row 42
Row 1: Chain 16 (more or fewer at your discretion) and sl st back into the same starting stitch. Repeat 6 times total to form 6 looped tufts.
These little loops give her that ruffled, just-woken-up look that is completely irresistible in chenille. Cluster them toward the very top of the head. You can absolutely add more loops or lengthen the chains if you want a more dramatic tuft situation — she can handle it and she will look amazing.
Beak (Make 1)
Yarn: Contrast color (golden yellow)
Start: Foundation chain
Row 1: Chain 5 (5)
Row 2: 3 sc, 3 sc in one stitch, 2 sc, 3 sc in one stitch (11)
Row 3: 11 sc + 3 sc shift (11)
Finishing: Leave a long yarn tail for sewing. Set aside.
Headband (Make 1)
Yarn: Your choice of color — this is where you get to have a little fun
Start: Foundation chain
Row 1: Chain 65. Starting in the 2nd ch from hook: 1 sc, 2 hdc, 3 dc, 2 hdc, 48 sc, 2 hdc, 3 dc, 2 hdc, 1 sc. (64)
Optionally, work the second side of the headband the same way for a neat double-sided finish.
🩷 Chloe’s Headband Tip: This is where personality really happens. A soft blush pink headband changes her whole mood. So does mint green, or pale lavender, or even a yellow that echoes her little beak and feet. I have been known to make several headbands in different colors just to swap them out depending on how I’m feeling. It’s a one-row project. Completely worth it.
Putting Your Crochet Duck Together
- Safety eyes: These should already be positioned between Rows 34 and 35, 6 stitches apart. Before pressing the washers on, hold the head under a bright lamp and look at it from directly in front — not from the side or an angle. That front-on view is the only one that matters. If both eyes look perfectly level from that angle, press each washer in firmly until it clicks all the way down. Once those washers are set, they are permanent. Take the extra thirty seconds here. Every time.
- Tail: Already secured to the body during Rows 17–18. Check that it sits centered at the back and lies flat.
- Wings: Already attached to the body during Row 25. Check that they sit symmetrically on each side, resting naturally against the body.
- Head closure: Already closed at Row 42. Weave in the yarn end securely.
- Beak: Using the long yarn tail and tapestry needle, sew the beak onto the head centered below the safety eyes, spanning Rows 36–38. Position it so it faces forward and sits flat against the face. A few firm stitches through the body of the beak and into the head is all it needs.
- Eyebrows: Using thin yarn or embroidery thread and your tapestry needle, embroider two small arched eyebrows just above and slightly outside of each eye. More detail on this below — it’s one of the most important details on this duck.
- Headband: Wrap around the head and tie or sew at the back to secure.
If you’d like a detailed walkthrough of sewing and positioning amigurumi parts cleanly, our guide to sewing amigurumi parts together is full of tips that make a real difference in how polished the final piece looks.
Making Your Crochet Duck Extra Cute — The Finishing Details
Okay. This is the part I’ve been looking forward to. Because here’s the thing about a plush duck worked in chenille yarn: the base shape alone is already irresistible. That round, squishy, palm-filling silhouette is wonderful all on its own. But the finishing details — the eyebrows, the beak placement, the hair tufts, the headband — are what take her from a nice crochet project to something that makes every single person in the room reach out and ask if they can hold her. This is where it goes from nice to irresistible.
The Eyebrows — Tiny Stitches, Huge Expression
The eyebrows are the detail that give this duck her personality, and they are simpler to do than you might expect. Thread a very thin strand of dark brown, black, or charcoal embroidery thread onto your tapestry needle. Come up just above and slightly outside of one eye, make a short gentle arch of two or three tiny stitches, and go back down. Repeat above the other eye. Check from directly in front to make sure both arches are level with each other and symmetrically placed. Two tiny arched stitches. That’s it. The difference in expression is extraordinary — she goes from a blank stare to the most gentle, curious, utterly sweet little face.
Safety Eye Placement — Getting It Just Right
I place the safety eyes before the head begins to close, while the opening is still wide enough to reach inside and adjust position. I insert both eyes loosely first — no washers yet — and hold the whole head under my lamp from directly in front. Both eyes need to look perfectly level from that angle. If one is even half a row off, I slide it to correct before committing. Once I’m satisfied, I press the washers on one at a time: thumb on the front of the eye, index finger behind the washer, pressing firmly and evenly until the full click.
🩷 Chloe’s Eye Tip: Do one washer at a time. Place the first one loosely, then step back and look from directly in front one last time before pressing fully. It gives you one final chance to adjust before you commit. When both washers are in and perfectly level? That’s the best feeling. Okay but those eyes though. Those glossy little eyes. 🩷
The Hair Tufts — Fluffy Is Always Better
The six looped tufts at the top of her head are worked with 16-chain loops — but this is one of those finishing moments where more is genuinely more. A few extra loops, a slightly longer chain, clusters pulled tighter or spread wider — all of it changes her look in a sweet way. I like to arrange the finished loops with my fingertip, spreading them into a soft little crown shape. In chenille especially, the loops catch the light and look like the most impractical, perfect little feathers. It’s everything.
Headband Color Ideas
A few combinations I love with this duck’s white-and-yellow palette:
- Soft blush pink — a classic, sweet contrast that looks beautiful against the white chenille
- Mint green — fresh, pastel-perfect, and a little unexpected
- Pale lavender — dreamy and delicate in the best possible way
- Matching golden yellow — ties the beak and feet palette together into something very cohesive and intentional
- Warm cream — subtle, soft, quietly elegant
Color Variations for the Whole Duck
The original white-and-yellow colorway is perfect and I would never talk you out of it. But if you want to explore the pastel side of chenille yarn, these combinations are completely precious:
- Blush pink body + peachy beak and feet — the gentlest, most tender duck imaginable
- Baby blue body + cream accents — classic and soft, like a little gift
- Lavender body + warm yellow accents — unexpected and completely charming
- Ivory body + dusty rose accents — vintage, delicate, so pretty on a shelf
Chloe’s Final Look
I have been staring at this finished little duck for an embarrassing amount of time and I have absolutely zero regrets about it. The way the chenille catches the light on those hair tufts, the tiny arched eyebrows giving her just a little bit of quiet personality, the glossy eyes, that sweet little beak — she’s perfect. Try making a pair in two different colorways and setting them side by side, or tuck her into a soft basket display with a few other plush friends. She will absolutely be the star of that shelf, and you will know exactly why. 🩷
What yarn is best for this crochet duck pattern free?
Bulky (5) chenille yarn like Himalaya Dolphin Baby or Bernat Baby Velvet is best to achieve the signature squishy, soft texture.
How big is the finished chenille duck?
When using a 4.5mm hook and bulky yarn, the duck stands approximately 7 inches (18 cm) tall.
Is this duck pattern suitable for beginners?
This is an intermediate pattern because it involves joining legs, integrating parts during construction, and working with chenille yarn which can make stitch counting tricky.