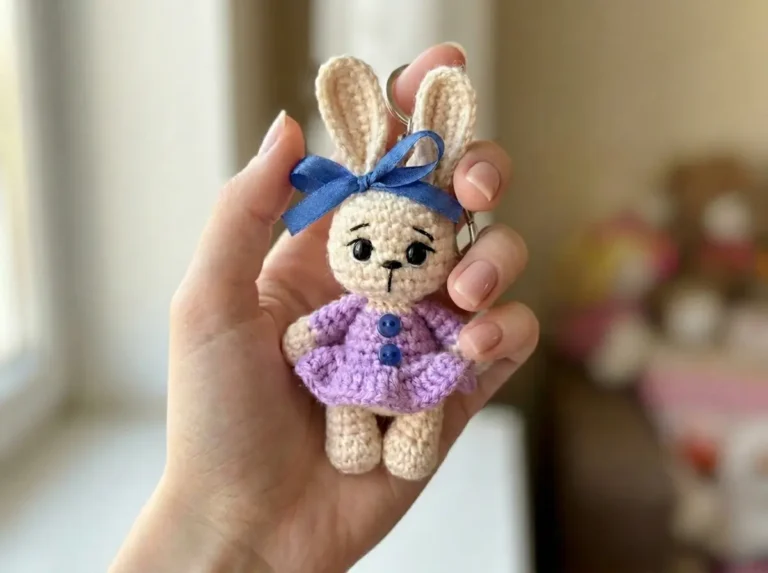
Free Bunny Amigurumi Pattern — Squishy Chenille Plush with Skirt
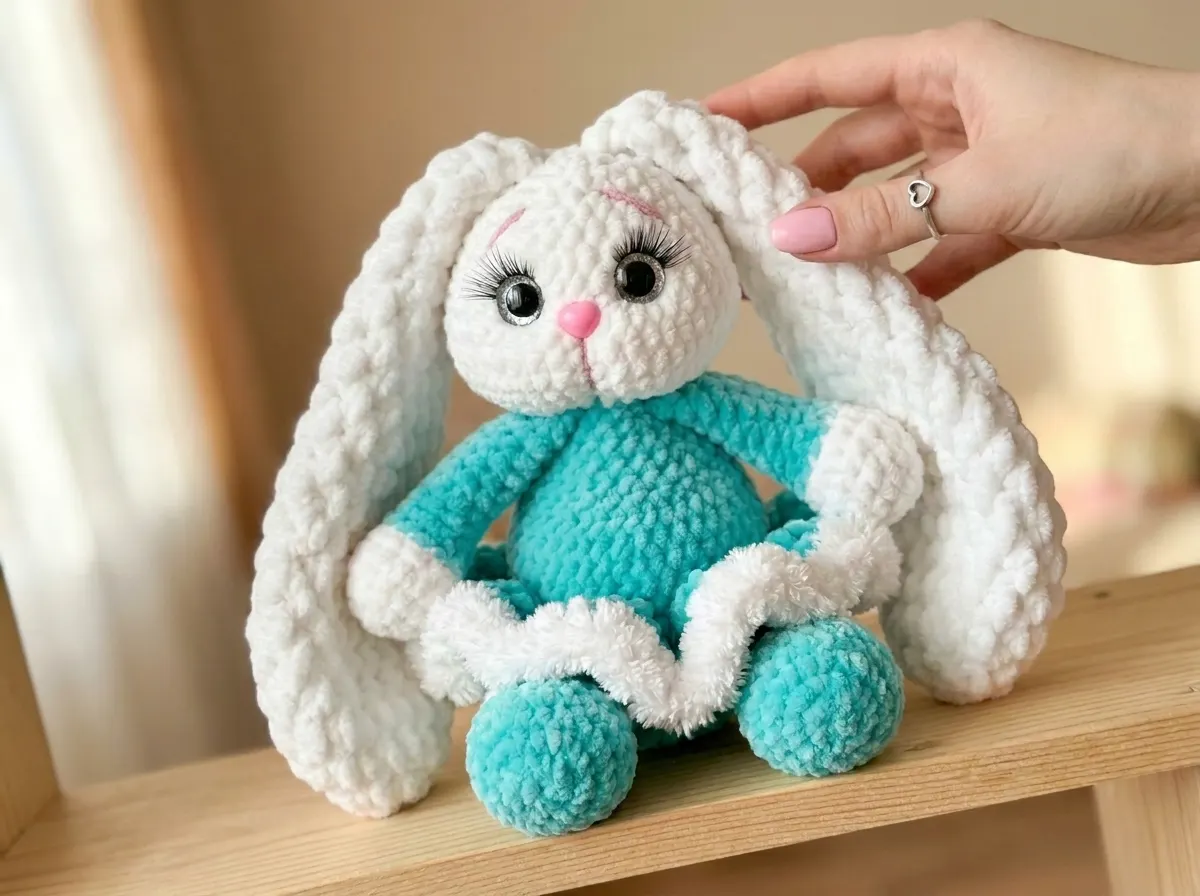
This bunny amigurumi free pattern is built for the chenille yarn sitting in your stash — the fluffy, velvet-soft stuff that makes everything look expensive without costing much to finish. The whole bunny uses about 1.5 skeins of bulky chenille for the body and half a skein for the accent color, plus small scraps of DK yarn for face shaping. The legs and arms build directly into one continuous body-head piece, which sounds intimidating but actually saves you sewing time. Grab your G/6 hook and let’s get to it.
🧶 What You’ll Need From Your Stash
- 💰 Yarn Needed: ~195 yds main color bulky chenille + ~65 yds accent color chenille + small amounts DK white and DK pink (face details only)
- 🎨 Colors: main color (any), accent color (any contrasting), white DK, pink DK
- 🪝 Hook: G/6 (4.0 mm) for body; I/9 (5.5 mm) for ears only
- ⏱️ Time: 8–12 hours
- 📏 Finished Size: approx. 10–12 in (depending on yarn and tension)
- 💡 Difficulty: Intermediate
- 🎁 Great For: handmade gifts, nursery decor, photography props, market tables
Materials for Your Bunny Amigurumi Free Pattern
- Bulky (5) chenille yarn, main color — approximately 195 yards. US alternatives: Bernat Baby Velvet, Premier Parfait, or any soft Bulky (5) weight chenille you’ve got on hand.
- Bulky (5) chenille yarn, accent color — approximately 65 yards. Same yarn family works best so the textures match.
- DK / Light Worsted (3) yarn, white — a small amount only, used for face shaping. Drops Muskat or Paintbox Cotton DK are good US picks. Any smooth DK white you have works.
- DK / Light Worsted (3) yarn, pink — a very small amount for muzzle embellishments. Seriously, a leftover piece from anything works here.
- Hook: G/6 (4.0 mm) for all parts except ears; I/9 (5.5 mm) for ears
- 16mm safety eyes (×2)
- Safety nose (×1)
- Eyelashes and clear-drying craft glue (Beacon 527 or similar)
- Polyester fiberfill — enough to stuff body, head, legs, arms, and tail firmly
- Stitch marker
- Tapestry needle and sewing needle
🧶 Scrap Check: The DK white and pink are face-detail yarn only — we’re talking less than 5 yards of each. If you’ve made literally any other amigurumi recently, you almost certainly have both already. Do not buy a new skein for this.
Abbreviations for This Bunny Amigurumi Pattern
| Abbreviation | Meaning |
|---|---|
| mr | magic ring |
| sc | single crochet |
| hdc | half double crochet |
| dc | double crochet |
| inc | increase (2 sc in same stitch) |
| dec | invisible decrease — insert hook through front loops only of next 2 stitches simultaneously, yarn over, pull through, yarn over, pull through 2 loops |
| hdc-inc | half double crochet increase (2 hdc in same stitch) |
| BLO | back loop only |
| FLO | front loop only |
| ch | chain |
| sl st | slip stitch |
| FO | fasten off |
| st(s) | stitch(es) |
Smart Crafter Tips for This Bunny Amigurumi Free Pattern
Always use the invisible decrease. Every “dec” in this pattern means invisible decrease — insert your hook through the front loops only of the next two stitches at once. It looks cleaner in chenille, which already has a lot of texture to hide mistakes. The standard sc2tog leaves a visible gap that shows through the fluff, so skip it entirely here.
The body-head is one piece — read Row 8 carefully before you get there. The legs get joined directly into Row 8 of the body, and the arms join at Row 19. This sounds complex, but it’s actually faster than sewing everything on afterward. When you reach Row 8, you’ll crochet across 7 stitches of the body, then 7 stitches across the top of the first leg, continue 14 stitches across the body, then 7 stitches across the second leg, then finish the remaining 7 body stitches. Have both legs ready before you start the body. First time making a magic ring? Our magic ring tutorial covers it in under two minutes.
Stuff the neck section very tightly. The transition between body and head (around Rows 18–21) is a narrow neck that needs to hold up the weight of the head. Pack it firmly with fiberfill or the head will flop. Our guide on how to stuff amigurumi properly has a section on stuffing narrow connectors without lumps.
Glue the eyelashes before installing the safety eyes. Attach the lashes to the safety eyes with clear-drying craft glue and let them dry completely first. Installing lashes after the eyes are locked in is a frustrating detour you don’t need.
The Pattern
Legs (×2)
Yarn: accent color for Rows 1–10, switch to main color before Row 11
Start: magic ring
Row 1: 6 sc in mr (6)
Row 2: 6 inc (12)
Row 3: (1 sc, inc) × 6 (18)
Row 4: (2 sc, inc) × 6 (24)
Row 5: (3 sc, inc) × 6 (30)
Row 6: 30 sc (30)
Row 7: 30 sc (30)
Row 8: 9 sc, 6 dec, 9 sc (24)
Row 9: 7 sc, 5 dec, 7 sc (19)
Row 10: 6 sc, 3 dec, 7 sc (16)
Row 11: 16 sc BLO (16) — switch to main color before this row
Row 12: 16 sc (16)
Row 13: 16 sc (16)
Row 14: 16 sc (16)
Row 15: (6 sc, dec) × 2 (14)
Row 16: 14 sc (14)
Row 17: 14 sc (14)
💡 Note: Before closing, work an additional +2 sc to position the seam at the back of the leg. Stuff the leg with fiberfill after Row 14. Fold in half and work 7 sc across to close. Do not FO — leave working yarn attached; this leg joins the body at Row 8.
🧶 Scrap Check: The accent color section is the foot — Rows 1–10. That’s roughly 20–25 yards of accent yarn per leg, 40–50 yards total for both. A half-skein of accent chenille covers legs and the body waistband comfortably.
Arms (×2)
Yarn: main color for Rows 1–6, switch to accent color before Row 7
Start: magic ring
Row 1: 6 sc in mr (6)
Row 2: 6 inc (12)
Row 3: (2 sc, inc) × 4 (16)
Row 4: 16 sc (16)
Row 5: 16 sc (16)
Row 6: 5 sc, 3 dec, 5 sc (13)
Row 7: 13 sc (13) — switch to accent color before this row
Row 8: 4 sc, 3 dec, 3 sc (10)
Row 9: 10 sc (10)
Row 10: 10 sc (10)
Row 11: 10 sc (10)
Row 12: 10 sc (10)
Row 13: 10 sc (10)
Row 14: 10 sc (10)
Row 15: 10 sc (10)
💡 Note: Stuff only the lower (hand/paw) portion of the arm — the upper sleeve stays soft and flat so it joins the body cleanly at Row 19. Before closing, work an additional +2 sc to position the seam. Fold in half and work 5 sc across to close. Leave working yarn attached for body joining.
Ears (×2)
Yarn: main color
Hook: I/9 (5.5 mm) — larger hook gives the ears their soft, floppy shape
Start: magic ring
Row 1: 6 hdc in mr (6)
Row 2: 6 hdc-inc (12)
Row 3: (1 hdc, hdc-inc) × 6 (18)
Row 4: (2 hdc, hdc-inc) × 6 (24)
Row 5: (3 hdc, hdc-inc) × 6 (30)
Row 6: 30 hdc (30)
Row 7: 30 hdc (30)
Row 8: 30 hdc (30)
Row 9: (13 hdc, dec) × 2 (28)
Row 10: (12 hdc, dec) × 2 (26)
Row 11: (11 hdc, dec) × 2 (24)
Row 12: 24 hdc (24)
Row 13: (4 hdc, dec) × 4 (20)
Row 14: 20 hdc (20)
Row 15: (3 hdc, dec) × 4 (16)
Row 16: (6 hdc, dec) × 2 (14)
Row 17: 14 hdc (14)
Row 18: (5 hdc, dec) × 2 (12)
Row 19: 12 hdc (12)
Row 20: 12 hdc (12)
Row 21: (4 hdc, dec) × 2 (10)
Row 22: 10 hdc (10)
Row 23: 10 hdc (10)
Row 24: 10 hdc (10)
Fold edges together and work 5 sc across to close. FO, leaving a long tail for sewing.
💡 Note: Don’t stuff the ears — they’re meant to flop naturally. The larger hook (I/9) is intentional here; it creates a softer, airier fabric that drapes better than a tight G/6 ear would.
Body-Head (×1)
Yarn: accent color for Rows 1–8 (body base), switch to main color before Row 9; switch back to main color before Row 20 (start of neck/head)
Have both finished legs and arms ready before starting this section
Start: magic ring
Row 1: 6 sc in mr (6)
Row 2: 6 inc (12)
Row 3: (1 sc, inc) × 6 (18)
Row 4: (2 sc, inc) × 6 (24)
Row 5: (3 sc, inc) × 6 (30)
Row 6: (4 sc, inc) × 6 (36)
Row 7: (5 sc, inc) × 6 (42)
Row 8: 7 sc, 7 sc (leg), 14 sc, 7 sc (leg), 7 sc (42) — join both legs here
Row 9: 42 sc BLO (42) — front loops of this row form the skirt base; switch to main color
Row 10: 42 sc (42)
Row 11: 42 sc (42)
Row 12: (5 sc, dec) × 6 (36)
Row 13: 36 sc (36)
Row 14: 13 sc, 6 dec, 11 sc (30)
Row 15: 30 sc (30)
Row 16: (3 sc, dec) × 6 (24)
Row 17: 24 sc (24)
Row 18: (2 sc, dec) × 6 (18)
Row 19: 4 sc, 5 sc (arm), 3 sc, 5 sc (arm), 1 sc (18) — join both arms here
Row 20: 18 sc (18)
Row 21: 18 inc (36)
Row 22: (5 sc, inc) × 6 (42)
Row 23: (6 sc, inc) × 6 (48)
Row 24: 48 sc (48)
Row 25: 48 sc (48)
Row 26: 48 sc (48)
Row 27: 48 sc (48)
Row 28: (6 sc, dec) × 6 (42)
Row 29: (5 sc, dec) × 6 (36)
Row 30: 36 sc (36)
Row 31: 36 sc (36)
Row 32: (4 sc, dec) × 6 (30)
Row 33: 30 sc (30)
Row 34: (3 sc, dec) × 6 (24)
Row 35: (2 sc, dec) × 6 (18)
Row 36: (1 sc, dec) × 6 (12)
Row 37: 6 dec (6)
💡 Stuffing note: Start stuffing the body around Row 14 and continue adding fiberfill as you close. Stuff the body firmly to shape the belly. The neck section (Rows 18–21) needs to be packed very tightly — this is the structural point that holds the head up. Safety eyes install between Rows 29–30, spaced 5 stitches apart. Safety nose installs between Rows 28–29, centered. Install eyes and nose before closing the head. See our guide on how to safely attach safety eyes if this is your first time.
Close the opening using a tapestry needle.
Tail (×1)
Yarn: main color
Start: magic ring
Row 1: 6 sc in mr (6)
Row 2: 6 inc (12)
Row 3: (1 sc, inc) × 6 (18)
Row 4: 18 sc (18)
Row 5: (1 sc, dec) × 6 (12)
Work 1 sl st. Lightly stuff the tail with fiberfill — just enough to give it shape without making it stiff. Leave a long tail for sewing.
Skirt
Yarn: accent color
Start: Join yarn to any front loop of Body-Head Row 9 (the BLO row created the ridge that holds this section)
Row 1: Ch 3, work in the round alternating 2 dc, 3 dc into each front loop of Row 9
Row 2: Ch 2, 1 dc in each st of previous row
Row 3: Ch 2, 1 dc in each st of previous row
At the end of each row, work a sl st into the turning ch to join the round. Work 1 sl st, FO, cut yarn and weave in ends neatly.
💡 Skirt note: The ch-3 at the start of Row 1 counts as your first dc. The alternating 2 dc / 3 dc pattern creates the flare — it does not need to be perfectly even; slight variation in the ruffle is the point. This section uses the front loops you preserved at Body Row 9, so the ridge line disappears neatly into the skirt edge.
Assembly
- Ears: Sew to the top of the head, centered and positioned between Rows 34 and 37. Pin in place before sewing and check symmetry from the front before committing.
- Legs: Already joined into the body at Row 8 — no additional sewing needed.
- Arms: Already joined into the body at Row 19 — no additional sewing needed.
- Tail: Sew onto the back of the body between Rows 3 and 7, centered. Use a sewing needle and matching yarn.
- Safety eyes: Installed between Rows 29 and 30, 5 stitches apart — lock washers in before closing the head (you cannot install them after).
- Safety nose: Installed between Rows 28 and 29, centered between the eyes — same rule applies, install before closing.
- Skirt: Worked directly into the front loops of Body Row 9 — no assembly needed, it’s built in.
💡 Assembly tip: The integrated leg and arm join (Rows 8 and 19) is where this pattern earns its time back. You’re skipping four sewing seams. The tradeoff is that you need to have your legs and arms completely finished and ready before you start the body. Make the limbs first — always. Our guide on sewing amigurumi parts together covers the ear attachment and tail placement in detail if you want visual guidance.
Face Details
Eyelashes: Glue to the safety eyes with clear-drying craft glue before installing. Let dry completely.
Muzzle shaping: Thread a tapestry needle with white DK yarn. Pull through the face to shape and define the muzzle area — this is a sculpting technique that creates dimension in the otherwise flat chenille surface. Take your time here; it makes a significant difference.
Eyebrows: Embroider with DK yarn between Rows 31 and 35.
Muzzle embellishments: Use pink DK yarn for additional details around the nose and muzzle area.
Stretch It Further
💡 Stretch It Further: This bunny is a color story waiting to happen. The same pattern in three different main colors — cream, grey, and caramel — makes a set that photographs beautifully together and sells as a bundle. Swap the accent for a tonal variation (blush on white, charcoal on grey) if you don’t want high contrast. Market tables love a matched set. Gift-givers love options. And your stash almost certainly has enough leftover chenille across a few skeins to make all three without buying a single new ball. Total yarn cost per bunny runs well under $10 — as a trio, that’s a gift set that looks far more expensive than it is.
Mia’s Take
About 260 yards of chenille, two hook sizes, and one continuous body-head that skips four seams — this bunny uses less yarn and less finishing time than it looks like it would. The integrated limb joins are the move here; once you’ve done it once, you’ll start looking for other patterns that use the same trick. Make a second in a contrasting colorway and you’ve got a gift set that took roughly the same total effort. That’s the kind of value I’m here for. 🧶
What yarn is best for this bunny amigurumi?
Bulky (5) weight chenille yarn like Bernat Baby Velvet or Premier Parfait works best for a soft, squishy finish that looks high-end.
How long does it take to crochet this bunny?
It typically takes between 8 to 12 hours to complete, depending on your experience with integrated limb techniques.
Is this pattern suitable for beginners?
It is an intermediate pattern due to the integrated limb joins, but the tips provided make it achievable for ambitious beginners.