Free Crochet Amigurumi Bouquet — Four Flowers, One Scrap Basket
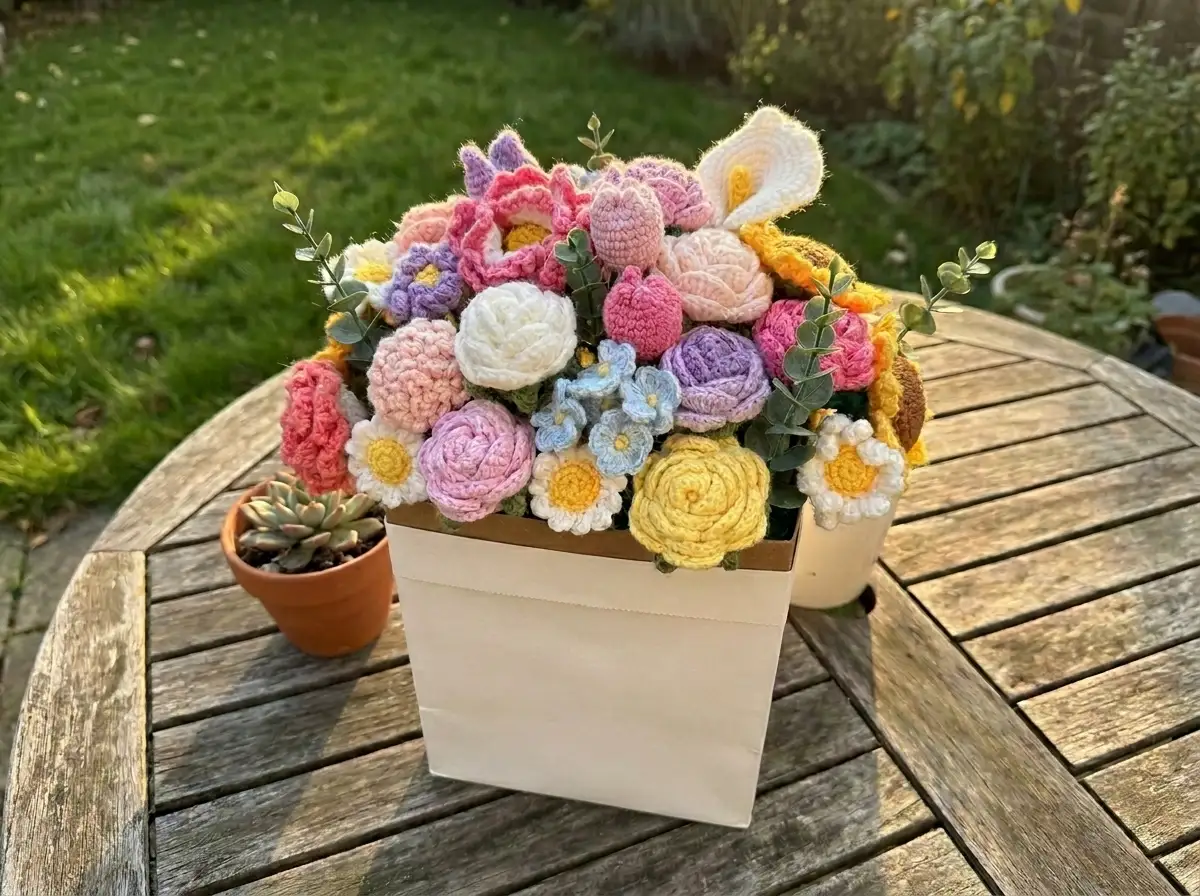
This free crochet amigurumi bouquet pattern is exactly what a well-stocked scrap basket is for. You get four complete flowers — carnations, a daisy, a rose, and forget-me-nots — using roughly 160–175 yards across six colors, most of which you probably already own in leftover quantities. Wire stems make the whole set poseable, giftable, and surprisingly impressive for the amount of yarn actually involved. Grab your scraps. This bouquet comes together faster than it looks.
🧶 What You’ll Need From Your Stash
- 💰 Yarn Needed: ~160–175 yards total — pink ~65 yds, green ~65 yds, white ~10 yds, yellow ~12 yds, blue/light blue ~8 yds
- 🎨 Colors: pink, green, white, yellow, blue, light blue (or any similar shades from your stash)
- 🪝 Hook: 2.5mm–3.5mm (approx. US C/2 to US D/3) — use whatever hook matches your yarn weight
- ⏱️ Time: 5–7 hours for the full set
- 📏 Finished Size: Varies by flower — carnation approx. 2.5–3 in across; forget-me-not approx. 1 in across
- 💡 Difficulty: Intermediate
- 🎁 Great For: home decor, handmade gifts, wedding table settings, market bundles, Mother’s Day
Full Materials List for This Amigurumi Bouquet
- Pink yarn — approximately 65 yards (for carnation flower + rose flower). Any pink yarn you have on hand works; the weight just needs to be consistent within each flower.
- Green yarn — approximately 65 yards (for all calyxes, holders, leaves, and stem wrapping). This is your most-used color — raid every green scrap you own.
- White yarn — approximately 10 yards (for daisy petals only). A tiny leftover ball is more than enough.
- Yellow yarn — approximately 12 yards (for daisy flower center + forget-me-not centers). Got half a skein of yellow you’ve been ignoring? Here’s where it goes.
- Blue and/or light blue yarn — approximately 8 yards total (for forget-me-not flowers). Mix the two shades for natural variation or use whichever you have.
- Floral wire — for daisy leaves, forget-me-not large leaf, and all stems. Medium-gauge craft wire works well.
- Polyester fiberfill — small amount, for carnation calyx stuffing only.
- Tapestry needle
- Scissors
- Craft glue — for securing stem wrapping
- Stitch markers — optional but helpful for tracking rounds
🧶 Scrap Check: The forget-me-nots use less than 8 yards of blue total. If you’ve ever made anything blue and kept the leftover, you already have what you need. Same goes for the white daisy petals — 10 yards is about the size of a small yarn cake sitting at the bottom of a drawer.
Abbreviations Used in This Amigurumi Bouquet Pattern
| Abbreviation | Meaning |
|---|---|
| sc | single crochet |
| dc | double crochet |
| hdc | half double crochet |
| tr | treble crochet |
| dtr | double treble crochet |
| sl st | slip stitch |
| ch | chain |
| mr | magic ring |
| inc | increase — 2 sc worked into the same stitch |
| dec | invisible decrease — insert hook through front loops only of next 2 stitches simultaneously, yarn over, pull through, yarn over, pull through 2 loops |
| dc-inc | double crochet increase — 2 dc worked into the same stitch |
| dc-dec | double crochet decrease — work dc over 2 stitches simultaneously |
| 3-dc shell | 3 double crochets worked into 1 stitch |
| FO | fasten off |
| BLO | back loop only |
| FLO | front loop only |
Smart Crafter Tips for Your Crochet Amigurumi Bouquet
Start with the forget-me-nots. They’re tiny and quick — the perfect warm-up before you tackle the carnation’s more involved stitch counts. Finishing a whole flower in under 20 minutes is a great confidence booster before the longer pieces.
Work your magic ring tighter than usual. Several flowers in this set start with a magic ring and need a clean, invisible center. If you’re new to this technique, our magic ring tutorial walks through every step — it’s simpler than it sounds, and a tight center makes the flowers look much more polished.
Pre-cut your wire before you start. Cut all your stem wires at the same time — roughly 8–10 in per stem, depending on how tall you want your bouquet. Having them ready to go means you won’t be scrambling mid-project. For the full list of tools that make assembly easier, that article covers wire-friendly finishing options in detail.
Batch your green work. All the leaves and calyx pieces use the same green yarn. Make them all back-to-back before switching colors — fewer yarn-end switches, less time wasted. I made both carnation leaves, both daisy leaves, both forget-me-not small leaves, and the large forget-me-not leaf in one sitting. About 30 minutes of focused green time clears the whole pile.
🧶 Scrap Check: The entire green section of this pattern — calyxes, holders, all leaves — uses roughly 65 yards of green. If you have multiple shades of green in your scrap bin, mix them. Different leaf greens actually look more realistic than one perfectly matched color throughout.
Carnation Crochet Amigurumi Pattern
Carnation — Flower (×1)
Yarn: pink | Start: magic ring
Row 1: 12 dc in mr (12)
Rows 2–4: 12 dc (12)
Row 5: 12 dc-inc (24)
Row 6: 24 dc-inc (48)
Row 7: 48 3-dc shell (3 dc in 1 st) (144)
Row 8: 144 (sc, 3 ch) (144)
FO, cut yarn.
🧶 Scrap Check: The carnation flower is the most yarn-intensive piece in this set — the dramatic ruffle in rows 7 and 8 uses a significant amount of pink. Set aside roughly 35–40 yards of pink for this piece alone before you begin.
Carnation — Calyx (×1)
Yarn: green | Start: magic ring
Row 1: 10 sc in mr (10)
Row 2: 5 (sc, inc) (15)
Rows 3–10: 15 sc (15)
Row 11: 5 (3 ch, dc-dec, skip 1 st, 3 ch, sl st) (stitch count not stated)
Note: The sl st in Row 11 closes each petal loop — it is not worked into a base stitch.
Leave a long tail for sewing. Stuff lightly before closing.
Carnation — Leaves (×2)
Yarn: green | Start: foundation chain
Row 1: 17 ch, starting in 3rd ch from hook: 5 hdc, 9 sc, (sc, sl st, sc), [sc*], 5 hdc (stitch count not stated)
Note: One stitch in the middle of this row could not be fully resolved from the source. The [sc*] notation indicates a single crochet was intended at that position — work 1 sc and continue. The leaf shape will confirm whether you’re on track.
FO, leave a tail for attaching to stem.
Daisy Crochet Amigurumi Pattern
Daisy — Flower Center (×1)
Yarn: yellow | Start: magic ring
Row 1: 6 sc in mr (6)
Row 2: 6 inc (12)
Row 3: 12 sc (12)
Note: Continue working in white yarn immediately after completing Row 3 to add the petals directly onto this center piece.
Daisy — Holder (×1)
Yarn: green | Start: magic ring
Work Rows 1–3 exactly as written for the Flower Center above. (12)
Daisy — Petals
Yarn: white | Start: work along the edge of the completed flower center
Row 1: (3 ch, 1 dc, 3 ch) repeat 12 times (stitch count not stated)
🧶 Scrap Check: The daisy petals use roughly 10 yards of white. That’s about the size of the little yarn ball that gets stuck to the inside of a skein wrapper. Don’t throw that away.
Daisy — Leaves (×2)
Yarn: green | Start: foundation chain
Row 1: 13 ch, add wire, starting in 2nd ch from hook: 11 sc, sl st, 11 sc, sl st (stitch count not stated)
Row 2: 1 ch, (dec, 2 ch, sl st) repeat to end (stitch count not stated)
Note: The wire is added during Row 1 so it becomes encased in the leaf. Fold the wire inside the foundation chain before beginning your stitches.
Rose Crochet Amigurumi Pattern
Rose — Flower (×1)
Yarn: pink | Start: foundation chain
Row 1: 53 ch, starting in 2nd ch from hook: 52 sc (52)
Row 2: 5 ch, turn, starting in 5th ch from hook: 1 dc, [(skip 2 sts, (1 dc, 2 ch, 1 dc)] repeat to end (stitch count not stated)
Row 3: 3 ch, turn, starting in 3rd ch from hook: 1 dc, 2 ch, dc-inc, in each 2-ch space of previous row: (dc-inc, 2 ch, dc-inc) repeat to end (stitch count not stated)
Row 4: 1 ch, turn, 8 dc in each 2-ch space of previous row, then sl st into the dc stitch of previous row, repeat to end (stitch count not stated)
FO, leaving a long tail. Roll the completed strip into a tight spiral to form the rose bud and secure with yarn tail. See Assembly section.
🧶 Scrap Check: The rose flower uses approximately 25–30 yards of pink. If you have leftover pink from the carnation, you can likely pull both flowers from the same skein — plan accordingly before you cut.
Rose — Leaves (×1)
Yarn: green | Start: foundation chain
Row 1: 15 ch, starting in 2nd ch from hook: 1 sc, 1 hdc, 2 dc, 2 tr, 2 dtr, 2 tr, 2 dc, hdc, 3 sc in 1 st, sl st, work symmetrically on opposite side (stitch count not stated)
Row 2: (sc, ch) repeat to center corner st, (1 sc, 3 ch, sl st, 1 sc), continue (sc, ch) to end, sl st at end (stitch count not stated)
FO, leave tail for attaching to stem.
Rose — Holder (×1)
Yarn: green | Start: foundation chain
Row 1: 3 ch, 20 dc in 1st ch inside ring (20)
Row 2: 3 ch, then work 3 dc. Turn, 3 ch, dc-dec, 1 dc. Turn, 3 ch, dc-dec. Turn, 2 ch, repeat 5 times. (stitch count not stated)
FO, leave a long tail. This piece forms the sepal base of the rose.
Forget-Me-Nots Crochet Amigurumi Pattern
Forget-Me-Nots — Flower (×1)
Yarn: blue or light blue | Start: magic ring
Row 1: 5 sc in mr (5)
Row 2: Ch 4, 2 tr, ch 4, sl st. Repeat 5 times. (stitch count not stated)
Note: Row 2 creates 5 petals worked from each of the 5 sc base stitches. Each repeat is one petal.
FO, leave tail. A small loop of yellow yarn is threaded through the center to create the contrasting center dot — see Assembly section.
Forget-Me-Nots — Small Leaves (×2)
Yarn: green | Start: foundation chain
Row 1: 16 ch, starting in 2nd ch from hook: 1 sc, 1 hdc, [*], 2 hdc, 1 sc, 3 sc in 1 st, 1 sc, 2 hdc, 9 dc, 1 hdc, 1 sc (stitch count not stated)
Note: One stitch position early in Row 1 could not be fully resolved from the source. Work 1 sc at the [*] position and continue — the leaf outline will confirm the shape is correct.
FO, leave tail for attaching to stem.
Forget-Me-Nots — Large Leaf (×1)
Yarn: green | Start: foundation chain
Row 1: 26 ch, add wire, starting in 2nd ch from hook: 1 sc, 1 hdc, 19 dc, 2 hdc, 1 sc, 3 sc in 1 st, 1 sc, 2 hdc, 19 dc, 1 hdc, 1 sc (stitch count not stated)
FO, leave tail. The wire inserted in Row 1 allows you to shape the leaf freely once complete.
🧶 Scrap Check: All three forget-me-not leaves combined use about 20 yards of green. If you’ve been working with green yarn throughout this project, check your tail ends before cutting — some of them are long enough to start a leaf without pulling from the main ball.
Assembling Your Crochet Amigurumi Bouquet
For full guidance on sewing crocheted pieces together neatly, our guide to sewing amigurumi parts covers the key techniques — the same principles apply to attaching wire-based flower components.
- Make all stems first. Cut wire to your desired stem height (8–10 in is a good starting point). Wrap each stem tightly with green yarn from the top down, using a small amount of craft glue at the base to secure the end. Let dry before attaching flowers.
- Carnation: Insert the wire stem up through the base of the calyx. Sew the ruffled flower piece onto the top of the calyx, gathering slightly as you go. Attach both leaves to the stem at the desired height by wrapping the leaf tail yarn around the wire and securing with glue.
- Daisy: Attach the white petals to the edge of the yellow flower center. Lay the green holder piece against the underside of the flower and sew together. Insert wire stem through the holder. Attach wire-framed leaves to stem.
- Rose: Roll the completed flower strip tightly into a spiral bud shape and secure with the long yarn tail, stitching through the base several times to hold the shape. Attach the holder piece around the base of the bud. Insert stem wire and secure.
- Forget-Me-Nots: Wrap a small loop of yellow yarn around a short piece of wire, bend into a circle, and pass through the center of the flower to create the yellow center dot. Secure the stem in place. Attach both small leaves and the large leaf to the stem at staggered heights.
- Bundle the stems at a comfortable height and wrap with a length of green yarn or twine to hold the arrangement together. Bend stems gently to position flowers at different heights for a natural look.
💡 Stretch It Further: Make two or three sets of forget-me-nots instead of one — they work up in under 20 minutes each and add volume to the bouquet without adding much yarn. Swap the pink for lavender or peach to create a completely different color story from the exact same four patterns. Bundle five stems in a small kraft paper cone tied with twine and you have a handmade gift that costs under $3 in materials. That’s the kind of math I like. You can also make individual flowers as bag charms or keychain attachments — skip the wire stem and add a keyring to the base instead.
Mia’s Take
Four flowers, roughly 160 yards across your scrap bin, and a handful of wire — that’s the whole budget for something that looks genuinely impressive sitting in a vase. This is exactly the kind of project I keep in my back pocket for when I need a real gift and I’m not buying anything. Make the full set once, figure out which flower you like best, and then just make a dozen of those from every pink and green scrap you own. There’s a market table in this pattern if you want one. 🧶
How much yarn do I need for this amigurumi bouquet?
You will need approximately 160–175 yards of yarn total in pink, green, white, yellow, and blue. It is an ideal project for using up scraps.
Is this amigurumi bouquet pattern suitable for beginners?
This pattern is rated as intermediate due to the variety of stitches and the use of floral wire for assembly and shaping.
How long does it take to finish the full bouquet?
Most crafters can complete the full four-flower set and assembly in about 5 to 7 hours.