Crochet Amigurumi Bear — Free Teddy Pattern with Step-by-Step Instructions
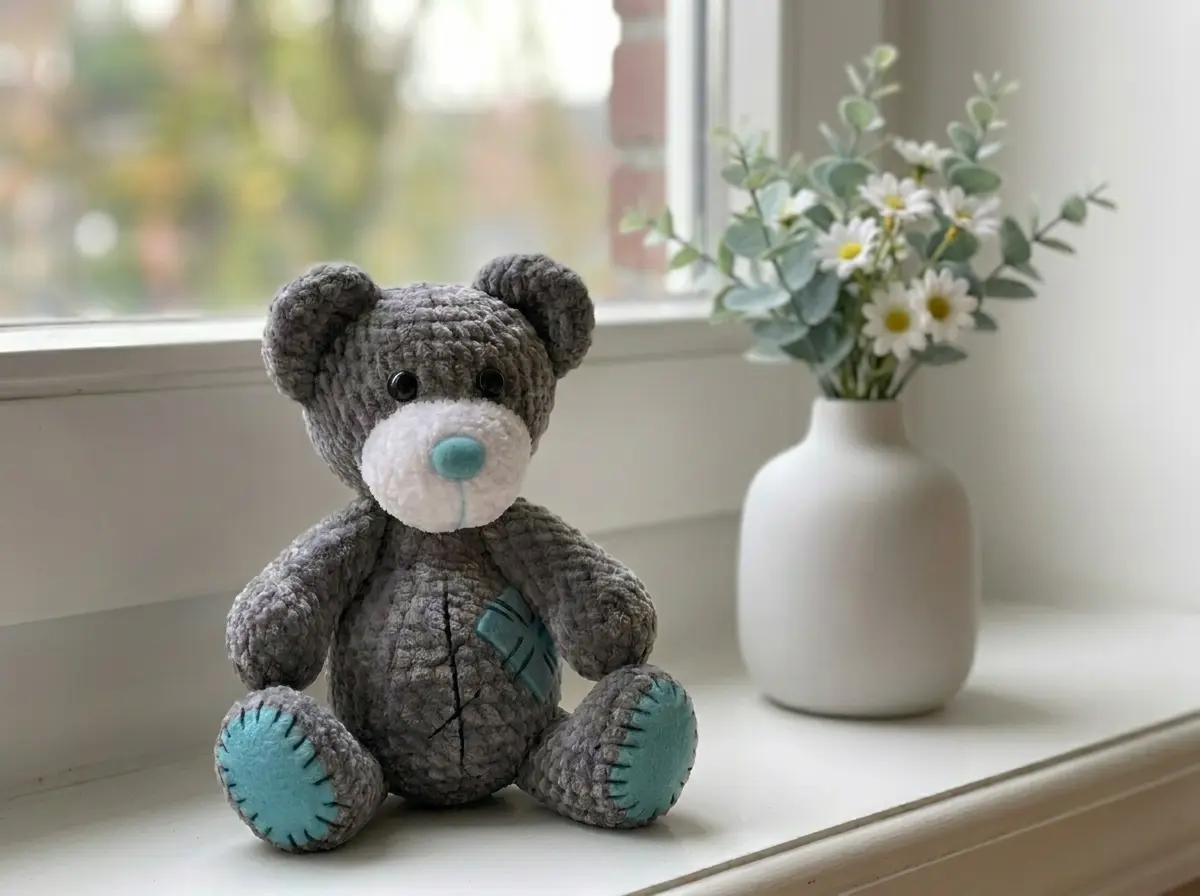
This crochet amigurumi bear is one of those projects I keep coming back to — there’s something about a properly shaped teddy with movable limbs and a little felt-patched belly that never gets old. I’ve tested every round in this pattern, and the counts are clean from start to finish. If you’re ready to make a solid, satisfying amigurumi bear, let’s get into it.
📋 Pattern Quick Stats
- Difficulty: Intermediate
- Finished Size: 10–11 in (26–28 cm)
- Hook Size: H/8 (5.0 mm)
- Yarn Weight: Bulky (5) — chenille/velvet
- Techniques Used: ch 2 start, invisible decrease, button jointing, sewing parts
- Estimated Time: 6–9 hours
Materials for This Amigurumi Bear
- Gray Bulky (5) chenille yarn — YarnArt Dolce (color 760) or US alternatives: Bernat Baby Velvet or Premier Parfait. These velvet/chenille yarns are classified as Bulky (5) on the Craft Yarn Council yarn weight system. Available at Joann, Michaels, Hobby Lobby, or Amazon US.
- White yarn — a small amount of the same weight chenille for the muzzle
- 12mm screw-in safety eyes × 2
- Light blue felt — for nose and decorative patches
- 4 buttons — for jointing the arms and lower legs
- Polyfill stuffing — Poly-Fil by Fairfield is widely available at US craft stores
- Black embroidery floss — for eyebrows and decorative stitching
- Light blue embroidery floss — for the nose line and patch stitching
- H/8 (5.0 mm) hook
- Tapestry needle — for sewing parts and weaving in ends
- Stitch marker
- Scissors
💡 Emma’s Tip: Chenille yarn is beautiful and gives this amigurumi bear that plush, velvety finish — but it’s famously difficult to frog. Work carefully and count every round before moving on. Trust me on this one.
Abbreviations Used in This Amigurumi Bear Pattern
| Abbreviation | Meaning |
|---|---|
| ch | chain |
| sc | single crochet |
| inc | increase — 2 single crochets worked into the same stitch |
| dec | invisible decrease — insert hook through front loops only of next 2 stitches simultaneously, yarn over, pull through, yarn over, pull through 2 loops |
| FLO | front loops only |
| FO | fasten off |
| ( ) × # | repeat the instructions in parentheses the stated number of times |
| (#) | total stitch count at the end of the round |
⚠️ Note on decreases: Every decrease in this pattern is worked through the front loops only — this is the invisible decrease method. It keeps the surface of your amigurumi bear smooth and clean. The sc2tog method (standard decrease) creates a visible gap that’s especially obvious in chenille. Always use the front-loop method here.
Special Techniques for This Amigurumi Bear Pattern
Before you start, it’s worth making sure you’re confident with a couple of key techniques this pattern relies on.
Starting with ch 2 instead of a magic ring: Most of the parts in this pattern begin with a chain-2 start rather than a magic ring. You chain 2, then work your stitches into the second chain from the hook. This method works beautifully with chenille yarn, which can be slippery and hard to control in a traditional adjustable loop. The center hole will close up cleanly once you’ve worked the first few increase rounds.
That said, the magic ring is a technique worth knowing for amigurumi in general. If you’ve never tried it, our complete magic ring tutorial walks through it step by step.
Invisible decrease: This is the only decrease method I use in amigurumi. Working through both front loops simultaneously eliminates the gap you’d get with a standard sc2tog, and it makes a real difference — especially in a large project like this bear where you’ll be doing a lot of shaping. If you want a detailed breakdown before you start, check out our invisible decrease tutorial.
Button jointing: The arms and lower legs on this bear are attached with buttons rather than sewn directly to the body. This gives the limbs movement and creates that classic poseable teddy look. Thread a long needle with strong thread, pass it through a button, through the body, and through a second button on the other side — pulling firmly enough that the buttons sit flush but the limbs still swing freely.
Safety eyes: The 12mm safety eyes go in before you close the head — always. Once the stuffing is in and the opening is closed, there’s no going back. For full guidance, our safety eye attachment tutorial covers placement, spacing, and how to secure the backings properly.
Crochet Amigurumi Bear Pattern
This amigurumi bear is worked in continuous rounds. Use a stitch marker to track the beginning of each round and move it up as you go. All parts are worked separately and assembled at the end.
Body (× 1)
Gray chenille yarn — ch 2 start
Row 1: Work 6 sc into the 2nd ch from hook (6)
Row 2: inc in each st (12)
Row 3: (1 sc, inc) × 6 (18)
Row 4: (2 sc, inc) × 6 (24)
Row 5: (3 sc, inc) × 6 (30)
Row 6: (4 sc, inc) × 6 (36)
Row 7: (5 sc, inc) × 6 (42)
Rows 8–10: 42 sc (3 rows) (42)
Row 11: (5 sc, dec) × 6 (36)
Row 12: 36 sc (36)
Row 13: (4 sc, dec) × 6 (30)
Row 14: 30 sc (30)
Row 15: (3 sc, dec) × 6 (24)
Row 16: 24 sc (24)
Row 17: 6 dec, 12 sc (18)
Rows 18–19: 18 sc (2 rows) (18)
Row 20: (4 sc, dec) × 3 (15)
FO, cut yarn.
💡 Emma’s Tip: Start stuffing the body firmly after Row 9 — once you’ve passed the widest point and the shaping starts to close in, it’s much harder to get polyfill distributed evenly. Pack it in gradually and check the shape from the outside as you go.
Head (× 1)
Gray chenille yarn — ch 2 start
Row 1: Work 6 sc into the 2nd ch from hook (6)
Row 2: inc in each st (12)
Row 3: (1 sc, inc) × 6 (18)
Row 4: (2 sc, inc) × 6 (24)
Row 5: (3 sc, inc) × 6 (30)
Row 6: (4 sc, inc) × 6 (36)
Row 7: (5 sc, inc) × 6 (42)
Rows 8–12: 42 sc (5 rows) (42)
Row 13: (5 sc, dec) × 6 (36)
Row 14: (4 sc, dec) × 6 (30)
Row 15: (3 sc, dec) × 6 (24)
Row 16: (2 sc, dec) × 6 (18)
Row 17: (4 sc, dec) × 3 (15)
FO, cut yarn.
⚠️ Important: Do not close the head completely before inserting your safety eyes and stuffing. Attach the 12mm eyes between Rows 9–10 (approximately 8–10 stitches apart) and secure the backings firmly from the inside. Then stuff the head fully before closing the final round.
Lower Legs (× 2)
Gray chenille yarn — ch 6 start
Row 1: Starting in the 2nd ch from hook: 4 sc, 3 sc in the last ch, rotate work to the other side and work 3 sc, inc (12)
Row 2: inc, 3 sc, 3 inc, 3 sc, 2 inc (18)
Row 3: 1 sc, inc, 3 sc, (1 sc, inc) × 3, 3 sc, (1 sc, inc) × 2 (24)
Rows 4–5: 24 sc (2 rows) (24)
Row 6: 6 sc, 5 dec, 8 sc (19)
Row 7: 5 sc, 4 dec, 6 sc (15)
Row 8: 15 sc (15)
Row 9: (3 sc, dec) × 3 (12)
Rows 10–13: 12 sc (4 rows) (12)
Row 14: 6 dec (6)
Stuff as you go. FO, cut yarn.
💡 Emma’s Tip: The foot shaping in Rows 6–7 comes together fast. Count carefully through those decrease rounds — the foot needs to look clean and defined before you continue up the leg. Take your time and count twice.
Arms (× 2)
Gray chenille yarn — ch 2 start
Row 1: Work 6 sc into the 2nd ch from hook (6)
Row 2: inc in each st (12)
Row 3: (1 sc, inc) × 6 (18)
Row 4: 18 sc (18)
Row 5: 3 sc, 6 dec, 3 sc (12)
Rows 6–10: 12 sc (5 rows) (12)
Row 11: 5 sc, dec, 5 sc (11)
Row 12: 11 sc (11)
Row 13: 5 sc, dec, 4 sc (10)
Row 14: 10 sc (10)
Row 15: 5 dec (5)
Stuff as you go. FO, cut yarn.
Ears (× 2)
Gray chenille yarn — ch 2 start
Row 1: Work 6 sc into the 2nd ch from hook (6)
Row 2: inc in each st (12)
Row 3: (1 sc, inc) × 6 (18)
Rows 4–5: 18 sc (2 rows) (18)
Row 6: (dec, 7 sc) × 2 (16)
Do not stuff. FO, cut yarn.
Muzzle (× 1)
White chenille yarn — ch 6 start
Row 1: Starting in the 2nd ch from hook: 4 sc, 3 sc in the last ch, rotate work to the other side and work 3 sc, inc (12)
Row 2: inc, 3 sc, 3 inc, 3 sc, 2 inc (18)
Row 3: 1 sc, inc, 3 sc, (1 sc, inc) × 3, 3 sc, (1 sc, inc) × 2 (24)
Rows 4–5: 24 sc (2 rows) (24)
Do not stuff. FO, cut yarn.
Tail (× 1)
Gray chenille yarn — ch 2 start
Row 1: Work 6 sc into the 2nd ch from hook (6)
Row 2: inc in each st (12)
Row 3: (1 sc, inc) × 6 (18)
Row 4: (1 sc, dec) × 6 (12)
Do not stuff. FO, cut yarn.
Assembly: Putting Your Amigurumi Bear Together
This is the part where patience really pays off. Pin everything in place before you sew a single stitch — it makes an enormous difference in how the finished amigurumi bear looks.
- Stuff and close all parts. The body, head, lower legs, and arms should be stuffed firmly. The ears, muzzle, and tail are left unstuffed — they lie flat and sew more cleanly that way.
- Attach the safety eyes. Position both 12mm eyes on the head between Rows 9–10, spaced approximately 8–10 stitches apart. Press the backings on firmly from inside the head before closing. If you’re making this bear for a young child, check the U.S. Consumer Product Safety Commission guidelines on toy safety — embroidered eyes are the safer choice for babies and toddlers.
- Attach the muzzle. Center the white muzzle on the front of the head and pin it in place between Rows 11–14. Sew it flat all the way around, leaving a small gap near the end to push in a small pinch of stuffing if you want a slightly raised profile. Close the gap and weave in your ends.
- Attach the ears. Flatten each ear so it forms a slight cup shape. Pin one to each side of the top of the head, centered around Rows 5–7. Ladder stitch around the base of each ear for a secure attachment.
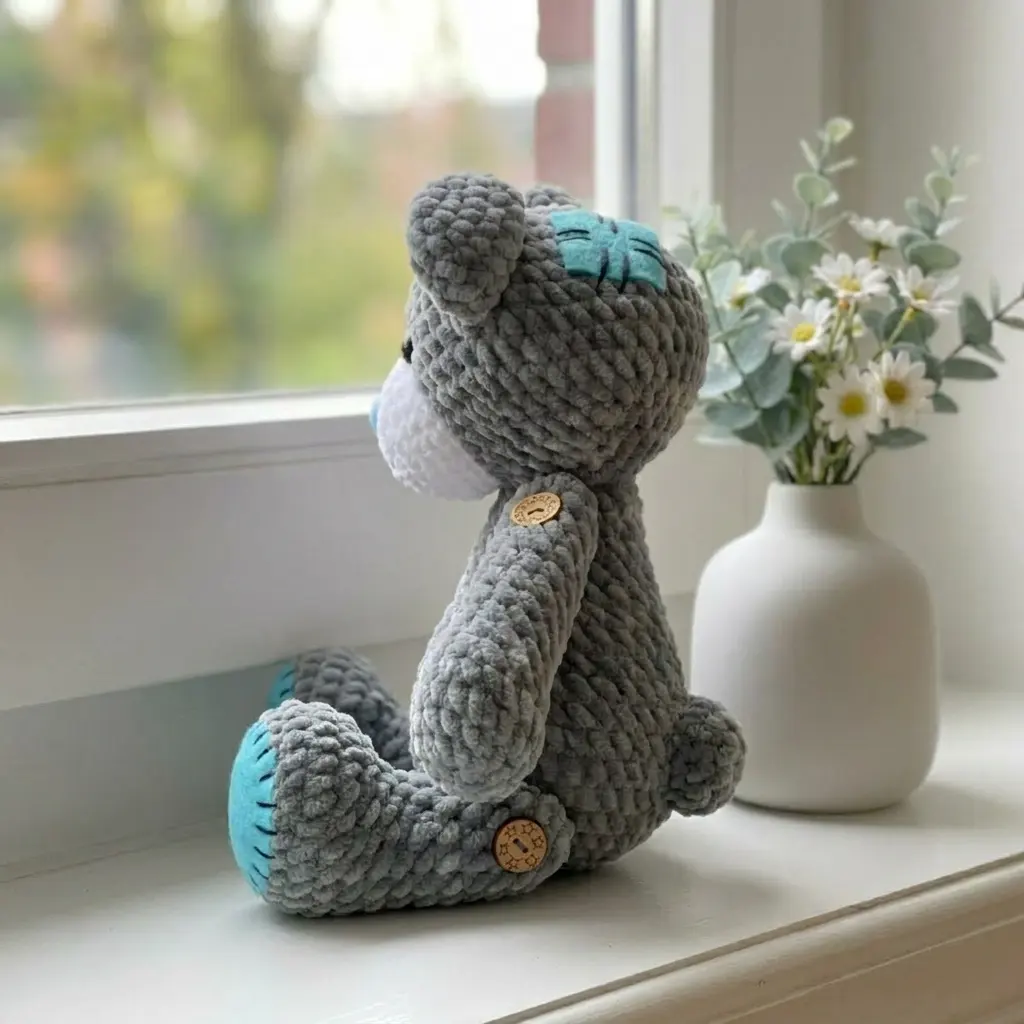
- Attach the arms (button jointing). Thread a long needle with strong thread or embroidery floss. Pass the needle through a button, then through the side of the body at approximately Rows 6–8, through the body, out the other side, through another button, and back through the same path. Pull firmly and knot securely. The arms should swing freely but sit snug against the body.
- Attach the lower legs (button jointing). Using the same method, attach the lower legs to the lower sides of the body around Rows 15–17.
- Attach the tail. Sew the tail to the lower back of the body, centered around Rows 18–19. A few firm stitches through the base of the tail are enough — it doesn’t need to be bulky.
- Attach the head to the body. Center the head on top of the body, aligning the midpoints. Use a ladder stitch all the way around the full opening for a secure, invisible join. This is the most important seam on the entire amigurumi bear — take your time with it. Our guide to sewing amigurumi parts together has detailed technique tips if you need them.
💡 Emma’s Tip: Before sewing the head permanently, hold it in position and look at the bear from the front. Rotate the head slightly left or right and see which angle gives it the most personality. That little tilt is what makes your amigurumi bear look alive rather than stiff.
Finishing Details: Felt Patches and Embroidery
The decorative details on this amigurumi bear are what give it its character — the little patched belly and stitched “scar” details are a design choice I love for the worn, loved-toy aesthetic.
Felt nose: Cut a small circle from light blue felt and glue or hand-stitch it to the center of the white muzzle. Embroider a short vertical line downward from the bottom edge of the felt nose using light blue embroidery floss.
Felt patches: Cut two small square patches from the same light blue felt — one for the belly and one for the top of the head. Stitch them in place with light blue floss, using a simple running stitch around the perimeter to mimic the look of real fabric patches.
Embroidered details: Using black embroidery floss, embroider small eyebrows above the safety eyes and add a stitched “scar” line across the belly patch. Add a few short decorative straight stitches around the base of the lower legs for that classic ragdoll-toy look. None of these need to be perfect — slightly irregular stitches actually add to the handmade charm.
💡 Emma’s Tip: If you’re new to embroidery on amigurumi, use a single strand of floss rather than all six — it gives you cleaner, finer lines on a small surface. And use a regular sharp needle rather than your tapestry needle for the embroidery; it pierces the chenille much more cleanly.
Emma’s Note
I’ve always had a soft spot for teddy bears that look a little bit lived-in — the kind that look like they’ve been carried around and patched up a few times. The felt details on this amigurumi bear are what push it from a simple crochet project into something with real personality. The button-jointed limbs are worth the extra effort too; watching those little legs swing is deeply satisfying. Take your time with the assembly, check every stitch count as you go, and don’t skip the pinning step before you sew. Happy hooking! 🧶
New to amigurumi? Start with our complete beginner’s guide to amigurumi before you begin — it covers every technique and tool you’ll need in one place.
What yarn is best for this amigurumi bear?
Bulky (5) chenille or velvet yarn gives this bear its plush, velvety finish. YarnArt Dolce, Bernat Baby Velvet, and Premier Parfait are all excellent options available at major US craft stores.
How long does it take to crochet this amigurumi bear?
Most crocheters complete this amigurumi bear in 6–9 hours, including all parts and final assembly. Working with chenille yarn requires extra care, so budget time for careful counting on each round.
Can beginners make this amigurumi bear pattern?
This pattern is rated Intermediate. Beginners should be comfortable with working in continuous rounds, invisible decreases, and sewing parts together before starting — the beginner’s guide linked in the article covers all these techniques.