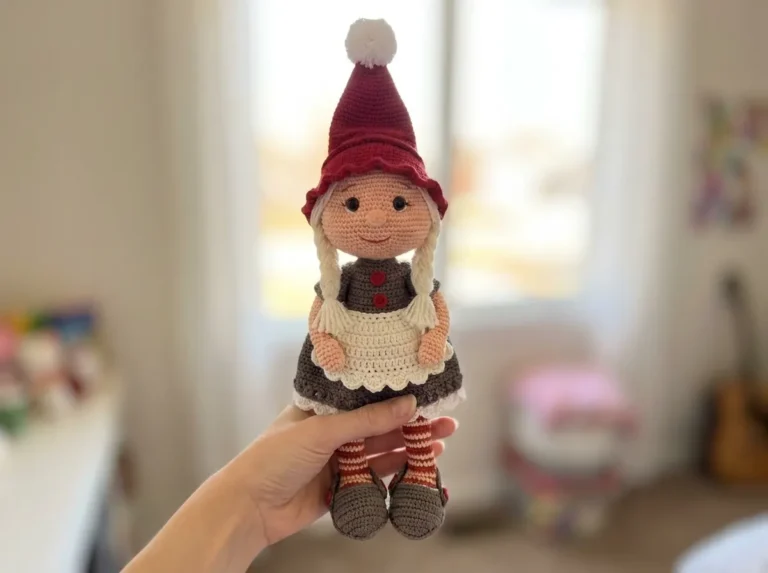
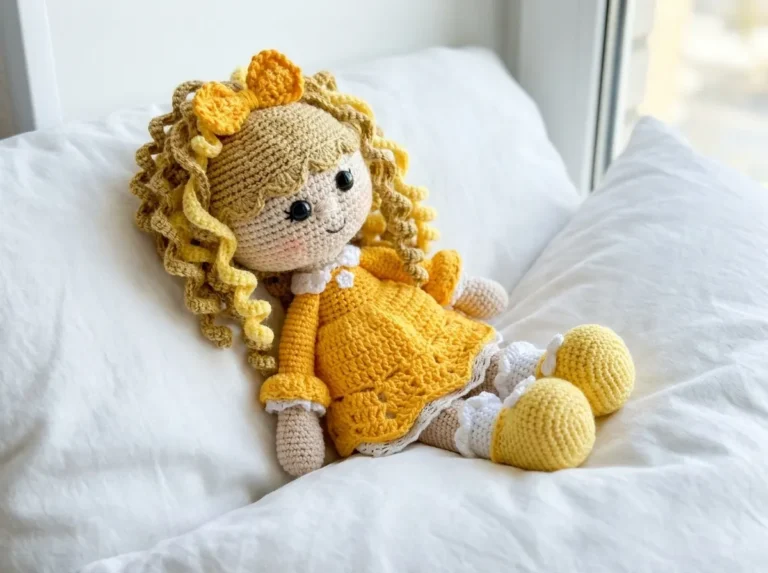
Free Amigurumi Doll Crochet Pattern — Ponytail Puffs & Dress
This amigurumi doll pattern is the kind of project that pulls three or four different scrap piles into one finished piece — skin tone for the body, a contrast color for the wig and puffs, whatever bright leftover you’ve been saving for the dress, and a tiny scrap of white for the bows. It’s a multi-session project, not a quick keychain, but your yarn basket practically funds the whole thing. Read through the dress notes before you start. Then grab your hooks.
🧶 What You’ll Need From Your Stash
- 💰 Yarn Needed: ~300–400 yards total (skin/flesh tone ~150 yds · wig + puff color ~60 yds · dress color ~80–120 yds · white accent ~10 yds)
- 🎨 Colors: skin/flesh tone · wig color of your choice · dress color of your choice · small amount of white for bows
- 🪝 Hook: 3.5mm (approx. US E/4) recommended for DK weight — adjust for your yarn weight and tension
- ⏱️ Time: 8–12 hours across multiple sessions
- 📏 Finished Size: approximately 10–12 in (25–30 cm), depending on yarn weight
- 💡 Difficulty: Intermediate
- 🎁 Great For: gifts, shelf display, kids’ rooms, handmade toy collections
Materials for Your Amigurumi Doll
- Skin/flesh-tone yarn — approximately 150 yards; DK weight recommended, any smooth non-fuzzy yarn works well for face and body definition
- Wig and ponytail puff color — approximately 60 yards; same color for both the wig and the two puffs
- Dress color — approximately 80–120 yards depending on how long you make the skirt
- White yarn — approximately 10 yards scrap; used only for tying the bows
- Hook: 3.5mm (approx. US E/4) — or the size that gives you a firm, tight fabric with your chosen yarn
- Safety eyes: 8–10mm, 2 pieces — insert before closing the head
- Polyester fiberfill (Poly-Fil or similar) — for head, arms, and ponytail puffs
- Tapestry needle — for sewing parts and weaving ends
- Stitch markers — non-negotiable for tracking continuous rounds
- Embroidery thread — for nose, eyebrows, and eyelashes
- Pink blush or chalk — for cheeks
🧶 Scrap Check: The bows use roughly 10 yards of white total — both of them. That’s the kind of quantity that lives at the bottom of a skein you thought was finished. Don’t buy new yarn for this. Dig around first.
Abbreviations Used in This Amigurumi Doll Pattern
| Abbreviation | Meaning |
|---|---|
| mr | magic ring |
| sc | single crochet |
| dc | double crochet |
| ch | chain |
| st(s) | stitch(es) |
| sl st | slip stitch |
| inc | increase — 2 sc worked into the same stitch |
| dec | invisible decrease — insert hook through front loops only of next 2 stitches simultaneously, yarn over, pull through, yarn over, pull through 2 loops |
| BLO | back loop only |
| FLO | front loop only |
| FO | fasten off |
Smart Crafter Tips for This Amigurumi Doll Pattern
Use the invisible decrease every time. Wherever this pattern says “dec,” work it as an invisible decrease — insert the hook through the front loops only of the next two stitches simultaneously. It closes cleanly and keeps the surface smooth. The standard sc2tog method leaves a visible gap that shows right through the fabric. Not worth it. Our guide to the invisible decrease walks through the method in detail if you need a refresher.
Work the magic ring tightly. Almost every part of this doll starts with a magic ring — the head, wig, arms, legs, and ponytail puffs. A loose center hole will show in the finished piece, especially on the head. Pull the tail firmly before placing your first stitch marker. New to the technique? Our magic ring tutorial covers it in two minutes and makes the whole thing click.
Plan your color changes before you start the body. The legs-and-body section involves two color changes: from your leg color to white (before Row 24), and from white to skin tone (before Row 39). Neither is complicated, but you want clean joins — especially on the white-to-skin-tone switch at the torso, which will sit at the doll’s waist and be visible. Our guide on seamless color changes shows the exact method to make those transitions invisible.
💡 Yarn weight matters here. The hook size isn’t specified in the original pattern, and the finished size of your doll will depend entirely on what you use. DK weight on a 3.5mm (approx. US E/4) hook gives a doll of roughly 10–12 in. For a smaller doll, step down to sport weight on a 2.75mm (approx. US C/2). For a chunkier, faster version, worsted on a 4.5mm (approx. US G/6) works — just know your dress will also scale up. The Craft Yarn Council yarn weight guide is useful if you’re figuring out what you actually have in your stash.
Free Amigurumi Doll Crochet Pattern
All parts are worked in continuous rounds unless otherwise noted. Place a stitch marker at the beginning of each round and move it up as you go.
Head (×1)
Yarn: skin/flesh tone
Start: magic ring
Row 1: 6 sc in mr (6)
Row 2: 6 inc (12)
Row 3: (1 sc, inc) × 6 (18)
Row 4: (2 sc, inc) × 6 (24)
Row 5: (3 sc, inc) × 6 (30)
Row 6: (4 sc, inc) × 6 (36)
Row 7: (5 sc, inc) × 6 (42)
Row 8: (6 sc, inc) × 6 (48)
Row 9: (7 sc, inc) × 6 (54)
Row 10: (8 sc, inc) × 6 (60)
Rows 11–15: 60 sc (60)
Row 16: (9 sc, inc) × 6 (66)
Row 17: 66 sc (66)
Row 18: (10 sc, inc) × 6 (72)
Row 19: (11 sc, inc) × 6 (78)
Rows 20–22: 78 sc (78)
Row 23: (11 sc, dec) × 6 (72)
Row 24: (10 sc, dec) × 6 (66)
Row 25: (9 sc, dec) × 6 (60)
Row 26: (8 sc, dec) × 6 (54)
Row 27: (7 sc, dec) × 6 (48)
Row 28: (6 sc, dec) × 6 (42)
Row 29: (5 sc, dec) × 6 (36)
Row 30: (4 sc, dec) × 6 (30)
Row 31: (3 sc, dec) × 6 (24)
Row 32: (2 sc, dec) × 6 (18)
Row 33: (1 sc, dec) × 6 (12)
Row 34: 12 sc (12)
Insert safety eyes between Rows 19 and 20, with 9 stitches between them, before you reach Row 26 — once the opening narrows it becomes hard to reach inside. Stuff the head firmly as you decrease. Leave the neck opening open for now — you’ll attach the head last, after the dress is on the body.
🧶 Safety Eyes Note: If this doll is intended for a child under 3, skip the plastic safety eyes and embroider the eyes instead. The U.S. Consumer Product Safety Commission recommends avoiding small parts on toys for children under 3. Embroidered eyes are just as charming and completely safe.
Wig (×1)
Yarn: wig color
Start: magic ring
Row 1: 6 sc in mr (6)
Row 2: 6 inc (12)
Row 3: (1 sc, inc) × 6 (18)
Row 4: (2 sc, inc) × 6 (24)
Row 5: (3 sc, inc) × 6 (30)
Row 6: (4 sc, inc) × 6 (36)
Row 7: (5 sc, inc) × 6 (42)
Row 8: (6 sc, inc) × 6 (48)
Row 9: 23 sc, 2 sl st, 23 sc (48)
Row 10: 23 sc, 3 sl st, 22 sc (48)
Row 11: 22 sc, 3 sl st, 23 sc (48)
The slip stitches in Rows 9–11 create a subtle center part in the wig. Work them snugly and don’t pull — you want a gentle impression, not a pucker. Fasten off and sew to the head, centering the part along the top.
Arms (×2)
Yarn: skin/flesh tone
Start: magic ring
Row 1: 5 sc in mr (5)
Row 2: 5 inc (10)
Row 3: (1 sc, inc) × 5 (15)
Rows 4–5: 15 sc (15)
Row 6: 1 dec, 13 sc (14)
Rows 7–24: 14 sc (14)
Stuff the arm halfway — just the rounded hand end, not the full length. Flatten the top edge of the arm so both sides align, then join the two edges together with a row of sc. This gives you a flat attachment tab that sews cleanly to the body. Make both arms before moving on. Sew to the body between Rows 55–56.
Legs and Body (×1)
Yarn: leg color, then white (before Row 24), then skin tone (before Row 39)
Start: magic ring — make two legs, then join into body
Make both legs the same way. Do not cut the yarn on the second leg — you will continue directly into the body from there.
Row 1: 6 sc in mr (6)
Row 2: 6 inc (12)
Row 3: 12 sc (12)
Row 4: (1 sc, inc) × 6 (18)
Rows 5–7: 18 sc (18)
Row 8: 2 dec, 5 sc, 2 inc, 7 sc (18)
Rows 9–11: 18 sc (18)
Row 12: 2 dec, 6 sc, 2 inc, 6 sc (18)
Rows 13–15: 18 sc (18)
Row 16: 2 dec, 6 sc, 2 inc, 6 sc (18)
Rows 17–19: 18 sc (18)
Row 20: 2 dec, 6 sc, 2 inc, 6 sc (18)
Rows 21–23: 18 sc (18)
Change to white before Row 24.
Row 24: BLO: 18 sc (18)
Rows 25–30: 18 sc (18)
🧶 Ruffle Detail: After completing Row 30, go back and work 1 row of sc into the remaining front loops from Row 24. This creates the bloomer/pantaloon ruffle at the leg. Work it before joining the legs — it’s much easier to reach while the piece is still open.
Row 31 — Join Legs: Working on the second leg: ch 5, then join to the first leg and continue — 18 sc along Leg 1, 5 sc along the chain, 18 sc along Leg 2, 5 sc along the opposite side of the chain (46)
The ch-5 bridge becomes the crotch seam. When working the 5 sc along each side of the chain, you’re going over and back across the same 5 chains. Keep even tension here — too tight and the legs will pull together.
Rows 32–38: 46 sc (46)
Change to skin tone before Row 39.
Rows 39–48: 46 sc (46)
Row 49: (5 sc, dec) × 6, 4 sc (40)
Row 50: 40 sc (40)
Row 51: (4 sc, dec) × 6, 4 sc (34)
Row 52: 34 sc (34)
Row 53: (3 sc, dec) × 6, 4 sc (28)
Row 54: 28 sc (28)
Row 55: (2 sc, dec) × 6, 4 sc (22)
Row 56: 22 sc (22)
Row 57: (1 sc, dec) × 6, 4 sc (16)
Row 58: (2 sc, dec) × 4 (12)
Rows 59–61: 12 sc (12)
Stuff the body firmly. Leave the neck opening open — you’ll sew the head on last, after the dress is in place.
Ponytail Puffs (×2)
Yarn: wig color (same as wig)
Start: magic ring
Row 1: 6 sc in mr (6)
Row 2: 6 inc (12)
Row 3: (1 sc, inc) × 6 (18)
Row 4: (2 sc, inc) × 6 (24)
Row 5: (3 sc, inc) × 6 (30)
Rows 6–8: 30 sc (30)
Row 9: (3 sc, dec) × 6 (24)
Row 10: (2 sc, dec) × 6 (18)
Row 11: (1 sc, dec) × 6, stuff (12)
Stuff lightly before closing — you want a round, bouncy puff, not a dense ball. Close the opening and fasten off, leaving a long tail for sewing. Sew both puffs to the wig after it’s attached to the head.
🧶 Scrap Check: Each ponytail puff uses roughly 12–15 yards of yarn. Two puffs = about 25–30 yards total from the same color as the wig. If you have 60 yards of your wig color, that covers the wig and both puffs with yarn to spare.
Bows (×2)
Yarn: dress color or white (white used to tie the center)
Start: chain
Row 1: ch 23, join into a ring (23)
Rows 2–5: 23 sc (23)
After Row 5, fasten off and leave a tail. Pinch the piece in the middle to form the bow shape, then wrap a separate length of white yarn tightly around the center several times and knot securely. Sew one bow to each ponytail puff.
Dress (×1)
Yarn: dress color
Start: chain — worked from the top (yoke) down
Note on this section: The dress is worked top-down with a split for the armholes. The skirt shaping is intentionally flexible — you alternate increase rows with straight rows until you reach your preferred length. The instructions below give the framework; fit the dress to your doll as you go.
Row 1: ch 40 for the yoke, join into a ring (40)
Rows 2–5: 40 dc (40)
Row 6 — Armhole Split: 6 dc (back), ch 8, skip 8 sts for sleeve opening, 12 dc (front), ch 8, skip 8 sts for sleeve opening, 6 dc (back) (40 including chains)
Before working Row 6, put the dress on the body and count how many stitches fall across the back, front, and each sleeve. The split given above is approximate — adjust the skip count and chain count to fit your doll. Starting at the exact center back gives the cleanest seam placement.
Row 7: 1 row of dc, no changes
Row 8: 2 dc in every stitch (double the count)
Row 9: 1 row of dc, no changes
Row 10: 8–10 evenly spaced increases in this row
Rows 11–12: 2 rows of dc, no changes
Row 13: 8–10 evenly spaced increases
Rows 14–15: 2 rows of dc, no changes
Continue alternating one increase row with two straight rows until the skirt reaches your desired length. For the ruffle hem: work 2 dc into every stitch along the bottom edge.
Polka dots on the dress are optional and can be added during or after finishing, using the bobble or puff stitch method.
Assembly
- Wig: Sew the completed wig to the head, centering the part down the top. The wig should sit naturally — not too far forward or back. Sew securely around the edge.
- Ponytail puffs: Sew one puff to each side of the wig, roughly level with the part. Position them so they sit up and out, not flat against the head.
- Bows: Attach one bow to each ponytail puff, sitting right at the center. The white yarn wrap should be on the front side.
- Dress: Slip the dress over the body before attaching the head. This is the only chance you get — once the head is sewn on, the dress won’t go over easily. Adjust the fit and tack the armhole edges if needed.
- Arms: Sew the arms to the body between Rows 55–56, one on each side. Position them symmetrically before stitching. Our guide on sewing amigurumi parts covers the exact hidden-stitch technique that keeps the seam invisible from the front.
- Head: Once the dress is in place, sew the head to the neck opening of the body. Align the face forward — the safety eyes or embroidered eyes should sit level. Sew all the way around the neck join firmly.
Decoration
- Bloomers ruffle: Work 1 row of sc into the front loops of Row 24 on each leg — this creates the pantaloon ruffle at the hem of the bloomers. Do this before joining the legs.
- Embroidered face: Using embroidery thread, work the nose, eyebrows, and eyelashes. Keep them fine and symmetrical — a small needle and a single strand of thread gives the cleanest result.
- Blush: Add pink to both cheeks using cosmetic blush or chalk applied lightly with a fingertip or soft brush. Build it up gradually — you can always add more, but you can’t easily remove it.
💡 Stretch It Further: This is where the scrap magic really kicks in. The basic doll structure stays the same every time — swap the dress color and wig color to make a completely different doll from the same pattern. Three dress colors, three wig colors, six dolls that all look intentionally coordinated. Bundle two or three together in a kraft box with ribbon for a handmade gift set that looks like it cost real money. You can also use the same dress pattern on a slightly scaled-up version (try worsted weight on a 4.5mm / approx. US G/6 hook) for a larger play doll, or scale down to sport weight for a smaller decorative version. Same pattern, three different sizes, your scrap bin doing all the heavy lifting.
Mia’s Take
Four yarn colors, a few hundred yards across multiple sessions, and at the end of it you have a complete doll — hair, dress, bloomers, bows, the whole thing. That’s a lot of finished object for what amounts to a handful of leftover skeins. The dress section is the one place where you’ll need to think on your feet and fit it to your specific doll, but that flexibility is actually the point — it means the dress works regardless of what yarn you used for the body. Make a few of these in different color combinations and you’ve got a gift set that looks thoughtful and handmade, because it is. That’s the kind of return I like on a yarn investment. 🧶
What yarn weight and hook size are best for this amigurumi doll?
We recommend using DK weight yarn with a 3.5mm (approx. US E/4) hook to achieve a firm, tight fabric that keeps the stuffing hidden, resulting in a doll measuring 10–12 inches.
Can a beginner crochet this amigurumi doll pattern?
This pattern is rated as Intermediate. While the basic stitches are simple, it requires experience with continuous rounds, changing colors seamlessly, joining legs with a chain bridge, and top-down dress shaping.
How can I make this amigurumi doll safe for children under 3 years old?
To make the toy completely safe for toddlers, skip the plastic safety eyes and instead embroider the eyes and facial features using secure embroidery thread.