The Sweetest Little Crochet Bee You’ll Ever Make
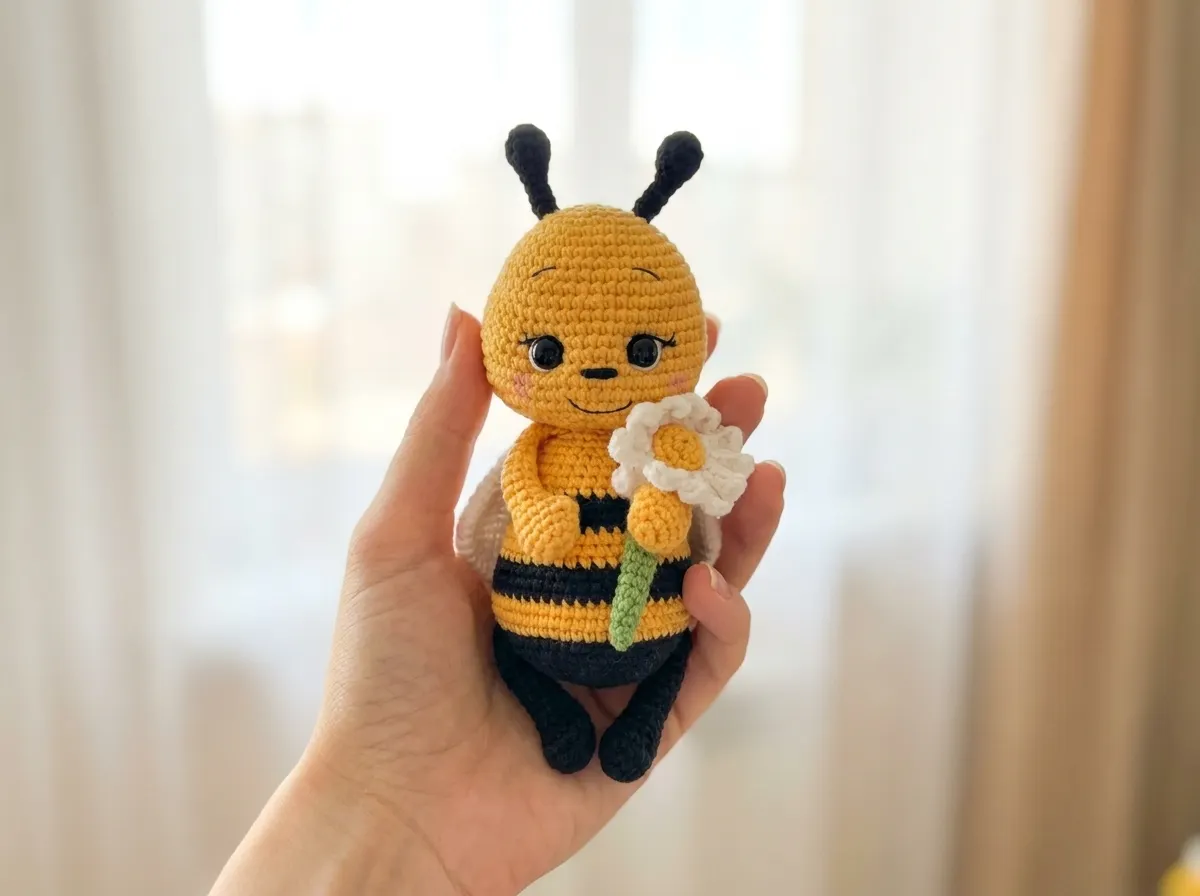
“Looking for a crochet bee pattern free? This project creates the most heart-squeezingly adorable little bumble bee — sunshine yellow body, bold black stripes, and the dreamiest pair of rounded white wings that catch every bit of light. Her embroidered smile, rosy blush cheeks, and those wide glossy eyes give her a personality that makes it genuinely hard to put her down. Every single detail on this little bee was designed to make you go oh. Ready to meet her?
🩷 Pattern Highlights
- Cuteness Rating: 🩷🩷🩷🩷🩷
- Finished Size: approx. 5 in (12.5 cm) tall
- Difficulty: Intermediate
- Hook Size: 2.0mm (US Steel 4)
- Yarn Palette: sunshine yellow, deep black, soft white
- Key Detail: layered embroidered eyes over 10mm safety eyes, hand-stitched smile, and rosy blush cheeks
- Estimated Time: 4–6 hours
Materials for This Free Crochet Bee Pattern
Half the magic of this bee is in how her colors work together — that warm, saturated yellow against deep matte black, and those soft white wings that look almost luminous in person. Here’s everything you’ll need before you start:
- Yarn: DK / Light Worsted weight (CYCA 3) cotton yarn in three colors:
- Sunshine yellow — main head and body color
- Deep black — stripes, horns, and legs
- Soft white — wings
- Hook: 2.0mm (US Steel 4)
- Safety eyes: 10mm black — the larger size gives her that beautiful wide-eyed expression
- Polyfill stuffing — pack those cheeks firmly
- Tapestry needle (long, blunt-tipped) — essential for all the assembly and embroidery
- Embroidery thread: black iris thread for eye outlines; a small amount of fine white yarn (DK or fingering weight) for eye whites — this is what creates the layered, glossy look that makes her gaze so expressive
- Pink pastel chalk or cosmetic blush — for those rosy cheeks you absolutely cannot skip
- Dental floss — for facial sculpting (the technique that shapes those gorgeous round cheeks)
- Scissors
- Stitch markers — non-negotiable for tracking rounds
🩷 Chloe’s Detail Tip: The 10mm safety eyes are deliberately on the larger side, and that’s what gives this bee her wide, sweet, immediately-lovable expression. Don’t be tempted to swap them for something smaller. Those eyes are her whole personality, and the size is part of why it works.
Abbreviations
| Abbreviation | Meaning |
|---|---|
| mr | Magic ring — an adjustable loop that closes completely, leaving no center hole |
| sc | Single crochet |
| hdc | Half double crochet |
| inc | Increase — 2 sc worked into the same stitch |
| dec | Invisible decrease — insert hook through the front loops only of the next 2 stitches simultaneously, yarn over, pull through, yarn over, pull through 2 loops. This keeps the fabric smooth with no visible gap. |
| FO | Fasten off |
| ( ) × X | Repeat everything inside the parentheses X times |
| ( ) | Total stitch count at end of round |
Before You Begin — Little Details That Make a Big Difference
This is an intermediate pattern — not because the stitches are complicated (it’s almost entirely single crochet), but because there are several parts to assemble and the finishing embroidery requires care and patience. Every extra minute you give to the details is absolutely worth it. This is the part that takes a little extra love, and the result shows it.
Every single part of this bee starts with a magic ring, which gives each piece that clean, hole-free center. If you haven’t worked with one before, our magic ring tutorial walks you through it step by step — it becomes second nature very quickly.
The body is where all that beautiful striping happens, and clean color changes are what separate a polished bee from a patchy one. Our color change tutorial shows you exactly how to transition between black and yellow so those stripe edges stay crisp all the way around.
The safety eyes go in between Rows 15 and 16 of the head, with exactly 6 stitches between them. Before pressing those washers down, hold the piece under a bright lamp and check from directly in front — symmetry at this stage is everything, and once they’re locked in, there’s no going back. Our safety eyes tutorial has all the tips for getting them perfectly level every single time.
🩷 Chloe’s Detail Tip: The head expands all the way to 60 stitches at its widest point — which creates that beautiful round, oversized shape that makes amigurumi heads so irresistibly squishy. When stuffing, really pack the cheek area firmly. That fullness is what gives the finished bee her soft, round silhouette.
Instructions for This Crochet Bee Pattern Free
Head (×1) — Sunshine Yellow
The head is the heart of this whole piece. Watch it grow from that tiny six-stitch ring into a perfectly round golden sphere — this is the moment where it really starts to feel like something precious is forming in your hands.
Yarn: Sunshine yellow | Start: Magic ring
Row 1: 6 sc in mr (6)
Row 2: 6 inc (12)
Row 3: (1 sc, 1 inc) × 6 (18)
Row 4: 1 sc, 1 inc, (2 sc, 1 inc) × 5, 1 sc (24)
Row 5: (3 sc, 1 inc) × 6 (30)
Row 6: 2 sc, 1 inc, (4 sc, 1 inc) × 5, 2 sc (36)
Row 7: 36 sc (36)
Row 8: (5 sc, 1 inc) × 6 (42)
Row 9: 42 sc (42)
Row 10: 3 sc, 1 inc, (6 sc, 1 inc) × 5, 3 sc (48)
Row 11: 48 sc (48)
Row 12: (7 sc, 1 inc) × 6 (54)
Rows 13–16: 54 sc (4 rows) (54)
🩷 Safety Eyes: Insert 10mm safety eyes between Rows 15 and 16, with 6 stitches between them. Place your markers, step back, check from the front — then press the washers in.
Row 17: 18 sc, (1 sc, 1 inc) × 3, 6 sc, (1 inc, 1 sc) × 3, 18 sc (60)
Rows 18–20: 60 sc (3 rows) (60)
Row 21: (3 sc, 1 dec) × 12 (48)
Row 22: 3 sc, 1 dec, (6 sc, 1 dec) × 5, 3 sc (42)
Row 23: (5 sc, 1 dec) × 6 (36)
Row 24: 2 sc, 1 dec, (4 sc, 1 dec) × 5, 2 sc (30)
Row 25: (3 sc, 1 dec) × 6 (24)
Row 26: 1 sc, 1 dec, (2 sc, 1 dec) × 5, 1 sc (18)
Fasten off, cut yarn. Stuff the head firmly, paying special attention to the cheeks. Leave the opening for attaching to the body.
Horns (×2) — Deep Black
These tiny little antennae are so satisfying to make. They have a sweet rounded tip that tapers into a slim stalk — like two perfect little black lollipops on top of her head.
Yarn: Deep black | Start: Magic ring
Row 1: 6 sc in mr (6)
Row 2: 6 inc (12)
Rows 3–4: 12 sc (2 rows) (12)
Row 5: 6 dec (6)
Rows 6–9: 6 sc (4 rows) (6)
Stuff firmly. Fasten off, cut yarn, leaving a long tail for sewing.
Arms (×2) — Sunshine Yellow
The arms have a lovely little detail on the palm — three half double crochet stitches that create a subtle rounded hand shape. It’s a small thing, but it makes the finished arm look so considered.
Yarn: Sunshine yellow | Start: Magic ring
Row 1: 6 sc in mr (6)
Row 2: 6 inc (12)
Rows 3–4: 12 sc (2 rows) (12)
Row 5: 3 hdc, 9 sc (12)
Row 6: 12 sc (12)
Row 7: (1 sc, 1 dec) × 4 (8)
Rows 8–19: 8 sc (12 rows) (8)
Lightly stuff the palm only. Stuff the arm through Row 11, leaving the upper portion unstuffed. Fold the arm flat and sc through both sides for 4 sc to close. Fasten off, leaving a long tail for sewing to the body.
Legs (×2) — Deep Black
Chunky little legs with a rounded foot — these close up into a flat base that makes the bee so stable when she’s sitting on a shelf. The shape is beautifully simple.
Yarn: Deep black | Start: Magic ring
Row 1: 6 sc in mr (6)
Row 2: 6 inc (12)
Row 3: (1 sc, 1 inc) × 6 (18)
Row 4: 18 sc (18)
Row 5: 5 sc, 4 dec, 5 sc (14)
Row 6: 5 sc, 2 dec, 5 sc (12)
Row 7: 4 sc, 2 dec, 4 sc (10)
Rows 8–16: 10 sc (9 rows) (10)
Stuff through Row 10, leaving the upper portion unstuffed. Work two offset stitches, then fold the leg flat and sc through both sides for 5 sc to close. Fasten off, leaving a long tail for sewing to the body.
Body (×1) — Black and Yellow Stripes
This is the most involved part of the pattern, and honestly, the most satisfying. Watching those black and yellow stripes build up row by row is so good. The body starts at the bottom in solid black, then breaks into those classic bee bands before finishing in yellow at the top. Keep your yarn tension consistent at every color change and the transitions will look crisp and clean.
Yarn: Deep black and sunshine yellow (alternating) | Start: Magic ring
Row 1: 6 sc in mr [black] (6)
Row 2: 6 inc [black] (12)
Row 3: (1 sc, 1 inc) × 6 [black] (18)
Row 4: 1 sc, 1 inc, (2 sc, 1 inc) × 5, 1 sc [black] (24)
Row 5: (3 sc, 1 inc) × 6 [black] (30)
Row 6: 2 sc, 1 inc, (4 sc, 1 inc) × 5, 2 sc [black] (36)
Row 7: (5 sc, 1 inc) × 6 [black] (42)
Row 8: 3 sc, 1 inc, (6 sc, 1 inc) × 5, 3 sc [black] (48)
Row 9: (7 sc, 1 inc) × 6 [black] (54)
Row 10: 54 sc [black] (54)
Rows 11–13: 54 sc (3 rows) [yellow] (54)
Rows 14–15: 54 sc (2 rows) [black] (54)
Row 16: (7 sc, 1 dec) × 6 [black] (48)
Row 17: 48 sc [yellow] (48)
Row 18: 3 sc, 1 dec, (6 sc, 1 dec) × 5, 3 sc [yellow] (42)
Row 19: 42 sc [yellow] (42)
Row 20: 42 sc [black] (42)
Row 21: (5 sc, 1 dec) × 6 [black] (36)
Row 22: 36 sc [black] (36)
Row 23: 36 sc [yellow] (36)
Row 24: 2 sc, 1 dec, (4 sc, 1 dec) × 5, 2 sc [yellow] (30)
Rows 25–26: 30 sc (2 rows) [yellow] (30)
Row 27: (3 sc, 1 dec) × 6 [yellow] (24)
Row 28: 24 sc [yellow] (24)
Row 29: 1 sc, 1 dec, (2 sc, 1 dec) × 5, 1 sc [yellow] (18)
Row 30: 18 sc [yellow] (18)
Stuff the body firmly. Fasten off, leaving a long tail for sewing to the head.
Wings (×2) — Soft White
The wings are crocheted flat and folded in half to close — no stuffing needed. They have a gentle oval shape that widens in the middle before tapering to a sweet pointed tip. In soft white cotton, they look almost delicate. I may have held mine up to the light for an embarrassingly long time.
Yarn: Soft white | Start: Magic ring
Row 1: 6 sc in mr (6)
Row 2: 6 inc (12)
Row 3: (1 sc, 1 inc) × 6 (18)
Row 4: 1 sc, 1 inc, (2 sc, 1 inc) × 5, 1 sc (24)
Row 5: (3 sc, 1 inc) × 6 (30)
Rows 6–8: 30 sc (3 rows) (30)
Row 9: (3 sc, 1 dec) × 6 (24)
Rows 10–12: 24 sc (3 rows) (24)
Row 13: 1 sc, 1 dec, (2 sc, 1 dec) × 5, 1 sc (18)
Rows 14–16: 18 sc (3 rows) (18)
Row 17: (1 sc, 1 dec) × 6 (12)
Rows 18–19: 12 sc (2 rows) (12)
Do not stuff. Fold the wing flat and sc through both sides for 6 sc to close. Fasten off, leaving a long tail for sewing to the body.
Assembly
Take your time with this part — proper placement is what makes the finished bee look intentional and polished rather than wobbly. Our guide to sewing amigurumi parts together has all the tips for getting clean, invisible joins if you need a refresher.
- Horns: Sew both horns to the head between Rows 4 and 5. Position them symmetrically — hold the head in front of you and make sure they mirror each other before securing.
- Legs: Sew both legs to the body between Rows 10 and 11. Space them evenly so the bee sits flat and balanced.
- Arms: Sew both arms to the body between Rows 29 and 30.
- Head to body: Sew the head onto the body, aligning the color-change line to sit at the back. Before closing the seam completely, add extra polyfill stuffing into the neck area — this keeps the head upright and gives it that satisfying round profile.
- Wings: Sew both wings to the body between Rows 29 and 30, aligning the two wing stitches with the two arm attachment stitches. To keep the wings from fanning outward too much, add one extra stitch from the inner center of each wing down to the body — this anchors them beautifully so they sit back at a gentle angle rather than sticking straight out.
Making This Crochet Bee Pattern Extra Cute — Finishing Details
Okay, here’s my favorite part. This is where a well-crocheted bee becomes an irresistible little bee. Don’t rush through this section — the finishing is everything.
Sculpting the face: Use dental floss to sculpt the cheeks before doing any embroidery. Thread it through the head and pull gently to define the cheek shapes. This is what creates that round, plush, doll-like face that makes people immediately want to pick her up. Work slowly and check the symmetry as you go.
The layered eyes: This pattern uses a beautiful technique — 10mm safety eyes as the base, with embroidered details layered on top. Use the fine white yarn to embroider small white highlights (the eye whites), and then use the black iris thread to outline the eye. The result is a soft, expressive gaze that looks much more hand-crafted and alive than a plain safety eye alone. Work in good light and take your time with the placement of those white highlights — they should sit consistently in the same position on both eyes.
The nose: Embroider the nose between Rows 17 and 18, approximately 3 stitches wide. Keep it small and centered — just a tiny suggestion of a nose that reads as sweet rather than prominent.
The eyebrows: Embroider short eyebrows from Row 9 to Row 10, about 2–3 stitches wide. Slightly curved, slightly raised — the expression you’re aiming for is friendly and a little bit curious. She’s a bee with opinions and she’s delighted about it.
The smile: This smile has beautiful structure. The corners of the mouth should fall between Rows 19 and 20, about 6 stitches wide. Then add a center bridge stitch between Rows 20 and 21 to form that classic curved smile shape. Getting this right takes one or two tries — work it loosely at first and adjust before securing the thread permanently.
The blush cheeks: Apply pink pastel chalk or cosmetic blush with a soft brush or cotton swab in gentle circular motions on each cheek. Build it up gradually — a little goes a long way, and soft rosy circles look much more delicate than a heavy application. This detail is the one that makes everyone say oh my goodness the moment they see her.
🩷 Chloe’s Detail Tip: After applying the blush, hold the bee at arm’s length and check that both cheeks have the same depth of color and sit in the same position on each side. Symmetry in the finishing is just as important as symmetry in the construction. A tiny difference in cheek placement can shift the whole expression — so take that extra look before you consider her done.
Color variation ideas: This bee is beautiful in her classic black and yellow, but imagine her in dusty lavender and soft white — a pastel bumble bee that feels more fantasy than garden. Or swap the yellow for blush pink with the same black stripes for something that feels thoroughly kawaii. The white wings work beautifully with any body color combination.
If you love tiny bee energy but want a quicker project, our mini bee keychain pattern is a scrap-friendly version that works up in under an hour — perfect for making a whole little colony. And if winged creatures are your thing, our butterfly amigurumi pattern uses a similar color-contrast approach with those gorgeous flat wings.
Chloe’s Final Look
I’ve been holding this finished little bee up to the window light for an embarrassing amount of time and I have zero regrets. The way those white wings catch the light, the glossy shine of the layered eyes, those tiny rosy cheeks against the warm yellow — she’s just completely, perfectly herself. Make her in the classic yellow and black first, and then immediately start planning her lavender and white cousin, because you absolutely will. Line them up on a shelf together and try to look at them without smiling. You can’t. 🩷
What is the difficulty level for this crochet bee pattern free?
This pattern is rated as Intermediate. While the stitches are basic, the assembly and facial sculpting require a bit more patience and care.
What size hook is best for this amigurumi bee?
We recommend a 2.0mm (US Steel 4) hook to ensure the stitches are tight enough so the stuffing doesn’t show through.
Can I use different colors for this bee pattern?
Absolutely! While yellow and black are classic, this crochet bee pattern free also looks beautiful in pastel shades like lavender or soft pink.