Crochet Snowman Free Pattern — Top Hat Amigurumi
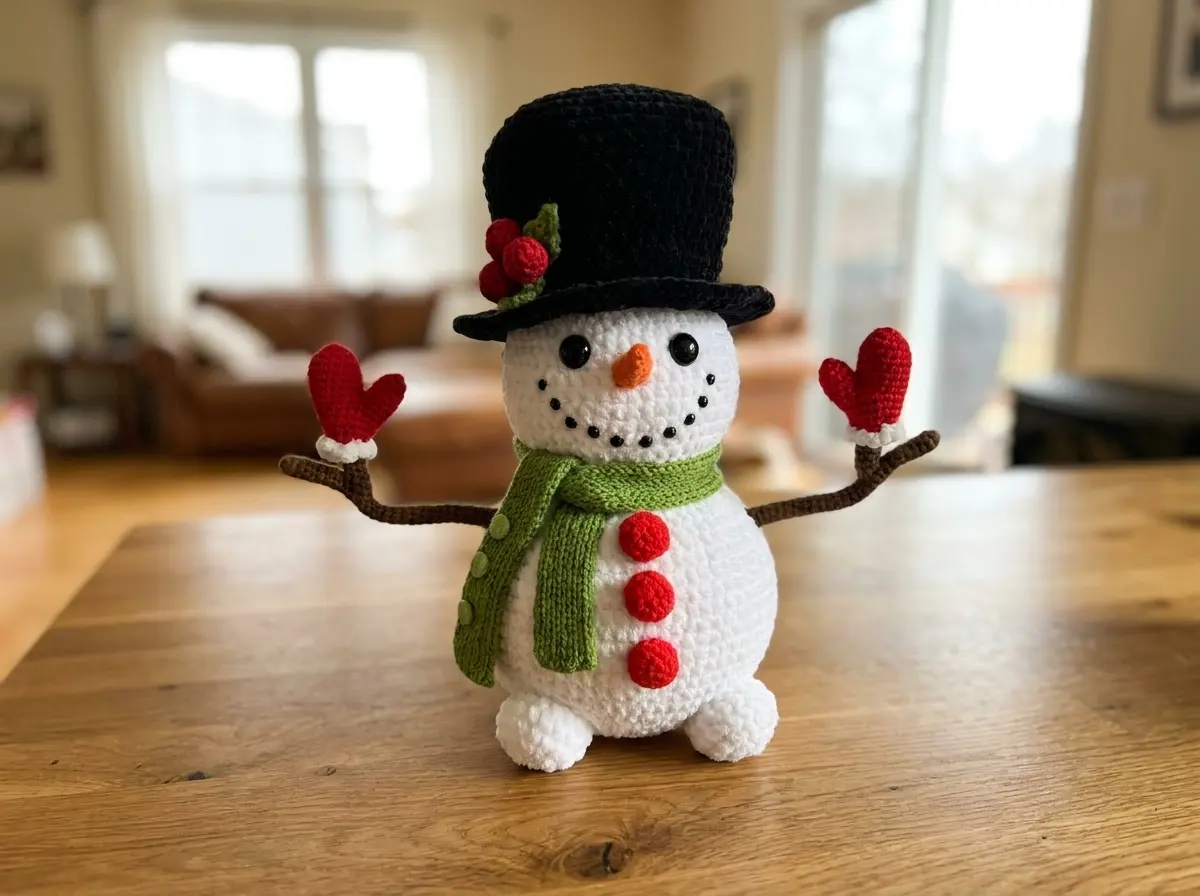
This crochet snowman free pattern is one I keep coming back to — that top hat, the wire branch arms, the little carrot nose. There’s something deeply satisfying about building a snowman piece by piece. He stands about 11 in tall with his hat on, works up in soft bulky chenille, and has more personality than most patterns I’ve made. Every round is tested and every count adds up. Grab your hook and let’s get started.
📋 Pattern Quick Stats
- Difficulty: Intermediate
- Finished Size: approx. 7.9 in (20 cm) without hat / approx. 11 in (28 cm) with hat
- Hook Size: G/6 (4.0mm) for chenille; steel hook size 4 (2.0mm) for DK cotton
- Yarn Weight: Bulky (5) chenille + DK/Light Worsted (3) cotton
- Techniques: magic ring, continuous rounds, decrease, BLO, FLO, color changes, wire insertion
- Estimated Time: 7–10 hours
Crochet Snowman Free Pattern: What You’ll Need
This snowman has nine separate parts, two yarn weights, and a handful of finishing materials. Having everything in front of you before you start saves a lot of back-and-forth.
Materials
- Bulky (5) chenille yarn, white — 1 skein (approx. 100 yds). US alternatives: Bernat Baby Velvet or Premier Parfait. Main yarn for head, body, and legs.
- Bulky (5) chenille yarn, black — slightly less than half a skein. Same brand or alternative. For the top hat.
- DK/Light Worsted (3) cotton yarn, red — small amount. US alternatives: Drops Muskat or Paintbox Simply Cotton DK. For mittens and berries.
- DK/Light Worsted (3) cotton yarn, green — small amount. Same weight as red. For leaves and scarf.
- DK/Light Worsted (3) cotton yarn, brown — small amount. For branch arms.
- DK/Light Worsted (3) cotton yarn, orange — small amount. For the carrot nose.
- Bulky/chenille yarn, white (Alize Softy or similar) — small amount. For mitten cuffs. Look for a white chenille or velvet yarn at your local craft store.
- Hook: G/6 (4.0mm) for chenille/bulky yarn; steel hook size 4 (2.0mm) for DK/cotton yarn
- 14mm safety eyes — 2 pieces
- 5mm safety eyes or small black beads — for the mouth
- Floral wire or similar — for branch arms (cut to length)
- Polyfill stuffing (Poly-Fil is widely available at Joann, Michaels, or Hobby Lobby)
- Tapestry needle
- Stitch marker
- Small buttons — for scarf decoration
- 20mm pompoms — for belly decoration (3 pieces)
- Knitting needles — for the scarf, sized for your DK yarn
The chenille yarn used for the head, body, and hat falls into the Bulky (5) category on the Craft Yarn Council yarn weight system. If you’re substituting, look for any yarn labeled “bulky” or “chunky” with a chenille or velvet texture — that softness is what gives this snowman his signature look.
💡 Emma’s Tip: Chenille yarn has almost no stitch definition, which means your tension matters more than usual. I keep mine tight so the polyfill doesn’t show through the fabric. If you notice gaps forming between stitches, drop down half a hook size.
⚠️ Safety Note: This snowman includes wire in the branch arms and small safety hardware. It is not suitable as a toy for children under 3. If you’re making this as a gift for a young child, omit the wire and embroider all facial details instead. The U.S. Consumer Product Safety Commission has guidelines on toy safety standards worth reviewing for children’s gifts.
Abbreviations Used in This Crochet Snowman Pattern
| Abbreviation | Meaning |
|---|---|
| sc | single crochet |
| inc | increase — 2 sc worked into the same stitch |
| dec | decrease — insert hook in next stitch, pull up loop, insert in following stitch, pull up loop, yarn over, pull through all 3 loops |
| mr | magic ring |
| ch | chain |
| sl st | slip stitch |
| hdc | half double crochet |
| dc | double crochet |
| BLO | back loop only |
| FLO | front loop only |
| k | knit stitch (scarf section only) |
| p | purl stitch (scarf section only) |
Special Techniques
A few things worth reviewing before you pick up your hook, especially if this is your first multi-part amigurumi.
Magic Ring: Almost every piece in this crochet snowman free pattern starts with a magic ring. It closes completely to eliminate a center hole — essential for clean, professional-looking amigurumi. If you haven’t tried one yet, our step-by-step magic ring tutorial walks you through it clearly.
Continuous Rounds: This pattern is worked in a continuous spiral — no joining slip stitches between rounds. Place your stitch marker in the first stitch of each new round and move it up as you go. It’s the standard amigurumi method and once you’re used to it, it’s second nature. For a full explanation of why it’s preferred, see our guide on working in continuous rounds.
BLO / FLO: The top hat uses both back loop only and front loop only rounds to shape the brim. These create structural ridges in the hat — don’t skip them or the shaping won’t work.
Safety Eyes: The 14mm safety eyes must be installed before you close the head. Once the opening is too small to reach inside, you’ve missed your window. Our guide on how to attach safety eyes covers the installation and locking process in detail.
Working the Crochet Snowman Free Pattern: Part by Part
This snowman is built in nine parts: head and body (one continuous piece), two legs, a carrot nose, two branch arms, two mittens, a top hat, three berries, three leaves, and a knitted scarf. I’ll go through each in order.
Head and Body (×1)
Yarn: white chenille, Bulky (5) | Hook: G/6 (4.0mm) | Start: magic ring
The head and body are worked as one continuous piece. You’ll shape the head first through row 22, then transition directly into the body from row 23 onward. Stuff as you go — don’t wait until the end or you’ll fight the closing rounds.
Row 1: 6 sc in mr (6)
Row 2: (inc) × 6 (12)
Row 3: (1 sc, inc) × 6 (18)
Row 4: (2 sc, inc) × 6 (24)
Row 5: (3 sc, inc) × 6 (30)
Row 6: (4 sc, inc) × 6 (36)
Row 7: (5 sc, inc) × 6 (42)
Row 8: (6 sc, inc) × 6 (48)
Row 9: (7 sc, inc) × 6 (54)
Rows 10–17: 54 sc (8 rows) (54)
💡 Emma’s Tip: Install your 14mm safety eyes between rows 10 and 11, approximately 7 stitches apart, before continuing. Lock them from the inside now — once the head starts closing, you won’t be able to reach in. This is one of those details that makes all the difference.
Row 18: (7 sc, dec) × 6 (48)
Row 19: (6 sc, dec) × 6 (42)
Row 20: (5 sc, dec) × 6 (36)
Row 21: (4 sc, dec) × 6 (30)
Row 22: (3 sc, dec) × 6 (24)
Row 22 completes the head. The next row is a full increase round — this is where the body expands outward.
Row 23: 24 inc (48)
Row 24: (2 sc, inc) × 16 (64)
Row 25: 64 sc (64)
Row 26: (3 sc, inc) × 16 (80)
Rows 27–34: 80 sc (8 rows) (80)
💡 Emma’s Tip: Keep adding stuffing throughout rows 27–34. I add a small handful every two rows so the body stays evenly firm. If you wait too long, it’s much harder to get the fill distributed without lumps near the closing rounds.
Row 35: (2 sc, dec) × 20 (60)
Row 36: (8 sc, dec) × 6 (54)
Row 37: (7 sc, dec) × 6 (48)
Row 38: (6 sc, dec) × 6 (42)
Row 39: (5 sc, dec) × 6 (36)
Row 40: (4 sc, dec) × 6 (30)
Row 41: (3 sc, dec) × 6 (24)
Row 42: (2 sc, dec) × 6 (18)
Row 43: (1 sc, dec) × 6 (12)
Row 44: (dec) × 6 (6)
Finishing: Add any final stuffing, then pull yarn tight to close the opening. Fasten off and weave in ends.
Legs (×2)
Yarn: white chenille, Bulky (5) | Hook: G/6 (4.0mm) | Start: magic ring
The legs are optional, but I always include them — they help the snowman stand upright and add stability on a shelf. Make two.
Row 1: 5 sc in mr (5)
Row 2: (inc) × 5 (10)
Row 3: (inc) × 10 (20)
Rows 4–5: 20 sc (2 rows) (20)
Row 6: (dec) × 10 (10)
Row 7: (dec) × 5 (5)
Finishing: Pull yarn tight and fasten off. Set both legs aside — you’ll sew them on last, once the snowman is otherwise complete, so you can position them for the best balance.
Carrot Nose (×1)
Yarn: orange DK/cotton | Hook: steel size 4 (2.0mm) | Start: chain
⚠️ Note: Leave a long yarn tail at the very beginning of this piece. You’ll use that starting tail to sew the nose onto the face — don’t weave it in.
Row 1: Chain 10, join into a ring with sl st (10)
Rows 2–3: 10 sc (2 rows) (10)
Row 4: dec, 8 sc (9)
Row 5: dec, 7 sc (8)
Row 6: dec, 6 sc (7)
Row 7: dec, 5 sc (6)
Row 8: dec, 4 sc (5)
Row 9: dec, 3 sc (4)
Finishing: Pull yarn tight and weave in the working end only. Use the long beginning tail to sew the nose onto the face.
Branch Arms (×2)
Yarn: brown DK/cotton | Hook: steel size 4 (2.0mm) | Start: magic ring
These arms are worked as crocheted tubes around a wire core. You’ll make one longer piece (approx. 4 in / 10cm) and one shorter piece (approx. 1.6 in / 4cm), then join them to form a branch shape.
Row 1: 7 sc in mr (7)
Continue working 7 sc per round in continuous rounds until the piece reaches the desired length — approximately 4 in (10cm) for the main arm, and 1.6 in (4cm) for the branch stub.
Finishing: Insert wire into each crocheted tube. Sew the short piece onto the long piece to form a Y-shaped branch. Insert the wire ends into the sides of the snowman’s body and sew both arms on very securely. I always do at least two passes with the tapestry needle on these — they need to hold up to handling.
Mittens (×2)
Yarn: red DK/cotton; white chenille for cuff | Hook: steel size 4 (2.0mm) | Start: magic ring
Each mitten is made in two pieces — a small thumb worked separately, then joined to the main body. Make two complete mittens.
Piece 1 — Thumb:
Row 1: 6 sc in mr (6)
Row 2: (1 sc, inc) × 3 (9)
Rows 3–5: 9 sc (3 rows) (9)
Fasten off and set aside.
Piece 2 — Main Body:
Row 1: 6 sc in mr (6)
Row 2: (inc) × 6 (12)
Row 3: (3 sc, inc) × 3 (15)
Rows 4–8: 15 sc (5 rows) (15)
Row 9: Join with Piece 1 — 9 sc across Piece 1, 15 sc across Piece 2 (24)
Row 10: (2 sc, dec) × 6 (18)
Row 11: 18 sc (18)
Row 12: (1 sc, dec) × 6 (12)
Rows 13–14: 12 sc (2 rows) (12)
Row 15: Switch to white chenille — (12 sc) × 2 (24)
Finishing: Fasten off and weave in ends. Make two complete mittens.
Top Hat (×1)
Yarn: black chenille, Bulky (5) | Hook: G/6 (4.0mm) | Start: magic ring
The hat is worked top-down. Row 11 (BLO) forms the crown crease, and Row 21 (FLO) forms the inner ledge where the brim begins to flare. These two rows define the hat’s shape — don’t work them in both loops by mistake.
Row 1: 6 sc in mr (6)
Row 2: (inc) × 6 (12)
Row 3: (1 sc, inc) × 6 (18)
Row 4: (2 sc, inc) × 6 (24)
Row 5: (3 sc, inc) × 6 (30)
Row 6: (4 sc, inc) × 6 (36)
Row 7: (5 sc, inc) × 6 (42)
Row 8: (6 sc, inc) × 6 (48)
Row 9: (7 sc, inc) × 6 (54)
Row 10: (8 sc, inc) × 6 (60)
Row 11: 60 sc in BLO (60)
Row 12: (13 sc, dec) × 4 (56)
Rows 13–14: 56 sc (2 rows) (56)
Row 15: (12 sc, dec) × 4 (52)
Rows 16–17: 52 sc (2 rows) (52)
Row 18: (11 sc, dec) × 4 (48)
Rows 19–20: 48 sc (2 rows) (48)
Row 21: 48 sc in FLO (48)
Row 22: (5 sc, inc) × 8 (56)
Row 23: (6 sc, inc) × 8 (64)
Row 24: (7 sc, inc) × 8 (72)
Row 25: 72 sc (72)
Finishing: Fasten off and weave in ends. The hat is not stuffed.
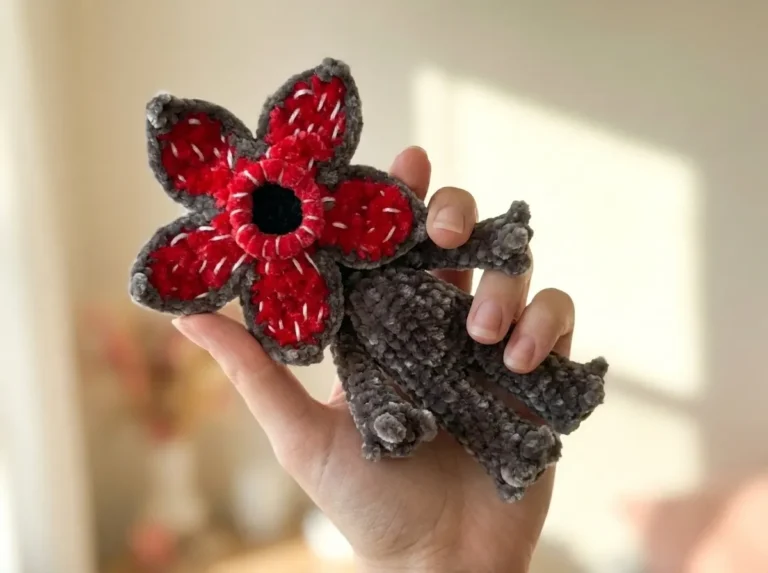
Berries (×3)
Yarn: red DK/cotton | Hook: steel size 4 (2.0mm) | Start: magic ring
Make three small berries for the hat decoration.
Row 1: 5 sc in mr (5)
Row 2: (inc) × 5 (10)
Row 3: (1 sc, inc) × 5 (15)
Row 4: 15 sc (15)
Row 5: (1 sc, dec) × 5 (10)
Row 6: (dec) × 5 (5)
Finishing: Stuff lightly, pull yarn tight to close, and leave a yarn tail for sewing. Make three.
Leaves (×3)
Yarn: green DK/cotton | Hook: steel size 4 (2.0mm) | Start: chain
Make three leaves. Each is worked in a single row along a foundation chain, with pointed tips formed by small 3-chain picots.
Row 1: Chain 12. Starting from the 2nd chain from hook: 2 sc, 1 hdc, 1 dc; then in the same stitch work (dc, hdc, 3 ch, sl st into 1st ch of those 3, dc) — this forms the first pointed tip; then hdc; then in the same stitch work (dc, hdc, 3 ch, sl st into 1st ch of those 3, dc) — second pointed tip; then dc, hdc, 2 sc. Repeat the same sequence along the other side of the foundation chain.
Finishing: Leave a yarn tail for sewing. Arrange three leaves in a triangle formation and sew them together, then sew the three berries into the center of the leaf cluster. Attach the completed flower decoration to the brim of the top hat.
Scarf (×1)
Yarn: green DK | Needles: sized for your DK yarn
The scarf is knitted in 1×1 rib. If knitting isn’t in your toolkit, a simple crocheted rectangle in dc or hdc works just as well — the texture will be slightly different but the effect is the same.
Cast on 11 stitches. Work in 1×1 rib (k1, p1) to your desired length. The scarf should be long enough to wrap around the neck with a little drape on each side. Bind off and weave in ends. Sew small buttons onto the scarf as decorative detail.
Assembling Your Crochet Snowman
Assembly is where this crochet snowman free pattern really comes to life. I always pin every element in place before committing to a single stitch — take your time here and the result will be worth it.
- Eyes: If not already installed, sew or embroider eyes between rows 10 and 11, approximately 7 stitches apart.
- Nose: Sew the carrot nose one row directly below the eyes, centered between them.
- Mouth: Embroider a gentle smile using small black beads or black embroidery thread, just below the nose.
- Branch Arms: Insert the wire ends through the sides of the body at the widest point and sew both arms on very securely. I always do two full passes with the tapestry needle on these joins.
- Mittens: Place the mittens over the ends of the branch arms.
- Legs: Sew the two legs onto the base of the body last, positioning them for the best standing balance.
- Top Hat: Sew the hat onto the top of the head. If it tips, anchor it at the back with a few extra stitches.
- Berry and Leaf Decoration: Sew the assembled flower cluster onto the front brim of the hat.
- Scarf: Tie or sew the scarf around the neck, just below the head. Secure it in place and add your button decorations.
- Pompoms: Glue or sew three pompoms down the front of the body for the classic snowman button row.
Finishing Details
Once the snowman is assembled, do one final pass over every seam. The wire branch arms especially need a firm connection — if you’re gifting this, reinforce both joins with an extra round of stitches before you consider it done.
If any spots on the chenille body look thin where the stuffing shows through, use a blunt tapestry needle to nudge the fill from inside before closing. It’s worth taking a moment to get the shape balanced — this piece is tall enough that any lean becomes obvious.
For the scarf buttons, hand-stitching through the ribbed fabric can be a little tricky with DK yarn. A dot of fabric glue is a perfectly reasonable alternative, especially if the buttons are purely decorative.
Emma’s Note
I have a soft spot for this snowman — there’s something about combining soft chenille with precise little DK cotton details that feels very considered. The branch arms with wire take a little patience, but the result is genuinely satisfying. Don’t rush the assembly step; pin everything before you sew and you’ll end up with a piece that looks exactly right. I checked every count in this crochet snowman free pattern twice, and they all add up. Happy hooking! 🧶
What yarn is best for this snowman amigurumi?
Bulky (5) chenille or velvet yarn in white is ideal for the head, body, and legs — the plush texture is what gives this snowman his soft, signature look. Bernat Baby Velvet and Premier Parfait are widely available US alternatives.
How long does it take to crochet this snowman pattern?
Plan for 7–10 hours of crocheting time, depending on your experience level. The head-and-body piece takes the longest; the hat, berries, and leaves work up quickly. Allow additional time for assembly and finishing.
Can beginners make this crochet snowman pattern?
This pattern is rated intermediate due to its nine separate parts, two different yarn weights, and wire arm insertion. Confident beginners who are comfortable with magic rings, continuous rounds, and basic decreases can successfully complete it with patience.