Free Crochet Mushroom Amigurumi Pattern — Tiny Beret Toadstool with Embroidered Cheeks
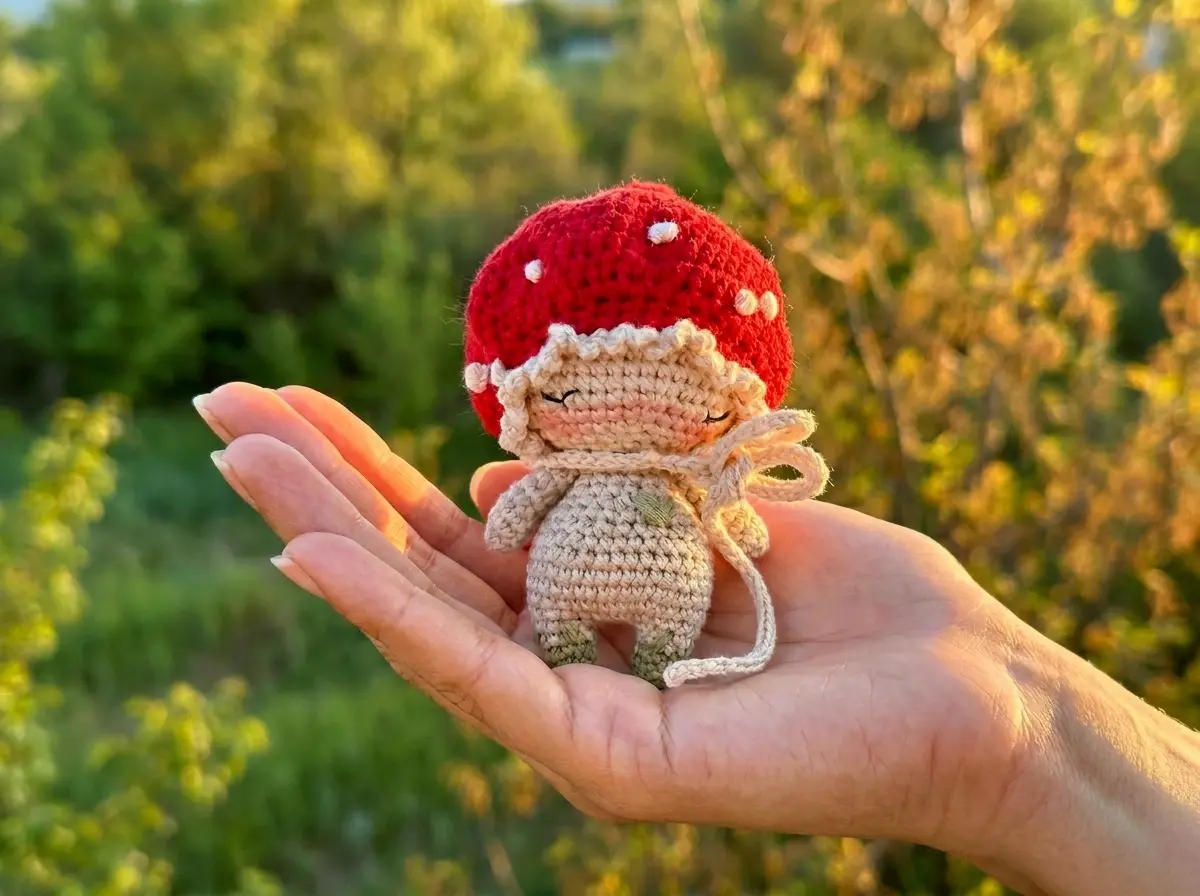
This mushroom amigurumi might be the most personality-packed little pattern I’ve ever made — a soft beige leg, a warm sand-toned cap, and the most precious tiny green beret sitting right on top. We’re talking embroidered eyes placed just so between rows 6 and 7, rosy soft-pastel cheeks, two little green leaves, and a red berry tucked beside them. It fits right in your palm, and I can already tell you’re going to make at least three in different colors. Let’s bring this sweet little toadstool to life.
🩷 Pattern Highlights
- Cuteness Rating: 🩷🩷🩷🩷🩷
- Finished Size: approx. 3.5 in (9 cm) tall including beret
- Difficulty: Intermediate (small hook, fine yarn — but so worth it)
- Hook Size: 1.5 mm
- Yarn Palette: warm beige, soft sand, sage green, cherry red
- Key Detail: embroidered eyes between Rows 6–7, soft-pastel blush cheeks, a dainty green beret with leaf and berry trim
- Estimated Time: 4–6 hours
Materials for Your Mushroom Amigurumi
Because this mushroom amigurumi is worked at a very fine gauge, the materials list is short — but every choice matters for achieving that tiny, crisp stitch definition that makes the finished piece look so polished.
- Color A — Warm Beige: Drops Safran #71 Beige (50g / 160 yds), fingering weight cotton. This is the leg — that soft, creamy neutral that makes the beret’s sage green pop.
- Color B — Soft Sand: Drops Safran #21 Sand (50g / 160 yds). The cap color — just a touch warmer and richer than the leg, like a little clay dome.
- Color C — Sage Green: Drops Safran #60 Green (50g / 160 yds). The beret, both leaves, and the ties — this soft, natural green is everything.
- Color D — Cherry Red: Drops Safran #19 Red (50g / 160 yds). Just one tiny berry, but it makes the whole hat pop.
- Hook: 1.5 mm (no US letter equivalent — this is a specialty fine hook)
- Polyfill stuffing: Polyester fiberfill — Poly-Fil by Fairfield is widely available at Joann, Michaels, and Hobby Lobby
- Tapestry needle: Blunt yarn needle for sewing and weaving in ends
- Stitch markers: At least 2–3 for tracking round starts
- Embroidery floss: Black (for eyes) and soft pink (for cheeks)
- Soft pastels: Optional but magical — Koh-I-Noor or any artist-grade pastel in dusty pink for the blush effect
- Small brush: For applying pastel shading to the cheeks
Drops Safran is a fingering / sock weight (CYCA 1) mercerized cotton — smooth, slightly shiny, and absolutely perfect for showing off the tiny stitch details in this pattern. If you can’t find Drops Safran locally, look for any fingering-weight mercerized cotton in similar tones.
🩷 Chloe’s Color Note: The beige-sand-green palette here is so quietly beautiful — earthy and soft all at once. If you want to push it more kawaii, swap the beige for pale blush pink and the sand for cream white. Or go full autumn fairy-core with terracotta and mustard. The beret stays green no matter what. It’s non-negotiable.
Abbreviations Used in This Mushroom Amigurumi Pattern
| Abbreviation | Meaning |
|---|---|
| mr | magic ring |
| ch | chain |
| sl st | slip stitch |
| sc | single crochet |
| dc | double crochet |
| inc | increase — 2 sc in the same stitch |
| dec | invisible decrease (inv dec) — insert hook through front loops only of next 2 stitches simultaneously, yarn over, pull through, yarn over, pull through 2 loops. Always use this method in amigurumi. |
| BLO | back loop only |
| FLO | front loop only |
| st(s) | stitch(es) |
| FO | fasten off |
Before You Begin — A Few Things That Make All the Difference
A couple of details in this pattern are worth pausing on before you pick up your hook. They’re the kind of things that take an extra few minutes and make the final piece look truly special.
The gauge is tiny — and that’s the point. At 1.5 mm, this pattern produces a very fine, dense fabric with crisp stitch definition. The stitches will feel small and controlled. If you haven’t crocheted at this scale before, take a few minutes to get comfortable with the hook before starting. Your tension will loosen naturally after the first couple of rows. If you’re new to the foundation of this work, our complete beginner’s guide to amigurumi walks through everything you need to feel confident before your first stitch.
The Row 6 BLO on the leg creates the base ridge. Row 6 is worked in back loops only — this is intentional and important. It creates a clean visual line at the base of the leg that defines the flat bottom of the mushroom. Don’t skip it. The front loops you leave behind in Row 6 can optionally be used later to embroider a little “grass” detail at the base, which the pattern notes as a finishing decoration. So satisfying.
The eyes are embroidered — and placement is everything. The face on this mushroom amigurumi is embroidered between Rows 6 and 7, with the eyes spaced 9 stitches apart. This is the detail that gives the mushroom its whole personality, and because embroidery thread is harder to reposition than a safety eye, I recommend marking the spots with pins or a removable stitch marker before committing to the first stitch. Our guide to sewing amigurumi parts has great tips on anchoring your thread so the embroidered details sit flat and secure.
🩷 Chloe’s Detail Tip: Before you embroider the eyes, hold the leg up in front of you at eye level and place two pins exactly 9 stitches apart between Rows 6 and 7. Step back. Tilt your head. Do they look symmetrical? Do they give the mushroom the expression you want — curious and sweet, or a little sleepy? Move the pins until the face feels right, then embroider. That extra minute makes all the difference in the world.
Free Mushroom Amigurumi Pattern
Part 1: Leg (Color A — Warm Beige)
Start with a magic ring. The leg begins wide at the base, narrows beautifully in the middle, then flares back out at the top to meet the cap. Watch the shape emerge — it’s one of those moments where the crochet just starts doing something magical.
Row 1: 6 sc in mr (6)
Row 2: 6 inc (12)
Row 3: (1 sc, inc) × 6 (18)
Row 4: (2 sc, inc) × 6 (24)
Row 5: (3 sc, inc) × 6 (30)
Row 6: 30 sc in BLO (30)
Rows 7–10: 30 sc (4 rows) (30)
Row 11: (3 sc, dec) × 6 (24)
Rows 12–14: 24 sc (3 rows) (24)
Row 15: (2 sc, dec) × 6 (18)
Rows 16–18: 18 sc (3 rows) (18)
Row 19: (1 sc, dec) × 6 (12)
Rows 20–21: 12 sc (2 rows) (12)
The leg is at its narrowest now — this little waist is so cute. The next rows flare it back out to form the wide collar that will join the cap.
Row 22: (1 sc, inc) × 6 (18)
Row 23: (2 sc, inc) × 6 (24)
Row 24: (3 sc, inc) × 6 (30)
Row 25: (4 sc, inc) × 6 (36)
Row 26: (5 sc, inc) × 6 (42)
Row 27: (6 sc, inc) × 6 (48)
Row 28: (7 sc, inc) × 6 (54)
Sl st, cut yarn and FO. Stuff the leg firmly with polyfill before setting it aside. If you’re not sure how much stuffing to use, our guide to stuffing amigurumi is full of practical advice for getting that perfect firm-but-not-lumpy feel.
Part 2: Cap (Color B — Soft Sand)
The cap is a smooth dome — pure rounds of increases until it’s the right diameter, then a few straight rows to build the sides. It’s one of the most satisfying shapes to crochet: you can watch it bloom from a tiny circle into a proper little mushroom cap.
Row 1: 6 sc in mr (6)
Row 2: 6 inc (12)
Row 3: (1 sc, inc) × 6 (18)
Row 4: (2 sc, inc) × 6 (24)
Row 5: (3 sc, inc) × 6 (30)
Row 6: (4 sc, inc) × 6 (36)
Row 7: (5 sc, inc) × 6 (42)
Row 8: (6 sc, inc) × 6 (48)
Row 9: (7 sc, inc) × 6 (54)
Rows 10–14: 54 sc (5 rows) (54)
Your mushroom amigurumi cap is now complete.
Do not cut yarn. You’ll use it immediately for the joining round.
Part 3: Joining the Cap and Leg (Color B — Soft Sand)
This is the moment the mushroom becomes a mushroom. Hold the stuffed leg up against the open edge of the cap, aligning them so the widest part of the leg (54 sts) meets the open edge of the cap.
Joining Row 1: Hold the leg against the cap and sc through both loops of both pieces: 54 sc (54)
Note: Begin stuffing the cap through the opening as you work this round. Add stuffing gradually to keep the dome shape full and round before you close it off.
Part 4: Beret (Color C — Sage Green)
The beret is my favorite part of this entire pattern. It’s worked separately as a little flat-then-curved disc that sits tilted on top of the cap. The sage green against the warm sand is just — okay, I have to keep moving.
The beret is what makes this mushroom amigurumi so distinctive.
Row 1: 6 sc in mr (6)
Row 2: 6 inc (12)
Row 3: (1 sc, inc) × 6 (18)
Row 4: (2 sc, inc) × 6 (24)
Row 5: (3 sc, inc) × 6 (30)
Row 6: (4 sc, inc) × 6 (36)
Row 7: (5 sc, inc) × 6 (42)
Row 8: (6 sc, inc) × 6 (48)
Row 9: (7 sc, inc) × 6 (54)
Row 10: (8 sc, inc) × 6 (60)
Row 11: (9 sc, inc) × 6 (66)
Rows 12–14: 66 sc (3 rows) (66)
Row 15: (9 sc, dec) × 6 (60)
Row 16: (8 sc, dec) × 6 (54)
Row 17: 54 sc (54)
Sl st, FO. Weave in ends. Set the beret aside — it’s ready to be placed and sewn.
Part 5: Leaf × 2 (Color C — Sage Green)
Two tiny leaves worked from a chain. They’re quick and they add so much charm tucked beside the berry on the beret.
Chain 7.
Row 1: Starting from the second ch from hook: 1 sl st, 1 sc, 1 dc, 1 dc, 1 sc, 3 sc in last st. Turn and work along the other side of the chain: 1 sc, 1 dc, 1 dc, 1 sc, 1 sl st. (13)
FO, leaving a long tail for sewing. Make two.
Part 6: Berry (Color D — Cherry Red)
One tiny cherry red berry. This is what — three minutes of crocheting? And yet it completely ties the beret together. The tiniest details make the biggest difference.
Row 1: 6 sc in mr (6)
Row 2: 6 inc (12)
Rows 3–4: 12 sc (12)
Row 5: 6 dec (6)
Stuff lightly, close the opening, FO. Leave a tail for sewing.
Part 7: Beret Ties (Color C — Sage Green)
Two simple chains that tie under the chin to keep the beret in place. So sweet.
- Chain 57
- Chain 47
FO both. Leave tails for attaching.
Assembly
This is the moment your mushroom amigurumi takes its final form.
- Position the beret on the mushroom amigurumi cap. There should be 11 rows of the cap visible between the lower edge of the beret and the top of the mushroom. Try the beret in place before pinning — it looks most charming tilted very slightly to one side, like a real beret.
- Sew the beret down. Once you’re happy with the placement, stitch it securely to the cap using a tapestry needle and the Color C yarn tail.
- Sew the leaves onto the beret. Position both leaves on the beret surface, slightly overlapping or fanning out from a center point. Pin first, then sew down with Color C tails.
- Sew the red berry next to the leaves. The berry nestles right beside the base of the leaves. It’s small — just a few anchor stitches are enough to hold it.
- Attach the beret ties. The two green chains attach to either side of the beret edge. The longer tie (57 ch) and shorter tie (47 ch) hang down from the beret as if they would tie under the mushroom’s chin. Secure each one with a few stitches.
- Embroider the eyes. Using black embroidery floss, embroider the eyes on the leg between Rows 6 and 7, spacing them exactly 9 stitches apart. See the embroidery tip below before you begin.
- Embroider the grass at the base. Using Color C (green) embroidery floss or yarn, add tiny upward stitches around the base of the leg to create the look of grass. Just a few short straight stitches here and there — imperfect is perfect.
Making It Extra Cute — The Finishing Details
This is the part where a nice little mushroom amigurumi becomes an irresistible one. The structure is already there — now it’s all about the details that give it a face, a personality, and that soft warmth that makes people reach out to touch it.
Getting the embroidered eyes right. Before you make a single stitch, count carefully: 9 stitches apart, between Rows 6 and 7. The center of the leg (where you want the face to sit) is directly opposite the slip stitch seam line, so position the eyes symmetrically on either side of that center front point. Use a double strand of black embroidery floss for a little more visual weight — the eyes need to read clearly on such a small piece. A small satin stitch oval is more expressive than a single cross-stitch, but work with what feels natural to you. The key is balance: step back after every few stitches and check.
🩷 Chloe’s Detail Tip: After embroidering the first eye, hold the mushroom at arm’s length and look at it with soft eyes (yes, really). If it looks slightly to the left or right, the second eye will fix or worsen that. Place a pin where you plan the second eye before committing. It takes thirty extra seconds and it makes the face feel centered and calm rather than cross-eyed and alarmed.
The soft pastel blush cheeks. This is what transforms the embroidered face into something utterly sweet. Take a small, soft brush (an eyeshadow brush works perfectly) and pick up just a tiny amount of dusty pink pastel — Koh-I-Noor soft pastels are the original recommendation, but any artist-grade chalk pastel in a blush or dusty rose will work. Tap off the excess and dust it onto the cheeks in two soft circles, just below and slightly outside each eye. Build up slowly — you can always add more, but you can’t take it away. The effect should look like the mushroom has been out in the cold. Absolutely precious.
Optional: cheek shading on the leg folds. The pattern also suggests applying a little pastel shading to the folds of the leg itself — the gentle contour lines where the leg narrows at the waist. A hint of blush there adds dimensional warmth and makes the piece look like it has a soft, rounded glow to it.
Color variations to dream about. The classic palette here — beige, sand, green — is earthy and sweet. But imagine this same pattern in:
- Pale lavender leg + cream cap + dusty rose beret (a spring fairy mushroom)
- Soft mint leg + ivory cap + lilac beret (pastel dream)
- Warm terracotta leg + cream cap + deep olive beret (autumn forest)
- Pale pink leg + white cap with red spots + green beret (classic toadstool, kawaii edition)
A set of three in different colorways lined up on a shelf? I can’t even handle how cute that would look.
Chloe’s Final Look
I’ve made a lot of tiny crocheted things, and this little mushroom amigurumi is genuinely one of my favorites — the beret alone gives it so much character before you even get to the embroidered face. With the pastel blush on the cheeks and the sage green of the leaves against that warm sand cap, it’s the kind of piece that makes people do a little double-take when they see it on your shelf. Make a collection of three in different colors and arrange them in a small terracotta pot with some moss — or just hold this one in your palm for a minute after you finish and smile. You earned it. 🩷
What yarn is best for this mushroom amigurumi pattern?
This pattern uses Drops Safran fingering-weight (CYCA 1) mercerized cotton. Any smooth fingering-weight cotton in similar tones will work — the key is a mercerized finish, which gives crisp stitch definition at the fine 1.5 mm gauge.
How long does it take to crochet this mushroom amigurumi?
Most crocheters complete this mushroom amigurumi in 4–6 hours. The fine 1.5 mm hook can slow the pace if you’re new to working at a small gauge, so budget closer to 6 hours for your first attempt.
Can beginners make this mushroom amigurumi?
The pattern is labeled intermediate due to the fine hook size and small-scale gauge. Beginners who are comfortable with magic rings, single crochet, increases, and decreases can absolutely attempt it — just allow extra time and take the gauge seriously.