Crochet Amigurumi Elephant Pattern — Free Step-by-Step Guide
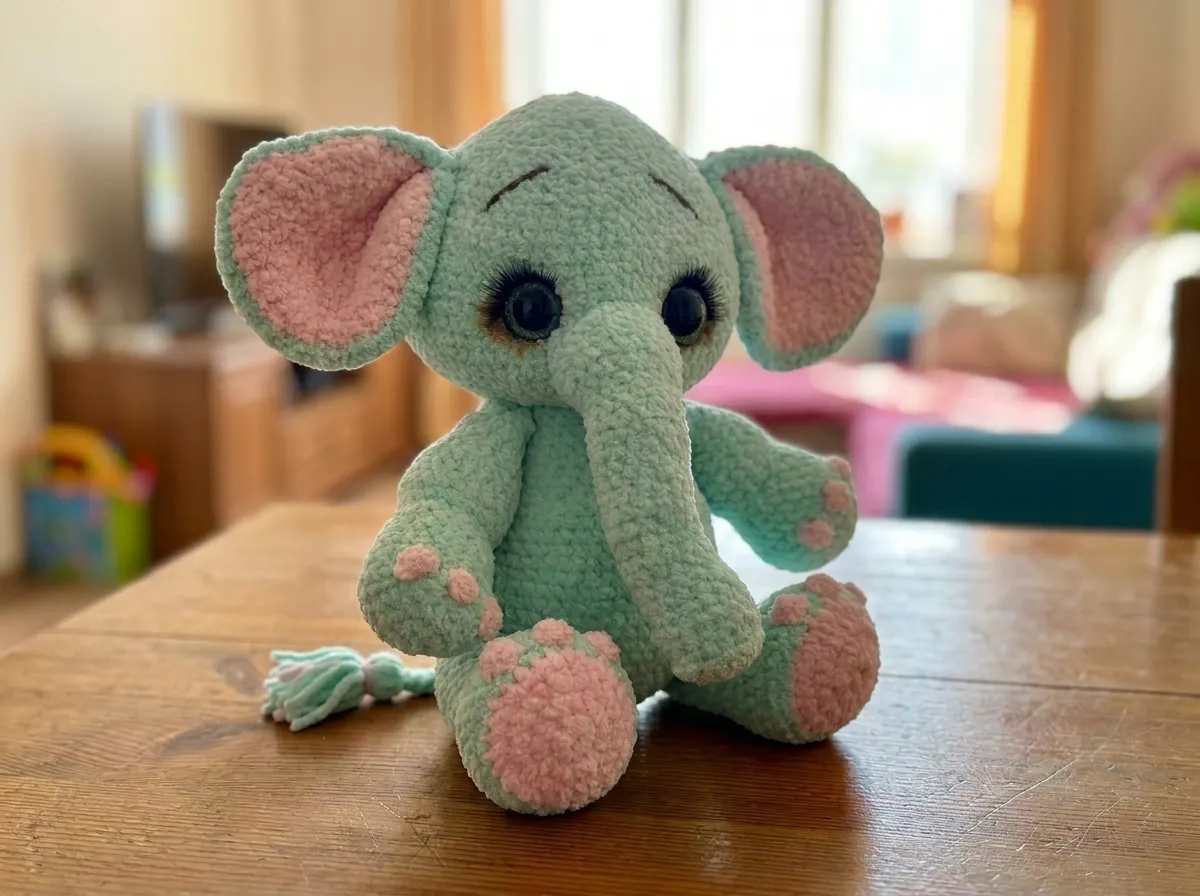
This crochet amigurumi elephant pattern is one I keep coming back to — there’s something about the jointed head and that curved trunk that makes the finished piece feel genuinely lifelike. The scale here is generous, and the plush yarn worked double means every stitch has real presence. I checked every row count in this pattern, and everything adds up. Let’s build something beautiful.
📋 Pattern Quick Stats
- Difficulty: Advanced
- Finished Size: Approx. 12–14 in tall (varies by tension)
- Hook Size: 3.0 mm (between US C/2 and D/3)
- Yarn Weight: Bulky (5) held double — plush/velvet yarn
- Techniques: magic ring, invisible decrease, BLO, color changes, two-piece ear assembly, wire armature, cotter pin jointed head
- Estimated Time: 10–15 hours
What You Need for This Amigurumi Elephant Pattern
Yarn
- Main color (head, trunk, outer ears, body, upper arms, upper legs, tail): approx. 5–6 skeins × 50g of a soft plush or velvet-style yarn, classified as Bulky (5) on the Craft Yarn Council yarn weight system, worked held double throughout. The original yarn is Alize Softy; US alternatives include Lion Brand Pound of Love held double, or any low-pile chenille or plush yarn in the same weight range.
- Contrast color (paw pads, foot soles, inner ear lining): approx. 40–50g of the same yarn type in a contrasting shade.
- Dark thin yarn: a small amount of fingering or sport weight dark yarn for embroidering eyebrows.
Hook
- 3.0 mm crochet hook. This size sits between US C/2 (2.75 mm) and US D/3 (3.25 mm). Your C/2 will work fine if that’s what you have on hand.
Other Tools and Notions
- 25 mm safety eyes (×2)
- Polyester fiberfill stuffing (polyfill)
- 1 pair of plastic craft eyelashes
- Darning/tapestry needle
- Stitch markers
- Chalk pastels or blush for eye shading
- Wire armature for arms (optional, but strongly recommended for poseable arms)
- 50 mm cotter pin joint set for attaching head to body
⚠️ Safety Note: If this elephant is intended as a toy for a young child, review current toy safety standards at the U.S. Consumer Product Safety Commission (CPSC) before finishing. Securely locked safety eyes and fully enclosed wire armature are essential for any child-facing version of this pattern.
Abbreviations
| Abbreviation | Meaning |
|---|---|
| sc | single crochet |
| inc | increase — 2 sc worked into the same stitch |
| inv dec | invisible decrease — insert hook through front loops only of next 2 sts simultaneously, yarn over, pull through, yarn over, pull through 2 loops |
| hdc | half double crochet |
| dc | double crochet |
| sl st | slip stitch |
| ch | chain |
| mr | magic ring |
| BLO | back loop only |
| st(s) | stitch(es) |
| FO | fasten off |
Key Techniques for This Crochet Amigurumi Elephant Pattern
Three techniques show up consistently across all seven parts of this pattern. If any of them are new to you, take a few minutes to practice before you begin — getting them solid from the start will save you a lot of frogging later.
Almost every part of this amigurumi elephant pattern begins with a magic ring, which closes completely to eliminate any center hole. If you’d like a detailed walkthrough, our step-by-step magic ring tutorial has you covered.
For every decrease in this pattern, use the invisible decrease. Working through the front loops only of two stitches simultaneously keeps the fabric tight and gap-free at every shaping point — it’s one of those details that really does make all the difference. Our complete invisible decrease tutorial explains the method in full if you need a refresher.
The 25 mm safety eyes need to go in and be locked down before the head is closed. There’s no going back once you’ve stuffed and sewn shut — so don’t skip this step. Our guide on how to attach safety eyes walks through placement and the locking washer method.
💡 Emma’s Tip: This pattern works the yarn held double — meaning you pull two strands from the same skein (or two separate skeins) and treat them as a single strand throughout. The result is a thick, dense fabric that hides stuffing completely and gives the finished elephant real weight and solidity. It’s worth practicing your tension on a small swatch before starting the body.
Crochet Amigurumi Elephant Pattern — Step-by-Step Instructions
Work all parts in continuous rounds unless otherwise specified. Place a stitch marker at the beginning of each round and move it up as you go — with 66 and 72-stitch rounds in this pattern, losing your place is not an option.
Head
Yarn: main color
Start: magic ring
Row 1: 6 sc in mr (6)
Row 2: 6 inc (12)
Row 3: (1 sc, inc) × 6 (18)
Row 4: (2 sc, inc) × 6 (24)
Row 5: (3 sc, inc) × 6 (30)
Row 6: (4 sc, inc) × 6 (36)
Row 7: (5 sc, inc) × 6 (42)
Row 8: (6 sc, inc) × 6 (48)
Row 9: (7 sc, inc) × 6 (54)
Row 10: (8 sc, inc) × 6 (60)
Row 11: (9 sc, inc) × 6 (66)
Rows 12–21: 66 sc (10 rows) (66)
Row 22: (9 sc, inv dec) × 6 (60)
Row 23: (8 sc, inv dec) × 6 (54)
Row 24: (7 sc, inv dec) × 6 (48)
Row 25: (6 sc, inv dec) × 6 (42)
Row 26: (5 sc, inv dec) × 6 (36)
Row 27: (4 sc, inv dec) × 6 (30)
Row 28: (3 sc, inv dec) × 6 (24)
Row 29: (2 sc, inv dec) × 6 (18)
Row 30: (1 sc, inv dec) × 6 (12)
Row 31: 6 inv dec (6)
💡 Emma’s Tip: Attach the 25 mm safety eyes before Row 22 — once you start decreasing, the opening narrows quickly. Install the cotter pin joint at the same time so it’s locked in and ready for the body connection. Begin stuffing gradually and firmly from Row 20 onward as you decrease, adding small amounts at a time so the fill distributes evenly. The head should feel solid, not squishy.
Finishing: Stuff firmly as you decrease. Close the opening and weave in ends.
Trunk
Yarn: main color
Start: magic ring
Row 1: 6 sc in mr (6)
Row 2: 6 inc (12)
Row 3: (1 sc, inc) × 6 (18)
Row 4: 18 sc in BLO (18)
Rows 5–9: 18 sc (5 rows) (18)
Row 10: (4 sc, inv dec) × 3 (15)
Rows 11–15: 15 sc (5 rows) (15)
Row 16: (3 sc, inv dec) × 3 (12)
Rows 17–21: 12 sc (5 rows) (12)
Row 22: 6 sc, 6 inc (18)
Rows 23–24: 18 sc (18)
Row 25: 6 sc, (1 sc, inc) × 6 (24)
Rows 26–28: 24 sc (24)
💡 Emma’s Tip: The BLO row at Row 4 creates a clean ridge that defines the rounded tip of the trunk — it’s a small structural detail worth doing carefully. The increases at Rows 22 and 25 build the flared, curved base that attaches to the face. Don’t stuff the trunk too firmly; a light fill lets it hang with a natural curve rather than sticking straight out.
Finishing: FO, leaving a long tail for sewing.
Ears (Make 2)
Each ear is constructed from two separate pieces — an inner piece in contrast color and an outer piece in main color — joined together before attachment. Work them both before assembly.
Inner piece — contrast color:
Start: magic ring
Row 1: 6 sc in mr (6)
Row 2: 6 inc (12)
Row 3: (1 sc, inc) × 6 (18)
Row 4: (2 sc, inc) × 6 (24)
Row 5: (3 sc, inc) × 6 (30)
Row 6: (4 sc, inc) × 6 (36)
Row 7: (5 sc, inc) × 6 (42)
Row 8: (6 sc, inc) × 6 (48)
Row 9: 15 sc, (inc, 1 hdc), 2 dc in 1 st, (1 hdc, inc), 28 sc (51)
FO and set aside.
Outer piece — main color: Work Rows 1–9 exactly as the inner piece. Do not fasten off.
💡 Ear Assembly: Hold the inner and outer pieces together with wrong sides facing each other. Using the working yarn from the outer piece, join the two layers by working 51 sc around the full edge through both pieces at once. The bottom of the ear — the side where the dc stitches are — is the attachment edge. Fold the ear in half so the contrast color faces inward, then work 3–4 sc through both layers to close and shape the base. This gives each ear its natural cupped form.
Arms (Make 2)
Yarn: contrast color for the paw, main color for the arm
Start: magic ring
Row 1: 6 sc in mr [contrast color] (6)
Row 2: 6 inc (12)
Row 3: (1 sc, inc) × 6 (18)
Row 4: (2 sc, inc) × 6 (24)
Row 5: 24 sc in BLO [switch to main color] (24)
Rows 6–8: 24 sc (24)
Row 9: (2 sc, inv dec) × 6 (18)
Rows 10–25: 18 sc (16 rows) (18)
Row 26: (1 sc, inv dec) × 6 (12)
Row 27: 6 inv dec (6)
💡 Emma’s Tip: The BLO row at Row 5 creates a clean wrist ridge that separates the paw from the arm — it’s one of those details that makes all the difference in a finished piece. If you’re inserting a wire armature, do it before you close the arm at Row 27, and insert it after Row 9 so it runs through the full length of the upper arm. Stuff only the paw portion (Rows 1–8) firmly; leave the upper arm lightly packed or unstuffed so the wire can flex.
Finishing: Close the opening and weave in ends.
Legs (Make 2)
Yarn: contrast color for the foot, main color for the leg
Start: 7 ch
💡 Emma’s Tip: The legs are the only part of this amigurumi elephant pattern that don’t begin with a magic ring. Instead, they start with a chain foundation that creates the flat oval sole of the foot. Work carefully across both sides of the foundation chain — the total from Row 1 should be 14 stitches before you continue upward.
Row 1: Starting from 2nd ch from hook: 5 sc, 3 sc in 1 st, 4 sc along opposite side of chain, inc [contrast color] (14)
Row 2: inc, 4 sc, 3 inc, 4 sc, 2 inc (20)
Row 3: 1 sc, inc, 4 sc, (1 sc, inc) × 3, 4 sc, (1 sc, inc) × 2 (26)
Row 4: 2 sc, inc, 4 sc, (2 sc, inc) × 3, 4 sc, (2 sc, inc) × 2 (32)
Row 5: 3 sc, inc, 4 sc, (3 sc, inc) × 3, 4 sc, (3 sc, inc) × 2 (38)
Row 6: 38 sc in BLO [switch to main color] (38)
Rows 7–10: 38 sc (38)
Row 11: 9 sc, 10 inv dec, 9 sc (28)
Row 12: 8 sc, 6 inv dec, 8 sc (22)
Rows 13–22: 22 sc (10 rows) (22)
💡 Emma’s Tip: The concentrated decreasing at Rows 11 and 12 shapes the ankle — it’s a fast drop in stitch count and it needs to be done cleanly. The invisible decrease is especially important here; with 10 decreases packed into a single row at Row 11, any visible gaps will show. Stuff the foot firmly through Row 12, then leave the upper leg (Rows 13–22) lightly filled so the leg can sit flat against the body when you position it.
Body
Yarn: main color
Start: magic ring
Row 1: 6 sc in mr (6)
Row 2: 6 inc (12)
Row 3: (1 sc, inc) × 6 (18)
Row 4: (2 sc, inc) × 6 (24)
Row 5: (3 sc, inc) × 6 (30)
Row 6: (4 sc, inc) × 6 (36)
Row 7: (5 sc, inc) × 6 (42)
Row 8: (6 sc, inc) × 6 (48)
Row 9: (7 sc, inc) × 6 (54)
Row 10: (8 sc, inc) × 6 (60)
Row 11: (9 sc, inc) × 6 (66)
Row 12: (10 sc, inc) × 6 (72)
Rows 13–22: 72 sc (10 rows) (72)
Row 23: (10 sc, inv dec) × 6 (66)
Rows 24–25: 66 sc (66)
Row 26: (9 sc, inv dec) × 6 (60)
Rows 27–28: 60 sc (60)
Row 29: (8 sc, inv dec) × 6 (54)
Rows 30–31: 54 sc (54)
Row 32: (7 sc, inv dec) × 6 (48)
Rows 33–34: 48 sc (48)
Row 35: (6 sc, inv dec) × 6 (42)
Rows 36–37: 42 sc (42)
Row 38: (5 sc, inv dec) × 6 (36)
Row 39: 36 sc (36)
💡 Emma’s Tip: Start stuffing after Row 18 while the opening is still wide enough to work comfortably. Add stuffing in stages as you decrease — don’t leave it for the final rows. The body needs to be packed firmly and evenly; uneven stuffing shows in the finished shape, and there’s no fixing it after you’ve sewn the head on. This is the one part where I always take a break midway just to assess the shape.
Finishing: FO, leaving a long tail for sewing.
Tail
Yarn: main color
Start: magic ring
Row 1: 4 sc in mr (4)
Row 2: inc, 3 sc (5)
Row 3: inc, 4 sc (6)
Row 4: inc, 5 sc (7)
Row 5: 7 sc (7)
Finishing: FO, leaving a sewing tail. To make the tassel, cut several short lengths of contrast color yarn, fold each in half, and attach them to the tip of the tail using a lark’s head knot. Trim evenly to your preferred length.
Assembly
This is the stage that determines whether your amigurumi elephant pattern result feels deliberate or accidental. Pin everything in place before you sew a single stitch — positioning the trunk, ears, and legs first and stepping back to look is worth every minute it takes.
- Head to body: Attach the head using the 50 mm cotter pin joint. Thread the pin through the top of the body, then through the cotter pin disc inside the head and lock it in place. This creates a clean, professional connection with a slight range of movement that a sewn join simply can’t replicate.
- Trunk: Sew the trunk to the front of the head, centered between approximately Rows 16 and 22. The wide, flared end (Row 28) should rest flush against the face; the tip points downward and slightly forward.
- Ears: Pin each ear symmetrically to the sides of the head with the folded base edge flush against the head surface. Check that both are at the same height from every angle before sewing. Trust me — it’s worth the extra few minutes to get this right.
- Arms: Sew to the upper body at the level of Rows 35–36. Position each arm so the paw faces forward and angles slightly downward.
- Legs: Test the sitting position before committing — place the body down and hold the legs against it to find the angle that gives the most stable, natural sit. The open top of each leg sews flat against the lower body. A slight angle forward usually works best.
- Tail: Sew to the center back of the body, positioned low near the base.
Finishing Details
The finishing is what transforms this amigurumi elephant pattern from a well-made stuffed animal into something with genuine character. Take your time here.
Eye indentations: Thread a darning needle with a length of main color yarn and pass it from one eye position straight through the head to the opposite side. Pull gently and consistently to create a slight natural indentation around each eye socket. This sinks the eyes deeper into the face and adds an expressiveness that flat placement simply doesn’t have. I always do this step — it’s one of those details that makes all the difference.
Eye shading: Using a small dry brush, apply chalk pastels or a touch of blush lightly around each eye socket. A warm brown or soft dusty rose works well for most colorways. Blend inward toward the eye with a cotton swab. Apply sparingly — you can always add more, but you can’t easily remove it.
Eyelashes: Apply a small amount of craft glue to the back of each eyelash strip and press into place just above the safety eye, curving outward and upward. Hold briefly until set. This is what gives this elephant her personality.
Eyebrows: Thread the dark thin yarn on a darning needle and embroider a short, slightly arched line above each eye. One or two stitches per brow is all you need — the goal is suggestion, not detail.
Optional nails: Embroider 2–3 short vertical stitches on the top surface of each paw in contrast color yarn to suggest claws. Keep them even and evenly spaced.
Emma’s Note
I’ve sewn a lot of amigurumi parts over the years, but the cotter pin joint on this elephant is one of those finishing details I find genuinely satisfying — there’s a solidity and polish to it that a hand-sewn join just can’t match. If your tension runs tight like mine, the double-held plush yarn will give you a beautifully dense fabric with no stuffing showing through anywhere. Don’t skip the eye shading and lashes — that’s the step that takes this amigurumi elephant pattern from lovely to stunning. Happy hooking. 🧶
What yarn works best for this amigurumi elephant pattern?
The pattern is designed for a soft plush or velvet-style yarn classified as Bulky (5), worked held double throughout. The original uses Alize Softy; good US alternatives include Lion Brand Pound of Love held double or any low-pile chenille yarn in the same weight range.
How long does it take to crochet this amigurumi elephant?
Most crocheters complete this elephant in 10–15 hours across several sessions. The body and head are the most time-intensive pieces; the tail and trunk can each be finished in under 30 minutes.
Is this amigurumi elephant pattern suitable for beginners?
This pattern is rated Advanced. It requires comfort with the magic ring, invisible decrease, BLO rows, color changes, two-piece ear assembly, and a cotter pin joint. Confident intermediate crocheters who have completed a basic amigurumi will be able to follow it with care.